There’s something almost magical about a jar of pickled eggs sitting in the fridge. They’re one of those old-school snacks that never really went out of style — you’ll find them behind the counter at neighborhood bars, tucked into farmers market coolers, and passed down in family recipe boxes for generations. And once you try making them at home, you’ll understand exactly why they’ve stuck around for so long.
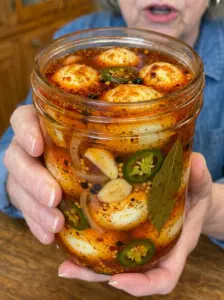
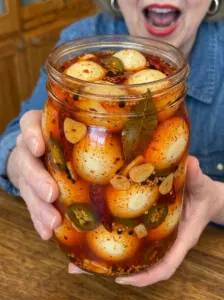
These garlic dill pickled eggs take everything people love about a classic pickled egg and dial it up with a fragrant, herby brine loaded with fresh dill, sliced garlic, mustard seeds, and peppercorns. The result is an egg that’s tangy, savory, a little garlicky, and packed with that unmistakable dill pickle flavor in every single bite. They’re firm, satisfying, and endlessly snackable — the kind of thing you make once and then find yourself making on repeat.
In this guide, you’ll find the full recipe, a breakdown of why each ingredient matters, detailed step-by-step instructions, expert tips for pickling success, creative serving ideas, storage and food-safety guidance, and answers to the most common questions people ask about making pickled eggs at home. Let’s dive in.
Why You Need to Make Garlic Dill Pickled Eggs
If you’ve never made pickled eggs before, here’s why this recipe deserves a spot in your kitchen rotation.
- They’re incredibly simple to make. This isn’t a complicated canning project — it’s boiled eggs, a quick brine, and a jar. That’s it.
- The flavor is bold and classic. Garlic and dill are a match made in pickling heaven, and this recipe leans into that combination with fresh dill sprigs, dill seeds, and plenty of sliced garlic.
- They’re a protein-packed snack. At around 75 calories and a solid dose of protein per egg, pickled eggs make a satisfying snack that doesn’t leave you reaching for something else five minutes later.
- They’re incredibly versatile. Eat them straight out of the jar, slice them onto salads, chop them into egg salad, or serve them as a retro-cool appetizer at your next gathering.
- They store well. A single batch keeps in the fridge for up to two weeks, so you always have a tangy, garlicky snack on hand.
- They’re a nostalgic, crowd-pleasing food. Pickled eggs have a cult following for a reason — they’re a beloved bar snack and potluck classic that never fails to spark conversation.
Whether you’re a longtime pickle lover or you’ve just started exploring home pickling, this garlic dill version is a fantastic entry point (or a fantastic upgrade if you’ve made plain pickled eggs before and want to level up the flavor).
Ingredients: What You’ll Need and Why It Matters
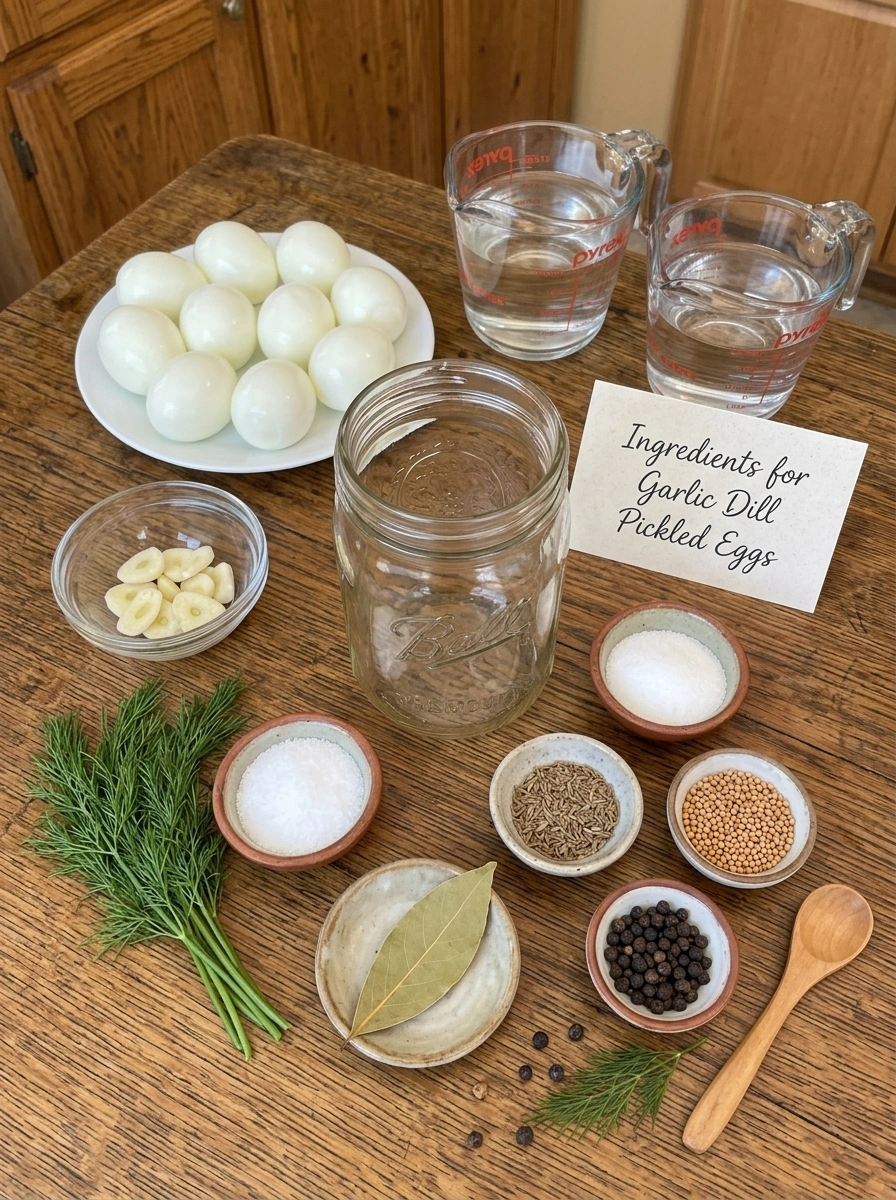
Here’s everything that goes into this garlic dill pickled eggs recipe, along with notes on why each ingredient earns its spot in the jar.
- 12 hard-boiled eggs, peeled — The star of the show. Using eggs that are fully cooked and properly peeled (with no stray shell bits) ensures a clean, smooth pickling process and the best final texture.
- 1 cup white vinegar — White vinegar provides the sharp, tangy backbone of the brine and is essential for both flavor and food safety, since the acidity helps preserve the eggs.
- 1 cup water — Water balances out the intensity of the vinegar so the brine isn’t overpoweringly sharp, while still keeping the acidity level high enough for safe pickling.
- 1 tbsp pickling salt — Pickling salt (also called canning salt) dissolves cleanly without the additives found in table salt, which can cloud the brine or affect flavor. It also enhances the overall taste of the eggs as they sit in the jar.
- 1 tbsp sugar — A touch of sugar rounds out the sharpness of the vinegar and adds a subtle balance to the brine, without making the eggs taste sweet.
- 6 garlic cloves, sliced — Garlic is one of the two headline flavors in this recipe. Slicing (rather than mincing) allows the garlic to infuse the brine gradually while still looking beautiful in the jar.
- 4 fresh dill sprigs — Fresh dill brings that iconic, slightly grassy, aromatic dill pickle flavor that makes these eggs so addictive. It also looks gorgeous suspended in the jar.
- 1 tsp dill seeds — Dill seeds add a more concentrated, slightly warm dill flavor that complements the fresh dill sprigs and deepens the overall taste of the brine.
- 1 tsp black peppercorns — Whole peppercorns infuse the brine with a subtle background heat and earthiness without making the eggs spicy.
- 1 tsp mustard seeds — Mustard seeds add a gentle tang and a little pop of texture, and they’re a classic addition in nearly every good pickling brine.
- 1 bay leaf — Bay leaf contributes a subtle herbal depth that rounds out the other spices and keeps the brine from tasting one-dimensional.
A Quick Note on Choosing and Boiling Your Eggs
For the best results, use eggs that are about a week or so old rather than perfectly fresh eggs straight from the carton — slightly older eggs tend to peel much more easily after boiling, which will save you a lot of frustration. Hard boil your eggs until the yolks are fully set, then cool them quickly in an ice bath before peeling. This makes peeling easier and helps stop the cooking process so you don’t end up with a chalky, overcooked yolk texture.
How to Make Garlic Dill Pickled Eggs: Step-by-Step Directions
This recipe comes together quickly, with just a few minutes of hands-on prep before the brine and refrigerator do all the real work. Here’s exactly how to make it.
Step 1: Arrange the Eggs in the Jar
Place the peeled hard-boiled eggs into a clean glass jar. A wide-mouth quart jar works especially well here, since it makes it easier to fit the eggs without cracking them.
Step 2: Add the Aromatics
Add the sliced garlic and fresh dill sprigs around the eggs, tucking them into the gaps so the flavor can surround the eggs from every angle.
Step 3: Build the Brine
In a saucepan, combine the white vinegar, water, pickling salt, sugar, dill seeds, black peppercorns, mustard seeds, and bay leaf. Heat over medium heat, stirring occasionally, until the salt and sugar fully dissolve. Be careful not to let the brine come to a boil — you just want it hot enough to dissolve everything and release the aromatics.
Step 4: Pour the Hot Brine Over the Eggs
Carefully pour the hot brine over the eggs in the jar, making sure they are fully submerged. This is one of the most important steps in the whole process — any eggs peeking above the brine line won’t pickle evenly and could spoil faster.
Step 5: Cool the Jar
Let the jar cool to room temperature on the counter before sealing. Pouring a hot lid onto a hot jar and immediately refrigerating can cause condensation buildup, so giving it time to cool first helps keep things food-safe and prevents excess moisture inside the jar.
Step 6: Seal and Refrigerate
Once cooled, seal the jar tightly with a lid and place it in the refrigerator.
Step 7: Let the Magic Happen
Let the eggs pickle for at least 3 days before tasting. For the best, most well-developed garlic and dill flavor, wait 5–7 days before serving. The longer they sit, the more the flavor penetrates into the egg itself.
Pro Tips for the Best Garlic Dill Pickled Eggs
- Fully submerge every egg. Any part of an egg exposed above the brine line won’t pickle properly and is more prone to spoilage. If needed, use a small clean weight, a fermentation weight, or even a small piece of parchment paper tucked under the lid to help keep the eggs pushed down.
- Don’t skip the ice bath after boiling. Shocking your eggs in ice water right after boiling not only makes them easier to peel, it also stops the cooking process so your yolks stay tender rather than dry and crumbly.
- Use a clean, sterilized jar. Since these eggs sit in the refrigerator for a couple of weeks, starting with a clean jar and clean utensils helps prevent any unwanted bacteria from getting into the brine.
- Be patient. It’s tempting to sneak a taste after a few hours, but the real flavor payoff comes after several days. Waiting the full 5–7 days makes a noticeable difference.
- Slice, don’t mince, your garlic. Sliced garlic infuses more gradually and evenly into the brine over the pickling period, giving you a more balanced garlic flavor rather than an overwhelming bite in one spot.
- Always use clean utensils when removing eggs. Reaching into the jar with a fork or fingers that have touched other food can introduce bacteria into the brine, shortening the shelf life of your eggs.
- Reuse the brine wisely. While the leftover brine after your eggs are gone can be used to flavor other quick pickles, it’s best not to reuse it for a second batch of eggs, since the acidity and flavor strength will have diminished.
Creative Ways to Serve Garlic Dill Pickled Eggs
Pickled eggs are endlessly snackable on their own, but here are some fun and delicious ways to use them beyond eating them straight from the jar.
1. Classic Bar Snack Style
Serve them cold, halved or whole, with a sprinkle of flaky salt and cracked black pepper for the ultimate old-school bar snack experience.
2. Deviled Pickled Eggs
Take your deviled egg game up a notch by using these garlic dill pickled eggs as the base. The tangy, garlicky flavor built into the egg itself makes for an incredibly flavorful twist on a party classic.
3. Chopped Into Egg Salad
Dice these eggs into egg salad for a tangy, dill-forward version that needs way less added mustard or vinegar, since the flavor is already built in.
4. Sliced on Salads
Add sliced pickled eggs to a green salad, potato salad, or grain bowl for a punch of tangy flavor and extra protein.
5. Charcuterie and Snack Board Addition
Add a few halved pickled eggs to a charcuterie or snack board alongside cheeses, cured meats, and crackers for a nostalgic, crowd-pleasing touch.
6. Topped on Avocado Toast
Slice a pickled egg over avocado toast for a tangy, protein-packed breakfast or brunch upgrade.
7. Paired With a Cold Beer
Pickled eggs and a cold beer are a classic pairing for a reason — the briny, garlicky bite is the perfect match for a crisp, cold drink.
8. Garnish for Bloody Marys
Skewer a pickled egg alongside pickles, olives, and other garnishes for an over-the-top Bloody Mary bar at your next brunch.
Storage Information
Proper storage keeps these pickled eggs safe, flavorful, and food-safe for as long as possible.
- Refrigerator storage: Store refrigerated for up to 2 weeks.
- Keep eggs submerged: Always make sure the eggs remain completely submerged in the brine to maintain freshness and food safety.
- Use clean utensils: Always use clean utensils when removing eggs from the jar to avoid introducing bacteria that could shorten shelf life.
Because this recipe is a refrigerator pickle rather than a shelf-stable, water-bath canned recipe, it should always be kept cold and consumed within the recommended two-week window rather than stored at room temperature.
Recipe at a Glance
- Prep Time: 15 minutes
- Cook Time: 5 minutes
- Total Time: 20 minutes
- Servings: 12 eggs
- Calories: ~75 calories per egg
Frequently Asked Questions About Garlic Dill Pickled Eggs
How long do pickled eggs need to sit before eating? You can eat them after 3 days, but for the best, most developed garlic and dill flavor, it’s worth waiting 5–7 days before digging in.
Do pickled eggs need to be refrigerated? Yes. This recipe is a refrigerator pickle, meaning the eggs must be kept cold at all times, both during the pickling process and for storage afterward.
Can I reuse the eggs’ shells or the boiling water for anything? No, the eggshells themselves aren’t used in this recipe and can be discarded or composted. The pickling process only involves the peeled, cooked eggs and the vinegar-based brine.
Why do my pickled eggs taste bland? This usually means they haven’t pickled long enough. The flavor builds gradually as the eggs sit in the brine, so eggs pulled out after only a day or two will taste much milder than eggs that have had a full 5–7 days to develop flavor.
Can I use dried dill instead of fresh dill sprigs? Fresh dill gives the brightest, most aromatic flavor, but if fresh dill isn’t available, you can substitute a smaller amount of dried dill. Keep in mind the flavor and appearance in the jar will be a bit different, since dried dill won’t have that same fresh, vibrant look.
Is it safe to make pickled eggs without a water bath canning process? Yes, as long as the eggs are stored in the refrigerator and consumed within the recommended storage window. This is a quick-pickle, refrigerator-style recipe rather than a shelf-stable canned product, so it does not require water bath processing, but it also cannot be stored at room temperature.
Can I make a smaller or larger batch? Absolutely. This recipe can easily be scaled up or down; just make sure to adjust your jar size and brine quantity so the eggs remain fully submerged.
Why is my brine cloudy? A slightly cloudy brine can happen from the herbs and spices settling into the liquid, or from using table salt instead of pickling salt, since table salt often contains anti-caking agents that can cloud the brine. This is generally still safe to eat, but using pickling salt helps keep the brine clearer.
Can I add other vegetables to the jar? Yes. Some people like to tuck in a few slices of onion, a small chili pepper for heat, or a few extra garlic cloves for an even bolder flavor. Just be sure everything stays fully submerged in the brine.
What’s the best type of jar to use? A wide-mouth glass quart jar is ideal for this recipe, since it makes it much easier to fit the eggs in and take them out without breaking them.
Final Thoughts
Garlic dill pickled eggs are proof that some of the best snacks are also the simplest ones. With just a handful of pantry staples and a few days of patience, you can turn ordinary hard-boiled eggs into a tangy, garlicky, deeply flavorful snack that keeps people coming back to the fridge. Whether you’re serving them at your next get-together, packing them for a protein-rich snack on the go, or slicing them into your favorite salad, this recipe delivers that classic dill pickle flavor in every single bite.
Once you make your first batch, don’t be surprised if this becomes a regular fixture in your refrigerator. Grab your eggs, garlic, and dill, and get ready for a snack that’s as satisfying to make as it is to eat.
Print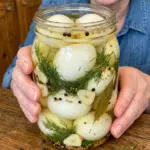
Garlic Dill Pickled Eggs: The Tangy, Garlicky Snack You’ll Crave on Repeat
- Total Time: 20 minutes
Ingredients
Here’s everything that goes into this garlic dill pickled eggs recipe, along with notes on why each ingredient earns its spot in the jar.
-
- 12 hard-boiled eggs, peeled — The star of the show. Using eggs that are fully cooked and properly peeled (with no stray shell bits) ensures a clean, smooth pickling process and the best final texture.
- 1 cup white vinegar — White vinegar provides the sharp, tangy backbone of the brine and is essential for both flavor and food safety, since the acidity helps preserve the eggs.
- 1 cup water — Water balances out the intensity of the vinegar so the brine isn’t overpoweringly sharp, while still keeping the acidity level high enough for safe pickling.
-
- 1 tbsp pickling salt — Pickling salt (also called canning salt) dissolves cleanly without the additives found in table salt, which can cloud the brine or affect flavor. It also enhances the overall taste of the eggs as they sit in the jar.
- 1 tbsp sugar — A touch of sugar rounds out the sharpness of the vinegar and adds a subtle balance to the brine, without making the eggs taste sweet.
- 6 garlic cloves, sliced — Garlic is one of the two headline flavors in this recipe. Slicing (rather than mincing) allows the garlic to infuse the brine gradually while still looking beautiful in the jar.
-
- 4 fresh dill sprigs — Fresh dill brings that iconic, slightly grassy, aromatic dill pickle flavor that makes these eggs so addictive. It also looks gorgeous suspended in the jar.
- 1 tsp dill seeds — Dill seeds add a more concentrated, slightly warm dill flavor that complements the fresh dill sprigs and deepens the overall taste of the brine.
- 1 tsp black peppercorns — Whole peppercorns infuse the brine with a subtle background heat and earthiness without making the eggs spicy.
- 1 tsp mustard seeds — Mustard seeds add a gentle tang and a little pop of texture, and they’re a classic addition in nearly every good pickling brine.
- 1 bay leaf — Bay leaf contributes a subtle herbal depth that rounds out the other spices and keeps the brine from tasting one-dimensional.
A Quick Note on Choosing and Boiling Your Eggs
For the best results, use eggs that are about a week or so old rather than perfectly fresh eggs straight from the carton — slightly older eggs tend to peel much more easily after boiling, which will save you a lot of frustration. Hard boil your eggs until the yolks are fully set, then cool them quickly in an ice bath before peeling. This makes peeling easier and helps stop the cooking process so you don’t end up with a chalky, overcooked yolk texture.
Instructions
This recipe comes together quickly, with just a few minutes of hands-on prep before the brine and refrigerator do all the real work. Here’s exactly how to make it.
Step 1: Arrange the Eggs in the Jar
Place the peeled hard-boiled eggs into a clean glass jar. A wide-mouth quart jar works especially well here, since it makes it easier to fit the eggs without cracking them.
Step 2: Add the Aromatics
Add the sliced garlic and fresh dill sprigs around the eggs, tucking them into the gaps so the flavor can surround the eggs from every angle.
Step 3: Build the Brine
In a saucepan, combine the white vinegar, water, pickling salt, sugar, dill seeds, black peppercorns, mustard seeds, and bay leaf. Heat over medium heat, stirring occasionally, until the salt and sugar fully dissolve. Be careful not to let the brine come to a boil — you just want it hot enough to dissolve everything and release the aromatics.
Step 4: Pour the Hot Brine Over the Eggs
Carefully pour the hot brine over the eggs in the jar, making sure they are fully submerged. This is one of the most important steps in the whole process — any eggs peeking above the brine line won’t pickle evenly and could spoil faster.
Step 5: Cool the Jar
Let the jar cool to room temperature on the counter before sealing. Pouring a hot lid onto a hot jar and immediately refrigerating can cause condensation buildup, so giving it time to cool first helps keep things food-safe and prevents excess moisture inside the jar.
Step 6: Seal and Refrigerate
Once cooled, seal the jar tightly with a lid and place it in the refrigerator.
Step 7: Let the Magic Happen
Let the eggs pickle for at least 3 days before tasting. For the best, most well-developed garlic and dill flavor, wait 5–7 days before serving. The longer they sit, the more the flavor penetrates into the egg itself.
- Prep Time: 15 minutes
- Cook Time: 5 minutes
Nutrition
- Serving Size: 12 eggs
- Calories: 75 calories per egg