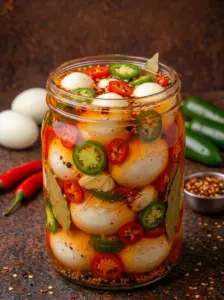
Spicy Pear Jalapeño Jam: The Sweet-and-Heat Condiment You Didn’t Know You Needed
If you’ve ever stood in front of the pantry wishing you had one jar that could do it all — dress up a cheese board, glaze a pork tenderloin, jazz up a grilled cheese, or save a boring cracker from a life of blandness — this spicy pear jalapeño jam is about to become your new kitchen MVP. It’s sweet, it’s fiery, it’s a little floral from the pears, and it finishes with just enough jalapeño kick to make people ask, “wait, what IS this?”
This isn’t your grandmother’s plain pear preserves, and it isn’t a straight-up pepper jelly either. It’s the best of both worlds: a fruit-forward jam with a slow-building heat that sneaks up on you in the best possible way. One taste and you’ll understand why sweet-and-spicy jams have become one of the most searched-for homemade condiments in the last few years — they’re easy, they’re impressive, and they make you look like a culinary genius with almost zero effort.
In this guide, you’ll get the full recipe, a breakdown of every ingredient and why it matters, step-by-step instructions with pro tips baked in, creative ways to serve it, canning and storage guidance, and answers to the most common questions people have about making pepper jam at home. Let’s get into it.
Why You’ll Fall in Love With This Spicy Pear Jalapeño Jam
Before we get to the recipe card, let’s talk about why this particular jam deserves a permanent spot in your recipe rotation.
- It’s ridiculously versatile. This jam isn’t a one-trick pony. It works as a breakfast spread, a glaze, a dip base, a sandwich upgrade, and a party appetizer — all from one batch.
- The flavor is balanced, not overwhelming. Ripe pears bring natural sweetness and a soft, almost honeyed texture, while jalapeños add brightness and heat without turning the jam into something you can’t eat more than a spoonful of.
- It’s a showstopper on a cheese board. Spoon it over a block of cream cheese or a wheel of brie, and watch it disappear before anything else on the table.
- It’s beginner-friendly. You don’t need to be an experienced canner to make this. The ingredient list is short, the process is straightforward, and it comes together in well under an hour.
- It makes a fantastic homemade gift. Ladled into cute jars with a ribbon and a label, this jam is the kind of homemade gift that people actually get excited about receiving — far more memorable than another candle or tin of cookies.
- It’s customizable. Want it milder? Remove the jalapeño seeds and membranes. Want it hotter? Leave some seeds in or add a pinch of cayenne. This recipe adapts easily to your spice tolerance.
If you’re a fan of sweet heat combinations — think hot honey, chili-lime everything, or candied jalapeños — this jam checks every box.
Ingredients: What You’ll Need and Why It Matters
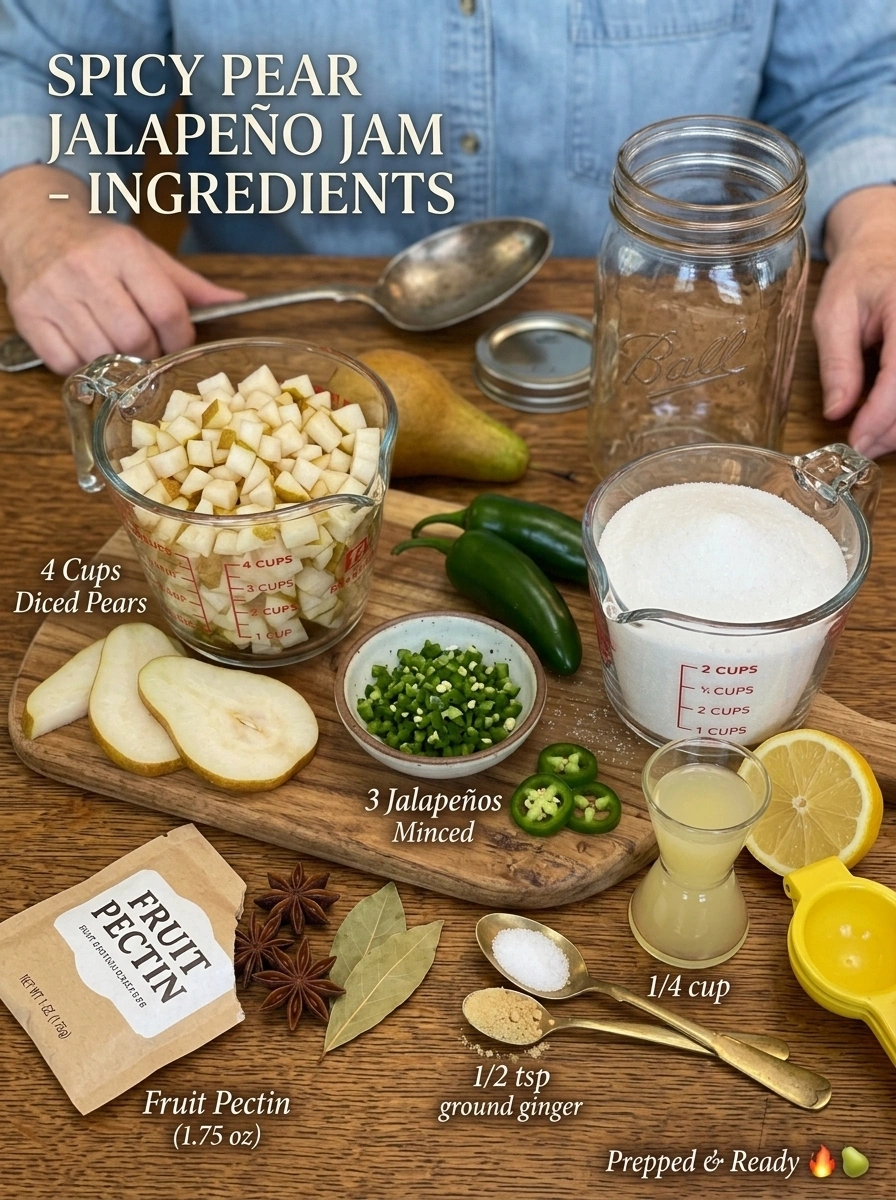
Here’s the full ingredient list for this spicy pear jalapeño jam recipe, along with notes on why each component earns its place.
- 4 cups ripe pears, peeled and finely diced — Ripe pears are the backbone of this jam. They’re naturally sweet, they break down beautifully when cooked, and their mild flavor is the perfect canvas for the jalapeño heat to play against. Bartlett, Anjou, or Bosc pears all work well; just make sure they’re ripe (slightly soft to the touch) for the best texture and sweetness.
- 3 jalapeños, finely minced (remove seeds for less heat) — Jalapeños provide the “spicy” half of this sweet-and-spicy jam. Mincing them finely ensures the heat is distributed evenly throughout instead of hitting in random hot pockets. If you want a milder jam, remove the seeds and white membrane (that’s where most of the capsaicin, the compound responsible for heat, is concentrated).
- 2 cups granulated sugar — Sugar isn’t just for sweetness here; it’s essential for the jam to set properly and also acts as a natural preservative, which is important for shelf stability if you plan on canning.
- 1/4 cup lemon juice — Lemon juice does double duty: it brightens the overall flavor and adds the acidity that pectin needs to activate and help the jam gel. Pears are relatively low in natural acid, so this ingredient is non-negotiable.
- 1 packet (1.75 oz) fruit pectin — Pectin is the ingredient responsible for that classic jammy, spreadable texture. Without it, you’d end up with a syrupy pear-jalapeño sauce instead of a jam that holds its shape on a spoon.
- 1/4 tsp salt — A small amount of salt rounds out the sweetness and heat, keeping the flavor from tasting flat or one-note.
- 1/2 tsp ground ginger (optional) — Ginger adds a subtle warmth and a little extra complexity. It’s optional, but if you love a hint of spice-rack depth alongside the jalapeño heat, don’t skip it.
A Quick Note on Choosing Pears
The pears you choose will make a noticeable difference in the final jam. Look for pears that give slightly when you press near the stem — that’s the sweet spot between underripe (too firm, not sweet enough) and overripe (mushy, harder to dice evenly). If your pears are still hard when you buy them, let them ripen on the counter for a few days before making this recipe.
How to Make Spicy Pear Jalapeño Jam: Step-by-Step Directions
This recipe comes together in about 35 minutes total, and most of that is hands-off simmering time. Here’s exactly how to do it.
Step 1: Prep Your Ingredients
Peel and finely dice your pears, and mince your jalapeños. The finer the dice, the more evenly the pear pieces will cook down and the smoother your final jam will be. If you like a chunkier jam, you can leave the pear pieces slightly larger.
Step 2: Combine and Simmer
Add the diced pears, minced jalapeños, lemon juice, and salt to a large saucepan. Cook over medium heat for 5–7 minutes, stirring occasionally, until the pears begin to soften. You’ll notice the mixture starting to release liquid and turn slightly translucent — that’s exactly what you want.
Step 3: Add the Pectin
Stir in the fruit pectin and bring the entire mixture to a full rolling boil — meaning a boil that doesn’t stop bubbling even when you stir it. This step is important because pectin needs high heat to activate properly.
Step 4: Add the Sugar
Once you’ve reached a rolling boil, add the sugar all at once (not gradually) and stir continuously until it’s completely dissolved. Adding all the sugar at once helps the jam set correctly and prevents crystallization.
Step 5: Boil to Thicken
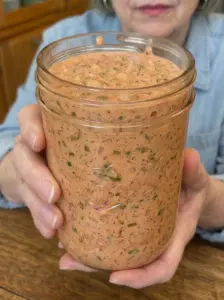
Continue boiling for 1–2 minutes, stirring frequently to prevent scorching on the bottom of the pan, until the jam visibly thickens. You’ll know it’s ready when it coats the back of a spoon and slowly drips off rather than running thin.
Step 6: Skim the Foam
Remove the pan from the heat. If there’s any foam on the surface (this is completely normal and just trapped air/impurities), skim it off with a spoon for a cleaner, clearer jam.
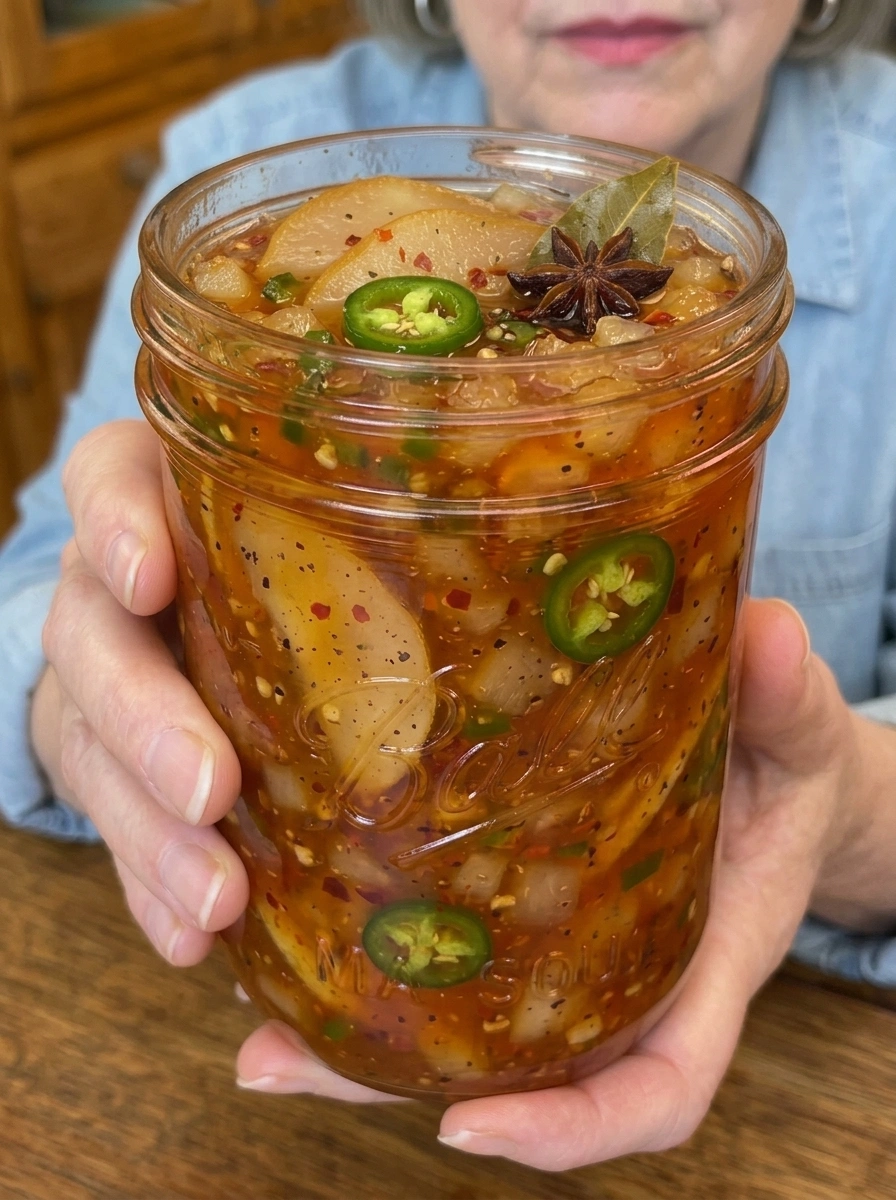
Step 7: Jar It Up
Carefully ladle the hot jam into clean, sterilized jars, leaving about 1/4 inch of headspace at the top of each jar. This headspace is important for proper sealing if you’re water-bath canning.
Step 8: Cool and Store
Let the jars cool completely on the counter before sealing and refrigerating for short-term storage, or process them in a water bath according to safe canning guidelines if you want shelf-stable jars for long-term storage.
Pro Tips for the Best Spicy Pear Jalapeño Jam
- Do a plate test. Before ladling your jam into jars, put a small plate in the freezer at the start of cooking. When you think the jam is close to done, drop a small spoonful onto the cold plate and let it sit for a minute. If it wrinkles when you push it with your finger, it’s set. If it’s still runny, boil for another minute and test again.
- Use gloves when handling jalapeños. Capsaicin oil can linger on your skin and cause irritation if you touch your eyes or face afterward. A pair of kitchen gloves makes prep much more pleasant.
- Don’t skip the sterilization step. Whether you’re refrigerating or canning, always start with clean, sterilized jars to prevent bacterial growth and extend shelf life.
- Stir constantly once the sugar goes in. Sugar can scorch quickly at high heat, so don’t walk away during this stage.
- Taste as you go (carefully). Once the jam has cooled slightly, taste a small amount to check the heat level. If you want more spice, you can stir in a pinch of crushed red pepper flakes or a splash of hot sauce before jarring.
- Let it fully cool before judging the texture. Jam continues to thicken as it cools, so don’t panic if it looks a little loose right off the stove — give it time to set before deciding whether it needs more cook time.
Creative Ways to Serve Spicy Pear Jalapeño Jam
Part of what makes this jam so fun is how many different ways you can use it. Here are some of the best serving ideas to get you inspired.
1. The Classic Cream Cheese Appetizer
This is hands-down the most popular way to serve a sweet-and-spicy jam like this one. Simply spoon the jam over a block of softened cream cheese, add a few crackers on the side, and watch it disappear at your next gathering. The creamy, cool cheese is the perfect contrast to the warm, spicy-sweet jam.
2. Elevated Cheese Board Addition
Add a small bowl of this jam to your next cheese board alongside sharp cheddar, brie, goat cheese, or a smoked gouda. The combination of creamy, salty cheese with sweet heat is basically foolproof.
3. Grilled Cheese Upgrade
Spread a thin layer inside a grilled cheese sandwich (sharp cheddar or pepper jack pairs especially well) for a sweet, spicy twist on a comfort food classic.
4. Meat Glaze
Brush this jam over pork chops, chicken thighs, or a pork tenderloin during the last few minutes of grilling or roasting for a sticky, caramelized glaze with real depth of flavor.
5. Breakfast Spread
Don’t overlook the simplest use — spread it on warm buttered toast, biscuits, or English muffins for a breakfast with a little kick.
6. Burger Topping
Skip the ketchup and try a spoonful of this jam on a burger instead, especially one topped with bacon and a sharp cheese. The sweetness and heat cut through the richness beautifully.
7. Charcuterie Pairing
Pair it with cured meats like prosciutto or salami. The saltiness of cured meat plus the sweet-spicy jam is an underrated combination that deserves more attention.
8. Deviled Egg Topping
For a fun party twist, top deviled eggs with a tiny spoonful of this jam instead of the usual paprika sprinkle.
Storage Information
Proper storage keeps this jam safe and delicious for as long as possible.
- Refrigerator storage: Store in an airtight jar in the refrigerator for up to 3 weeks.
- Water-bath canned jars (unopened): If properly processed using safe canning guidelines, unopened jars can be stored in a cool, dark place for up to 1 year.
- After opening: Once opened, always refrigerate and use within 3 weeks for the best quality and safety.
If you’re new to canning, it’s worth looking into official, tested water-bath canning guidelines (such as those from your local agricultural extension office) to make sure you’re processing your jars at the correct time and temperature for safe long-term storage.
Recipe at a Glance
- Prep Time: 15 minutes
- Cook Time: 20 minutes
- Total Time: 35 minutes
- Servings: 24 (about 1 tablespoon each)
- Calories: ~50 per serving
Frequently Asked Questions About Spicy Pear Jalapeño Jam
Can I make this jam less spicy? Yes. Removing the seeds and white membrane from the jalapeños will significantly reduce the heat while still giving you that fresh pepper flavor. You can also reduce the number of jalapeños to two if you want an even milder result.
Can I make it spicier? Absolutely. Leave some or all of the jalapeño seeds in, add a pinch of cayenne pepper, or stir in a small amount of your favorite hot sauce after cooking for extra heat.
What kind of pears work best for this recipe? Bartlett, Anjou, and Bosc pears all work well. The key is making sure they’re ripe — slightly soft to the touch — for the best sweetness and texture.
Do I have to use fruit pectin? Pectin is what gives this jam its classic spreadable texture. Without it, the mixture will be more like a syrup or sauce rather than a jam that holds together on a spoon. If you prefer a low-sugar or no-added-pectin version, you’ll need to adjust the recipe and cook time significantly, as this specific recipe is formulated for standard pectin.
Can I substitute a different pepper for jalapeño? Yes. Serrano peppers will make the jam spicier, while a poblano will give a milder, more vegetal flavor. Adjust quantities to taste since different peppers vary in heat level.
Is this recipe safe for canning? This recipe can be safely water-bath canned as long as you follow proper, tested canning procedures, including correct headspace, clean sterilized jars, and appropriate processing time for your altitude. Always refer to current, trusted canning guidelines when processing jars for long-term shelf storage.
Why didn’t my jam set properly? The most common causes are not reaching a full rolling boil before adding the sugar, not boiling long enough after adding the pectin, or measuring ingredients inaccurately. Doing a cold-plate test during cooking can help you catch this before jarring.
Can I freeze this jam instead of canning or refrigerating it? Yes, this jam can be frozen in freezer-safe containers, leaving room for expansion. Thaw in the refrigerator before using.
How long does this recipe take to make from start to finish? Including prep and cook time, this recipe takes about 35 minutes total, making it an easy homemade condiment even for a weeknight project.
What size batch does this recipe make? This recipe yields about 24 servings, at roughly one tablespoon per serving, which typically fills two to three standard half-pint (8 oz) jars, depending on how full you fill them.
Final Thoughts
This spicy pear jalapeño jam is proof that a handful of simple, affordable ingredients can create something genuinely exciting. It’s sweet, it’s got a real kick, and it’s flexible enough to show up at breakfast, dinner, and everything in between. Whether you’re building the ultimate appetizer with cream cheese and crackers, glazing a roast for Sunday dinner, or jarring up a batch as thoughtful homemade gifts, this jam earns its spot as a new pantry staple.
Once you make a batch, don’t be surprised if it becomes a regularly requested favorite among friends and family — sweet and spicy jams like this one have a way of turning first-time tasters into repeat customers. Grab your pears and jalapeños, and get ready for a condiment that truly does it all.
Print
Spicy Pear Jalapeño Jam
- Total Time: 35 minutes
Ingredients
Here’s the full ingredient list for this spicy pear jalapeño jam recipe, along with notes on why each component earns its place.
-
- 4 cups ripe pears, peeled and finely diced — Ripe pears are the backbone of this jam. They’re naturally sweet, they break down beautifully when cooked, and their mild flavor is the perfect canvas for the jalapeño heat to play against. Bartlett, Anjou, or Bosc pears all work well; just make sure they’re ripe (slightly soft to the touch) for the best texture and sweetness.
- 3 jalapeños, finely minced (remove seeds for less heat) — Jalapeños provide the “spicy” half of this sweet-and-spicy jam. Mincing them finely ensures the heat is distributed evenly throughout instead of hitting in random hot pockets. If you want a milder jam, remove the seeds and white membrane (that’s where most of the capsaicin, the compound responsible for heat, is concentrated).
- 2 cups granulated sugar — Sugar isn’t just for sweetness here; it’s essential for the jam to set properly and also acts as a natural preservative, which is important for shelf stability if you plan on canning.
-
- 1/4 cup lemon juice — Lemon juice does double duty: it brightens the overall flavor and adds the acidity that pectin needs to activate and help the jam gel. Pears are relatively low in natural acid, so this ingredient is non-negotiable.
- 1 packet (1.75 oz) fruit pectin — Pectin is the ingredient responsible for that classic jammy, spreadable texture. Without it, you’d end up with a syrupy pear-jalapeño sauce instead of a jam that holds its shape on a spoon.
- 1/4 tsp salt — A small amount of salt rounds out the sweetness and heat, keeping the flavor from tasting flat or one-note.
- 1/2 tsp ground ginger (optional) — Ginger adds a subtle warmth and a little extra complexity. It’s optional, but if you love a hint of spice-rack depth alongside the jalapeño heat, don’t skip it.
A Quick Note on Choosing Pears
The pears you choose will make a noticeable difference in the final jam. Look for pears that give slightly when you press near the stem — that’s the sweet spot between underripe (too firm, not sweet enough) and overripe (mushy, harder to dice evenly). If your pears are still hard when you buy them, let them ripen on the counter for a few days before making this recipe.
Instructions
This recipe comes together in about 35 minutes total, and most of that is hands-off simmering time. Here’s exactly how to do it.
Step 1: Prep Your Ingredients
Peel and finely dice your pears, and mince your jalapeños. The finer the dice, the more evenly the pear pieces will cook down and the smoother your final jam will be. If you like a chunkier jam, you can leave the pear pieces slightly larger.
Step 2: Combine and Simmer
Add the diced pears, minced jalapeños, lemon juice, and salt to a large saucepan. Cook over medium heat for 5–7 minutes, stirring occasionally, until the pears begin to soften. You’ll notice the mixture starting to release liquid and turn slightly translucent — that’s exactly what you want.
Step 3: Add the Pectin
Stir in the fruit pectin and bring the entire mixture to a full rolling boil — meaning a boil that doesn’t stop bubbling even when you stir it. This step is important because pectin needs high heat to activate properly.
Step 4: Add the Sugar
Once you’ve reached a rolling boil, add the sugar all at once (not gradually) and stir continuously until it’s completely dissolved. Adding all the sugar at once helps the jam set correctly and prevents crystallization.
Step 5: Boil to Thicken
Continue boiling for 1–2 minutes, stirring frequently to prevent scorching on the bottom of the pan, until the jam visibly thickens. You’ll know it’s ready when it coats the back of a spoon and slowly drips off rather than running thin.
Step 6: Skim the Foam
Remove the pan from the heat. If there’s any foam on the surface (this is completely normal and just trapped air/impurities), skim it off with a spoon for a cleaner, clearer jam.
Step 7: Jar It Up
Carefully ladle the hot jam into clean, sterilized jars, leaving about 1/4 inch of headspace at the top of each jar. This headspace is important for proper sealing if you’re water-bath canning.
Step 8: Cool and Store
Let the jars cool completely on the counter before sealing and refrigerating for short-term storage, or process them in a water bath according to safe canning guidelines if you want shelf-stable jars for long-term storage.
- Prep Time: 15 minutes
- Cook Time: 20 minutes
Nutrition
- Serving Size: 24 (about 1 tablespoon each)
- Calories: 50 per serving