If you’ve ever grabbed a pickled egg from a jar at a bar, a gas station, or a country store and thought “why don’t I make these at home?”—this is your sign. Homemade spicy pickled eggs are in an entirely different league from anything you’ll find in a commercial jar, and they’re far easier to make than most people expect.
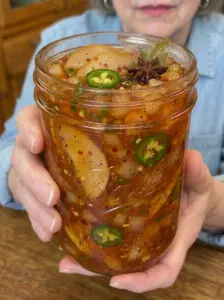
These Spicy Pickled Eggs deliver a bold, layered punch of heat, tang, garlic, and smoke in every single bite. The brine is built with white vinegar, hot sauce, jalapeños, serrano peppers, smoked paprika, and a full lineup of aromatic spices that infuse the eggs over several days in the refrigerator. The result is a snack that’s intensely flavorful, satisfyingly chewy on the outside, with a creamy yolk that absorbs the brine beautifully from the inside out. Fiery without being one-dimensional, garlicky without being overwhelming, and tangy enough to keep you reaching back into the jar for one more.
At around 80 calories per egg and packed with protein, they’re also one of the most satisfying low-carb, high-protein snacks you can keep on hand. Once your first batch is in the fridge, you’ll understand why people who make these once tend to keep a jar going at all times.
A Brief History of Pickled Eggs
Pickled eggs have a long and practical history rooted in preservation. Long before refrigeration, pickling was one of the primary ways people extended the shelf life of perishable foods. Eggs preserved in vinegar brine could last for weeks or even months without spoiling, making them a valuable food source in rural communities and a staple in British pub culture, where jars of pickled eggs sat on bar counters for over a century.
In the United States, pickled eggs became especially popular in the South, Appalachia, and rural Midwest, where homemade jars were kept in kitchens, general stores, and taverns as a quick, protein-rich snack. Pennsylvania Dutch communities became particularly well known for their beet-pickled eggs—a vivid magenta variation that remains a regional staple today.
The spicy pickled egg tradition has roots in bar snack culture, where the heat and tang of the brine paired naturally with cold beer and bold flavors. Today, homemade spicy pickled eggs have experienced a significant revival among food enthusiasts, home picklers, and anyone who appreciates a bold, high-protein snack that can be made in minutes and enjoyed for weeks.
Why Homemade Spicy Pickled Eggs Are Worth Making
The flavor is incomparably better. Commercial pickled eggs are preserved for shelf stability, which means they tend to be rubbery in texture and flat in flavor. Homemade pickled eggs use a fresh brine packed with real spices, fresh peppers, and smoked paprika—the difference in flavor is dramatic.
They’re a serious protein powerhouse. Each egg delivers around 6 grams of protein at approximately 80 calories. A couple of pickled eggs make a genuinely satisfying snack that holds you over for hours.
The heat level is entirely in your hands. This recipe uses both jalapeños and serrano peppers, with the serranos listed as optional for those who want maximum fire. You can dial the heat up or down to suit your preference without affecting the rest of the recipe.
They get better over time. Unlike most snacks, these eggs actually improve the longer they sit in the brine. After three days they’re good; after five to seven days they’re exceptional.
They’re incredibly versatile. Eat them straight from the jar, slice them onto salads, chop them into egg salad, serve them on charcuterie boards, or bring them to a tailgate. They fit in almost anywhere.
The prep is genuinely minimal. Twenty minutes of active work, a few days of patience, and you have a jar full of fiery, complex, restaurant-quality pickled eggs ready to eat whenever you want them.

Ingredients and What Each One Does
Every component of this brine is working toward a specific flavor goal. Understanding the role of each ingredient helps you make confident adjustments and better pickled eggs every time.
12 hard-boiled eggs, peeled The foundation of the recipe. Hard-boiled eggs have a firm white that holds its structure beautifully in the brine while still absorbing flavor gradually over several days. The yolk softens slightly in the brine and takes on the color and flavor of the pickling liquid, giving you a rich, spiced center in every bite. Peeling the eggs carefully—without tearing the white—gives you the cleanest finished product.
1 cup white vinegar White vinegar provides the clean, sharp acidity that preserves the eggs and gives the brine its characteristic tang. Its neutral color keeps the brine clear and allows the smoked paprika and other spices to define the visual character of the jar.
1 cup water Water balances the acidity of the vinegar to a pickling-appropriate level. Without it, the brine would be too sharp and the eggs would have an overwhelmingly acidic flavor.
2 tbsp hot sauce Hot sauce is one of the defining elements of this recipe. It adds heat, vinegar complexity, and a depth of flavor that you can’t replicate with dried spices alone. It also gives the brine a subtle orange-red tint that makes the finished eggs look as bold as they taste. Use your favorite brand—Louisiana-style hot sauces like Crystal or Frank’s work beautifully, while something like Cholula adds a touch of earthy complexity.
1 tbsp pickling salt or kosher salt Salt seasons the brine, helps preserve the eggs, and plays an important role in the texture of the finished product. Pickling salt is preferred because it dissolves cleanly without additives. Kosher salt is a perfectly good substitute.
1 tbsp sugar A small amount of sugar balances the sharp acidity of the vinegar and the heat of the peppers, giving the brine a subtle sweetness that keeps it from being one-dimensionally aggressive. It’s a background note you’d notice the absence of more than the presence of.
5 cloves garlic, smashed Smashed garlic cloves infuse the brine slowly and deeply, releasing their savory, aromatic flavor without becoming harsh or overpowering. The longer the eggs sit in the brine, the more the garlic flavor develops—one of the many reasons these eggs are better after five to seven days than after three.
2 jalapeños, thinly sliced Jalapeños provide fresh, vegetal heat that layers beautifully with the hot sauce and dried pepper flakes. Sliced thin, they maximize their surface area in the brine and contribute to both the flavor and the visual appeal of the jar.
2 serrano peppers, thinly sliced (optional) Serrano peppers are significantly hotter than jalapeños—roughly two to five times the heat level—and they add a different kind of clean, bright spice that escalates the overall heat considerably. They’re listed as optional, but if you want a truly fiery pickled egg, don’t skip them.
1 tsp crushed red pepper flakes Red pepper flakes add a dry, lingering heat that complements the fresh pepper slices. Where jalapeños and serranos provide immediate, fresh heat, red pepper flakes provide a slower, building warmth that you feel in the back of the throat.
1 tsp black peppercorns Whole peppercorns contribute gentle, earthy spice and aromatic complexity to the brine as it heats and as the eggs marinate.
1 tsp mustard seeds Mustard seeds are a classic pickling spice that add a mild, peppery warmth and a pleasant visual element inside the jar. They provide subtle flavor without overwhelming the other spices.
1/2 tsp smoked paprika Smoked paprika is one of the most important flavor elements in this recipe. It adds a deep, earthy smokiness that takes the brine in a more complex, layered direction and gives the eggs a beautiful reddish tint as they marinate. This is the ingredient that makes people ask “what is that flavor?” when they taste these eggs for the first time.
2 bay leaves Bay leaves add a quiet herbal depth and a slightly floral complexity to the brine. Their contribution is subtle but meaningful—the kind of ingredient that rounds out the whole without drawing attention to itself.
Step-by-Step Directions
Step 1: Hard-Boil and Peel the Eggs
If you haven’t already, hard-boil your eggs. Place them in a single layer in a saucepan, cover with cold water by about an inch, and bring to a boil over medium-high heat. Once boiling, turn off the heat, cover the pan, and let the eggs sit for 10 to 12 minutes. Transfer immediately to an ice bath and let them cool completely before peeling. Fully cooled eggs peel more cleanly and have a better texture in the brine.
Step 2: Pack the Jar
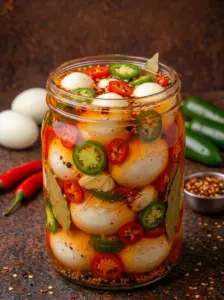
Place the peeled eggs into a clean, large glass jar—a quart-sized mason jar works well for 12 eggs, though you may need two pint jars depending on the size of your eggs. Tuck the smashed garlic cloves, sliced jalapeños, and serrano pepper slices around and between the eggs as you pack them in.
Step 3: Make the Brine
Combine the white vinegar, water, hot sauce, salt, sugar, crushed red pepper flakes, black peppercorns, mustard seeds, smoked paprika, and bay leaves in a medium saucepan. Heat over medium heat, stirring frequently, until the salt and sugar are completely dissolved. You don’t need a full boil—just enough heat to dissolve the salt and sugar and begin blooming the spices.
Step 4: Pour the Brine
Carefully pour the hot brine over the eggs in the jar, making sure the eggs are completely submerged. The brine should cover everything. If you’re slightly short, add a small splash of vinegar and water in equal parts to top it off.
Step 5: Cool to Room Temperature
Let the jar sit uncovered until the brine cools to room temperature. This usually takes 20 to 30 minutes. Don’t rush this step—sealing the jar while the brine is hot can create a partial vacuum and affect the final texture of the eggs.
Step 6: Seal and Refrigerate
Once cool, seal the jar tightly and refrigerate. Now comes the hardest part: waiting.
Refrigerate for at least 3 days before opening. For the boldest, most fully developed flavor, give them 5 to 7 days.
Understanding the Pickling Timeline
One of the most common questions people have about pickled eggs is how long they need to marinate. Here’s a clear breakdown of what to expect at each stage:
After 24 hours: The brine has begun to penetrate the surface of the egg whites. The eggs will have a faint pink-orange tint from the smoked paprika and hot sauce, but the flavor inside is still mostly plain egg. Not ready yet.
After 3 days: The minimum recommended eating point. The outer layer of the egg white has absorbed significant flavor—tangy, spicy, and garlicky. The center of the yolk is still relatively mild. These are good, but they’re not at their best.
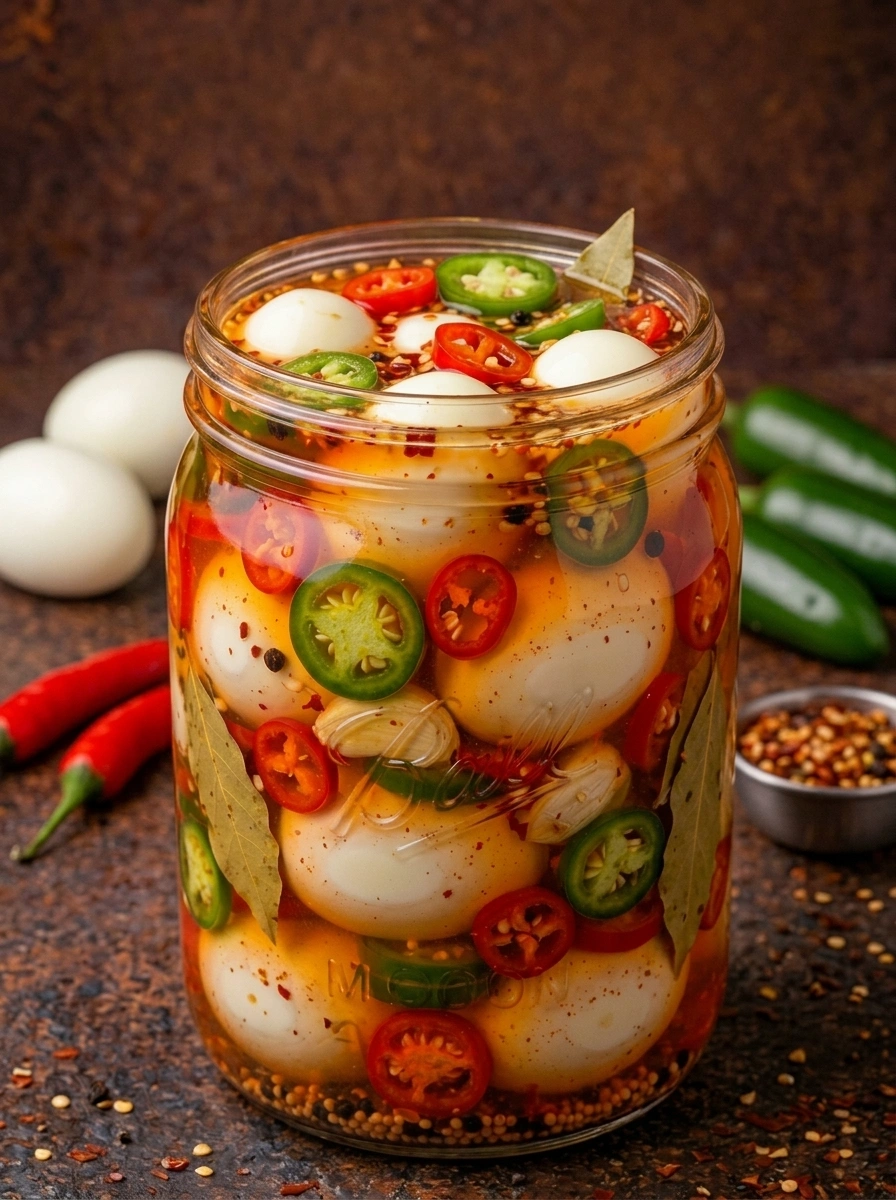
After 5 days: The sweet spot for most people. The brine has penetrated more deeply into the egg white, and the yolk has taken on visible color and flavor. The heat is present and assertive, the garlic is rich and savory, and the smoked paprika gives every bite a subtle smokiness. These are excellent.
After 7 days: Maximum flavor development. The eggs are deeply colored throughout, intensely seasoned, and the heat from the jalapeños, serranos, and pepper flakes is at its boldest. If you love big, bold flavors, wait for this.
Serving Ideas: More Than Just a Bar Snack
Spicy pickled eggs are far more versatile than their bar snack reputation suggests. Here are some of the best ways to put them to work:
Straight from the jar: The classic approach. Grab one, add a pinch of salt if needed, and enjoy. These are genuinely one of the most satisfying protein snacks you can keep in your fridge.
Sliced on salads: Halve or quarter a pickled egg and add it to a green salad, potato salad, or grain bowl. The spiced, tangy egg adds a protein punch and a flavor kick that makes every bite more interesting.
Deviled pickled eggs: Use spicy pickled eggs instead of plain hard-boiled eggs as the base for deviled eggs. The already-spiced white and tinted yolk make for a stunning, boldly flavored deviled egg that’s perfect for parties.
Spicy egg salad: Chop pickled eggs and use them in place of plain hard-boiled eggs in your egg salad recipe. The result is a tangy, spicy egg salad that’s far more exciting than the standard version.
On charcuterie and snack boards: Halved pickled eggs add color, protein, and bold flavor to a charcuterie board alongside cured meats, sharp cheeses, pickled vegetables, and crackers.
As a beer snack: These eggs and a cold beer are one of life’s great simple pleasures. The heat and tang of the egg pair beautifully with the bitterness of an IPA or the malt sweetness of a lager.
With hot sauce and hot links: Serve alongside spicy sausages or smoked meats for a Southern-inspired protein plate that’s as bold as it is satisfying.
Chopped into potato salad: Chop spicy pickled eggs into your next batch of potato salad for a tangy, spicy upgrade that’ll have people asking what your secret is.
Tips for Perfect Spicy Pickled Eggs
Start with perfectly cooked eggs. Overcooked eggs have a dry, rubbery white and a greenish ring around the yolk. Cook them just right—10 to 12 minutes in residual heat after boiling—and you’ll have tender, creamy eggs that pickle beautifully.
Peel carefully. Nicks and tears in the egg white aren’t just cosmetic—they can cause the egg to absorb brine unevenly. Take your time peeling, and use the ice bath trick for the cleanest results.
Use a large enough jar. The eggs need to be fully submerged in brine at all times. A jar that’s too small will result in eggs that are partially exposed and pickle unevenly.
Press the eggs down before sealing. After pouring the brine, use a clean spoon to gently press the eggs down so they’re fully submerged. They have a tendency to float, especially right after the hot brine is poured.
Resist the urge to open early. Three days is the minimum, but five to seven days is when these eggs truly shine. The extra days make a real, noticeable difference in flavor depth and heat penetration.
Label your jar with the date. It sounds simple, but it helps you track when the eggs are at their best and when they should be eaten by.
Heat Level Guide
Not everyone wants the same level of fire. Here’s how to adjust this recipe to your preferred heat level:
Mild: Use one jalapeño, skip the serranos entirely, reduce the red pepper flakes to 1/4 teaspoon, and reduce the hot sauce to one tablespoon. You’ll still get a warmth and complexity without significant heat.
Medium (as written with one jalapeño variation): Use two jalapeños, skip the serranos, keep the red pepper flakes and hot sauce as written. This is a comfortable, satisfying heat that most people find very enjoyable.
Hot (as written): Both jalapeños and the serrano peppers, full hot sauce, full red pepper flakes. Bold, assertive heat that builds as you eat.
Extra hot: Add a third jalapeño, keep both serranos, double the red pepper flakes, and add a habanero pepper (seeds and all) to the jar. Not for the faint of heart.
Storage Information
Store your spicy pickled eggs in an airtight glass jar in the refrigerator for up to 2 weeks. Always keep the eggs fully submerged in the brine—eggs exposed to air deteriorate faster and may develop an off texture. If the brine level drops, top it off with a small amount of white vinegar.
These are refrigerator pickles and are not shelf-stable without proper canning processing. Do not store at room temperature after the brine has been added.
Frequently Asked Questions
Do pickled eggs need to be refrigerated? Yes, always. This recipe produces refrigerator pickles, not shelf-stable canned goods. They must be kept in the refrigerator at all times and consumed within two weeks for the best flavor and food safety.
Why are my egg whites rubbery? Two common causes: overcooked eggs before pickling, or eggs that have been in the brine too long beyond the two-week storage window. Eggs cooked for exactly 10 to 12 minutes in residual heat and eaten within two weeks of pickling will have the best texture.
Can I reuse the brine for a second batch? The brine from the first batch will have given up some of its potency, but you can top it off with fresh vinegar, add a new round of garlic and pepper slices, and add another dozen eggs. The second batch will be a bit milder than the first but still delicious.
Can I use apple cider vinegar instead of white vinegar? Yes. Apple cider vinegar adds a slightly fruity, more complex tang and will give the finished eggs a slightly golden-brown tint rather than the orange-red of white vinegar with smoked paprika. The flavor will be a bit earthier and more rounded.
Why didn’t the heat penetrate all the way through my eggs? Full heat penetration to the center of the yolk takes five to seven days. If your eggs after three days taste mostly of brine on the outside but plain egg inside, that’s normal—give them more time.
Can I add other vegetables to the jar? Absolutely. Sliced onion rings, whole or halved radishes, carrot coins, or sliced bell peppers all do well in this brine and make the jar look stunning. They also absorb the flavor quickly and become a delicious bonus snack.
Final Thoughts
Spicy Pickled Eggs are the rare recipe that gets better the more you make it. Your first batch teaches you the basics—how the brine comes together, how the heat level builds, how patient you need to be. By your second or third batch, you’ll have calibrated everything perfectly to your taste, and you’ll have a standing jar in your fridge that never quite empties before the next one is started.
Bold, fiery, garlicky, and impossible to stop eating—these eggs earn their reputation. Make your first batch, wait the full five to seven days, and find out for yourself why plain eggs just don’t cut it anymore.
Recipe at a Glance Prep Time: 15 minutes Cook Time: 5 minutes Total Time: 20 minutes Servings: 12 Calories: ~80 per egg Storage: Up to 2 weeks in the refrigerator.
Print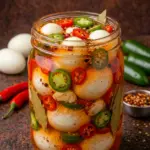
Spicy Pickled Eggs: Fiery, Garlicky, and Absolutely Addictive
Ingredients
Every component of this brine is working toward a specific flavor goal. Understanding the role of each ingredient helps you make confident adjustments and better pickled eggs every time.
12 hard-boiled eggs, peeled The foundation of the recipe. Hard-boiled eggs have a firm white that holds its structure beautifully in the brine while still absorbing flavor gradually over several days. The yolk softens slightly in the brine and takes on the color and flavor of the pickling liquid, giving you a rich, spiced center in every bite. Peeling the eggs carefully—without tearing the white—gives you the cleanest finished product.
1 cup white vinegar White vinegar provides the clean, sharp acidity that preserves the eggs and gives the brine its characteristic tang. Its neutral color keeps the brine clear and allows the smoked paprika and other spices to define the visual character of the jar.
1 cup water Water balances the acidity of the vinegar to a pickling-appropriate level. Without it, the brine would be too sharp and the eggs would have an overwhelmingly acidic flavor.
2 tbsp hot sauce Hot sauce is one of the defining elements of this recipe. It adds heat, vinegar complexity, and a depth of flavor that you can’t replicate with dried spices alone. It also gives the brine a subtle orange-red tint that makes the finished eggs look as bold as they taste. Use your favorite brand—Louisiana-style hot sauces like Crystal or Frank’s work beautifully, while something like Cholula adds a touch of earthy complexity.
1 tbsp pickling salt or kosher salt Salt seasons the brine, helps preserve the eggs, and plays an important role in the texture of the finished product. Pickling salt is preferred because it dissolves cleanly without additives. Kosher salt is a perfectly good substitute.
1 tbsp sugar A small amount of sugar balances the sharp acidity of the vinegar and the heat of the peppers, giving the brine a subtle sweetness that keeps it from being one-dimensionally aggressive. It’s a background note you’d notice the absence of more than the presence of.
5 cloves garlic, smashed Smashed garlic cloves infuse the brine slowly and deeply, releasing their savory, aromatic flavor without becoming harsh or overpowering. The longer the eggs sit in the brine, the more the garlic flavor develops—one of the many reasons these eggs are better after five to seven days than after three.
2 jalapeños, thinly sliced Jalapeños provide fresh, vegetal heat that layers beautifully with the hot sauce and dried pepper flakes. Sliced thin, they maximize their surface area in the brine and contribute to both the flavor and the visual appeal of the jar.
2 serrano peppers, thinly sliced (optional) Serrano peppers are significantly hotter than jalapeños—roughly two to five times the heat level—and they add a different kind of clean, bright spice that escalates the overall heat considerably. They’re listed as optional, but if you want a truly fiery pickled egg, don’t skip them.
1 tsp crushed red pepper flakes Red pepper flakes add a dry, lingering heat that complements the fresh pepper slices. Where jalapeños and serranos provide immediate, fresh heat, red pepper flakes provide a slower, building warmth that you feel in the back of the throat.
1 tsp black peppercorns Whole peppercorns contribute gentle, earthy spice and aromatic complexity to the brine as it heats and as the eggs marinate.
1 tsp mustard seeds Mustard seeds are a classic pickling spice that add a mild, peppery warmth and a pleasant visual element inside the jar. They provide subtle flavor without overwhelming the other spices.
1/2 tsp smoked paprika Smoked paprika is one of the most important flavor elements in this recipe. It adds a deep, earthy smokiness that takes the brine in a more complex, layered direction and gives the eggs a beautiful reddish tint as they marinate. This is the ingredient that makes people ask “what is that flavor?” when they taste these eggs for the first time.
2 bay leaves Bay leaves add a quiet herbal depth and a slightly floral complexity to the brine. Their contribution is subtle but meaningful—the kind of ingredient that rounds out the whole without drawing attention to itself.
Instructions
Step 1: Hard-Boil and Peel the Eggs
If you haven’t already, hard-boil your eggs. Place them in a single layer in a saucepan, cover with cold water by about an inch, and bring to a boil over medium-high heat. Once boiling, turn off the heat, cover the pan, and let the eggs sit for 10 to 12 minutes. Transfer immediately to an ice bath and let them cool completely before peeling. Fully cooled eggs peel more cleanly and have a better texture in the brine.
Step 2: Pack the Jar
Place the peeled eggs into a clean, large glass jar—a quart-sized mason jar works well for 12 eggs, though you may need two pint jars depending on the size of your eggs. Tuck the smashed garlic cloves, sliced jalapeños, and serrano pepper slices around and between the eggs as you pack them in.
Step 3: Make the Brine
Combine the white vinegar, water, hot sauce, salt, sugar, crushed red pepper flakes, black peppercorns, mustard seeds, smoked paprika, and bay leaves in a medium saucepan. Heat over medium heat, stirring frequently, until the salt and sugar are completely dissolved. You don’t need a full boil—just enough heat to dissolve the salt and sugar and begin blooming the spices.
Step 4: Pour the Brine
Carefully pour the hot brine over the eggs in the jar, making sure the eggs are completely submerged. The brine should cover everything. If you’re slightly short, add a small splash of vinegar and water in equal parts to top it off.
Step 5: Cool to Room Temperature
Let the jar sit uncovered until the brine cools to room temperature. This usually takes 20 to 30 minutes. Don’t rush this step—sealing the jar while the brine is hot can create a partial vacuum and affect the final texture of the eggs.
Step 6: Seal and Refrigerate
Once cool, seal the jar tightly and refrigerate. Now comes the hardest part: waiting.
Refrigerate for at least 3 days before opening. For the boldest, most fully developed flavor, give them 5 to 7 days.