Ingredients
Here’s the full ingredient list for this spicy pear jalapeño jam recipe, along with notes on why each component earns its place.
-
- 4 cups ripe pears, peeled and finely diced — Ripe pears are the backbone of this jam. They’re naturally sweet, they break down beautifully when cooked, and their mild flavor is the perfect canvas for the jalapeño heat to play against. Bartlett, Anjou, or Bosc pears all work well; just make sure they’re ripe (slightly soft to the touch) for the best texture and sweetness.
- 3 jalapeños, finely minced (remove seeds for less heat) — Jalapeños provide the “spicy” half of this sweet-and-spicy jam. Mincing them finely ensures the heat is distributed evenly throughout instead of hitting in random hot pockets. If you want a milder jam, remove the seeds and white membrane (that’s where most of the capsaicin, the compound responsible for heat, is concentrated).
- 2 cups granulated sugar — Sugar isn’t just for sweetness here; it’s essential for the jam to set properly and also acts as a natural preservative, which is important for shelf stability if you plan on canning.
-
- 1/4 cup lemon juice — Lemon juice does double duty: it brightens the overall flavor and adds the acidity that pectin needs to activate and help the jam gel. Pears are relatively low in natural acid, so this ingredient is non-negotiable.
- 1 packet (1.75 oz) fruit pectin — Pectin is the ingredient responsible for that classic jammy, spreadable texture. Without it, you’d end up with a syrupy pear-jalapeño sauce instead of a jam that holds its shape on a spoon.
- 1/4 tsp salt — A small amount of salt rounds out the sweetness and heat, keeping the flavor from tasting flat or one-note.
- 1/2 tsp ground ginger (optional) — Ginger adds a subtle warmth and a little extra complexity. It’s optional, but if you love a hint of spice-rack depth alongside the jalapeño heat, don’t skip it.
A Quick Note on Choosing Pears
The pears you choose will make a noticeable difference in the final jam. Look for pears that give slightly when you press near the stem — that’s the sweet spot between underripe (too firm, not sweet enough) and overripe (mushy, harder to dice evenly). If your pears are still hard when you buy them, let them ripen on the counter for a few days before making this recipe.
Instructions
This recipe comes together in about 35 minutes total, and most of that is hands-off simmering time. Here’s exactly how to do it.
Step 1: Prep Your Ingredients
Peel and finely dice your pears, and mince your jalapeños. The finer the dice, the more evenly the pear pieces will cook down and the smoother your final jam will be. If you like a chunkier jam, you can leave the pear pieces slightly larger.
Step 2: Combine and Simmer
Add the diced pears, minced jalapeños, lemon juice, and salt to a large saucepan. Cook over medium heat for 5–7 minutes, stirring occasionally, until the pears begin to soften. You’ll notice the mixture starting to release liquid and turn slightly translucent — that’s exactly what you want.
Step 3: Add the Pectin
Stir in the fruit pectin and bring the entire mixture to a full rolling boil — meaning a boil that doesn’t stop bubbling even when you stir it. This step is important because pectin needs high heat to activate properly.
Step 4: Add the Sugar
Once you’ve reached a rolling boil, add the sugar all at once (not gradually) and stir continuously until it’s completely dissolved. Adding all the sugar at once helps the jam set correctly and prevents crystallization.
Step 5: Boil to Thicken
Continue boiling for 1–2 minutes, stirring frequently to prevent scorching on the bottom of the pan, until the jam visibly thickens. You’ll know it’s ready when it coats the back of a spoon and slowly drips off rather than running thin.
Step 6: Skim the Foam
Remove the pan from the heat. If there’s any foam on the surface (this is completely normal and just trapped air/impurities), skim it off with a spoon for a cleaner, clearer jam.
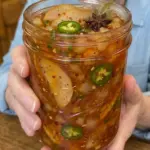
Step 7: Jar It Up
Carefully ladle the hot jam into clean, sterilized jars, leaving about 1/4 inch of headspace at the top of each jar. This headspace is important for proper sealing if you’re water-bath canning.
Step 8: Cool and Store
Let the jars cool completely on the counter before sealing and refrigerating for short-term storage, or process them in a water bath according to safe canning guidelines if you want shelf-stable jars for long-term storage.
- Prep Time: 15 minutes
- Cook Time: 20 minutes
Nutrition
- Serving Size: 24 (about 1 tablespoon each)
- Calories: 50 per serving