Easy Pickled Mushrooms Recipe: Tangy, Garlicky, and Bursting with Flavor
If you’ve never made pickled mushrooms at home, you’re in for a treat. This easy pickled mushrooms recipe transforms humble button or cremini mushrooms into a savory, tangy, garlicky condiment that you’ll want to put on absolutely everything. Whether you’re building the ultimate charcuterie board, dressing up a salad, stacking a sandwich, or simply snacking straight from the jar, these quick pickled mushrooms deliver bold, briny flavor in every bite.
Pickling is one of the oldest and most reliable ways to preserve food while adding incredible depth of flavor, and mushrooms happen to be a perfect candidate for the pickling jar. Their naturally meaty, earthy texture soaks up the garlic, dill, and warm spices in the brine, while the vinegar adds a bright tang that balances out their umami richness. Best of all, this recipe comes together with simple pantry staples and just 25 minutes of active time, making it an approachable project for beginners and seasoned home cooks alike.
In this article, we’ll walk through everything you need to know to make perfect pickled mushrooms at home: the ingredients, step-by-step instructions, tips for getting the best texture and flavor, creative ways to serve them, and answers to the most common questions people have about mushroom pickling. By the end, you’ll have all the tools you need to make a jar (or several) of these addictive bites.
Why You’ll Love This Pickled Mushrooms Recipe
There are countless reasons this recipe has become a go-to in kitchens everywhere. First, it’s incredibly versatile. Pickled mushrooms work as an appetizer, a salad topper, a sandwich upgrade, or a stand-alone snack. Second, the recipe is forgiving and easy to customize. You can adjust the spice level, swap fresh dill for dried, or experiment with different vinegars to suit your taste. Third, this is a make-ahead recipe, which means it’s perfect for meal prepping, entertaining, or simply having a flavorful condiment ready in the fridge whenever you need it.
On top of all that, pickled mushrooms are naturally low in calories, at around 35 calories per serving, which makes them a guilt-free way to add big flavor to your meals. They’re vegetarian, vegan, gluten-free, and naturally low-carb, which means they fit into a wide range of dietary lifestyles without any modification.
Ingredients for Pickled Mushrooms
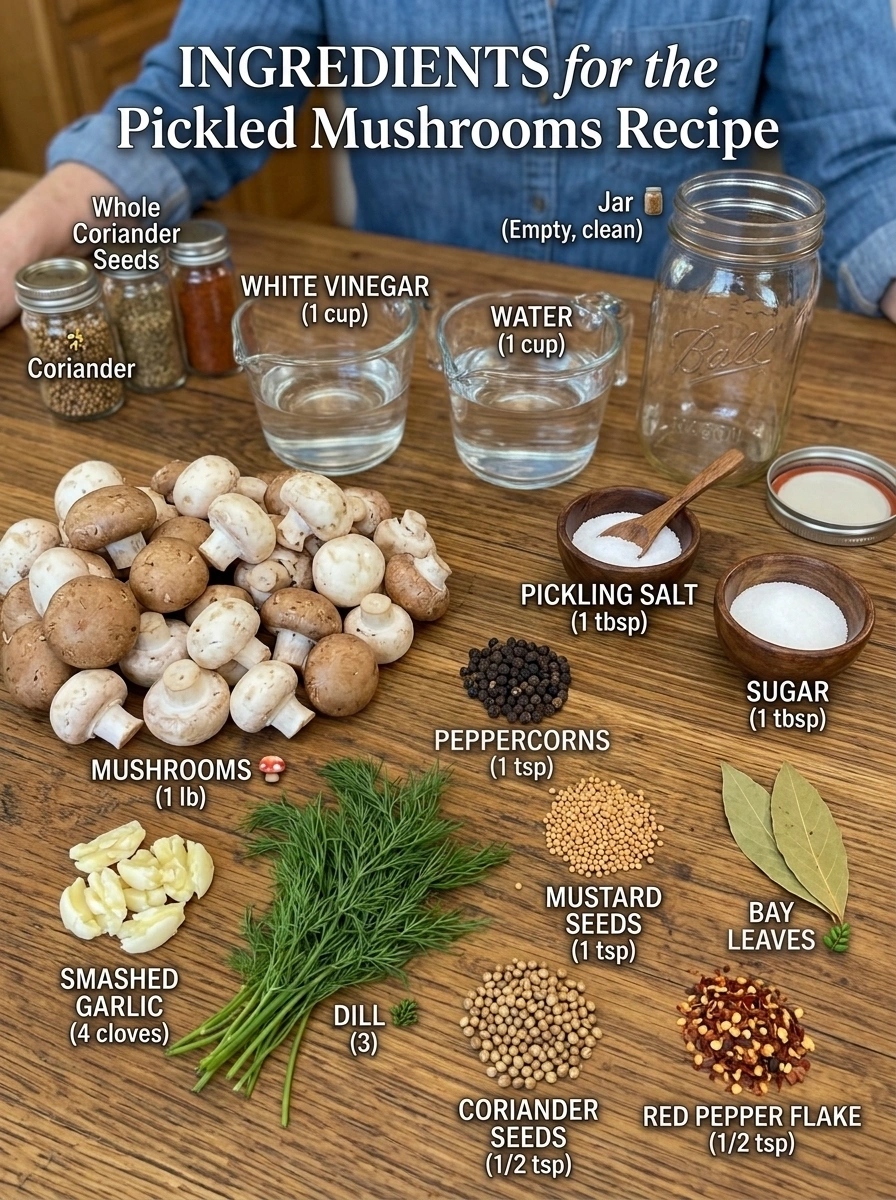
To make this recipe, you’ll need a short list of ingredients that come together to create a brine packed with savory, tangy, and aromatic notes. Here’s what goes into the jar:
- 1 pound small button or cremini mushrooms
- 1 cup white vinegar
- 1 cup water
- 1 tablespoon pickling salt or kosher salt
- 1 tablespoon sugar
- 4 cloves garlic, smashed
- 3 sprigs fresh dill, or 1 teaspoon dried dill
- 1 teaspoon black peppercorns
- 1 teaspoon mustard seeds
- 1/2 teaspoon coriander seeds
- 1/2 teaspoon red pepper flakes, optional
- 2 bay leaves
Each ingredient plays an important role. The vinegar and water create the acidic base of the brine, while the salt and sugar balance the flavor and help with preservation. The garlic and dill bring classic pickling aromatics, and the peppercorns, mustard seeds, coriander seeds, and bay leaves layer in warm, slightly spicy complexity. The red pepper flakes are optional, but they add a gentle heat that pairs beautifully with the tangy brine if you like a little kick.
How to Choose the Best Mushrooms for Pickling
Not all mushrooms are created equal when it comes to pickling. For this recipe, small button mushrooms or cremini mushrooms are ideal because their compact size allows them to absorb the brine quickly and evenly. Look for mushrooms that are firm, dry to the touch, and free of dark spots or sliminess. If the mushrooms you find at the store are on the larger side, you can simply cut them in half or quarters so they pickle more efficiently and fit neatly into your jar.
While button and cremini mushrooms are the classic choice, you can experiment with other varieties as well. Small oyster mushrooms or quartered shiitake mushrooms can also take well to pickling, though the texture and flavor will differ slightly from the traditional version.
Step-by-Step Instructions
Step 1: Clean and Prep the Mushrooms
Start by gently cleaning your mushrooms with a damp paper towel or a soft brush to remove any dirt. Avoid soaking them in water, as mushrooms are porous and will absorb excess moisture, which can affect their texture later. Trim the stems if needed, especially if they look dry or woody.
Step 2: Blanch the Mushrooms
Bring a pot of water to a rolling boil and blanch the mushrooms for 3 to 4 minutes. This step is essential because it helps soften the mushrooms slightly, allowing them to absorb the brine more effectively while also helping to preserve their texture during storage. After blanching, drain the mushrooms well so excess water doesn’t dilute your pickling brine.
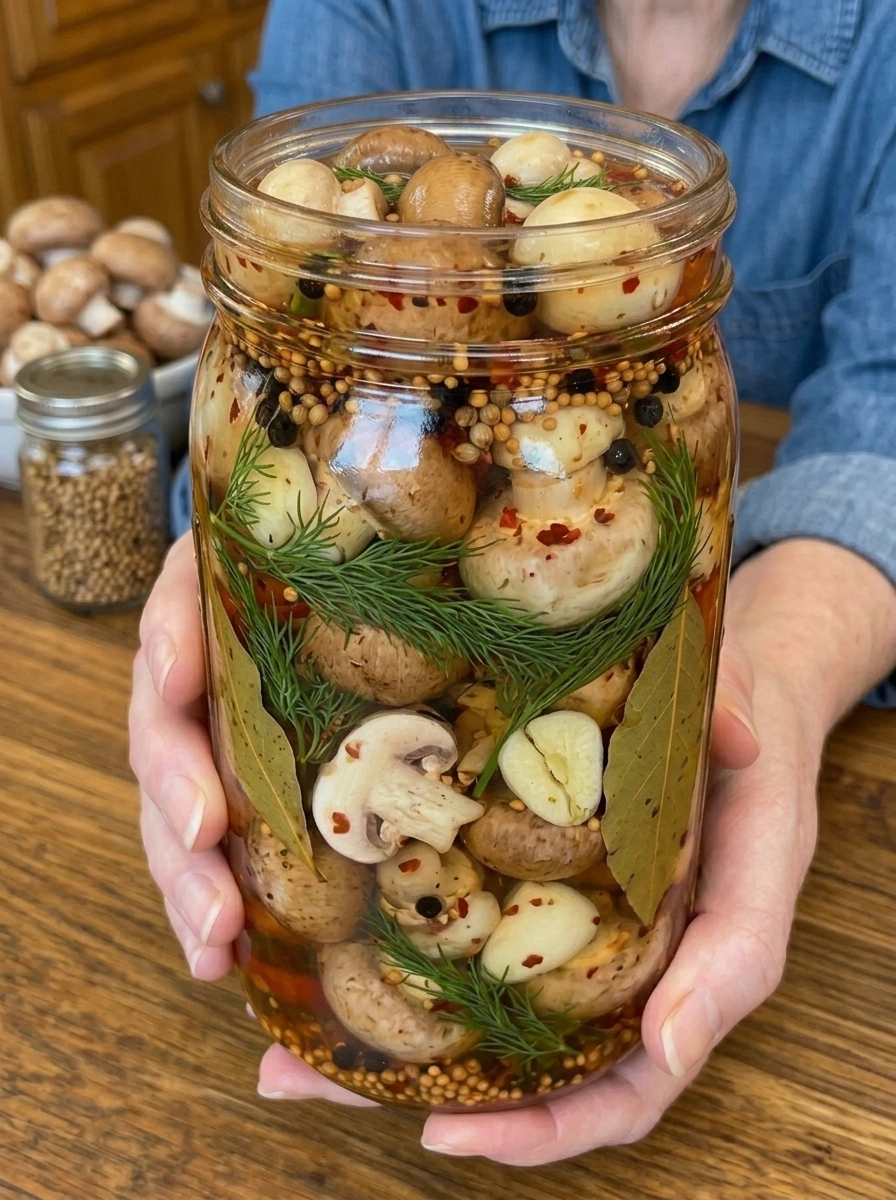
Step 3: Pack the Jar
Once your mushrooms are drained, pack them into a clean glass jar along with the smashed garlic cloves and fresh dill sprigs. Packing the mushrooms while they’re still warm helps them absorb the brine more quickly once it’s added.
Step 4: Make the Brine
In a saucepan, combine the white vinegar, water, pickling salt, sugar, black peppercorns, mustard seeds, coriander seeds, red pepper flakes, and bay leaves. Heat the mixture over medium heat, stirring occasionally, until the sugar and salt have fully dissolved. You don’t need to bring it to a hard boil, just a gentle simmer is enough to fully dissolve the dry ingredients and release the aromatics from the spices.
Step 5: Pour the Brine Over the Mushrooms
Carefully pour the hot brine over the packed mushrooms in the jar, making sure they are fully submerged. This step is crucial for both flavor and food safety, as any mushrooms left above the brine line are more prone to spoilage.
Step 6: Cool and Seal
Allow the jar to cool to room temperature on the counter before sealing it tightly with a lid. Sealing the jar while it’s still hot can cause condensation buildup, which may affect texture and shelf life.
Step 7: Refrigerate and Wait
Once sealed, transfer the jar to the refrigerator and let the mushrooms pickle for at least 48 hours. While they’re technically safe to eat after two days, the real magic happens if you can wait 4 to 5 days, allowing the garlic, dill, and spices to fully infuse the mushrooms with bold, tangy flavor.
Tips for the Best Pickled Mushrooms
Making great pickled mushrooms is mostly about technique and patience. Here are a few tips to help you get the best results every time:
Use a clean, sterilized jar. Sterilizing your glass jar before adding the mushrooms helps prevent unwanted bacteria and extends the shelf life of your pickled mushrooms.
Don’t skip the blanching step. Blanching helps the mushrooms hold their shape and texture in the brine instead of turning mushy or rubbery.
Keep the mushrooms fully submerged. Any mushrooms poking above the brine line are at risk of drying out or developing mold, so press them down gently or use a small weight if needed.
Let them sit as long as possible. While 48 hours is the minimum, the flavor only gets better with time. Many people find that the mushrooms taste best after a full 5 days in the fridge.
Adjust the spice level to your taste. If you love heat, double the red pepper flakes or add a sliced fresh chili to the jar. If you prefer a milder pickle, simply leave the red pepper flakes out entirely.
Storage Information
Once made, store your pickled mushrooms in an airtight jar in the refrigerator for up to 3 weeks. For the best flavor and texture throughout that time, always keep the mushrooms completely submerged in the pickling brine. If you notice the brine level dropping as you use the mushrooms, you can top it off with a bit of extra vinegar to keep the remaining mushrooms fully covered.
It’s worth noting that this is a refrigerator pickle recipe, not a shelf-stable canning recipe. That means the jar must be kept cold at all times and is not intended for long-term pantry storage. If you’re interested in shelf-stable canned mushrooms, that requires a different process involving proper canning equipment and processing times to ensure food safety.
Ways to Serve Pickled Mushrooms
One of the best things about this recipe is just how versatile pickled mushrooms are in the kitchen. Here are some of the most popular ways to enjoy them:
Charcuterie and snack boards. Pickled mushrooms are a natural fit alongside cured meats, cheeses, olives, and crackers, adding a tangy contrast to rich, salty flavors.
Salads. Toss a handful of sliced pickled mushrooms into a green salad, grain bowl, or pasta salad for an instant flavor boost.
Sandwiches and burgers. Layer pickled mushrooms onto sandwiches, burgers, or wraps in place of traditional pickles for a savory, garlicky twist.
Martinis and cocktails. Just like a pickled onion or olive, a pickled mushroom makes a fun and flavorful garnish for a savory cocktail.
Straight from the jar. Sometimes the best way to enjoy them is the simplest: as a quick, low-calorie snack straight out of the fridge.
Avocado toast or eggs. Top your morning avocado toast or scrambled eggs with a few sliced pickled mushrooms for a bold, tangy breakfast upgrade.
Frequently Asked Questions About Pickled Mushrooms
Can I use a different type of vinegar?
Yes. While this recipe calls for white vinegar for its clean, sharp acidity, you can substitute apple cider vinegar or white wine vinegar for a slightly different flavor profile. Just be sure to use a vinegar with at least 5% acidity to ensure proper preservation.
Do I have to blanch the mushrooms first?
Blanching is highly recommended because it helps the mushrooms hold their texture and absorb the brine more evenly. Skipping this step can result in mushrooms that are tougher or less flavorful.
Can I make this recipe with frozen mushrooms?
Fresh mushrooms are best for this recipe, as frozen mushrooms tend to release excess water and become mushy once thawed, which can affect both texture and brine concentration.
How long do pickled mushrooms last?
When stored properly in an airtight jar in the refrigerator, pickled mushrooms will keep for up to 3 weeks, as long as they remain fully submerged in the brine.
Are pickled mushrooms healthy?
Pickled mushrooms are low in calories, at roughly 35 calories per serving, and contain no added fat. They’re a great way to add bold flavor to meals without adding many calories.
Can I reuse the brine?
While you can reuse the brine once for a second small batch of blanched mushrooms, the flavor will be less concentrated than the original batch. For the best results, it’s recommended to make a fresh brine each time.
Final Thoughts
This pickled mushrooms recipe is proof that a handful of simple ingredients, a little patience, and the right balance of vinegar, garlic, and spices can create something truly special. Savory, tangy, and bursting with bold flavor, these mushrooms are endlessly versatile, easy to make ahead, and guaranteed to disappear quickly once they hit the table. Whether you’re stacking them on a charcuterie board, tossing them into a salad, layering them on a sandwich, or eating them straight from the jar, this is one pickle recipe you’ll find yourself making again and again.
Once you try this recipe, don’t be surprised if pickled mushrooms become a permanent fixture in your refrigerator. They’re the kind of homemade condiment that elevates everyday meals with almost no effort, and once you taste how much better homemade pickled mushrooms are compared to store-bought, there’s no going back.
Print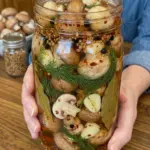
Easy Pickled Mushrooms Recipe
Ingredients
To make this recipe, you’ll need a short list of ingredients that come together to create a brine packed with savory, tangy, and aromatic notes. Here’s what goes into the jar:
-
- 1 pound small button or cremini mushrooms
- 1 cup white vinegar
- 1 cup water
-
- 1 tablespoon pickling salt or kosher salt
- 1 tablespoon sugar
- 4 cloves garlic, smashed
-
- 3 sprigs fresh dill, or 1 teaspoon dried dill
- 1 teaspoon black peppercorns
- 1 teaspoon mustard seeds
-
- 1/2 teaspoon coriander seeds
- 1/2 teaspoon red pepper flakes, optional
- 2 bay leaves
Each ingredient plays an important role. The vinegar and water create the acidic base of the brine, while the salt and sugar balance the flavor and help with preservation. The garlic and dill bring classic pickling aromatics, and the peppercorns, mustard seeds, coriander seeds, and bay leaves layer in warm, slightly spicy complexity. The red pepper flakes are optional, but they add a gentle heat that pairs beautifully with the tangy brine if you like a little kick.
Instructions
Not all mushrooms are created equal when it comes to pickling. For this recipe, small button mushrooms or cremini mushrooms are ideal because their compact size allows them to absorb the brine quickly and evenly. Look for mushrooms that are firm, dry to the touch, and free of dark spots or sliminess. If the mushrooms you find at the store are on the larger side, you can simply cut them in half or quarters so they pickle more efficiently and fit neatly into your jar.
While button and cremini mushrooms are the classic choice, you can experiment with other varieties as well. Small oyster mushrooms or quartered shiitake mushrooms can also take well to pickling, though the texture and flavor will differ slightly from the traditional version.
Step-by-Step Instructions
Step 1: Clean and Prep the Mushrooms
Start by gently cleaning your mushrooms with a damp paper towel or a soft brush to remove any dirt. Avoid soaking them in water, as mushrooms are porous and will absorb excess moisture, which can affect their texture later. Trim the stems if needed, especially if they look dry or woody.
Step 2: Blanch the Mushrooms
Bring a pot of water to a rolling boil and blanch the mushrooms for 3 to 4 minutes. This step is essential because it helps soften the mushrooms slightly, allowing them to absorb the brine more effectively while also helping to preserve their texture during storage. After blanching, drain the mushrooms well so excess water doesn’t dilute your pickling brine.
Step 3: Pack the Jar
Once your mushrooms are drained, pack them into a clean glass jar along with the smashed garlic cloves and fresh dill sprigs. Packing the mushrooms while they’re still warm helps them absorb the brine more quickly once it’s added.
Step 4: Make the Brine
In a saucepan, combine the white vinegar, water, pickling salt, sugar, black peppercorns, mustard seeds, coriander seeds, red pepper flakes, and bay leaves. Heat the mixture over medium heat, stirring occasionally, until the sugar and salt have fully dissolved. You don’t need to bring it to a hard boil, just a gentle simmer is enough to fully dissolve the dry ingredients and release the aromatics from the spices.
Step 5: Pour the Brine Over the Mushrooms
Carefully pour the hot brine over the packed mushrooms in the jar, making sure they are fully submerged. This step is crucial for both flavor and food safety, as any mushrooms left above the brine line are more prone to spoilage.
Step 6: Cool and Seal
Allow the jar to cool to room temperature on the counter before sealing it tightly with a lid. Sealing the jar while it’s still hot can cause condensation buildup, which may affect texture and shelf life.
Step 7: Refrigerate and Wait
Once sealed, transfer the jar to the refrigerator and let the mushrooms pickle for at least 48 hours. While they’re technically safe to eat after two days, the real magic happens if you can wait 4 to 5 days, allowing the garlic, dill, and spices to fully infuse the mushrooms with bold, tangy flavor.