Ingredients
To make this recipe, you’ll need a short list of ingredients that come together to create a brine packed with savory, tangy, and aromatic notes. Here’s what goes into the jar:
-
- 1 pound small button or cremini mushrooms
- 1 cup white vinegar
- 1 cup water
-
- 1 tablespoon pickling salt or kosher salt
- 1 tablespoon sugar
- 4 cloves garlic, smashed
-
- 3 sprigs fresh dill, or 1 teaspoon dried dill
- 1 teaspoon black peppercorns
- 1 teaspoon mustard seeds
-
- 1/2 teaspoon coriander seeds
- 1/2 teaspoon red pepper flakes, optional
- 2 bay leaves
Each ingredient plays an important role. The vinegar and water create the acidic base of the brine, while the salt and sugar balance the flavor and help with preservation. The garlic and dill bring classic pickling aromatics, and the peppercorns, mustard seeds, coriander seeds, and bay leaves layer in warm, slightly spicy complexity. The red pepper flakes are optional, but they add a gentle heat that pairs beautifully with the tangy brine if you like a little kick.
Instructions
Not all mushrooms are created equal when it comes to pickling. For this recipe, small button mushrooms or cremini mushrooms are ideal because their compact size allows them to absorb the brine quickly and evenly. Look for mushrooms that are firm, dry to the touch, and free of dark spots or sliminess. If the mushrooms you find at the store are on the larger side, you can simply cut them in half or quarters so they pickle more efficiently and fit neatly into your jar.
While button and cremini mushrooms are the classic choice, you can experiment with other varieties as well. Small oyster mushrooms or quartered shiitake mushrooms can also take well to pickling, though the texture and flavor will differ slightly from the traditional version.
Step-by-Step Instructions
Step 1: Clean and Prep the Mushrooms
Start by gently cleaning your mushrooms with a damp paper towel or a soft brush to remove any dirt. Avoid soaking them in water, as mushrooms are porous and will absorb excess moisture, which can affect their texture later. Trim the stems if needed, especially if they look dry or woody.
Step 2: Blanch the Mushrooms
Bring a pot of water to a rolling boil and blanch the mushrooms for 3 to 4 minutes. This step is essential because it helps soften the mushrooms slightly, allowing them to absorb the brine more effectively while also helping to preserve their texture during storage. After blanching, drain the mushrooms well so excess water doesn’t dilute your pickling brine.
Step 3: Pack the Jar
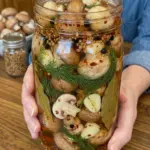
Once your mushrooms are drained, pack them into a clean glass jar along with the smashed garlic cloves and fresh dill sprigs. Packing the mushrooms while they’re still warm helps them absorb the brine more quickly once it’s added.
Step 4: Make the Brine
In a saucepan, combine the white vinegar, water, pickling salt, sugar, black peppercorns, mustard seeds, coriander seeds, red pepper flakes, and bay leaves. Heat the mixture over medium heat, stirring occasionally, until the sugar and salt have fully dissolved. You don’t need to bring it to a hard boil, just a gentle simmer is enough to fully dissolve the dry ingredients and release the aromatics from the spices.
Step 5: Pour the Brine Over the Mushrooms
Carefully pour the hot brine over the packed mushrooms in the jar, making sure they are fully submerged. This step is crucial for both flavor and food safety, as any mushrooms left above the brine line are more prone to spoilage.
Step 6: Cool and Seal
Allow the jar to cool to room temperature on the counter before sealing it tightly with a lid. Sealing the jar while it’s still hot can cause condensation buildup, which may affect texture and shelf life.
Step 7: Refrigerate and Wait
Once sealed, transfer the jar to the refrigerator and let the mushrooms pickle for at least 48 hours. While they’re technically safe to eat after two days, the real magic happens if you can wait 4 to 5 days, allowing the garlic, dill, and spices to fully infuse the mushrooms with bold, tangy flavor.