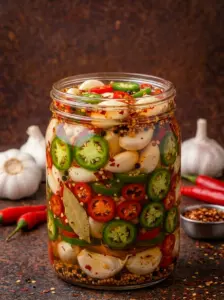
There is a moment — usually somewhere around the third or fourth one — when you realize that spicy pickled garlic has completely ruined you for regular garlic. That the raw clove you used to throw into a pan without a second thought now seems like a rough draft of what garlic could be. Pickled garlic is tangy where raw garlic is sharp, mellow where raw garlic is aggressive, and complex where raw garlic is blunt. Add a fiery brine loaded with jalapeños, hot sauce, and red pepper flakes, and you have something in an entirely different category: a tiny, intensely flavorful bite that disappears faster than almost anything else on a table.
These little bites are the kind of thing people discover at a restaurant or a friend’s house and immediately start asking about. They look unassuming — just garlic cloves in a jar — but one taste and the reaction is always the same: eyes slightly wide, reaching for another, asking if there’s more. At around 20 calories per serving, they’re one of the most rewarding things you can make for the effort required. Twenty minutes of active work, three to seven days of patience, and a full month of having the most interesting thing in your refrigerator.
This guide covers everything: what pickling does to garlic and why the transformation is so dramatic, a complete ingredient breakdown, step-by-step instructions, the essential food safety information for pickled garlic specifically, tips for sourcing and peeling garlic efficiently, and every possible way to use a jar once it’s ready.
What Pickling Does to Garlic — and Why It’s Extraordinary
Raw garlic is polarizing. Its flavor is sharp, pungent, and aggressive — allicin, the compound responsible for most of garlic’s characteristic bite, is produced when the cell walls of a raw clove are broken or crushed, and it hits your palate immediately and forcefully. People who love garlic in cooked food often find raw garlic overpowering. Even dedicated garlic lovers tend to use it as a background ingredient rather than eating it whole.
Pickling changes all of this. When garlic cloves are submerged in a hot vinegar brine and left to cure, several things happen simultaneously that transform the flavor completely.
The heat breaks down allicin. Hot brine penetrates the outer layers of the clove and begins to denature the enzymes that produce allicin. Over the pickling period, the sharpest, most aggressive edge of the raw garlic mellows significantly. What remains is garlic’s deeper, more complex flavor profile: savory, slightly sweet, nutty, and aromatic.
The acid transforms the texture. The vinegar brine softens the outer cell structure of the garlic while leaving the interior firm. The result is a clove that has a satisfying snap when bitten rather than the hard crunch of raw garlic or the soft squish of roasted garlic. It’s a unique texture that exists specifically in pickled garlic and nowhere else.
The brine’s flavors penetrate completely. Garlic is dense, and flavor absorption takes longer than it would with a more porous vegetable. This is why spicy pickled garlic genuinely needs three to seven days — and why it’s so much better at seven days than at three. By the end of a full week in this brine, the cloves have absorbed the tang of the vinegar, the heat of the jalapeños and hot sauce, the warmth of the red pepper flakes, and the subtle complexity of mustard seeds and peppercorns. Every bite is an entire flavor experience in one small clove.
The color changes. You may notice the garlic cloves developing a slightly blue or green tint during pickling. This is a natural, harmless reaction between sulfur compounds in the garlic and trace minerals in the vinegar or water. It looks alarming the first time you see it but is completely safe and does not affect flavor. It’s more common with younger garlic or garlic that has been stored for a while before pickling.
Sourcing and Peeling Garlic: The Practical Foundation
Two cups of peeled garlic cloves sounds simple until you’re standing at the counter staring down a pile of bulbs. Here’s everything you need to know about sourcing and preparing your garlic efficiently.
What to Buy
Whole heads of garlic are the best option. Fresh garlic that you peel yourself is firmer, more aromatic, and more flavorful than pre-peeled cloves from a bag, and it will produce a crunchier, better-tasting pickled result. Look for heads that are firm and tightly packed, with dry papery skin and no soft spots or green sprouting.
Pre-peeled garlic (sold in bags or jars at most grocery stores) is a legitimate shortcut if time is short. The quality is slightly lower — pre-peeled garlic is often older and has less moisture and aroma than freshly peeled — but it still produces an excellent pickled garlic. If you use pre-peeled, make sure the cloves are firm and white, not yellowing or soft.
Elephant garlic is technically a leek relative rather than true garlic, and its flavor is significantly milder. It won’t produce the same bold, garlicky punch that this recipe is built around. Stick with regular garlic.
How to Peel Garlic Quickly
Peeling two cups of garlic by hand, clove by clove, takes a long time and leaves your fingers smelling intensely garlicky for hours. These methods are faster:
The shake method: Separate the cloves from the head and place them in a large metal bowl. Place a second bowl on top, creating a sealed dome. Shake vigorously for 30 seconds. The friction between the cloves and the metal loosens and removes most of the papery skin. Works especially well with large, firm cloves.
The blanch method: Drop the cloves into boiling water for 30 seconds, then transfer to ice water. The skins slip off effortlessly with a gentle squeeze. This method slightly softens the outer layer of the clove, which can reduce the final crunch minimally — for most people, the tradeoff in convenience is worth it.
The microwave method: Microwave the separated (but unpeeled) cloves for 10 to 15 seconds. The steam created inside the skins loosens them. Let cool for a minute, then squeeze each clove out of its skin. Quick and effective.
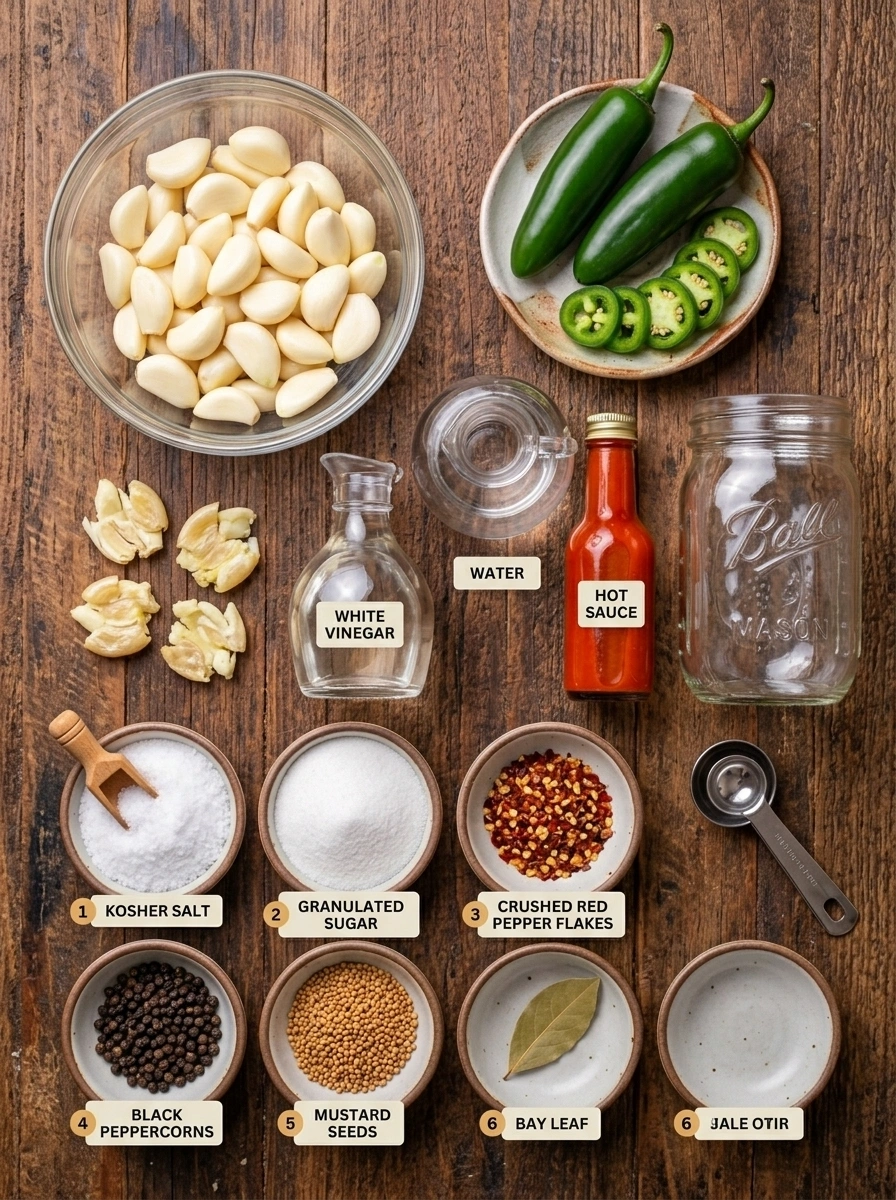
Ingredient Breakdown: Building the Perfect Brine
White Vinegar (1 cup)
The backbone of the brine. White vinegar’s clean, sharp acidity is exactly right for pickling garlic — it penetrates the dense cloves efficiently and delivers a bright, pure tang that lets the garlic’s own transformed flavor come through clearly. Its neutral color keeps the brine transparent, which shows off the cloves beautifully in the jar.
Water (1 cup)
The diluting agent that brings the brine to a balanced level of acidity. A 1:1 ratio of vinegar to water is the standard for quick refrigerator pickles — acidic enough to preserve and transform, approachable enough to eat the pickled result comfortably.
Pickling Salt or Kosher Salt (1 tbsp)
Seasons the brine and drives flavor into the garlic through osmosis. Pickling salt — also called canning salt — is the best choice: pure, fine-grained, and free of the anti-caking agents and iodine found in table salt that can make brine cloudy and affect flavor.
Sugar (1 tbsp)
A single tablespoon rounds the sharp edges of the vinegar and the heat without making the pickled garlic noticeably sweet. In a spicy pickled brine, sugar plays the same role it plays in a good hot sauce — you don’t taste sweetness, you taste a more balanced and complete version of everything else.
Hot Sauce (2 tbsp)
The ingredient that most distinguishes this recipe from plain pickled garlic. Hot sauce infuses the brine with a fermented pepper heat that’s fundamentally different from fresh or dried peppers — more complex, more pervasive, and distributed completely evenly throughout every drop of liquid. The vinegar base of most hot sauces also reinforces the brine’s acidity, making the pickled result tangier and more vibrant. Choose your hot sauce based on your heat preferences: a Louisiana-style sauce for bright, tangy heat; a habanero sauce for serious fire and fruity depth; sriracha for garlicky sweetness.
Jalapeños (2, thinly sliced)
Fresh jalapeños contribute heat with a bright, green-pepper character that’s distinct from the dried chili heat of the red pepper flakes. Sliced thin, they infuse the brine quickly and settle around the garlic cloves, ensuring that every clove is surrounded by fresh pepper flavor throughout the pickling period. Leave the seeds and membranes intact for maximum heat, or remove them for the flavor without as much fire.
Extra Garlic Cloves (4, smashed — optional)
Adding smashed garlic cloves to the brine on top of the cloves you’re pickling amplifies the garlic flavor in the brine itself. Smashing breaks the cell walls more completely than slicing, releasing allicin and aromatic compounds quickly and intensely. These smashed cloves infuse the brine during the cooking step and continue to deepen its garlicky character during the pickling period. Optional, but worth including if you want the most garlic-forward result possible.
Crushed Red Pepper Flakes (1 tsp)
A second heat source that operates differently from the fresh jalapeños. Dried and crushed, red pepper flakes release their capsaicin into the oil-free brine slowly over time, building a sustained warmth that complements the fresh pepper heat without duplicating it. They also look beautiful suspended in the clear brine.
Black Peppercorns (1 tsp)
Aromatic warmth and complexity without direct capsaicin heat. Whole peppercorns release their flavor gradually during the pickling period and add a classic, familiar spiced depth that makes the overall brine more complete and interesting.
Mustard Seeds (1 tsp)
The classic pickling spice that appears in most serious pickle recipes for good reason. They add a mild, earthy, slightly bitter note and a pop of texture. After a week in the brine, mustard seeds become tender enough to bite and release a small burst of warm, savory flavor — one of the unexpected small pleasures of eating this pickled garlic.
Bay Leaf (1)
Quietly essential. A single bay leaf contributes a faintly herbal, almost floral background note that rounds the brine and makes it taste whole rather than assembled. You won’t identify it, but you’d miss it.
How to Make Spicy Pickled Garlic: Step-by-Step
Step 1: Peel and Pack
Peel two cups of garlic cloves using your preferred method. Inspect each clove and discard any that are soft, bruised, or have sprouted green centers — these will pickle unevenly and may turn mushy.
Pack the cloves tightly into a clean, dry quart-sized glass jar. Add the sliced jalapeños, tucking them throughout the garlic so they’re distributed evenly. If using the optional smashed garlic cloves, add them now as well.
Packing tip: Wide-mouth jars make this significantly easier — standard-mouth jars require more patience to pack tightly. A wide-mouth pint jar works perfectly for this recipe if you don’t have a quart jar.
Step 2: Make the Brine
Combine the white vinegar, water, salt, sugar, hot sauce, crushed red pepper flakes, black peppercorns, mustard seeds, and bay leaf in a small saucepan. Heat over medium heat, stirring occasionally, until the salt and sugar are completely dissolved — 3 to 4 minutes. Don’t boil; a gentle simmer is sufficient.
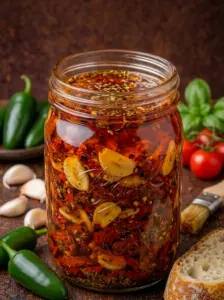
The brine will be slightly tinted from the hot sauce and red pepper flakes — a faint orange-red that becomes part of the jar’s visual appeal.
Step 3: Pour the Brine
Carefully pour the hot brine over the packed garlic cloves. Make sure every clove is fully submerged. Garlic is denser than most pickling vegetables and won’t float — this actually makes it easier to keep submerged than cucumbers or other lighter vegetables. If any cloves sit above the brine line, press them gently down with a clean spoon.
Step 4: Cool, Seal, and Refrigerate
Let the jar cool uncovered at room temperature until it reaches a comfortable temperature to handle — about 30 to 45 minutes. Seal tightly and transfer to the refrigerator.
Step 5: The Patience Period
This is where most of the magic happens, and it requires the most discipline.
At 3 days: The garlic has begun to absorb the brine. The tang is there, the heat is present, and the cloves have started to mellow. Perfectly edible, but not yet their full selves.
At 7 days: Transformation complete. The cloves are deeply flavored all the way through, the harsh raw edge of the garlic is entirely gone, the heat has built and settled into a sustained warmth, and the brine has become something extraordinary in its own right — use it as you would hot sauce or pickle brine.
At 2 weeks and beyond: The garlic continues to mellow and the flavors continue to integrate. By three to four weeks the cloves are sweeter and more mellow still, with a depth of flavor that week-one garlic doesn’t have. The full one-month storage window is worth using.
Food Safety: What You Need to Know About Pickling Garlic
Garlic in oil is one of the highest-risk food safety scenarios in home cooking — raw garlic stored in oil at room temperature creates conditions that can support the growth of Clostridium botulinum, the bacterium responsible for botulism. This recipe, however, uses a vinegar brine rather than oil, which changes the situation significantly.
Acidic environments — those with a pH below 4.6 — prevent botulism toxin production. Vinegar brine, properly made, creates exactly that acidic environment. This is why traditional pickling in vinegar brine has been a safe preservation method for centuries. The 1:1 ratio of white vinegar to water in this recipe, combined with the salt, produces a brine well within the safe acidity range for refrigerator pickling.
That said, follow these guidelines consistently:
Always refrigerate. This recipe is developed for refrigerator storage only. Never store pickled garlic at room temperature, even in vinegar brine — the combination of refrigeration and acidity is what keeps this preparation safe.
Use within one month. The one-month refrigerator window is the safe window. Mark the jar with the date you made it.
Keep the garlic submerged. Cloves exposed above the brine line are not in the protective acidic environment. Keep everything covered.
Use clean utensils every time. Introducing bacteria from a dirty spoon can compromise the safety and shelf life of the pickled garlic. Always use clean, dry utensils when removing cloves from the jar.
Every Way to Use Spicy Pickled Garlic
Straight from the jar. The most common fate of a jar of pickled garlic. Cold, tangy, spicy, deeply garlicky — one leads to another leads to several more.
On charcuterie and antipasto boards. Scatter a generous handful across a board with cured meats, olives, cheeses, and crackers. They anchor the board’s flavor and disappear first.
In pasta. Roughly chop three or four pickled cloves and toss with hot pasta, good olive oil, parmesan, and black pepper. The mellow tang of the pickled garlic makes a lighter, brighter aglio e olio-style dish that you can eat any night of the week.
On pizza. Slice and scatter over pizza before or after baking. They melt into the cheese when baked or provide a punchy, tangy contrast when added fresh after the oven.
In sandwiches and wraps. Slice thinly and layer into Italian subs, grilled chicken wraps, banh mi, or any sandwich that benefits from a garlicky, tangy kick.
In salad dressings and marinades. Mince a clove or two and whisk into vinaigrettes, marinades for chicken or steak, or sauces. The pre-pickled garlic adds tang alongside its savory depth.
On grilled meats. Serve alongside grilled lamb chops, steak, chicken thighs, or pork — the acidity cuts through the richness of the meat and the garlic flavor bridges everything together.
In stir-fries and sautés. Use in place of fresh garlic when you want the garlic flavor without the sharp raw bite. Add at the end of cooking rather than the beginning, since it’s already been heat-treated.
The brine. Don’t discard the leftover brine when the garlic is gone. It’s a spicy, garlicky, tangy liquid that works as a hot sauce substitute, a salad dressing base, a marinade, or a Bloody Mary addition. Some people drink it straight. You’ll understand why after the first sip.
Variations to Try
Honey Heat: Add two tablespoons of honey to the brine for a sweet-heat variation where the garlic pickles in a balanced sweet-spicy-tangy brine. Incredible on pizza and charcuterie boards.
Herb Garden: Add two sprigs of fresh dill, a sprig of rosemary, and a few thyme branches to the jar before pouring the brine. The herbs infuse slowly and produce a more herbaceous, garden-fresh pickled garlic that works beautifully in salads and on cheese boards.
Turmeric Golden: Add half a teaspoon of ground turmeric to the brine. The garlic turns a stunning golden-yellow and gains an earthy, slightly bitter warmth from the turmeric. Visually spectacular in a jar.
Smoky Chipotle: Replace the jalapeños with two chipotles in adobo sauce, roughly chopped, and use a chipotle-based hot sauce. The result is deeply smoky, moderately spicy, and extraordinary alongside grilled meats.
Mild Version: Omit the jalapeños, reduce the red pepper flakes to ¼ teaspoon, and use a mild hot sauce. The garlic pickles in a tangy, gently spiced brine without real heat — more accessible and still deeply flavorful.
Frequently Asked Questions
Why did my garlic turn blue or green? Completely normal and completely safe. A reaction between sulfur compounds in the garlic and trace minerals in the water or vinegar causes this color change. It doesn’t affect the flavor or safety of the pickled garlic. Embrace it — some people find the color quite beautiful.
Can I use pre-minced garlic from a jar? Not recommended. Jarred minced garlic is too fine to pickle as individual pieces and will turn the brine cloudy and mushy. This recipe is specifically designed for whole peeled cloves.
Why is my pickled garlic still very sharp and pungent after three days? Three days is the minimum, not the target. The transformation takes time — particularly for something as dense as a whole garlic clove. Give it the full seven days before judging the result. The difference between day three and day seven is dramatic.
Can I add other vegetables to the jar? Absolutely. Sliced carrots, cauliflower florets, pearl onions, and cucumber rounds all pickle beautifully alongside garlic. Add them at the same time and use the same brine. The garlic may take longer to fully pickle than the other vegetables, but they’ll all be excellent.
Can I water-bath can this for shelf stability? With tested ratios and proper processing, garlic pickles can be water-bath canned for long-term pantry storage. However, the USDA notes that garlic is a low-acid vegetable that requires careful attention to safe canning guidelines. If you want to can this recipe, consult the National Center for Home Food Preservation for tested, safe processing times and ratios.
Recipe at a Glance
| Detail | Info |
|---|---|
| Prep Time | 15 minutes |
| Cook Time | 5 minutes |
| Total Time | 20 minutes (plus 3–7 days pickling) |
| Servings | 12 |
| Calories | ~20 per serving |
| Ready to eat | After 3 days (best at 7 days) |
| Storage | Up to 1 month refrigerated |
Final Thoughts
Spicy pickled garlic is one of those recipes that asks very little of you and gives back enormously. Twenty minutes of active work. A week of patience. A full month of the most addictive thing in your refrigerator.
Once you have a jar, you’ll find yourself reaching for it constantly — on pasta, on boards, on sandwiches, straight from the jar at midnight. The brine alone is worth making it for. The garlic is something you’ll want to keep in permanent supply.
Make a batch. Wait seven days. Try one clove.
Then try to stop at one.
Print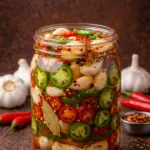
Spicy Pickled Garlic: Tangy, Garlicky, Fiery, and Ridiculously Addictive
- Total Time: 20 minutes (plus 3–7 days pickling)
Ingredients
White Vinegar (1 cup)
The backbone of the brine. White vinegar’s clean, sharp acidity is exactly right for pickling garlic — it penetrates the dense cloves efficiently and delivers a bright, pure tang that lets the garlic’s own transformed flavor come through clearly. Its neutral color keeps the brine transparent, which shows off the cloves beautifully in the jar.
Water (1 cup)
The diluting agent that brings the brine to a balanced level of acidity. A 1:1 ratio of vinegar to water is the standard for quick refrigerator pickles — acidic enough to preserve and transform, approachable enough to eat the pickled result comfortably.
Pickling Salt or Kosher Salt (1 tbsp)
Seasons the brine and drives flavor into the garlic through osmosis. Pickling salt — also called canning salt — is the best choice: pure, fine-grained, and free of the anti-caking agents and iodine found in table salt that can make brine cloudy and affect flavor.
Sugar (1 tbsp)
A single tablespoon rounds the sharp edges of the vinegar and the heat without making the pickled garlic noticeably sweet. In a spicy pickled brine, sugar plays the same role it plays in a good hot sauce — you don’t taste sweetness, you taste a more balanced and complete version of everything else.
Hot Sauce (2 tbsp)
The ingredient that most distinguishes this recipe from plain pickled garlic. Hot sauce infuses the brine with a fermented pepper heat that’s fundamentally different from fresh or dried peppers — more complex, more pervasive, and distributed completely evenly throughout every drop of liquid. The vinegar base of most hot sauces also reinforces the brine’s acidity, making the pickled result tangier and more vibrant. Choose your hot sauce based on your heat preferences: a Louisiana-style sauce for bright, tangy heat; a habanero sauce for serious fire and fruity depth; sriracha for garlicky sweetness.
Jalapeños (2, thinly sliced)
Fresh jalapeños contribute heat with a bright, green-pepper character that’s distinct from the dried chili heat of the red pepper flakes. Sliced thin, they infuse the brine quickly and settle around the garlic cloves, ensuring that every clove is surrounded by fresh pepper flavor throughout the pickling period. Leave the seeds and membranes intact for maximum heat, or remove them for the flavor without as much fire.
Extra Garlic Cloves (4, smashed — optional)
Adding smashed garlic cloves to the brine on top of the cloves you’re pickling amplifies the garlic flavor in the brine itself. Smashing breaks the cell walls more completely than slicing, releasing allicin and aromatic compounds quickly and intensely. These smashed cloves infuse the brine during the cooking step and continue to deepen its garlicky character during the pickling period. Optional, but worth including if you want the most garlic-forward result possible.
Crushed Red Pepper Flakes (1 tsp)
A second heat source that operates differently from the fresh jalapeños. Dried and crushed, red pepper flakes release their capsaicin into the oil-free brine slowly over time, building a sustained warmth that complements the fresh pepper heat without duplicating it. They also look beautiful suspended in the clear brine.
Black Peppercorns (1 tsp)
Aromatic warmth and complexity without direct capsaicin heat. Whole peppercorns release their flavor gradually during the pickling period and add a classic, familiar spiced depth that makes the overall brine more complete and interesting.
Mustard Seeds (1 tsp)
The classic pickling spice that appears in most serious pickle recipes for good reason. They add a mild, earthy, slightly bitter note and a pop of texture. After a week in the brine, mustard seeds become tender enough to bite and release a small burst of warm, savory flavor — one of the unexpected small pleasures of eating this pickled garlic.
Bay Leaf (1)
Quietly essential. A single bay leaf contributes a faintly herbal, almost floral background note that rounds the brine and makes it taste whole rather than assembled. You won’t identify it, but you’d miss it.
Instructions
Step 1: Peel and Pack
Peel two cups of garlic cloves using your preferred method. Inspect each clove and discard any that are soft, bruised, or have sprouted green centers — these will pickle unevenly and may turn mushy.
Pack the cloves tightly into a clean, dry quart-sized glass jar. Add the sliced jalapeños, tucking them throughout the garlic so they’re distributed evenly. If using the optional smashed garlic cloves, add them now as well.
Packing tip: Wide-mouth jars make this significantly easier — standard-mouth jars require more patience to pack tightly. A wide-mouth pint jar works perfectly for this recipe if you don’t have a quart jar.
Step 2: Make the Brine
Combine the white vinegar, water, salt, sugar, hot sauce, crushed red pepper flakes, black peppercorns, mustard seeds, and bay leaf in a small saucepan. Heat over medium heat, stirring occasionally, until the salt and sugar are completely dissolved — 3 to 4 minutes. Don’t boil; a gentle simmer is sufficient.
The brine will be slightly tinted from the hot sauce and red pepper flakes — a faint orange-red that becomes part of the jar’s visual appeal.
Step 3: Pour the Brine
Carefully pour the hot brine over the packed garlic cloves. Make sure every clove is fully submerged. Garlic is denser than most pickling vegetables and won’t float — this actually makes it easier to keep submerged than cucumbers or other lighter vegetables. If any cloves sit above the brine line, press them gently down with a clean spoon.
Step 4: Cool, Seal, and Refrigerate
Let the jar cool uncovered at room temperature until it reaches a comfortable temperature to handle — about 30 to 45 minutes. Seal tightly and transfer to the refrigerator.
Step 5: The Patience Period
This is where most of the magic happens, and it requires the most discipline.
At 3 days: The garlic has begun to absorb the brine. The tang is there, the heat is present, and the cloves have started to mellow. Perfectly edible, but not yet their full selves.
At 7 days: Transformation complete. The cloves are deeply flavored all the way through, the harsh raw edge of the garlic is entirely gone, the heat has built and settled into a sustained warmth, and the brine has become something extraordinary in its own right — use it as you would hot sauce or pickle brine.
At 2 weeks and beyond: The garlic continues to mellow and the flavors continue to integrate. By three to four weeks the cloves are sweeter and more mellow still, with a depth of flavor that week-one garlic doesn’t have. The full one-month storage window is worth using.
- Prep Time: 15 minutes
- Cook Time: 5 minutes
Nutrition
- Serving Size: 12
- Calories: 20 per serving