Dragon Breath Pickled Eggs: Fiery, Tangy, Garlicky, and Hopelessly Addictive
There are pickled eggs, and then there are Dragon Breath Pickled Eggs. Standard pickled eggs are mild, vinegary, vaguely nostalgic — the kind of thing you find sitting in a jar on a bar counter, more curiosity than conviction. Dragon Breath Pickled Eggs are something else entirely. Fiery from four layers of heat. Tangy from a punchy vinegar brine spiked with hot sauce. Deeply savory from five smashed garlic cloves. Kissed with smokiness from smoked paprika and dried red chilies. One bite in and you’ll understand the name completely.
These are the pickled eggs you make when you’re done being polite about it. The ones people reach for at a party and immediately start asking where you got them. The ones you eat cold from the jar late at night, standing in front of the open refrigerator, telling yourself you’ll only have one more. They’re bold, complex, wildly satisfying — and they take just 20 minutes of active work to make.
This guide covers everything: what makes pickled eggs work, why the wait is worth it, a full breakdown of every ingredient and its role, step-by-step instructions, tips for perfect eggs every time, and every creative way to use them once they’ve had their time in the brine.
The Pickled Egg: A Brief and Underrated History
Pickled eggs have a longer history than most people realize. Long before refrigeration, preserving hard-boiled eggs in brine or vinegar was a practical way to extend the life of a highly perishable protein. Farmers, tavern keepers, and rural households across Europe and North America relied on pickled eggs as a portable, shelf-stable, high-protein food that could sustain people through long work days and lean seasons.
In the United States, pickled eggs became especially associated with bars and taverns — particularly in Pennsylvania Dutch country, where large jars of brine-soaked eggs sat on counters as a salty, high-protein accompaniment to beer. The Pennsylvania Dutch tradition, deeply influenced by German immigrant food culture, also produced spiced and beet-pickled egg varieties that are still beloved regional specialties today.
Dragon Breath Pickled Eggs honor that tradition while turning the heat dial all the way up. The base technique is classic — hard-boiled eggs, vinegar brine, spices, time. The flavor profile is anything but traditional. Hot sauce in the brine, jalapeños, dried red chilies, smoked paprika, and a mountain of garlic create something that feels genuinely modern and unapologetically bold. Old technique, new fire.
Why Pickled Eggs Are Worth Making at Home
The Flavor Penetrates Completely
Unlike pickled vegetables, which are primarily flavored on their surface and just beneath the skin, pickled eggs absorb brine all the way to the yolk — but it takes time. This is why Dragon Breath Pickled Eggs need at least three days in the brine before eating, and why they’re genuinely spectacular at five to seven days. The longer they sit, the deeper the flavor penetrates and the more the egg white takes on the color, tang, and heat of the brine.
They’re Incredibly High in Protein
Each Dragon Breath egg delivers approximately 6 grams of protein at around 80 calories — making them one of the most protein-dense snacks imaginable. They’re naturally low in carbohydrates, contain healthy fats from the yolk, and are packed with vitamins and minerals including vitamin D, vitamin B12, choline, and selenium. For anyone eating low-carb, keto, or high-protein, pickled eggs are a near-perfect snack.
They Last Two Full Weeks
Make a batch on Sunday and you have a high-protein, ready-to-eat snack for the entire week and beyond. No reheating required. No meal prep beyond the initial 20 minutes. Just open the jar, pull out an egg, and eat. They get better as they sit, which means the last egg in the jar is even better than the first.
They’re Genuinely Impressive
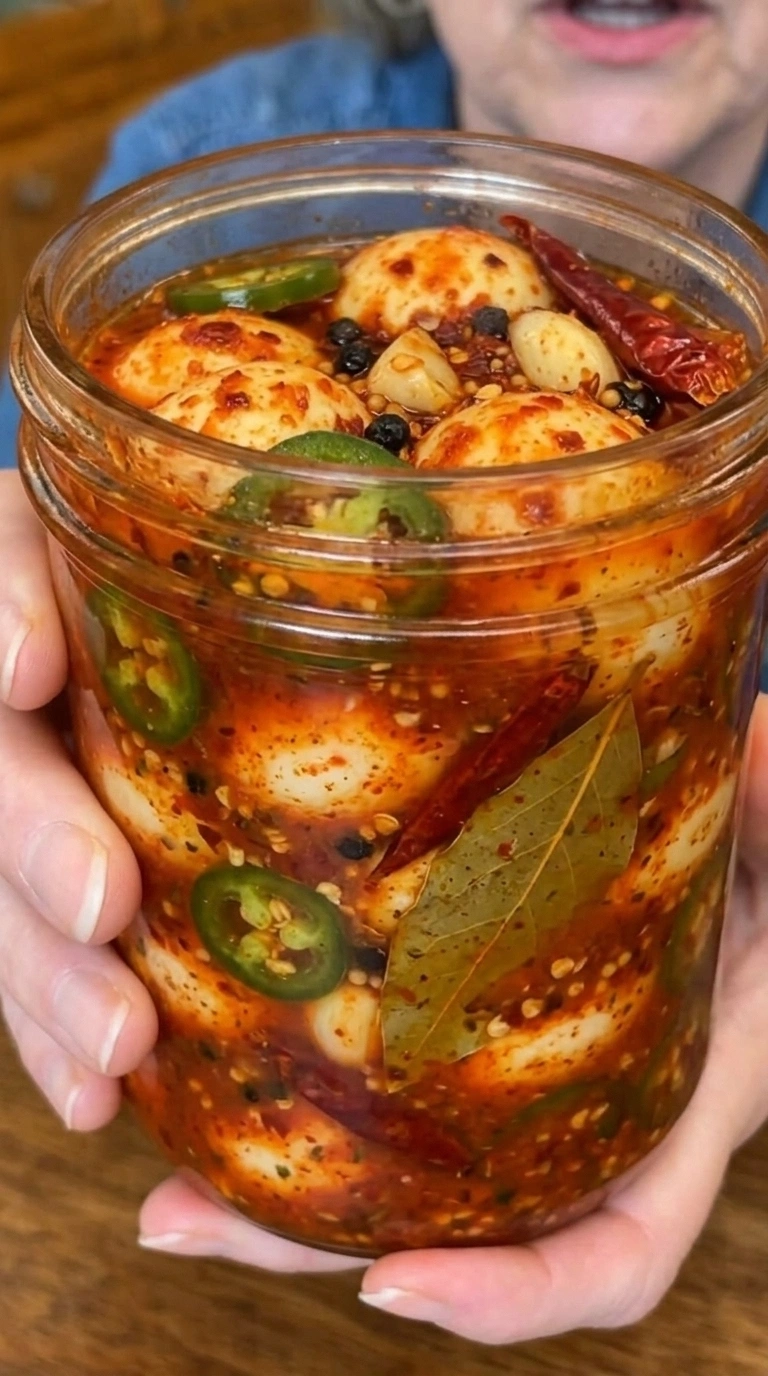
A jar of Dragon Breath Pickled Eggs on a counter, a bar cart, a snack table, or a charcuterie spread immediately draws attention. They look dramatic — deep orange-red from the brine, dramatic from the garlic and chilies visible through the glass. They taste even more dramatic than they look. People who have never tried a pickled egg are instantly converted.
Getting Your Hard-Boiled Eggs Right
The egg is the canvas for everything else in this recipe. A poorly cooked hard-boiled egg — overcooked with a greenish-gray ring around the yolk, or undercooked with a translucent white — will undermine the finished pickle no matter how good the brine is. Here’s how to cook them perfectly every time.
The Stovetop Method
Place the eggs in a single layer in a saucepan. Cover with cold water by at least an inch. Bring to a full boil over medium-high heat. Once the water reaches a rolling boil, remove the pan from the heat, cover with a lid, and let the eggs sit in the hot water for exactly 11 minutes for fully set yolks with no green ring.
Transfer immediately to a bowl of ice water and let cool for at least 15 minutes before peeling. The ice bath stops the cooking instantly and makes peeling significantly easier.
The Steam Method
Many experienced egg cooks swear by steaming for perfect results and easier peeling. Place a steamer basket over an inch of boiling water, add the eggs, cover, and steam for 13 minutes. Transfer to ice water as above. Steamed eggs peel more reliably than boiled ones, especially with very fresh eggs whose whites tend to stick stubbornly to the shell.
Tips for Easy Peeling
Fresh eggs are notoriously difficult to peel because their shells adhere tightly to the white. If you’re planning ahead, buy your eggs a week before you plan to hard-boil them — slightly older eggs peel dramatically more easily. Peeling under cold running water also helps, as the water gets under the membrane and releases the shell more smoothly. And always peel from the wide end, where the air pocket gives you an initial gap to work with.
Inspect Every Egg
Before packing your jar, inspect each peeled egg carefully. Any tears, gouges, or rough spots in the white should be noted — those areas will absorb brine much faster and more intensely than intact whites, which can create uneven flavor. This isn’t a dealbreaker, but it’s good to know which eggs to eat first.
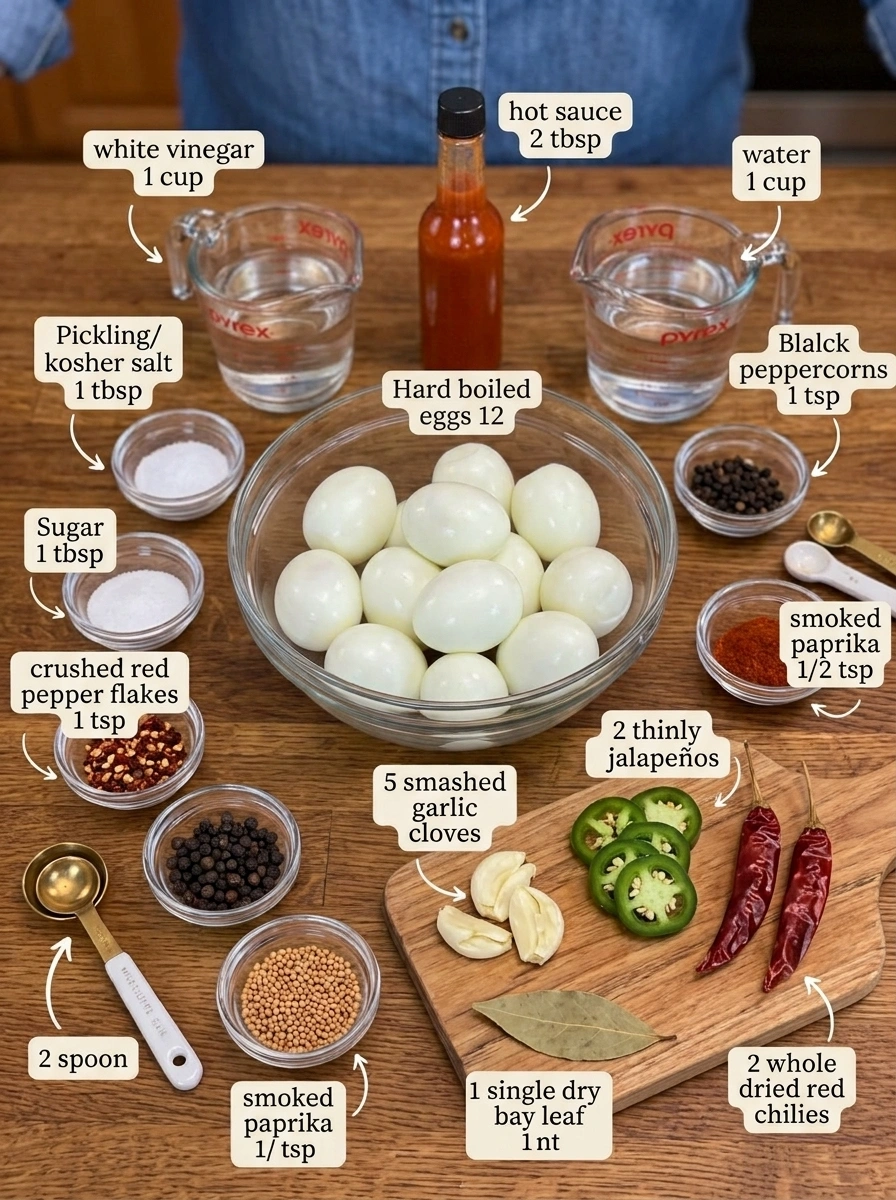
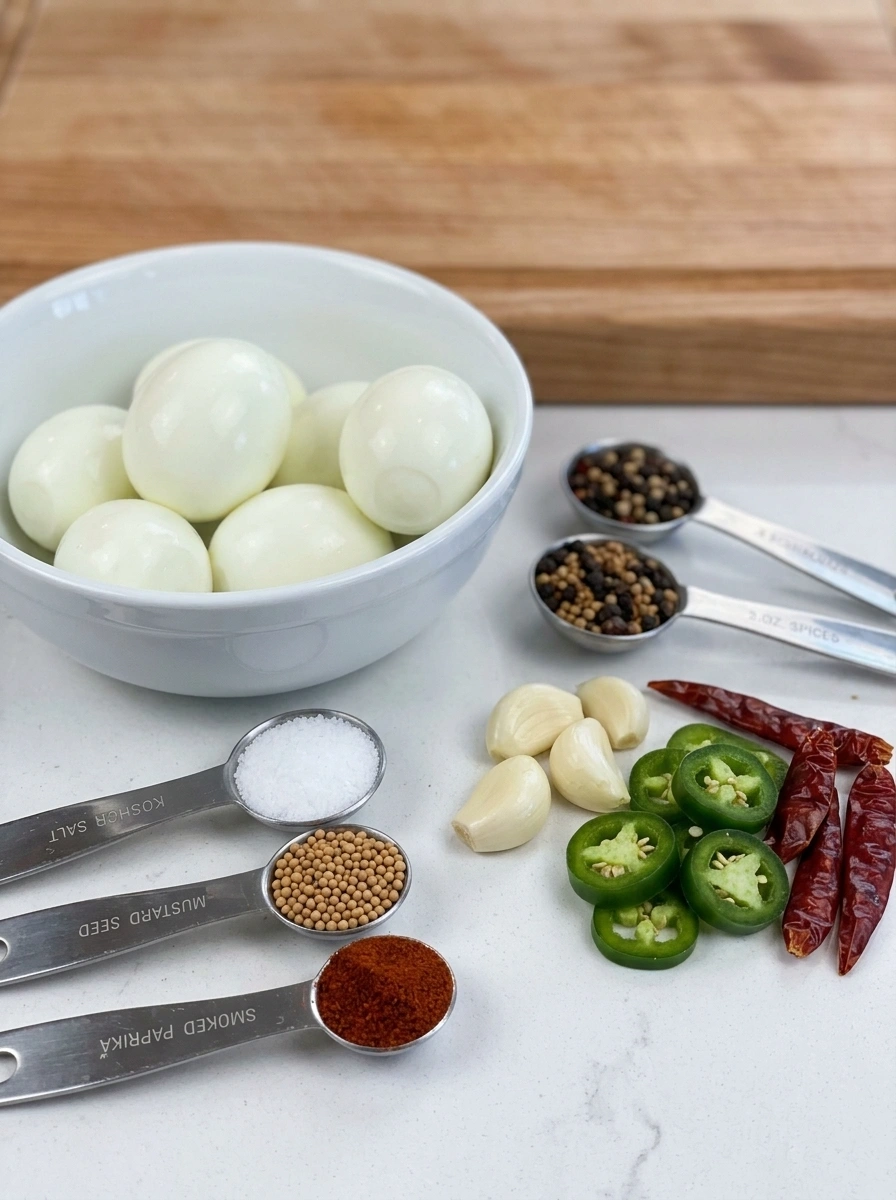
Ingredient Breakdown: Building the Dragon Breath Brine
White Vinegar (1 cup)
The acid backbone of the brine. White vinegar is the right choice here for its clean, neutral flavor that lets all the heat and spice elements come through without competition. It’s also colorless, which allows the beautiful orange-red of the smoked paprika and hot sauce to color the brine without muddiness. The eggs will take on this color over their days in the jar — a visual signal that the brine is doing its job.
Water (1 cup)
Dilutes the vinegar to an approachable level of acidity. A 1:1 ratio is the sweet spot — acidic enough to preserve and flavor the eggs over two weeks of refrigerator storage, mild enough to create a balanced brine that complements rather than overwhelms.
Hot Sauce (2 tbsp)
The secret ingredient that separates Dragon Breath Pickled Eggs from every other spicy pickled egg recipe. Hot sauce contributes three things simultaneously: vinegar-based acidity that reinforces the brine, fermented pepper flavor that’s more complex than fresh or dried peppers alone, and diffuse, all-over heat that infuses the brine evenly. Your choice of hot sauce shapes the character of the entire brine. A Louisiana-style sauce like Frank’s RedHot gives you tangy, straightforward heat. Tabasco adds intensity and funk. A habanero-based hot sauce takes the heat level significantly higher and adds fruity depth. Sriracha contributes garlic-forward sweetness. Don’t be afraid to go beyond two tablespoons if you want more fire.
Pickling Salt or Kosher Salt (1 tbsp)
Seasons the brine and helps drive flavor into the egg whites through osmosis. Use pickling salt or kosher salt exclusively — iodized table salt can discolor the brine and contribute an off flavor over the days the eggs sit.
Sugar (1 tbsp)
A single tablespoon is all it takes to balance the aggressive acidity and heat of this brine. You won’t taste sweetness in the finished egg — you’ll just notice that the heat and tang feel more rounded and complete than they would without it. Sugar in a spicy brine works the same way salt works in chocolate: it doesn’t make things sweet, it makes the other flavors more themselves.
Garlic (5 cloves, smashed)
Smashed rather than sliced or minced because smashing releases the garlic’s aromatic compounds more gradually and completely into the brine, producing a deeper, more pervasive garlic flavor over the long pickling time. Five cloves is a generous amount, and after five to seven days in the brine, every egg will taste deeply, savagely garlicky. This is a feature, not a bug.
Jalapeños (2, thinly sliced)
Fresh, bright, vegetal heat that penetrates the egg white over time. Jalapeños in a pickled egg brine behave differently than they do in a quick pickle — the long pickling time allows their heat and flavor to infuse more thoroughly. The result is eggs that have jalapeño flavor not just in the brine, but in the egg itself.
Dried Red Chilies (2–3)
Dried chilies contribute a different dimension of heat than fresh jalapeños — more concentrated, slightly smoky, with a deeper and more complex pepper flavor that develops slowly over the pickling period. They also look spectacular in the jar, whole and vivid against the orange-red brine.
Crushed Red Pepper Flakes (1 tsp)
The fourth layer of heat, adding a slow-building warmth that sustains the spice experience after the initial bite. Red pepper flakes are made from dried cayenne-type peppers and bring a dry, direct heat that’s distinct from the fresh or fermented pepper sources in the brine.
Black Peppercorns (1 tsp)
Aromatic and warming without the sharp heat of capsaicin-bearing peppers. Whole peppercorns release their flavor gradually over the pickling period and add a classic spiced complexity to the brine that ties everything together.
Mustard Seeds (1 tsp)
A pickling tradition staple that adds a gentle earthiness and a pop of texture. They look beautiful suspended in the brine, visible through the glass, and contribute a nuanced, savory depth that makes the brine taste more complete.
Smoked Paprika (½ tsp)
This is the ingredient that makes Dragon Breath Pickled Eggs taste unlike any other pickled egg you’ve had. Smoked paprika contributes a rich, wood-smoke flavor and a gorgeous deep red-orange color that the brine takes on completely. In combination with the dried chilies, it gives these eggs a campfire depth that makes the heat feel more complex and interesting than straight vinegar-and-pepper heat alone.
Bay Leaf (1)
Quiet and essential. A single bay leaf adds a faintly floral, herbal background note that rounds the brine and makes it taste whole. The kind of ingredient you don’t consciously register but would notice the absence of.
How to Make Dragon Breath Pickled Eggs: Step-by-Step
Step 1: Hard-Boil and Peel the Eggs
Cook your eggs using your preferred method, transfer to an ice bath, cool completely, and peel carefully. Pat dry with a paper towel before packing the jar — excess moisture on the surface of the eggs dilutes the brine immediately around them.
Step 2: Pack the Jar
Use a wide-mouth quart-sized jar — the wide opening makes packing and removing eggs significantly easier. Place the peeled eggs into the jar. Tuck the smashed garlic cloves, jalapeño slices, and dried red chilies in the spaces between the eggs. Make sure these aromatics are distributed throughout the jar rather than all sitting at the top or bottom — you want every egg surrounded by heat and flavor.
Visual tip: Position jalapeño slices and dried chilies along the visible side of the jar. Once the brine goes in and the jar sits in the fridge, it will look absolutely dramatic — vivid red, orange, and green against the jar.
Step 3: Make the Brine
Combine the white vinegar, water, hot sauce, salt, sugar, red pepper flakes, black peppercorns, mustard seeds, smoked paprika, and bay leaf in a saucepan over medium heat. Stir occasionally as the mixture heats. The brine will turn a deep orange-red almost immediately from the smoked paprika and hot sauce — this is exactly right. Heat until the salt and sugar dissolve completely, about 3 to 4 minutes. Don’t boil; a gentle simmer is all you need.
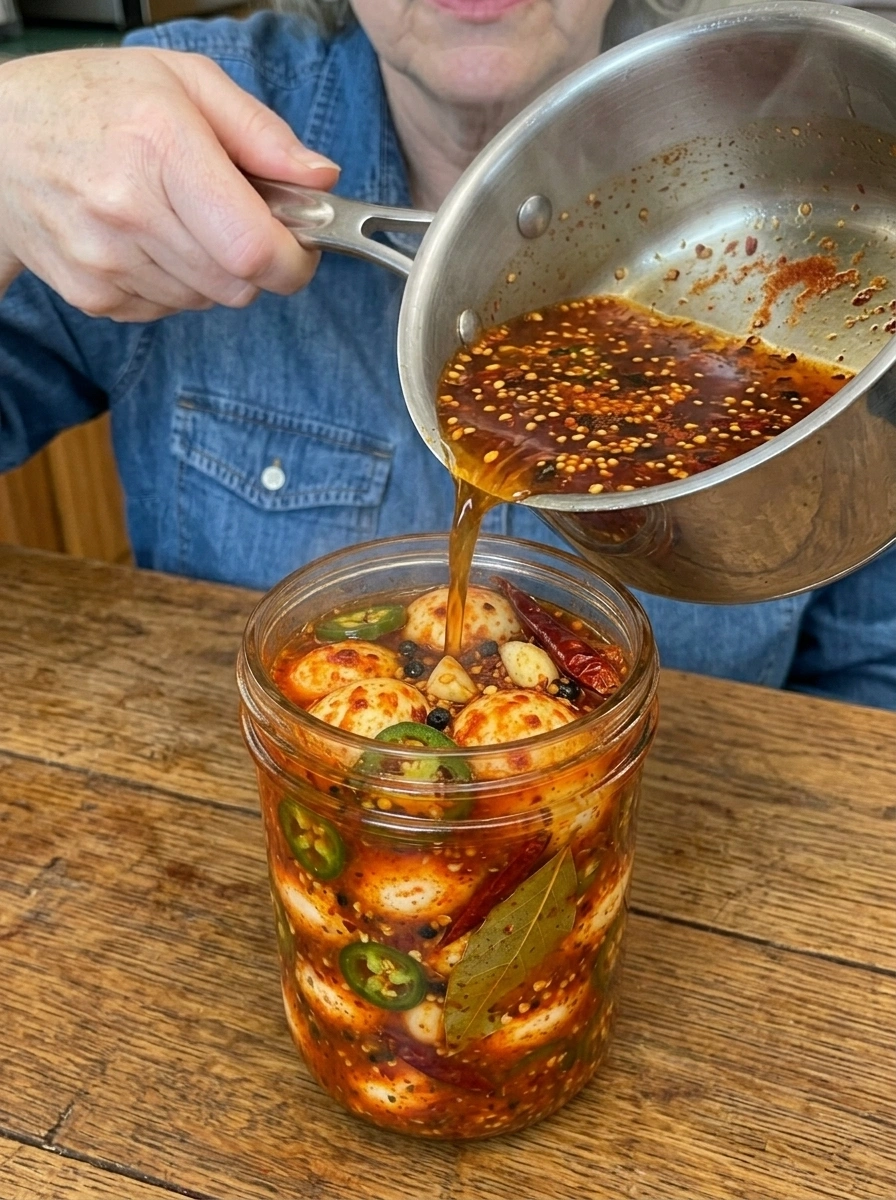
Step 4: Pour the Brine
Carefully pour the hot brine over the eggs until every egg is completely submerged. The brine will seep into every gap between the eggs and around the garlic and peppers. If any eggs float above the brine line, gently press them down or rearrange until everything is covered.
Step 5: Cool and Seal
Leave the jar uncovered on the counter until it cools to room temperature — about 45 minutes to an hour for a full jar of eggs and hot brine. Seal tightly.
Step 6: The Wait
Refrigerate and leave them alone. This is the hardest part.
After 3 days, the eggs are ready to eat — the white will have taken on noticeable flavor and a faint orange tinge. After 5 to 7 days, they are fully transformed: deeply flavored, visibly colored all the way through the white, fiery, tangy, and garlicky to the core. The yolk takes the longest to absorb brine flavor, so the longer you wait, the more complex every bite becomes.
How to Serve Dragon Breath Pickled Eggs
Straight from the jar, cold. The most honest way to eat them. Cold from the fridge, slightly firm, fiery and garlicky — the jar rarely makes it back to the shelf before a second egg disappears.
Halved on a spicy charcuterie board. Cut lengthwise and arrange on a board with cured meats, spicy pickles, hot honey, pepper jack cheese, and crackers. They look incredible and taste even better.
Deviled eggs with a kick. Remove the yolks, mix with hot sauce, a touch of mayo, Dijon mustard, and smoked paprika, then pipe back into the fire-red whites. The most dramatic deviled eggs you’ll ever serve.
Sliced over ramen or noodle bowls. Halve an egg and nestle it into a bowl of ramen, udon, or spicy noodles. The fiery yolk bleeds into the broth and the egg white adds a chewy, pickled contrast to the soft noodles.
On a breakfast plate. Slice alongside crispy bacon, toast, and avocado for a breakfast with genuine personality. The acid and heat wake you up more effectively than coffee.
In a Bloody Mary. Skewer a whole Dragon Breath egg on a cocktail pick and use it as a Bloody Mary garnish. The brine can be poured directly into the drink for extra fire. This is a guaranteed conversation starter at brunch.
Chopped into potato salad or egg salad. Dice the pickled eggs finely and fold into potato salad or egg salad in place of plain hard-boiled eggs. The result is a salad with depth, tang, and heat that plain eggs can never achieve.
With cold beer. The original pairing and still the best one. Cold, fiery pickled eggs with a cold, slightly bitter beer is a combination that has stood the test of time for very good reason.
Variations
Nuclear Option: Replace the jalapeños with habaneros, use a habanero hot sauce, and add an extra dried chili. For anyone who genuinely believes nothing is ever hot enough.
Smoky Chipotle: Add two chipotle peppers in adobo sauce to the brine and replace the smoked paprika with one teaspoon of it for an even deeper smoke character. These have a BBQ-adjacent quality that’s extraordinary.
Garlic Herb: Dial back the heat by removing the dried chilies and reducing the pepper flakes to ¼ teaspoon. Add a generous handful of fresh dill, a sprig of thyme, and increase the garlic to seven cloves. Deeply savory and herbaceous without the fire.
Beet Dragon Breath: Add one medium roasted beet, sliced, to the jar before pouring the brine. The beet turns the brine and the egg whites a deep, otherworldly magenta while adding an earthy sweetness that balances the heat beautifully.
Sweet Heat: Add two tablespoons of honey to the brine for a sweet-fire combination that makes the heat bloom differently — more of a slow burn with a honeyed finish.
Frequently Asked Questions
How long do pickled eggs take to be ready? A minimum of 3 days. Five to seven days produces a significantly better result — deeper color, more pervasive flavor and heat. Don’t rush it.
Can I reuse the brine for a second batch? The brine weakens after the first batch as the eggs absorb its flavor and dilute it with their own moisture. For best results, make fresh brine for each batch.
Why are my egg whites rubbery? Rubbery whites usually result from overcooked eggs. Use the method above — 11 minutes in hot water after boiling, then immediately into ice water — for tender whites every time.
Is it safe to leave pickled eggs at room temperature? No. Pickled eggs should be stored in the refrigerator at all times. Unlike commercially canned products, homemade pickled eggs are not processed for shelf stability and must be kept cold.
Can I use different sized eggs? Yes, but size affects pickling time. Large eggs (the standard) need 5 to 7 days for full flavor. Extra-large eggs may need an additional day. Medium or small eggs will be ready closer to the 3-day mark.
Do the eggs get hotter over time? Yes, noticeably. The capsaicin from the peppers and hot sauce continues to infuse the eggs throughout the two-week storage period. An egg eaten on day seven is hotter than one eaten on day three. An egg on day fourteen is hotter still.
Recipe at a Glance
| Detail | Info |
|---|---|
| Prep Time | 15 minutes |
| Cook Time | 5 minutes |
| Total Time | 20 minutes (plus 3–7 days pickling) |
| Servings | 12 eggs |
| Calories | ~80 per egg |
| Ready to eat | After 3 days (best at 5–7 days) |
| Storage | Up to 2 weeks refrigerated |
Final Thoughts
Dragon Breath Pickled Eggs are for people who take their snacks seriously. They’re fiery, tangy, garlicky, smoky, and utterly impossible to eat just one of. They take 20 minutes to make and reward patience with a depth of flavor that store-bought pickled eggs could never approach.
Make a jar. Wait seven days if you can. Pull one out cold from the fridge, take a bite, and feel the heat bloom from your lips to your ears.
Then make a note to double the recipe next time. Because this jar won’t last long.
Print
Dragon Breath Pickled Eggs
- Total Time: 20 minutes (plus 3–7 days pickling)
Ingredients
Ingredient Breakdown: Building the Dragon Breath Brine
White Vinegar (1 cup)
The acid backbone of the brine. White vinegar is the right choice here for its clean, neutral flavor that lets all the heat and spice elements come through without competition. It’s also colorless, which allows the beautiful orange-red of the smoked paprika and hot sauce to color the brine without muddiness. The eggs will take on this color over their days in the jar — a visual signal that the brine is doing its job.
Water (1 cup)
Dilutes the vinegar to an approachable level of acidity. A 1:1 ratio is the sweet spot — acidic enough to preserve and flavor the eggs over two weeks of refrigerator storage, mild enough to create a balanced brine that complements rather than overwhelms.
Hot Sauce (2 tbsp)
The secret ingredient that separates Dragon Breath Pickled Eggs from every other spicy pickled egg recipe. Hot sauce contributes three things simultaneously: vinegar-based acidity that reinforces the brine, fermented pepper flavor that’s more complex than fresh or dried peppers alone, and diffuse, all-over heat that infuses the brine evenly. Your choice of hot sauce shapes the character of the entire brine. A Louisiana-style sauce like Frank’s RedHot gives you tangy, straightforward heat. Tabasco adds intensity and funk. A habanero-based hot sauce takes the heat level significantly higher and adds fruity depth. Sriracha contributes garlic-forward sweetness. Don’t be afraid to go beyond two tablespoons if you want more fire.
Pickling Salt or Kosher Salt (1 tbsp)
Seasons the brine and helps drive flavor into the egg whites through osmosis. Use pickling salt or kosher salt exclusively — iodized table salt can discolor the brine and contribute an off flavor over the days the eggs sit.
Sugar (1 tbsp)
A single tablespoon is all it takes to balance the aggressive acidity and heat of this brine. You won’t taste sweetness in the finished egg — you’ll just notice that the heat and tang feel more rounded and complete than they would without it. Sugar in a spicy brine works the same way salt works in chocolate: it doesn’t make things sweet, it makes the other flavors more themselves.
Garlic (5 cloves, smashed)
Smashed rather than sliced or minced because smashing releases the garlic’s aromatic compounds more gradually and completely into the brine, producing a deeper, more pervasive garlic flavor over the long pickling time. Five cloves is a generous amount, and after five to seven days in the brine, every egg will taste deeply, savagely garlicky. This is a feature, not a bug.
Jalapeños (2, thinly sliced)
Fresh, bright, vegetal heat that penetrates the egg white over time. Jalapeños in a pickled egg brine behave differently than they do in a quick pickle — the long pickling time allows their heat and flavor to infuse more thoroughly. The result is eggs that have jalapeño flavor not just in the brine, but in the egg itself.
Dried Red Chilies (2–3)
Dried chilies contribute a different dimension of heat than fresh jalapeños — more concentrated, slightly smoky, with a deeper and more complex pepper flavor that develops slowly over the pickling period. They also look spectacular in the jar, whole and vivid against the orange-red brine.
Crushed Red Pepper Flakes (1 tsp)
The fourth layer of heat, adding a slow-building warmth that sustains the spice experience after the initial bite. Red pepper flakes are made from dried cayenne-type peppers and bring a dry, direct heat that’s distinct from the fresh or fermented pepper sources in the brine.
Black Peppercorns (1 tsp)
Aromatic and warming without the sharp heat of capsaicin-bearing peppers. Whole peppercorns release their flavor gradually over the pickling period and add a classic spiced complexity to the brine that ties everything together.
Mustard Seeds (1 tsp)
A pickling tradition staple that adds a gentle earthiness and a pop of texture. They look beautiful suspended in the brine, visible through the glass, and contribute a nuanced, savory depth that makes the brine taste more complete.
Smoked Paprika (½ tsp)
This is the ingredient that makes Dragon Breath Pickled Eggs taste unlike any other pickled egg you’ve had. Smoked paprika contributes a rich, wood-smoke flavor and a gorgeous deep red-orange color that the brine takes on completely. In combination with the dried chilies, it gives these eggs a campfire depth that makes the heat feel more complex and interesting than straight vinegar-and-pepper heat alone.
Bay Leaf (1)
Quiet and essential. A single bay leaf adds a faintly floral, herbal background note that rounds the brine and makes it taste whole. The kind of ingredient you don’t consciously register but would notice the absence of.
Instructions
How to Make Dragon Breath Pickled Eggs: Step-by-Step
Step 1: Hard-Boil and Peel the Eggs
Cook your eggs using your preferred method, transfer to an ice bath, cool completely, and peel carefully. Pat dry with a paper towel before packing the jar — excess moisture on the surface of the eggs dilutes the brine immediately around them.
Step 2: Pack the Jar
Use a wide-mouth quart-sized jar — the wide opening makes packing and removing eggs significantly easier. Place the peeled eggs into the jar. Tuck the smashed garlic cloves, jalapeño slices, and dried red chilies in the spaces between the eggs. Make sure these aromatics are distributed throughout the jar rather than all sitting at the top or bottom — you want every egg surrounded by heat and flavor.
Visual tip: Position jalapeño slices and dried chilies along the visible side of the jar. Once the brine goes in and the jar sits in the fridge, it will look absolutely dramatic — vivid red, orange, and green against the jar.
Step 3: Make the Brine
Combine the white vinegar, water, hot sauce, salt, sugar, red pepper flakes, black peppercorns, mustard seeds, smoked paprika, and bay leaf in a saucepan over medium heat. Stir occasionally as the mixture heats. The brine will turn a deep orange-red almost immediately from the smoked paprika and hot sauce — this is exactly right. Heat until the salt and sugar dissolve completely, about 3 to 4 minutes. Don’t boil; a gentle simmer is all you need.
Step 4: Pour the Brine
Carefully pour the hot brine over the eggs until every egg is completely submerged. The brine will seep into every gap between the eggs and around the garlic and peppers. If any eggs float above the brine line, gently press them down or rearrange until everything is covered.
Step 5: Cool and Seal
Leave the jar uncovered on the counter until it cools to room temperature — about 45 minutes to an hour for a full jar of eggs and hot brine. Seal tightly.
Step 6: The Wait
Refrigerate and leave them alone. This is the hardest part.
After 3 days, the eggs are ready to eat — the white will have taken on noticeable flavor and a faint orange tinge. After 5 to 7 days, they are fully transformed: deeply flavored, visibly colored all the way through the white, fiery, tangy, and garlicky to the core. The yolk takes the longest to absorb brine flavor, so the longer you wait, the more complex every bite becomes.
- Prep Time: 15 minutes
- Cook Time: 5 minutes
Nutrition
- Serving Size: 12 eggs
- Calories: 80 per egg