Sourdough Ciabatta: The Secret to a Crisp Crust and Airy, Open Crumb
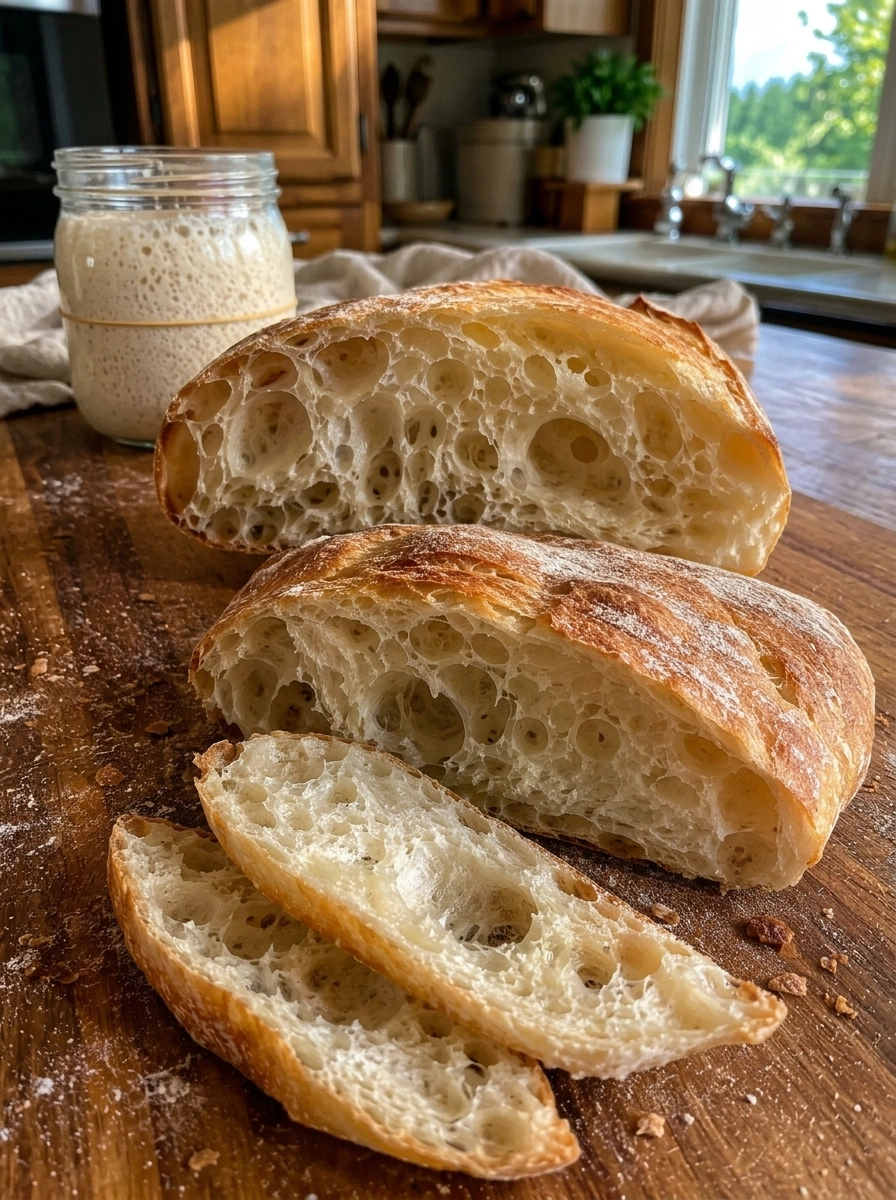
There’s nothing quite like pulling a fresh loaf of homemade ciabatta out of the oven, hearing that unmistakable crackle as the crust cools, and slicing into a crumb full of those big, irregular holes that only true ciabatta delivers. This Sourdough Ciabatta takes that classic Italian bread and infuses it with the deep, complex flavor of natural fermentation, resulting in a loaf that’s every bit as beautiful as it is delicious.
Made with an active sourdough starter and a notably high-hydration dough, this recipe embraces the wet, sticky nature of ciabatta rather than fighting against it. That extra hydration is exactly what creates the dramatic open crumb ciabatta is famous for, while the slow sourdough fermentation builds a tangy, nuanced flavor you simply can’t get from a same-day yeasted version.
This isn’t a beginner “dump and bake” recipe, but it’s far from intimidating either. With a little patience through the stretch-and-fold process and some attention to how the dough looks and feels rather than strictly following the clock, you’ll end up with bakery-quality ciabatta loaves that have a thin, crisp golden crust and a soft, chewy, wonderfully open interior. Let’s walk through exactly why this method works and how to nail it every time.
What Is Sourdough Ciabatta?
Ciabatta is a rustic Italian bread known for its irregular, elongated shape, thin and crackly crust, and dramatically open, holey crumb. The name “ciabatta” actually translates to “slipper” in Italian, referencing the bread’s flat, elongated shape. Traditional ciabatta is made with a very wet dough, which is essential to achieving that signature airy interior.
Sourdough ciabatta takes this classic bread and replaces commercial yeast with a naturally fermented sourdough starter. This substitution does more than just change the leavening method — it fundamentally transforms the flavor and texture of the finished loaf. The slower fermentation process encouraged by a sourdough starter develops more complex, tangy flavor notes and can also improve the bread’s digestibility and shelf life compared to conventionally yeasted versions.
Because the dough for ciabatta is intentionally wet and loose — much wetter than a typical sandwich bread or even most other artisan loaves — it requires a slightly different handling approach, relying on gentle folding techniques rather than traditional kneading to build strength and structure.
Why This Recipe Works
Understanding why each step in this recipe matters will help you achieve consistent, beautiful results every time you bake.
High hydration creates that signature open crumb. With 380 grams of water against 450 grams of flour, this dough sits at roughly 84% hydration — significantly wetter than most bread recipes. That extra water is what allows large, irregular air pockets to form throughout the crumb as the dough ferments and bakes.
An active starter builds real fermented flavor. Using a bubbly, active sourdough starter rather than commercial yeast means the dough ferments more slowly, giving wild yeast and lactic acid bacteria time to develop the deep, slightly tangy flavor that makes sourdough ciabatta so much more interesting than a standard version.
Stretch-and-folds build strength without deflating the dough. Because this dough is far too wet and sticky to knead by hand in the traditional sense, gentle stretch-and-folds or coil folds are used instead. This technique develops gluten structure gradually while preserving the gas bubbles that will become those signature holes.
Reading the dough matters more than the clock. Bulk fermentation times can vary significantly depending on starter strength, room temperature, and even the specific flour used. Watching for visual cues — expansion, jiggliness, and visible bubbles — ensures your dough is fermented properly regardless of how long it actually takes.
Gentle shaping preserves trapped gas. Unlike many other bread doughs that get punched down and reshaped firmly, ciabatta dough is handled as gently as possible during shaping specifically to preserve the air bubbles that create the open, irregular crumb.
High heat and steam create the perfect crust. Baking at a high temperature with steam for the first portion of baking allows the loaves to expand fully before the crust sets, then finishing without steam allows that crust to turn deeply golden and delightfully crisp.
Together, these techniques result in a loaf with all the hallmarks of exceptional ciabatta: a thin, crackly crust and a glossy, elastic, wide-open crumb.
Ingredients You’ll Need
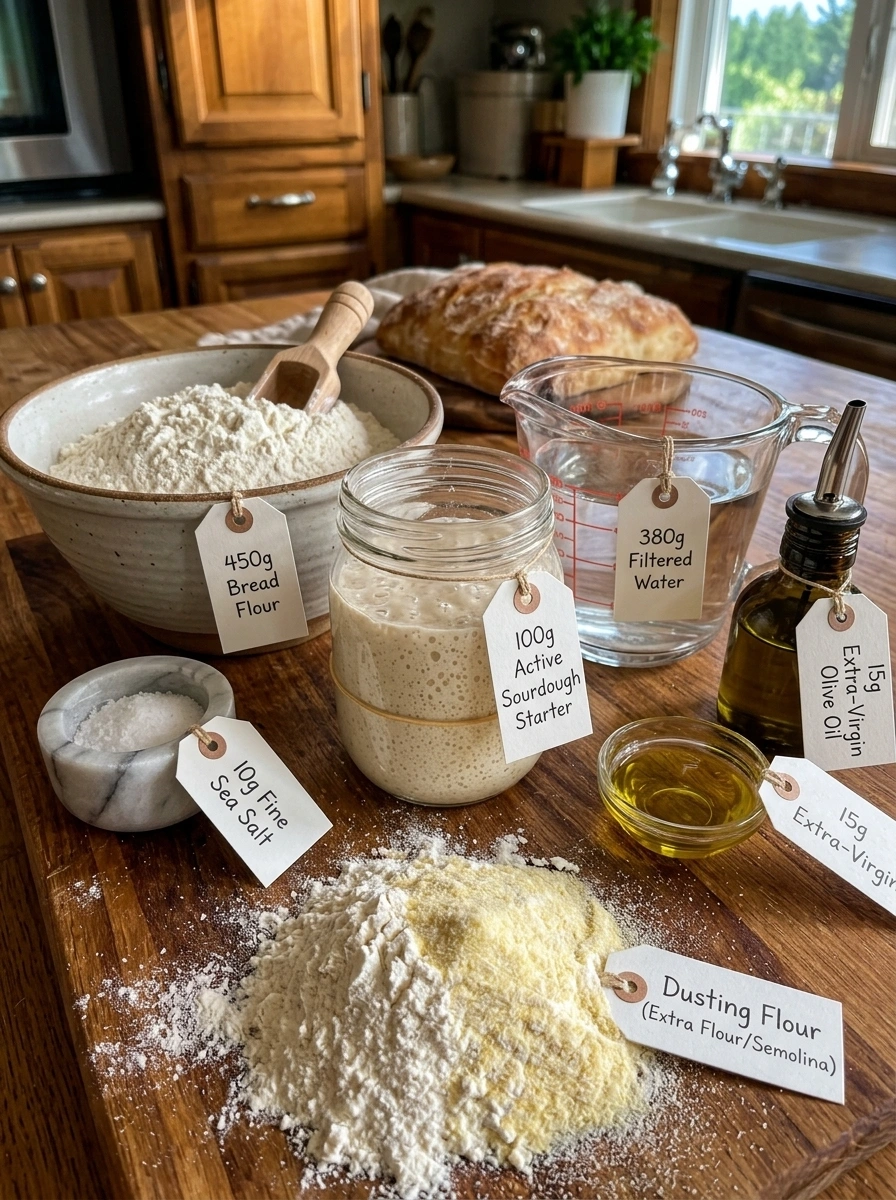
Here’s everything required to make this Sourdough Ciabatta, yielding 2–3 rectangular loaves.
- 100 g active sourdough starter
- 450 g bread flour
- 380 g filtered water
- 10 g fine sea salt
- 15 g extra-virgin olive oil
- Extra flour or semolina for dusting
A Closer Look at the Key Ingredients
Active sourdough starter is the foundation of this recipe’s flavor and rise. Your starter should be bubbly, active, and at or near its peak — ideally fed 4 to 8 hours before you plan to mix your dough, though timing will vary depending on your starter’s specific feeding schedule and your kitchen’s temperature.
Bread flour is preferred over all-purpose flour for this recipe because its higher protein content provides the gluten strength needed to support such a high-hydration dough without collapsing.
Filtered water is recommended because heavily chlorinated tap water can sometimes interfere with the activity of natural sourdough cultures. Room temperature water is generally ideal for this recipe.
Fine sea salt is dissolved into the reserved water before being added to the dough, ensuring it distributes evenly rather than sitting in undissolved pockets.
Extra-virgin olive oil adds a subtle richness and helps contribute to the ciabatta’s soft, tender crumb, while also being a traditional ingredient in many Italian ciabatta recipes.
Extra flour or semolina is used generously for dusting the work surface and the parchment or couche the loaves rest on, since this dough is extremely sticky and needs a well-floured surface to be handled successfully.
Step-by-Step Instructions
Follow these steps closely, but remember to let the visual cues guide your timing more than the clock.
1. Mix the Dough
Combine the active starter with 350 g of the water. Add the flour and mix until no dry flour remains. Cover and rest for about 30 minutes. This resting period, often called an autolyse, allows the flour to fully hydrate and begins gluten development before any additional mixing.
Dissolve the salt in the remaining 30 g water, add it to the dough with the olive oil, and gently work everything together until fully incorporated.
The dough should be very wet, sticky, and loose. Don’t add extra flour just because it feels wetter than ordinary bread dough — this high hydration is exactly what creates ciabatta’s signature texture.
2. Build Strength
During the first 2 hours of bulk fermentation, perform 3–4 sets of stretch-and-folds or coil folds about 30 minutes apart. With each fold, the dough should gradually become smoother, stronger, and more elastic, even though it will remain quite wet and sticky throughout.
3. Bulk Fermentation
Allow the dough to continue fermenting until it looks noticeably expanded, jiggly, and filled with bubbles. Look for bubbles along the sides and surface of the dough rather than relying only on the clock. Depending on starter strength and room temperature, this may take roughly 4–7 hours total.
4. Shape Gently
Generously flour the work surface and carefully turn out the dough. Do not punch it down, as this would release the air bubbles you’ve worked to build throughout fermentation.
Gently stretch it into a rough rectangle while preserving as much trapped gas as possible. Divide into 2–3 rectangular ciabatta loaves with a bench scraper.
Transfer them carefully onto well-floured parchment or a couche, handling the dough as little as possible to keep the gas bubbles intact.
5. Final Proof
Cover loosely and rest for approximately 45–90 minutes. The loaves should become slightly puffier and feel light and delicate to the touch.
6. Bake
Preheat the oven to 475°F (245°C) with a baking stone or steel inside if available, as this helps create a strong bottom crust and better overall oven spring.
Bake with steam for the first 10–12 minutes, then continue without steam until deeply golden and crisp, approximately 18–25 minutes total, depending on loaf size.
7. Cool & Slice
Cool completely on a wire rack before cutting. The best reveal should show a thin golden crust surrounding a glossy, elastic crumb with large and small irregular air pockets throughout.
Tips for the Best Sourdough Ciabatta
- Use a strong, active starter. A sluggish or under-fed starter will result in a slower rise and a denser final loaf, so make sure yours is bubbly and at peak activity before mixing.
- Resist the urge to add flour. This dough is meant to be extremely wet and sticky. Adding extra flour to make it easier to handle will result in a tighter, less open crumb.
- Use wet or floured hands during folding. Since this dough is so sticky, keeping your hands wet or well-floured during stretch-and-folds makes the process much more manageable.
- Trust visual cues over timing. Because sourdough fermentation is so temperature-dependent, the times given are estimates. Watch for the dough to look expanded, jiggly, and bubbly rather than fixating on the clock.
- Handle the dough as little as possible during shaping. Every bit of gentle handling during shaping helps preserve the air pockets that create ciabatta’s signature open crumb.
- Use steam for a better crust. Steam during the first portion of baking helps the crust stay flexible long enough for the loaves to fully expand before setting, resulting in better oven spring and a crisper final crust.
Flavor Variations
While classic Sourdough Ciabatta is a timeless favorite, here are a few ways to customize this recipe:
- Herb & Olive Oil Ciabatta: Fold in a tablespoon of chopped fresh rosemary or thyme along with the olive oil for an herby, aromatic loaf.
- Roasted Garlic Ciabatta: Gently fold in mashed roasted garlic cloves during shaping for a rich, savory variation.
- Kalamata Olive Ciabatta: Fold in chopped pitted kalamata olives during the final stretch-and-fold for a Mediterranean-inspired loaf.
- Whole Wheat Ciabatta: Substitute up to 20% of the bread flour with whole wheat flour for a slightly nuttier flavor and heartier texture, adjusting hydration slightly as needed.
- Sun-Dried Tomato Ciabatta: Fold in chopped, oil-packed sun-dried tomatoes for a burst of savory, tangy flavor throughout the loaf.
- Everything Bagel Ciabatta: Sprinkle everything bagel seasoning over the shaped loaves before the final proof for a flavorful, seeded crust.
Serving Suggestions
This Sourdough Ciabatta is wonderfully versatile and can be enjoyed in countless ways:
- Use for sandwiches, where its sturdy yet airy crumb holds up beautifully to hearty fillings without becoming soggy.
- Serve alongside olive oil and balsamic vinegar for simple, elegant dipping at the start of a meal.
- Toast and top with fresh tomatoes and basil for a quick and delicious bruschetta.
- Pair with soups and stews, using the crisp crust to soak up flavorful broths.
- Slice and grill for an easy, smoky addition to an antipasto or charcuterie spread.
- Make homemade croutons from any leftover ciabatta for a crunchy salad topping.
Storage Information
Proper storage helps preserve the crisp crust and soft interior that make this bread so special.
Room Temperature: Store the cooled ciabatta in a paper bag or loosely wrapped in a clean kitchen towel at room temperature for up to 2 days. Avoid airtight plastic bags, which can soften the crust.
Freezer: For longer storage, slice the cooled loaf and freeze in an airtight bag for up to 3 months. Thaw at room temperature or toast slices directly from frozen.
Refreshing the Crust: If the crust softens after a day or two, a few minutes in a hot oven can help restore some of its original crispness.
Signs to Discard: If you notice mold or an off smell, discard the loaf rather than risking spoilage.
Recipe Overview
Recipe Name: Sourdough Ciabatta Category: Baked Goods / Artisan Bread Yield: 2–3 rectangular loaves Prep Time: 30 minutes Fermentation Time: 4–7 hours Final Proof: 45–90 minutes Bake Time: 18–25 minutes Total Time: Approximately 6–9 hours, depending on fermentation Difficulty: Intermediate Storage: Room temperature up to 2 days, or freeze up to 3 months
Frequently Asked Questions
1. Why is my ciabatta dough so wet and sticky? This is completely normal and intentional. Ciabatta relies on a high-hydration dough to achieve its signature open, holey crumb, so resist the urge to add extra flour.
2. Can I use all-purpose flour instead of bread flour? Bread flour is recommended for its higher protein content, which provides the strength needed to support this wet dough. All-purpose flour can be used in a pinch, but the crumb structure may be slightly less open.
3. How do I know if my sourdough starter is active enough? An active starter should be bubbly, roughly doubled in size from its last feeding, and pass the float test, where a small spoonful floats when dropped in water.
4. Why does fermentation time vary so much? Fermentation speed depends heavily on starter strength, room temperature, and even the specific flour used, which is why this recipe emphasizes visual cues over strict timing.
5. What if I don’t have a baking stone or steel? A preheated baking sheet can be used as a substitute, though a stone or steel typically provides better heat retention and helps create a stronger crust.
6. How do I create steam in a home oven? Common methods include placing a pan of hot water in the oven during preheating, spritzing the oven walls with water just before baking, or using a covered baking vessel for part of the bake.
7. Can I make this dough by hand without a stand mixer? Yes, this recipe is designed to be made by hand using stretch-and-folds rather than traditional kneading, making it accessible even without a stand mixer.
8. Why didn’t my ciabatta get big holes in the crumb? This is usually the result of adding too much extra flour during handling, over-degassing the dough during shaping, or under-fermenting the dough before baking.
9. Can I retard the dough in the refrigerator overnight? Yes, after the stretch-and-fold stage, you can transfer the dough to the refrigerator to slow fermentation overnight, then let it come back to room temperature and finish bulk fermentation the next day for a more convenient schedule and deeper flavor.
Bake Your Best Loaf Yet
This Sourdough Ciabatta is a true celebration of what naturally fermented bread can be — crisp, golden, and full of character, with a crumb so open and airy it practically glistens when you slice into it. While it takes a bit of patience and attention throughout the process, the reward is a loaf that rivals anything you’d find at a specialty bakery.
Save this recipe for your next weekend baking project, and don’t be afraid to experiment with the flavor variations once you’ve got the base technique down. Once you taste real, slow-fermented sourdough ciabatta fresh from your own oven, there’s no going back to store-bought.
Print
Sourdough Ciabatta
Ingredients
Here’s everything required to make this Sourdough Ciabatta, yielding 2–3 rectangular loaves.
- 100 g active sourdough starter
- 450 g bread flour
- 380 g filtered water
- 10 g fine sea salt
- 15 g extra-virgin olive oil
- Extra flour or semolina for dusting
Instructions
Follow these steps closely, but remember to let the visual cues guide your timing more than the clock.
Combine the active starter with 350 g of the water. Add the flour and mix until no dry flour remains. Cover and rest for about 30 minutes. This resting period, often called an autolyse, allows the flour to fully hydrate and begins gluten development before any additional mixing.
Dissolve the salt in the remaining 30 g water, add it to the dough with the olive oil, and gently work everything together until fully incorporated.
The dough should be very wet, sticky, and loose. Don’t add extra flour just because it feels wetter than ordinary bread dough — this high hydration is exactly what creates ciabatta’s signature texture.
During the first 2 hours of bulk fermentation, perform 3–4 sets of stretch-and-folds or coil folds about 30 minutes apart. With each fold, the dough should gradually become smoother, stronger, and more elastic, even though it will remain quite wet and sticky throughout.
Allow the dough to continue fermenting until it looks noticeably expanded, jiggly, and filled with bubbles. Look for bubbles along the sides and surface of the dough rather than relying only on the clock. Depending on starter strength and room temperature, this may take roughly 4–7 hours total.
Generously flour the work surface and carefully turn out the dough. Do not punch it down, as this would release the air bubbles you’ve worked to build throughout fermentation.
Gently stretch it into a rough rectangle while preserving as much trapped gas as possible. Divide into 2–3 rectangular ciabatta loaves with a bench scraper.
Transfer them carefully onto well-floured parchment or a couche, handling the dough as little as possible to keep the gas bubbles intact.
Cover loosely and rest for approximately 45–90 minutes. The loaves should become slightly puffier and feel light and delicate to the touch.
Preheat the oven to 475°F (245°C) with a baking stone or steel inside if available, as this helps create a strong bottom crust and better overall oven spring.
Bake with steam for the first 10–12 minutes, then continue without steam until deeply golden and crisp, approximately 18–25 minutes total, depending on loaf size.
Cool completely on a wire rack before cutting. The best reveal should show a thin golden crust surrounding a glossy, elastic crumb with large and small irregular air pockets throughout.