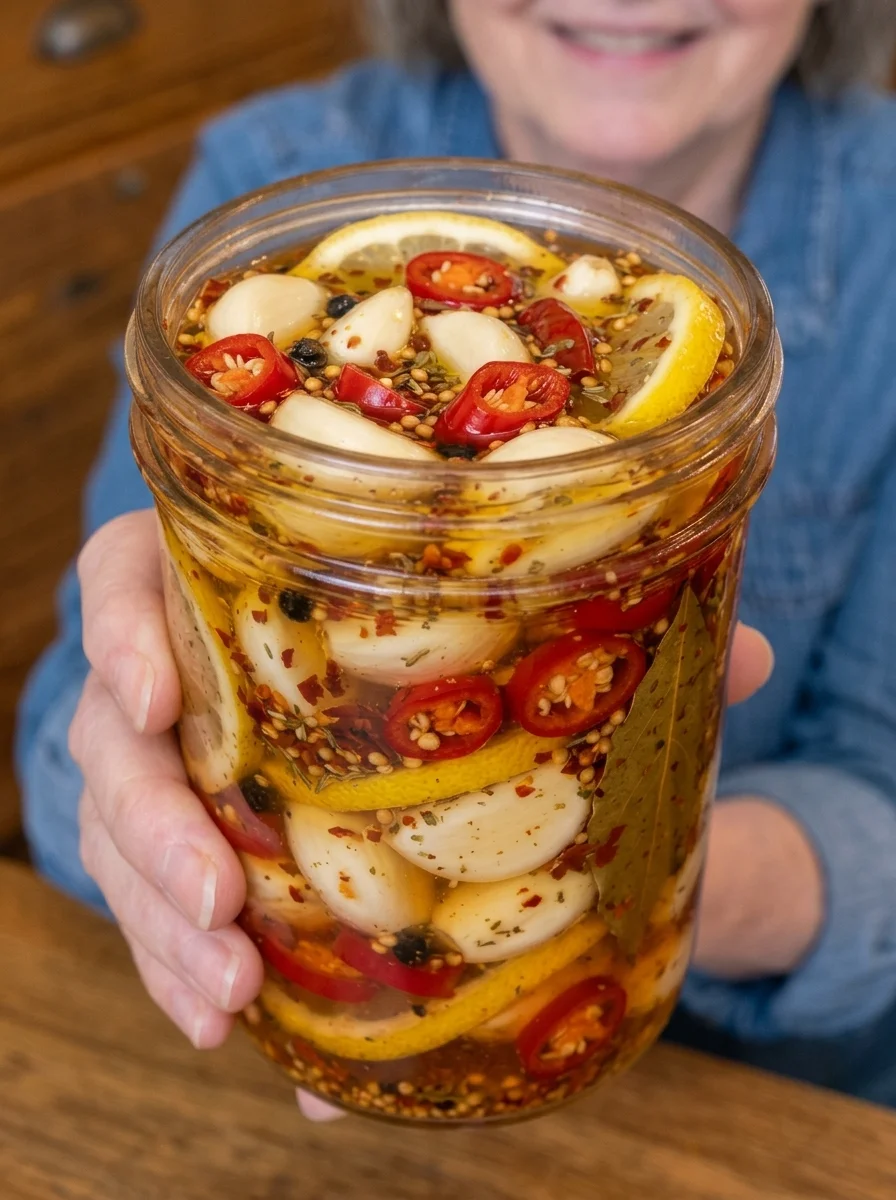
Lemon Chili Pickled Garlic combines whole garlic cloves, fresh lemon, cider vinegar, and two kinds of chile in a bright, savory refrigerator condiment. A brief simmer softens the garlic slightly while keeping some bite, and a little honey rounds out the sharp brine. Lemon zest adds citrus aroma, while mustard seeds, peppercorns, oregano, and a bay leaf give the liquid a lightly spiced finish.
Serve a few cloves alongside grilled foods, chop them into a salad, or use them to add a tangy garlic note to a sandwich. The flavor is bold, so a small amount goes a long way. This is a short-term refrigerated recipe rather than a shelf-stable preserve.
Recipe and storage note: This supplied recipe has not been independently tested for acidity, flavor, or storage life. The original two-week refrigerated claim is not validated for this diluted vinegar-and-fresh-lemon mixture. This article omits oil from the storage container and uses a conservative maximum of 4 refrigerated days from preparation. That is a cautious handling limit, not proof that the brine has safely acidified the centers of the cloves. For longer storage, use a tested garlic preservation recipe or freeze promptly.
Why You’ll Enjoy This Condiment
- Lemon juice and zest provide both tartness and fresh citrus aroma.
- Red pepper flakes and sliced chile offer adjustable heat.
- Whole garlic cloves keep a distinct bite after a short simmer.
- The brine is seasoned with familiar pantry spices.
- Small portions can add a lot of flavor to simple meals.
Recipe at a Glance
- Prep time: About 10 minutes with already peeled garlic
- Cook time: About 10–15 minutes, including bringing the brine to a simmer
- Initial preparation: Approximately 20–25 minutes
- Flavor development: About 24 hours in the refrigerator
- Yield: 2 cups garlic cloves plus brine; final jar volume varies
- Servings: Approximately 8 portions of garlic
- Storage: Refrigerate promptly at 40°F or below and use within 4 days of preparation
Peeling whole heads of garlic may take longer than the listed preparation time. If you only need a few servings, halve the entire recipe rather than making a large jar you will not finish within the short storage period.
Ingredients
- 2 cups peeled garlic cloves
- 1/2 cup apple cider vinegar labeled 5% acidity
- 1/2 cup water
- 1/4 cup fresh lemon juice
- 1 teaspoon finely grated lemon zest
- 1 tablespoon honey
- 1 teaspoon kosher salt
- 1–2 teaspoons red pepper flakes
- 1 fresh red chile or Fresno pepper, thinly sliced
- 1/2 teaspoon black peppercorns
- 1/2 teaspoon mustard seeds
- 1/2 teaspoon dried oregano
- 1 small bay leaf
- Extra-virgin olive oil, optional, only for an individual portion immediately before serving
Ingredient Notes
Garlic
Choose firm, sound cloves without mold, soft spots, or damaged areas. Peel completely and trim the tough root ends. Keep the cloves whole for the intended texture, and try to use similarly sized cloves so they soften at a similar rate.
Large cloves may remain quite firm after 5–7 minutes, while small cloves soften faster. The short cooking step mellows some raw sharpness, but it does not make the garlic taste like slow-roasted garlic. Expect a strong garlic flavor, especially after only one day.
Prepeeled garlic is convenient if it has been stored according to the package directions and is still fresh. Preparing a new batch does not extend the usable life of an ingredient that is already old.
Apple Cider Vinegar
Use commercial vinegar labeled 5% acidity. Do not substitute homemade vinegar or a low-acidity drinking vinegar. Cider vinegar adds a fruity background, while distilled white vinegar would give a sharper, cleaner flavor.
The vinegar here is diluted with water and combined with fresh juice and low-acid vegetables. Its presence does not establish a tested preservation method. Oregon State’s guidance for garlic stored in undiluted vinegar should not be applied as a storage guarantee for this different mixture.
Lemon Juice and Zest
Fresh lemon juice contributes tang, but its acidity varies. The zest gives an aromatic lemon note without needing more liquid. Wash the lemon before zesting and take only the yellow outer layer, avoiding thick white pith.
Replacing fresh juice with bottled juice does not, by itself, turn this into a tested canning or long-storage recipe. Keep the same short-term refrigerator approach unless following a different, validated preservation formula.
Honey and Salt
Honey balances the sharp flavors; it is not being used as a preservative here. Stir until it dissolves into the warm brine. Sugar can change the flavor if substituted, but no sweetener adjustment should be treated as a way to extend storage.
Kosher salt crystals vary in size between brands, so the same teaspoon can taste more or less salty. The listed amount seasons the brine. Avoid adding more until you have tasted a cooled sample.
Chile and Pepper Flakes
Fresno peppers offer a fresh chile flavor and attractive red slices. Another fresh red chile can work, but heat varies widely. Begin with 1 teaspoon pepper flakes if you prefer a milder batch; you can add heat to individual servings later.
Remove some of the fresh pepper’s pale inner ribs and seeds for a gentler result. Handle hot peppers carefully, wash hands and tools afterward, and avoid touching your eyes.
Whole Spices and Oregano
Peppercorns and mustard seeds season the liquid gradually. Dried oregano adds an herbal note. The bay leaf can remain in the storage container for flavor but should be removed before serving; it is not intended to be eaten.
Whole spices can be unpleasant to bite into. Lift out the garlic with a fork or drain an individual portion through a small strainer if you prefer to avoid them.
Optional Olive Oil
Do not add olive oil to the storage jar. If you want its flavor, drizzle a little over a portion just before eating and do not return that portion to the batch. Oil is not needed for the brine and should not be presented as a preservation ingredient.
Oregon State Extension and the National Center for Home Food Preservation both advise a maximum four-day refrigerated period for nonacidified homemade garlic-in-oil mixtures. This lemon-vinegar simmer is not the tested acidification procedure described in their guidance.
Equipment and Container Choice
Use a small nonreactive saucepan, a clean heat-safe food container, a spoon, and a clean fork for serving. Stainless steel is a useful choice for the saucepan. Avoid reactive cookware that can affect the flavor of an acidic mixture.
Two cups of cloves plus brine may not fit a pint jar. Have a larger container or two smaller containers available rather than forcing everything into a crowded jar. Smaller containers also help the mixture cool more quickly.
Use containers suitable for hot food and avoid sudden temperature shocks to glass. A clean container does not make the recipe shelf-stable; refrigeration and limited storage still apply.
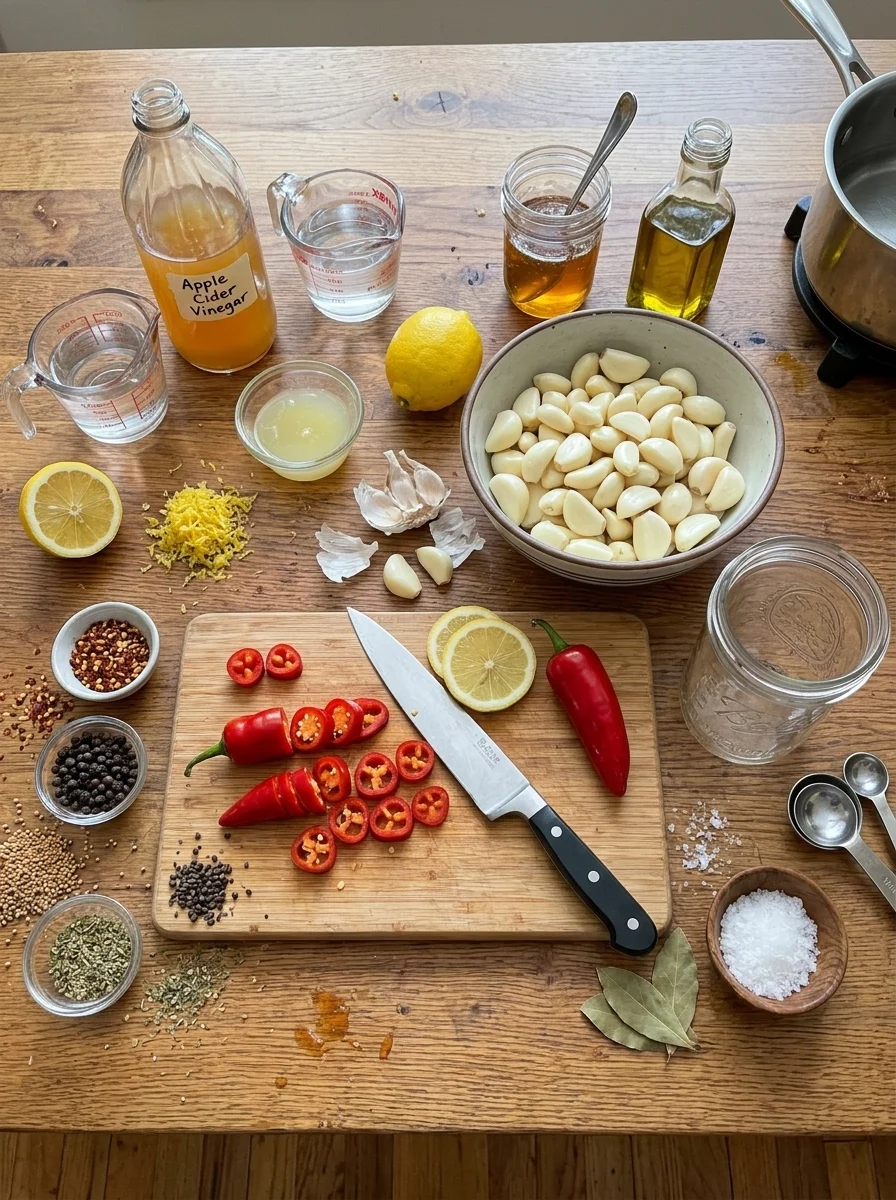
How to Make Lemon Chili Pickled Garlic
1. Prepare the Garlic and Chile
Peel the garlic, remove any damaged cloves, and trim tough root ends. Wash the fresh chile and slice thinly. Measure the spices before heating the brine so everything is ready to add.
If peeling takes longer than expected, that is normal. Do not rush with a knife or leave prepared ingredients sitting out unnecessarily while doing other tasks.
2. Combine the Brine
Add the vinegar, water, lemon juice, zest, honey, salt, red pepper flakes, peppercorns, mustard seeds, oregano, and bay leaf to the saucepan. Stir to combine.
Bring to a gentle simmer over medium heat, stirring until the honey and salt dissolve. Avoid boiling hard or reducing the liquid substantially; the recipe needs enough liquid to cover the cloves in storage.
3. Simmer the Garlic
Carefully add the cloves and sliced chile. Lower the heat and simmer gently for about 5–7 minutes, stirring occasionally, until the garlic softens slightly but retains some bite.
The timing is a texture guide, not a validated preservation process. A brief simmer does not establish shelf stability or prove uniform acidification throughout a whole clove.
4. Transfer to Containers
Spoon the garlic and chile into clean heat-safe containers and pour over the brine. Keep the cloves covered by the liquid. If the batch does not fit comfortably, divide it between two containers.
If there is not enough liquid, do not top up with plain water. Use a smaller or better-fitting container, or make a small additional portion of the same brine proportions. Do not assume that improvised changes create a longer storage life.
5. Cool Briefly and Refrigerate Promptly
Let active steaming subside briefly, then refrigerate in suitable small containers. Do not wait for the jar to become completely cold on the counter. Keep the refrigerator at 40°F or below and label the preparation date.
Do not add oil. Store the garlic covered by brine, using a clean utensil to reposition any cloves that float above the liquid.
6. Allow a Short Flavor Rest
After about 24 hours in the refrigerator, taste a small portion with a clean utensil. The lemon, chile, and garlic flavors will have begun to blend. The cloves may still have a strong garlic bite.
Keep the four-day limit counted from preparation, including the first day of flavor development. Waiting three days does not begin a fresh storage period afterward.
7. Serve Small Portions
Lift out a few cloves and chile slices, leaving the bay leaf and unwanted whole spices behind. Serve cold or chop into another dish. Add olive oil only to the portion you will eat immediately if desired.
Return the main container to the refrigerator promptly. Do not pour used serving liquid or uneaten portions back into the jar.
Flavor and Texture Expectations
These cloves are briefly simmered, so they will be firmer than roasted garlic but may be less crunchy than raw cloves. Their texture depends on size, freshness, and cooking time. Pickling does not guarantee that garlic becomes completely mild.
The brine tastes sharp and concentrated by itself. In a salad or grain bowl, a small amount spreads through other ingredients and becomes less dominant. Begin with a few chopped pieces rather than a large serving.
A short refrigerated rest develops flavor, but this recipe is not a fermentation project. Bubbling should not be encouraged or treated as a sign of success.
Serving Ideas
Chop a clove or two into a tomato and cucumber salad, add to a grain bowl, or tuck small pieces into a sandwich. The lemon-chile flavor also pairs with roasted vegetables, grilled chicken, fish, and bean salads.
For pasta, add a little chopped garlic to a prepared serving rather than pouring in a large amount of brine. Taste before adding more salt or lemon because the condiment supplies both. A little freshly chopped parsley can complement its herbal flavor.
Use a small spoonful of brine in a dressing only while the batch is within its short storage period and has been handled cleanly. Mix with oil immediately before serving, and do not regard the resulting dressing as a long-lasting infused oil.
On a snack board, offer a small dish with a serving fork and identify it clearly as strong garlic. Replenish from the refrigerator rather than leaving the entire batch out.
Flavor Variations
Milder Chile
Use the lower amount of pepper flakes and remove the fresh pepper’s inner ribs. The garlic remains assertive, so reducing chile heat does not make the entire condiment mild.
More Lemon Aroma
Add a little extra finely grated yellow zest to a serving rather than increasing the water or juice in the storage jar. Too much pith can make the flavor bitter.
Herbal Finish
Add a small amount of fresh parsley to an individual portion just before serving. Keep fresh herbs out of the stored batch if you are trying to keep the formula and storage instructions consistent.
Less Sweet
Reduce the honey for flavor if desired, keeping in mind that it is included to balance the acid rather than to preserve the mixture. Expect a sharper result. Do not lengthen storage based on the change.
Serving With Olive Oil
Drain a small portion, drizzle lightly with olive oil, and eat immediately. This gives the optional richer finish without adding an oil layer to the stored jar.
Storage and Handling
Keep refrigerated at 40°F or below from preparation onward. Use within 4 days of making this untested mixture as a conservative short-term approach, rather than relying on the original two-week claim. This is not a validated shelf-life determination.
Keep cloves covered with brine and use clean utensils. Do not store at room temperature or attempt to water-bath can this formula. The presence of lemon and vinegar, a hot fill, or a tightly sealed lid does not establish shelf stability.
For longer storage, promptly freeze small portions in freezer-safe containers with room for expansion, or choose a tested garlic preservation recipe. Freezing can change the texture, so thawed garlic may be better chopped into cooked dishes. Thaw in the refrigerator and use promptly; freezing is not a remedy for food that has already been stored improperly.
Discard a batch that has exceeded the handling limits or shows spoilage. Do not taste questionable food to determine whether it is safe. Harmful contamination cannot always be detected by appearance, taste, or smell.
Troubleshooting
The Garlic Is Still Very Strong
Whole cloves can retain a raw bite after a short simmer and one day of chilling. Use smaller portions or chop finely into another dish. Do not leave the jar for weeks hoping it will mellow beyond the recommended storage period.
The Brine Does Not Cover the Garlic
Use a narrower container or divide the batch into smaller ones. If necessary, prepare more brine in the same proportions. Do not dilute the existing liquid with plain water to reach the top.
The Garlic Is Softer Than Expected
Small cloves may have cooked faster than large ones. Use them chopped into dressings or prepared dishes if the batch has been safely handled. Next time, choose similarly sized cloves and check their texture earlier.
The Flavor Is Too Hot
Use less of the chile in individual servings and pair the garlic with a larger quantity of unseasoned food. For a future batch, reduce the pepper flakes and choose a milder fresh pepper. Avoid diluting the whole storage jar to fix heat.
The Flavor Is Too Sharp
Serve a small amount alongside richer or milder foods. A little oil on an individual serving can soften the impression of acidity. Do not add large amounts of water to the stored brine.
Frequently Asked Questions
Can I Keep It for Two Weeks?
That period has not been validated for this recipe. The mixture uses diluted vinegar, variable fresh lemon juice, whole garlic, and fresh chile. Use the short refrigerated approach described here or follow a tested recipe designed for longer storage.
Does Simmering Make It Safe to Can?
No. A brief simmer is not a tested canning process. Shelf-stable preservation requires a validated formula and processing instructions appropriate to the food and container.
Can I Add Olive Oil to the Jar?
The article’s adapted method leaves oil out of storage. Add it only to an individual serving just before eating. This brine is not a substitute for a tested garlic acidification procedure for oil infusion.
Can I Substitute Bottled Lemon Juice?
It can change the flavor and provide more consistent acidity than fresh juice, but it does not validate this overall formula or establish a longer shelf life. Do not use the substitution as a reason to can or extend storage.
How Much Does It Make?
The recipe begins with 2 cups garlic cloves and 1 1/4 cups liquid, plus seasonings and chile. The liquid fills spaces around the cloves, so final container volume is not simply the sum of those measurements. Have a larger jar or two smaller containers ready.
Is It Really 30 Calories per Quarter Cup?
That figure may understate a portion made mostly of garlic cloves. Garlic packing density, clove size, honey, and how much brine is consumed affect the total. For a dependable estimate, use the actual weight of the garlic and product labels, then divide by measured servings. No verified nutrition value is provided for this untested recipe.
Print
Lemon Chili Pickled Garlic
Description
Prep time: About 10 minutes with peeled cloves
Cook time: About 10–15 minutes, including heating the brine
Flavor rest: Approximately 24 hours refrigerated
Yield: 2 cups garlic cloves plus brine
Ingredients
- 2 cups peeled garlic cloves
- 1/2 cup apple cider vinegar labeled 5% acidity
- 1/2 cup water
- 1/4 cup fresh lemon juice
- 1 teaspoon lemon zest
- 1 tablespoon honey
- 1 teaspoon kosher salt
- 1–2 teaspoons red pepper flakes
- 1 fresh red chile or Fresno pepper, thinly sliced
- 1/2 teaspoon black peppercorns
- 1/2 teaspoon mustard seeds
- 1/2 teaspoon dried oregano
- 1 small bay leaf
- Olive oil, optional, only for immediate serving
Instructions
- Peel sound garlic cloves and trim root ends. Wash and slice the chile.
- Combine vinegar, water, lemon juice, zest, honey, salt, pepper flakes, peppercorns, mustard seeds, oregano, and bay leaf in a nonreactive saucepan.
- Bring to a gentle simmer, stirring to dissolve honey and salt. Add garlic and chile; simmer gently for 5–7 minutes, until slightly softened.
- Transfer to clean heat-safe containers and cover the cloves with brine. Divide into smaller containers if needed. Do not add oil to the jar.
- Cool briefly and refrigerate promptly at 40°F or below. Label with the preparation date.
- Allow about 24 hours for flavor development, then serve small portions with clean utensils. Add optional oil only to an individual serving immediately before eating.
Storage: Use within 4 days of preparation as a conservative limit for this untested mixture. The resting day counts toward that limit. This is not a tested acidification or shelf-stable canning recipe. Freeze promptly for longer storage or use a tested preservation recipe.