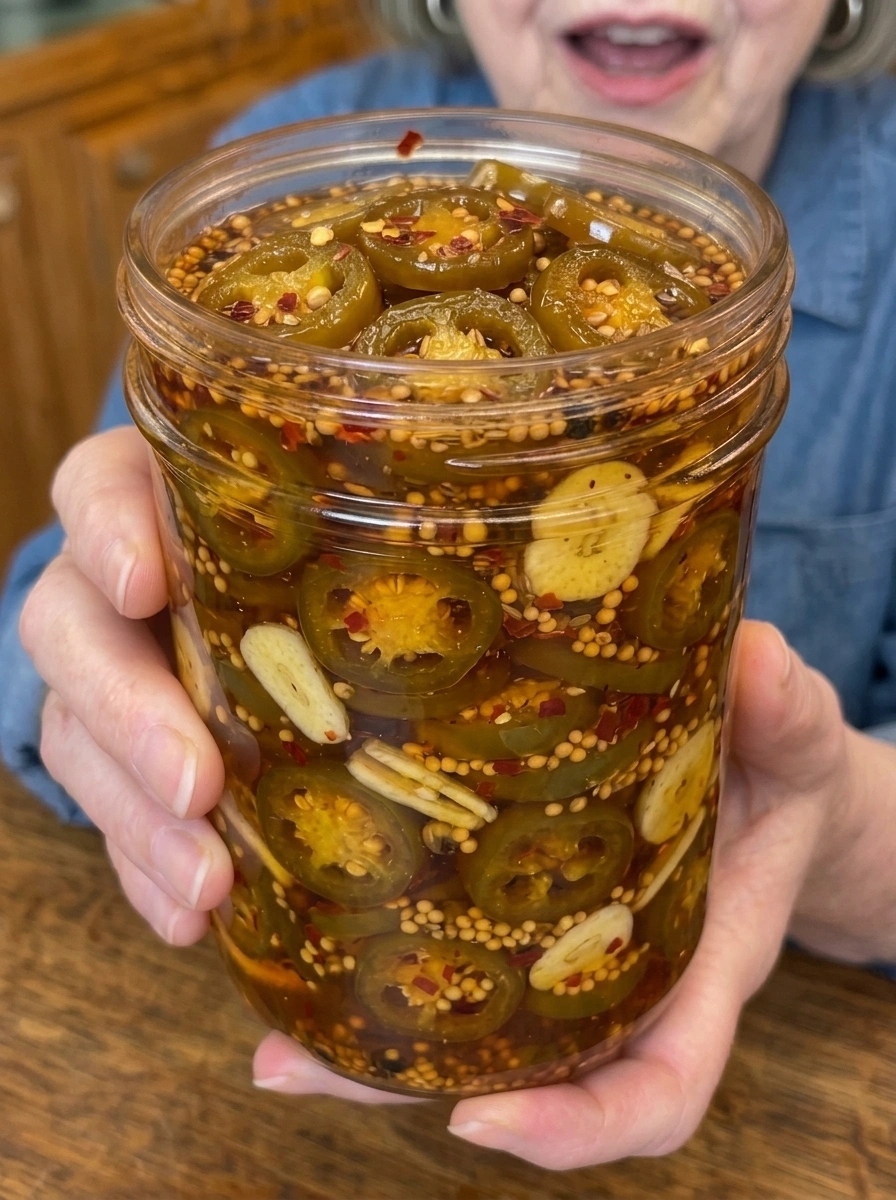
If you’ve never made your own candied jalapeños at home, prepare to fall in love. This Honey Garlic Candied Jalapeños recipe takes fresh, crisp jalapeño rounds and transforms them into glossy, syrup-coated rings that taste like a perfect collision of sweet honey, tangy vinegar, and warm garlic — with just enough heat to keep things interesting. Sometimes called “cowboy candy,” candied jalapeños have exploded in popularity because they do something few condiments can: they make everything better. Cream cheese and crackers become an instant party appetizer. A plain burger turns into a gourmet bite. Nachos, tacos, pizza, and charcuterie boards all get an upgrade with just a spoonful of these sticky, spicy rings.
What makes this particular version special is the honey garlic base. Instead of a straight sugar-vinegar syrup, this recipe layers in real honey and thin slices of garlic, along with mustard seed, celery seed, turmeric, and ginger — spices that give the syrup a warm, almost pickling-spice complexity. The result is a candied jalapeño that’s deeper and more aromatic than the basic versions, with a syrup so good you’ll want to save every last drop.
This recipe is beginner-friendly, doesn’t require a full canning setup, and comes together in about 30 minutes of active time (plus a little patience while the jars chill in the fridge). Whether you’re a jalapeño popper fanatic, a hot honey addict, or just someone who loves a good sweet-heat condiment, this recipe deserves a permanent spot in your refrigerator door.
Why You’ll Love This Honey Garlic Candied Jalapeños Recipe
There’s a reason candied jalapeños have become a pantry staple for so many home cooks, and this honey garlic version takes all of those reasons and turns them up a notch.
It’s the perfect balance of sweet and spicy. The sugar and honey mellow out the jalapeños’ natural heat just enough to make them approachable, while still leaving a lingering warmth that builds with every bite. If you like your food to have a little kick without being overwhelming, this is the recipe for you.
The garlic makes all the difference. Many candied jalapeño recipes stick to a basic sugar-vinegar brine. Adding thinly sliced garlic cloves directly into the simmering syrup infuses every ring — and the syrup itself — with a savory depth that plays beautifully against the sweetness of the honey.
It’s incredibly versatile. This isn’t a one-trick condiment. You can spoon it over a block of cream cheese for an effortless appetizer, layer it onto a burger or pulled pork sandwich, scatter it over nachos or tacos, or use the syrup alone as a glaze for grilled chicken or salmon. Few homemade condiments pull this much weight in the kitchen.
No canning equipment required. This is a refrigerator recipe, not a shelf-stable canning recipe, which means there’s no pressure canner, no water bath, and no special equipment beyond a saucepan and some clean glass jars. It’s approachable for anyone, even if you’ve never made a homemade condiment before.
It gets better with time. Unlike a lot of recipes that are best fresh, these candied jalapeños actually improve the longer they sit in the fridge. By day three to five, the flavors have fully melded, and the peppers have taken on that perfect sweet, spicy, garlicky balance.
The syrup is basically a bonus recipe. Don’t be surprised if you find yourself making a batch specifically for the leftover honey-garlic syrup. It’s that good drizzled over roasted vegetables, whisked into a vinaigrette, or brushed onto grilled meats.
Ingredient Breakdown: What You’ll Need
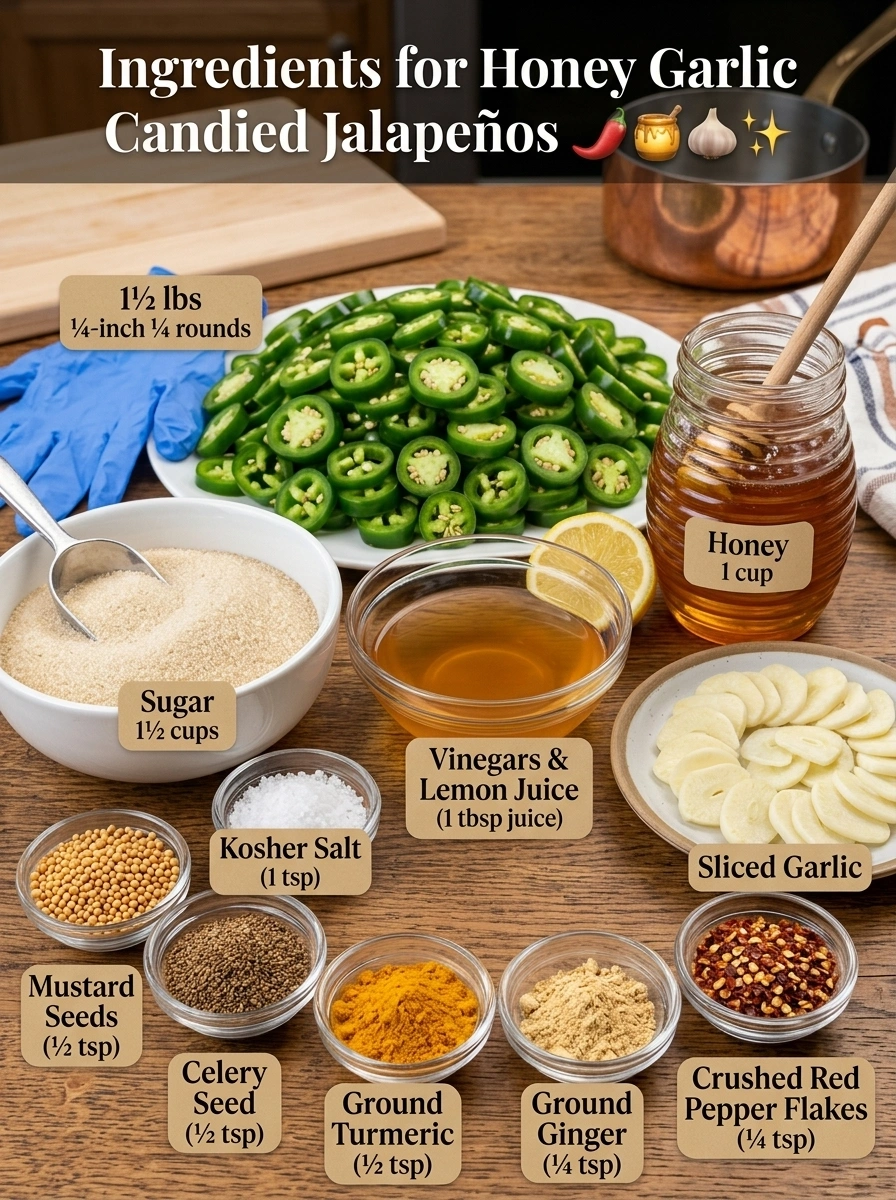
Each ingredient in this recipe plays a specific role in building flavor, texture, and that signature glossy candied finish. Here’s a closer look at what goes into the pot.
Fresh jalapeños (1½ lbs, sliced into ¼-inch rounds): Fresh, firm jalapeños are the star of the show. Look for peppers that are bright green, firm to the touch, and free of soft spots or blemishes. Slicing them into even ¼-inch rounds ensures they cook consistently and candy evenly. Always wear disposable gloves when handling jalapeños — the oils that make them spicy can linger on your skin and cause irritation, especially if you touch your eyes afterward.
Granulated sugar (1½ cups) and honey (1 cup): Together, these form the sweet backbone of the candying syrup. Sugar helps create that classic syrupy, slightly thickened texture, while honey adds floral depth, a touch of complexity, and a stickier, glossier finish than sugar alone could achieve.
Apple cider vinegar (¾ cup) and white vinegar (¼ cup): The acidity from the vinegars balances the sweetness, keeps the flavor from becoming cloying, and helps preserve the peppers in the refrigerator. Apple cider vinegar adds a subtle fruity tang, while white vinegar contributes a cleaner, sharper acidity.
Garlic (4 cloves, thinly sliced): Sliced garlic simmered right in the syrup infuses the whole batch with savory warmth. As it cooks, the garlic softens and becomes almost candied itself, turning into a delicious bonus bite among the jalapeño rings.
Fresh lemon juice (1 tbsp): A small amount of lemon juice brightens the overall flavor and adds another layer of acidity that keeps the sweetness in check.
Kosher salt (1 tsp): Salt rounds out the flavor profile and enhances every other ingredient in the syrup, from the honey to the spices.
Mustard seeds (½ tsp) and celery seed (½ tsp): These two spices are classic pickling ingredients that add a subtle earthy, slightly tangy crunch and aroma. They’re what give this recipe a more complex, “pickled” quality rather than tasting like straight candy.
Ground turmeric (¼ tsp): Turmeric adds warmth, a beautiful golden hue to the syrup, and a subtle earthy note that complements the honey.
Ground ginger (¼ tsp): A small amount of ground ginger adds warmth and a gentle spiced quality that works especially well with the honey and garlic.
Crushed red pepper flakes (¼ tsp, optional): If you want an extra layer of heat beyond what the jalapeños provide naturally, red pepper flakes are an easy way to dial things up.
Step-by-Step Directions
Follow these steps closely for perfectly candied, glossy jalapeño rings every time.
Step 1: Prep the jalapeños. Wash the jalapeños thoroughly under cool water. Using a sharp knife, slice them into even ¼-inch rounds. Consistency in slice thickness is important here — rounds that are too thin can turn mushy, while rounds that are too thick may not candy through properly. Wear disposable gloves throughout this process to protect your skin from the peppers’ natural oils.
Step 2: Build the syrup base. In a large saucepan, combine the granulated sugar, honey, apple cider vinegar, white vinegar, sliced garlic, lemon juice, kosher salt, mustard seeds, celery seed, turmeric, ground ginger, and crushed red pepper flakes if you’re using them. Give everything a good stir so the sugar starts to distribute evenly.
Step 3: Bring to a boil. Place the saucepan over medium heat and bring the mixture to a gentle boil, stirring frequently. Keep an eye on it and stir often to make sure the sugar fully dissolves and the honey is completely incorporated into the liquid — you don’t want any undissolved sugar granules at the bottom of the pan.
Step 4: Simmer to infuse. Once the mixture reaches a boil, reduce the heat to a gentle simmer. Let it cook for about 5 minutes. This resting simmer allows the garlic and all the spices to infuse fully into the syrup, deepening the flavor before the jalapeños even go in.
Step 5: Add the jalapeños. Add the sliced jalapeño rounds to the saucepan and stir gently to make sure every piece gets coated in the hot syrup.
Step 6: Simmer until glossy. Continue simmering for 8 to 10 minutes, stirring occasionally. You’re looking for the jalapeños to turn glossy and slightly translucent at the edges while still holding onto a pleasant crunch. Overcooking at this stage can lead to mushy peppers, so keep a close eye on the texture as you go.
Step 7: Transfer to jars. Using a slotted spoon, carefully transfer the candied jalapeño rounds into clean glass jars, packing them in fairly snugly but without crushing them.
Step 8: Add the syrup. Carefully pour the hot honey-garlic syrup over the jalapeños in each jar, making sure the peppers are completely submerged. This is important both for flavor and for keeping the peppers properly preserved in the fridge.
Step 9: Cool and seal. Allow the filled jars to cool to room temperature on the counter before sealing them tightly with their lids. Sealing while still hot can cause condensation buildup inside the jar.
Step 10: Refrigerate and wait. Place the sealed jars in the refrigerator for at least 24 hours before eating. For the best possible flavor, aim to wait 3 to 5 days — this is when the sweet, spicy, and garlicky notes fully meld together into that signature candied jalapeño flavor.
Pro Tips for the Best Candied Jalapeños
A few small details can make a big difference in how your candied jalapeños turn out.
- Slice evenly. Uniform ¼-inch rounds are the key to consistent texture across the whole batch. If your slices vary widely in thickness, some pieces will overcook while others stay underdone.
- Don’t skip the gloves. Jalapeño oils are potent and can cause real discomfort if they get on your skin, especially around your eyes or nose. A pair of disposable gloves takes the worry out of prep.
- Watch the syrup, not the clock. Every stove runs a little differently. Instead of rigidly following the timing, watch for the sugar to fully dissolve and the syrup to look glossy and slightly thickened before moving to the next step.
- Don’t overcook the peppers. The goal is a jalapeño that’s glossy and slightly translucent but still has a bit of bite left. Pulling them at the 8-minute mark rather than the full 10 can help if you prefer extra crunch.
- Use clean, dry jars. Any residual moisture or debris in your jars can affect how well the jalapeños keep, so make sure your glass jars are thoroughly cleaned and completely dry before filling.
- Fully submerge the peppers. Keeping the jalapeños completely covered in syrup is one of the most important factors for both flavor absorption and keeping them fresh in the fridge.
- Be patient. It’s tempting to dig in right away, but the difference between a jar eaten at 24 hours and one eaten after 3 to 5 days is significant. The extra wait time allows the sugar, vinegar, honey, and spices to fully penetrate the peppers.
Flavor Variations to Try
Once you’ve made the classic version, this recipe is easy to customize to your taste.
- Extra spicy: Add a full teaspoon of crushed red pepper flakes, or leave some of the jalapeño seeds and ribs intact for more heat instead of removing them.
- Smoky twist: Add a small pinch of smoked paprika to the syrup for a subtle smoky undertone that pairs beautifully with grilled meats.
- Citrus forward: Increase the lemon juice slightly, or add a bit of orange zest to the syrup for a brighter, more citrus-forward finish.
- Mixed pepper jar: Swap out a portion of the jalapeños for thinly sliced serrano or fresno peppers for a slightly different heat profile and color contrast.
- Herb-infused: Add a sprig of fresh thyme or a bay leaf to the syrup while it simmers for a subtle herbal note.
Serving Suggestions
One of the best things about this recipe is just how many ways you can use it. Here are some of the most popular ways to enjoy your Honey Garlic Candied Jalapeños:
- Spooned generously over a block of softened cream cheese with crackers for an effortless party appetizer.
- Piled onto burgers for a sweet-spicy crunch that cuts through rich, juicy meat.
- Layered on pulled pork sandwiches, where the sweetness balances the smoky barbecue flavor.
- Added to grilled chicken for a quick way to dress up a simple protein.
- Scattered over pizza right after it comes out of the oven for a sweet heat finish.
- Piled high on nachos alongside melted cheese, salsa, and sour cream.
- Tucked into tacos for a bright, sweet-spicy contrast to savory fillings.
- Served alongside hot dogs in place of traditional relish.
- Added to barbecue plates as a tangy, sweet counterpoint to smoky meats.
- Included on a charcuterie board, where they pair beautifully with sharp cheeses and cured meats.
Storage Information 🧊
Proper storage is key to keeping your candied jalapeños tasting their best. Store the jars in the refrigerator, tightly sealed, for up to 1 month. Always make sure the jalapeños stay fully submerged in their syrup — this keeps them from drying out or losing their signature glossy texture, and it helps preserve their flavor over time.
This recipe is designed as a refrigerator recipe rather than a shelf-stable canning recipe, so there’s no need for a water bath or pressure canner. Just be sure to use clean glass jars and keep everything refrigerated throughout the storage period.
Don’t even think about tossing the leftover honey-garlic syrup once the jalapeños are gone. That syrup is liquid gold in the kitchen — use it as a glaze for grilled chicken, salmon, or pork, drizzle it over roasted vegetables, whisk it into a homemade salad dressing, or spoon it warm over cornbread for a sweet-spicy finishing touch.
Frequently Asked Questions
Can I make this recipe less spicy? Yes. Removing the seeds and white ribs from the jalapeños before slicing will reduce the heat significantly, since that’s where much of the capsaicin is concentrated. You can also skip the optional crushed red pepper flakes.
Do I need to can these jars for shelf stability? No, this recipe is designed to be stored in the refrigerator rather than processed for shelf-stable canning. As long as the jars are kept refrigerated and the peppers stay submerged in syrup, they’ll keep well for up to a month.
Why are my candied jalapeños too soft? Overcooking during the simmering stage is the most common cause. Try pulling the peppers from the syrup a couple of minutes earlier, aiming for glossy and slightly translucent rather than fully soft.
Can I use a different type of pepper? Absolutely. While jalapeños are the classic choice, this same method works well with serrano peppers for extra heat or milder peppers if you want a gentler version.
How long should I wait before eating them? While they’re technically safe to eat after 24 hours in the refrigerator, waiting 3 to 5 days allows the flavors to fully develop, resulting in a noticeably richer, more balanced sweet-spicy-garlicky flavor.
Can I reuse the syrup for a second batch of jalapeños? It’s best to make a fresh batch of syrup for food safety and flavor consistency, since the syrup thins out and loses potency after cooking down with the first batch of peppers.
What’s the best way to soften the sugar and honey into the syrup? Stir frequently over medium heat and be patient — rushing this step at too high a heat can cause scorching before the sugar fully dissolves.
Print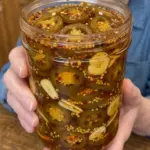
Honey Garlic Candied Jalapeños
- Total Time: 30 minutes (plus at least 24 hours chilling)
Ingredients
- 1½ lbs fresh jalapeños, sliced into ¼-inch rounds
- 1½ cups granulated sugar
- 1 cup honey
- ¾ cup apple cider vinegar
- ¼ cup white vinegar
- 4 cloves garlic, thinly sliced
- 1 tbsp fresh lemon juice
- 1 tsp kosher salt
- ½ tsp mustard seeds
- ½ tsp celery seed
- ½ tsp ground turmeric
- ¼ tsp ground ginger
- ¼ tsp crushed red pepper flakes (optional)
Instructions
- Wash and slice jalapeños into ¼-inch rounds, wearing gloves.
- Combine sugar, honey, both vinegars, garlic, lemon juice, salt, and spices in a saucepan.
- Bring to a gentle boil, stirring until sugar dissolves and honey is incorporated.
- Reduce heat and simmer 5 minutes to infuse the syrup.
- Add jalapeños and stir to coat.
- Simmer 8–10 minutes until glossy and slightly translucent but still crunchy.
- Transfer peppers to clean glass jars with a slotted spoon.
- Pour hot syrup over peppers until fully submerged.
- Cool to room temperature, then seal jars tightly.
- Refrigerate at least 24 hours, ideally 3–5 days, before serving.
- Prep Time: 15 minutes
- Cook Time: 15 minutes
Nutrition
- Serving Size: 20
- Calories: 75 per serving