Bisquick Impossible Pizza Pie: The Cheesy, Savory Family Dinner That Makes Itself
There’s a category of recipe that earns a permanent spot in the family dinner rotation not by being complicated or impressive, but by being reliably, deeply satisfying every single time. Bisquick Impossible Pizza Pie is that recipe. Seasoned Italian sausage and savory pizza sauce layered with sliced pepperoni and two kinds of cheese, topped with a simple Bisquick batter that — through what feels like actual kitchen magic — rises around the filling during baking to create a fluffy, golden crust without any kneading, proofing, rolling, or pizza-dough stress. It tastes like pizza. It eats like a casserole. It takes an hour start to finish. And it consistently produces one of the most satisfying dinners you can put on a weeknight table.
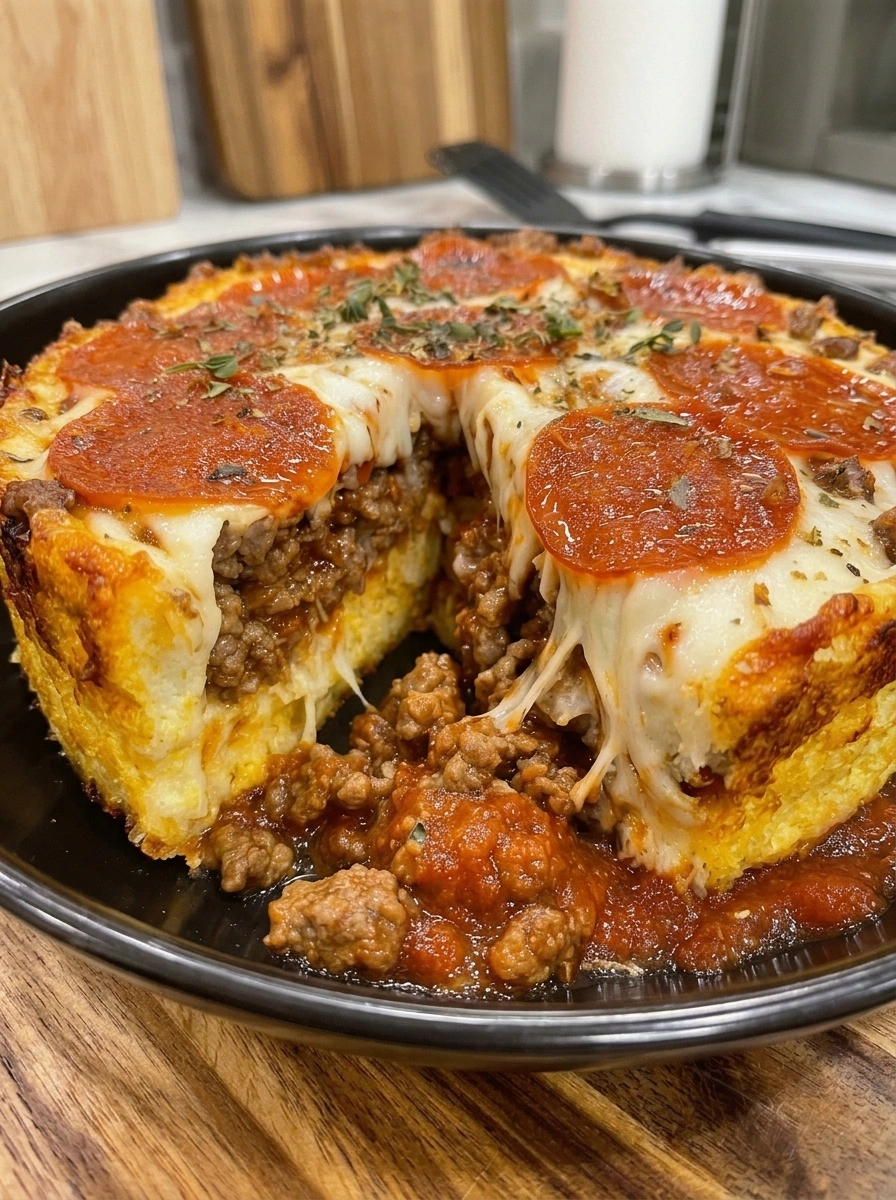
One slice — warm from the oven, molten with mozzarella, fragrant with Italian sausage and fresh herbs — and you’ll understand immediately why the Impossible Pie concept has been beloved in American home kitchens since Bisquick introduced it in the 1970s. And why this pizza version specifically is the kind of thing people make on Friday nights when they want something that feels like a treat but requires none of the effort of ordering delivery or wrestling with homemade dough.
This guide covers everything: the history of the Impossible Pie and why the “magic” actually happens, a complete ingredient breakdown with tips for building the best version, step-by-step instructions, tips for the perfect slice, and every variation and serving suggestion worth knowing.
The Impossible Pie: A Very American Kitchen Story
To understand why Bisquick Impossible Pizza Pie works the way it does, it helps to know a little about the Impossible Pie concept itself — one of the most clever and enduring ideas in American convenience cooking.
Bisquick — the ready-made baking mix of flour, leavening, shortening, and salt produced by General Mills — was introduced in 1931 and quickly became a pantry staple in American kitchens for pancakes, biscuits, and quick breads. The brand’s breakthrough convenience cooking moment came in the early 1970s when the Impossible Pie concept was introduced: a savory filling poured into a pie dish, topped with a thin Bisquick batter, and baked until the batter migrated through and around the filling to form a crust that seemed to appear from nowhere.
The Impossible Quiche (sometimes called Impossible Chicken Pie or Impossible Tuna Pie) became a sensation, spawning dozens of variations and earning a permanent section in Bisquick recipe booklets. The concept was celebrated precisely because it eliminated the most intimidating part of pie-making — the crust — while producing something that looked and tasted like a proper homemade pie. For busy families in the 1970s and 1980s, this was revelatory. For busy families now, it still is.
The pizza version takes the concept in a direction that’s almost inevitable in retrospect: everything people love about pizza — the sausage, the pepperoni, the mozzarella, the sauce — built into an Impossible Pie structure, producing something that’s simultaneously a casserole, a pizza, and a deeply satisfying family dinner with none of the fuss of any of the three.
Why the Batter “Magically” Rises Around the Filling
The Impossible Pie’s signature trick — the batter that sinks beneath the filling and rises to form a crust — isn’t magic. It’s physics and chemistry, and understanding it makes you a more confident cook.
Density and gravity do the initial work. When you pour the thin Bisquick batter over a layer of dense filling (heavy sausage, cheese, and sauce), the batter naturally migrates downward through the gaps in the filling toward the bottom of the dish. The filling is significantly denser than the liquid batter, so the batter seeps under and around it as the dish heats up.
Leavening does the rest. Bisquick contains baking powder, which activates when it encounters liquid and heat. As the oven heats the batter, carbon dioxide bubbles form throughout and the batter expands upward. Because the center of the dish contains the heavy filling, the batter rises most dramatically around the edges and on top, creating the characteristic puffed, golden crust that surrounds the filling.
The eggs set the structure. The two eggs in the batter provide protein that coagulates during baking, setting the crust’s structure permanently once the heat is sufficient. This is why the crust holds its shape when sliced and doesn’t collapse back onto the filling.
The critical rule: do not stir. Once the batter is poured over the filling, stirring disrupts the density-based separation that allows the migration process to work. Pour it slowly and evenly over the filling and leave it alone. The oven does the rest.
Choosing Your Ingredients: How to Build the Best Version
Italian Sausage
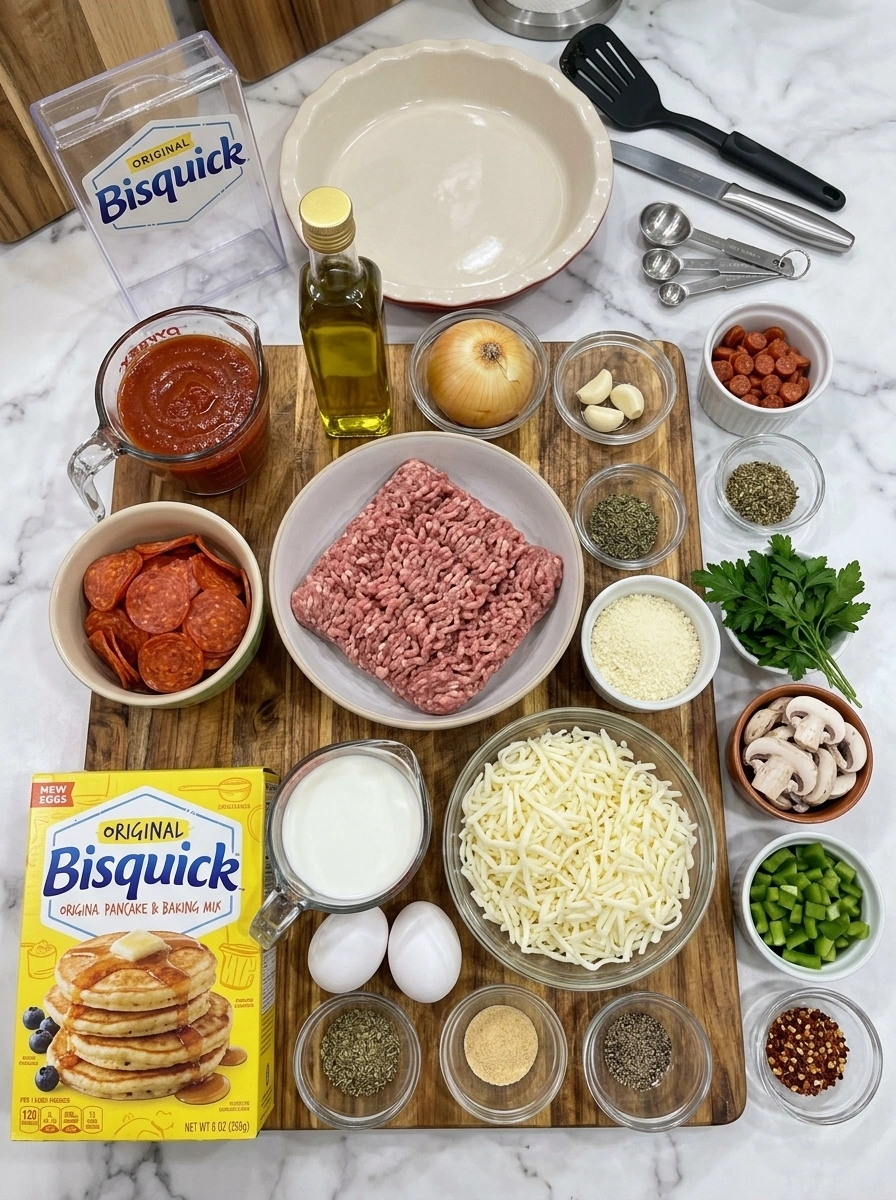
Italian sausage is the traditional and ideal choice here — its fennel seeds, garlic, and Italian herb seasoning create a filling that tastes specifically like pizza from the first bite. Sweet Italian sausage produces a milder, more family-friendly result; hot Italian sausage adds heat throughout every layer. A mix of both is excellent.
Remove the sausage from its casings before browning if buying links — squeeze the meat out directly into the skillet. If buying bulk sausage, it’s already casing-free.
Ground beef is the listed alternative and a completely legitimate choice — season it aggressively with Italian seasoning, garlic, and red pepper flakes to approximate the seasoning profile of Italian sausage.
Drain well. Italian sausage releases significant fat during browning. Excess fat in the dish prevents the batter from setting properly — drain thoroughly after browning before spreading the sausage mixture into the baking dish.
Pizza Sauce
One cup of pizza sauce is the flavor anchor of the entire filling. Use a good-quality store-bought pizza sauce (Rao’s Homemade is widely regarded as the best supermarket option) or your favorite jarred marinara. The sauce should be thick rather than watery — thin sauce can prevent the crust from setting properly by adding excess moisture to the filling.
Avoid pasta sauce with large vegetable chunks, which will make the filling uneven and can affect how the batter migrates.
Cheese
The recipe uses three cheese applications: two cups of shredded whole milk mozzarella in the filling, half a cup of Parmesan layered with it, and another half cup of mozzarella scattered on top before baking.
Whole milk mozzarella is essential rather than part-skim. Whole milk mozzarella melts into a distinctly creamier, stretchier, more satisfying result. Part-skim mozzarella melts more rubbery and doesn’t provide the same luxurious pull when you cut a slice.
Shred your own cheese if possible. Pre-shredded cheese is coated with anti-caking agents (usually cellulose or potato starch) that inhibit melting. Cheese you shred from a block melts more smoothly and completely.
Parmesan adds a sharp, salty depth that mozzarella alone can’t provide — it layers a more complex cheese flavor into the filling rather than just cheese volume.
Pepperoni
Sliced pepperoni goes in the filling; mini pepperoni goes on top. The mini pepperoni on top serve both a practical and aesthetic purpose: they crisp up beautifully in the oven without burning the way full-size slices can, and they create the visual cues that immediately read “pizza” when the dish comes out of the oven.
The Bisquick Batter
The batter is deliberately thin — thinner than pancake batter — which is what allows it to migrate around the filling. The ratio of one cup Bisquick to one cup milk to two eggs produces the right consistency for the migration process. Don’t be tempted to thicken it.
Whisk until just smooth. A few small lumps are fine and won’t affect the finished crust. Overworking the batter develops gluten and can make the crust tougher.
Season the batter. The addition of Italian seasoning, garlic powder, and black pepper to the batter is what makes this more than just Bisquick pancake batter poured over filling — the seasoned batter becomes a genuinely flavorful crust that contributes to the pizza character of every bite.
How to Make Bisquick Impossible Pizza Pie: Step-by-Step
Step 1: Preheat and Prep the Dish
Preheat the oven to 400°F (205°C). Lightly grease a 9-inch deep-dish pie plate or a 9×9-inch baking dish with cooking spray or a thin coat of olive oil. Deep-dish is preferable — the filling is generous and a shallow dish may overflow as the batter rises.
Step 2: Brown the Sausage
Heat the olive oil in a large skillet over medium-high heat. Add the diced onion and cook for 3 to 4 minutes, stirring occasionally, until softened and translucent. Add the minced garlic and cook for 30 seconds until fragrant — watch carefully at this stage, as garlic burns quickly at this heat level.
Add the Italian sausage, breaking it into small crumbles with a wooden spoon or spatula. Cook for 6 to 8 minutes, continuing to break up the meat, until fully browned with no pink remaining. Drain any excess grease thoroughly — tilt the pan and spoon out the fat, or carefully transfer the sausage to a paper-towel-lined plate before returning to the pan.
Stir in the pizza sauce and simmer for 2 minutes, stirring to combine. The sauce will thicken slightly and the flavors will begin to meld.
Step 3: Build the Filling
Spread the sausage and sauce mixture evenly across the bottom of the prepared baking dish. Scatter the sliced pepperoni over the sausage layer. Sprinkle the two cups of shredded mozzarella and the Parmesan cheese evenly over the pepperoni. At this point the dish looks like a very full, slightly messy pizza — that’s correct.
Step 4: Make the Batter
In a medium bowl, whisk together the Bisquick mix, eggs, milk, Italian seasoning, garlic powder, and black pepper until smooth. The batter will be thin — thinner than you might expect. This is correct and essential.
Step 5: Pour the Batter
Slowly pour the batter over the filling in an even, steady stream. Pour from the edges inward, covering as much of the surface as possible before filling the center. Do not stir. The batter will immediately begin to settle around and through the filling.
Sprinkle the remaining half cup of shredded mozzarella and the mini pepperoni over the top of the batter.
Step 6: Bake
Bake uncovered at 400°F for 30 to 35 minutes. The pie is done when the crust is deeply golden brown, visibly puffed around the edges and center, and a toothpick or thin knife inserted into the center comes out without wet batter clinging to it.
Don’t rush the bake. The center takes longer to set than the edges — if the edges look done but the center still looks liquid, give it another 3 to 5 minutes. A slightly underbaked center will not hold together when sliced.
Step 7: Rest Before Slicing
Remove from the oven and let rest for a full 10 minutes before slicing. This rest period is important — it allows the structure to firm up and the cheese to stabilize so that slices hold their shape when cut rather than falling apart. The pie continues cooking slightly from residual heat during this time.
Step 8: Garnish and Serve
Sprinkle dried oregano, dried basil, and fresh chopped parsley over the top. Cut into wedges or squares and serve immediately while the cheese is still melted and the crust is at peak texture.
Tips for the Best Impossible Pizza Pie
Drain the sausage thoroughly. Excess grease in the filling prevents the batter from setting cleanly and can make the crust greasy and heavy. Drain well, or briefly blot the browned sausage with paper towels.
Keep the batter thin. The migration process requires a thin, pourable batter. If your batter seems thick — harder to pour than water, more like pancake batter — add a splash more milk and whisk again.
Pour the batter gently and evenly. A slow, even pour gives the batter the best chance to distribute across the entire surface before settling through the filling. Pouring too fast in one spot creates uneven coverage.
Use a deep dish. A standard 9-inch pie dish or 9×9-inch baking dish is the minimum size. As the batter rises, it expands upward significantly. A shallow dish risks overflow; a deep dish gives the crust room to puff dramatically.
Let it rest. Ten minutes is the minimum. The slices that fall apart at the table are almost always from pies cut immediately out of the oven. Patience here directly affects how well the finished pie presents.
Don’t open the oven during baking. The rising process is driven by trapped steam and CO2 from the leavening. Opening the oven releases that trapped heat and can cause the crust to deflate prematurely.
Serving Suggestions
With Caesar salad. The classic pairing — a crisp, cold Caesar alongside a warm, rich pizza pie provides the textural and temperature contrast that makes each component better. The anchovy saltiness of the dressing complements the Italian sausage and cheese.
With garlic bread. Warm garlic bread for dipping in any extra pizza sauce and for scooping up the last bits from the dish — deeply optional and deeply worth it.
With roasted vegetables. A sheet pan of roasted broccoli, zucchini, or bell peppers is a lighter, more vegetable-forward accompaniment that balances the richness of the pie without competing with its flavors.
With a simple green salad. Dressed with olive oil, lemon juice, and a little salt — the simplest possible salad that provides brightness and freshness alongside the savory richness of the pie.
Straight from the dish. The most honest answer. A warm wedge of Impossible Pizza Pie needs nothing alongside it to be completely satisfying.
The Optional Add-Ins: Building Your Version
The recipe includes seven optional add-ins, each of which creates a meaningfully different finished pie.
Sliced mushrooms: Add to the skillet alongside the onion to cook them down before the sausage goes in. Raw mushrooms added directly to the filling will release water during baking, potentially preventing the crust from setting properly.
Diced green bell pepper: Add to the filling layer for color, crunch, and a slightly bitter vegetal note that plays well against the rich sausage and cheese.
Black olives: Scatter over the filling layer before adding the cheese. Their briny, savory depth adds a Mediterranean quality to the overall flavor.
Cooked bacon crumbles: Fold into the sausage mixture or scatter over the filling layer. More meat, more salt, more satisfaction.
Sliced jalapeños: For heat lovers — scatter over the filling or mix into the batter. Fresh jalapeños add bright, building heat; pickled jalapeños add tangy heat.
Crushed red pepper flakes: Add to the batter or scatter over the top before baking for a diffuse, sustained warmth throughout every bite.
Pepper Jack cheese: Substitute for some or all of the mozzarella in the filling for a cheese with built-in spice character that adds heat and complexity without any additional ingredients.
Storage and Reheating
Refrigerator: Store leftovers in an airtight container for up to 4 days. The crust softens slightly in the refrigerator but reheats well to a near-original texture.
Freezer: Individual slices freeze well for up to 2 months. Wrap each slice in plastic wrap, then in foil, and store in a freezer bag. Thaw overnight in the refrigerator before reheating.
Oven reheating (best method): Place slices on a baking sheet in a 350°F oven for 5 to 8 minutes until heated through and the crust has re-crisped slightly. This produces the closest result to freshly baked.
Air fryer reheating (excellent): 350°F for 3 to 5 minutes. The air fryer restores some of the crust’s original texture better than the microwave and faster than the oven.
Microwave (fastest): 90 seconds to 2 minutes on medium power. The crust will be softer than oven or air fryer reheating, but the flavor is fully preserved and this is the practical choice for a quick lunch.
Variations to Try
Supreme Pizza Pie: Add sliced mushrooms, diced green pepper, black olives, and cooked bacon crumbles to the filling for a fully loaded supreme pizza experience.
Three Cheese: Add ½ cup of ricotta cheese dotted across the filling before adding the Bisquick batter. The ricotta pockets melt into creamy, slightly tangy pools that make each slice taste more layered and luxurious.
Buffalo Chicken: Replace the Italian sausage with cooked shredded chicken tossed in buffalo sauce, swap the pizza sauce for blue cheese dressing, and use a combination of mozzarella and cheddar. Omit the pepperoni. This variation is outstanding and consistently surprises people.
Veggie Lovers: Replace the sausage with sautéed mushrooms, diced bell peppers, spinach, and sliced black olives. Use a full 2 cups of mozzarella in the filling to compensate for the reduced richness of no meat. Season aggressively with Italian seasoning and red pepper flakes.
White Pizza: Replace the pizza sauce with a white garlic cream sauce or simply layer the dish with olive oil, minced roasted garlic, and a sprinkle of Italian seasoning before adding the cheese. Use mozzarella and ricotta for the filling, top with fresh basil after baking.
Frequently Asked Questions
The center is still wet after 35 minutes — what do I do? Continue baking in 5-minute increments until a toothpick inserted in the center comes out clean. Ovens vary significantly; a pie that takes 30 minutes in one oven may take 40 minutes in another. The visual cue of a golden, puffed top isn’t sufficient — test the center before pulling it out.
Can I use a different baking mix instead of Bisquick? Any all-purpose baking mix that contains flour, leavening, salt, and fat (Jiffy Mix, Krusteaz, store-brand baking mix) will produce similar results. Avoid self-rising flour alone — without the fat component, the texture of the crust will be noticeably different.
Can I make this ahead? The filling can be made up to 24 hours ahead and refrigerated. Bring it to room temperature before adding the batter and baking — cold filling significantly extends the baking time and can produce uneven results. Do not pour the batter over the filling ahead of time, as the leavening will activate and dissipate before the pie reaches the oven.
Why didn’t my batter rise around the filling? Most commonly caused by batter that was too thick (needed more milk), filling that was too wet (needed more draining), or an oven temperature that was too low. Check that your oven is actually reaching 400°F with an oven thermometer — many home ovens run 25 to 50 degrees cooler than their dial indicates.
Can I make this gluten-free? Yes — Bisquick makes a Gluten Free Pancake & Baking Mix that performs well as a 1:1 substitute in this recipe. The crust texture will be slightly different but entirely satisfying.
Recipe at a Glance
| Detail | Info |
|---|---|
| Prep Time | 15 minutes |
| Cook Time | 35 minutes |
| Rest Time | 10 minutes |
| Total Time | 1 hour |
| Servings | 8 |
| Calories | ~470 per serving |
| Refrigerator Storage | Up to 4 days |
| Freezer Storage | Up to 2 months |
Final Thoughts
Bisquick Impossible Pizza Pie is the rare weeknight dinner that feels like more than a weeknight dinner. The self-forming crust feels genuinely impressive every time it comes out of the oven, puffed and golden and fragrant. The filling is everything pizza should be — savory, cheesy, and deeply satisfying. And the whole thing requires exactly one skillet, one bowl, and one baking dish.
Make it on a Friday night. Serve it with a salad and garlic bread. Watch it disappear before you’ve finished setting the table.
Then save the recipe somewhere you can find it, because you’re going to be asked to make it again very soon.
Print
Bisquick Impossible Pizza Pie
- Total Time: 1 hour
Ingredients
Italian Sausage
Italian sausage is the traditional and ideal choice here — its fennel seeds, garlic, and Italian herb seasoning create a filling that tastes specifically like pizza from the first bite. Sweet Italian sausage produces a milder, more family-friendly result; hot Italian sausage adds heat throughout every layer. A mix of both is excellent.
Remove the sausage from its casings before browning if buying links — squeeze the meat out directly into the skillet. If buying bulk sausage, it’s already casing-free.
Ground beef is the listed alternative and a completely legitimate choice — season it aggressively with Italian seasoning, garlic, and red pepper flakes to approximate the seasoning profile of Italian sausage.
Drain well. Italian sausage releases significant fat during browning. Excess fat in the dish prevents the batter from setting properly — drain thoroughly after browning before spreading the sausage mixture into the baking dish.
Pizza Sauce
One cup of pizza sauce is the flavor anchor of the entire filling. Use a good-quality store-bought pizza sauce (Rao’s Homemade is widely regarded as the best supermarket option) or your favorite jarred marinara. The sauce should be thick rather than watery — thin sauce can prevent the crust from setting properly by adding excess moisture to the filling.
Avoid pasta sauce with large vegetable chunks, which will make the filling uneven and can affect how the batter migrates.
Cheese
The recipe uses three cheese applications: two cups of shredded whole milk mozzarella in the filling, half a cup of Parmesan layered with it, and another half cup of mozzarella scattered on top before baking.
Whole milk mozzarella is essential rather than part-skim. Whole milk mozzarella melts into a distinctly creamier, stretchier, more satisfying result. Part-skim mozzarella melts more rubbery and doesn’t provide the same luxurious pull when you cut a slice.
Shred your own cheese if possible. Pre-shredded cheese is coated with anti-caking agents (usually cellulose or potato starch) that inhibit melting. Cheese you shred from a block melts more smoothly and completely.
Parmesan adds a sharp, salty depth that mozzarella alone can’t provide — it layers a more complex cheese flavor into the filling rather than just cheese volume.
Pepperoni
Sliced pepperoni goes in the filling; mini pepperoni goes on top. The mini pepperoni on top serve both a practical and aesthetic purpose: they crisp up beautifully in the oven without burning the way full-size slices can, and they create the visual cues that immediately read “pizza” when the dish comes out of the oven.
The Bisquick Batter
The batter is deliberately thin — thinner than pancake batter — which is what allows it to migrate around the filling. The ratio of one cup Bisquick to one cup milk to two eggs produces the right consistency for the migration process. Don’t be tempted to thicken it.
Whisk until just smooth. A few small lumps are fine and won’t affect the finished crust. Overworking the batter develops gluten and can make the crust tougher.
Season the batter. The addition of Italian seasoning, garlic powder, and black pepper to the batter is what makes this more than just Bisquick pancake batter poured over filling — the seasoned batter becomes a genuinely flavorful crust that contributes to the pizza character of every bite.
Instructions
Preheat the oven to 400°F (205°C). Lightly grease a 9-inch deep-dish pie plate or a 9×9-inch baking dish with cooking spray or a thin coat of olive oil. Deep-dish is preferable — the filling is generous and a shallow dish may overflow as the batter rises.
Heat the olive oil in a large skillet over medium-high heat. Add the diced onion and cook for 3 to 4 minutes, stirring occasionally, until softened and translucent. Add the minced garlic and cook for 30 seconds until fragrant — watch carefully at this stage, as garlic burns quickly at this heat level.
Add the Italian sausage, breaking it into small crumbles with a wooden spoon or spatula. Cook for 6 to 8 minutes, continuing to break up the meat, until fully browned with no pink remaining. Drain any excess grease thoroughly — tilt the pan and spoon out the fat, or carefully transfer the sausage to a paper-towel-lined plate before returning to the pan.
Stir in the pizza sauce and simmer for 2 minutes, stirring to combine. The sauce will thicken slightly and the flavors will begin to meld.
Spread the sausage and sauce mixture evenly across the bottom of the prepared baking dish. Scatter the sliced pepperoni over the sausage layer. Sprinkle the two cups of shredded mozzarella and the Parmesan cheese evenly over the pepperoni. At this point the dish looks like a very full, slightly messy pizza — that’s correct.
In a medium bowl, whisk together the Bisquick mix, eggs, milk, Italian seasoning, garlic powder, and black pepper until smooth. The batter will be thin — thinner than you might expect. This is correct and essential.
Slowly pour the batter over the filling in an even, steady stream. Pour from the edges inward, covering as much of the surface as possible before filling the center. Do not stir. The batter will immediately begin to settle around and through the filling.
Sprinkle the remaining half cup of shredded mozzarella and the mini pepperoni over the top of the batter.
Bake uncovered at 400°F for 30 to 35 minutes. The pie is done when the crust is deeply golden brown, visibly puffed around the edges and center, and a toothpick or thin knife inserted into the center comes out without wet batter clinging to it.
Don’t rush the bake. The center takes longer to set than the edges — if the edges look done but the center still looks liquid, give it another 3 to 5 minutes. A slightly underbaked center will not hold together when sliced.
Remove from the oven and let rest for a full 10 minutes before slicing. This rest period is important — it allows the structure to firm up and the cheese to stabilize so that slices hold their shape when cut rather than falling apart. The pie continues cooking slightly from residual heat during this time.
Sprinkle dried oregano, dried basil, and fresh chopped parsley over the top. Cut into wedges or squares and serve immediately while the cheese is still melted and the crust is at peak texture.
- Prep Time: 15 minutes
- Cook Time: 35 minutes
Nutrition
- Serving Size: 4
- Calories: 470 per serving