Twinkie Banana Pudding Cups: Creamy, Juicy Bliss!
Sensory-Rich Introduction with Immediate Craving
Imagine a warm summer afternoon, the sun casting a golden glow as laughter fills the air. You reach for a cup of Twinkie Banana Pudding Cups, and the moment you take a spoonful, you’re transported to a world of creamy bliss. The soft, spongy texture of Hostess Twinkies melds perfectly with the rich banana cream pudding, while the fresh slices of Chiquita bananas add a burst of fruity sweetness. Each layer is a delightful surprise, with the crunch of Nabisco Nilla Wafers providing a satisfying contrast. This dessert is not just a treat; it’s a nostalgic journey back to childhood, perfect for birthday parties, summer picnics, or simply a cozy night in. Whether you’re celebrating a special occasion or just indulging in a sweet craving, these cups are sure to bring joy to your table.
Why You’ll Love This Twinkie Banana Pudding Cups
- Texture Contrast: The soft Twinkies, creamy pudding, and crunchy Nilla Wafers create a delightful medley of textures that keep each bite interesting.
- Flavor Balance: The sweetness of the banana pudding and Twinkies is perfectly balanced by the fresh banana slices, making it a harmonious dessert.
- Versatility: These cups can be served at various occasions, from casual family gatherings to elegant dinner parties, appealing to all ages.
- Ease of Preparation: With no baking required, this recipe is quick and simple, making it accessible for even novice cooks.
- Universal Appeal: The combination of familiar flavors and textures makes this dessert a crowd-pleaser, ensuring everyone will want a second helping.
Essential Tools & Preparation Strategy
- Mixing Bowl: Essential for combining the pudding mix and milk; choose a large bowl for easy whisking.
- Whisk: A sturdy whisk is necessary to ensure the pudding thickens properly without lumps.
- Mason Jars or Clear Cups: Ideal for layering and showcasing the beautiful dessert; opt for transparent containers to highlight the colorful layers.
- Spoon: Use a large spoon for scooping and layering ingredients efficiently.
- Knife: A sharp knife is needed to slice the Twinkies and bananas evenly.
- Measuring Cups: Accurate measurements are crucial for the pudding mix and milk; ensure you have a set on hand.
- Chilling Rack: If available, a chilling rack can help cool the cups evenly in the refrigerator.
Ingredients & Their Roles in This Twinkie Banana Pudding Cups
- Hostess Twinkies: Provide a soft, spongy base that adds sweetness and nostalgia.
- Jell-O Banana Cream Instant Pudding Mix: The star of the show, creating a rich and creamy filling.
- Fairlife Whole Milk: Enhances the creaminess of the pudding while ensuring it thickens properly.
- Cool Whip Original: Adds a light, airy texture to the pudding and serves as a delightful topping.
- Chiquita Bananas: Fresh banana slices contribute natural sweetness and a fruity flavor that complements the pudding.
- Nabisco Nilla Wafers: Offer a crunchy contrast to the creamy layers, enhancing the overall texture of the dessert.
Step-by-Step Guide to Perfect Twinkie Banana Pudding Cups
- Prepare the Pudding: In a large bowl, whisk together the Jell-O banana cream pudding mix and Fairlife milk for about 2 minutes until thickened.
- Incorporate Cool Whip: Gently fold in half of the Cool Whip into the pudding mixture until well combined, being careful not to deflate it.
- Slice the Twinkies: Unwrap the Hostess Twinkies and slice them into bite-sized rounds for easy layering.
- Layer the Ingredients: In clear cups or mason jars, start with a layer of sliced Twinkies, followed by a scoop of banana pudding, sliced bananas, and a layer of Nilla Wafers.
- Repeat Layers: Continue layering the ingredients until the cups are full, ensuring the last layer is pudding for a beautiful finish.
- Top the Cups: Finish each cup with a dollop of the remaining Cool Whip, a Nilla Wafer, and a slice of banana for garnish.
- Chill: Place the cups in the refrigerator and chill for at least 2 hours to allow the flavors to meld together.
Chef’s Notes & Pro Tips for Flawless Results
- Make-Ahead Instructions: These cups can be prepared a day in advance and stored in the refrigerator, making them perfect for parties.
- Storage: Keep the cups covered in the fridge for up to 3 days for optimal freshness.
- Equipment Recommendations: Use a hand mixer for the pudding if you prefer a quicker method, but whisking by hand works just as well.
- Customization Options: Feel free to add layers of chocolate syrup or peanut butter for a unique twist on the classic recipe.
Avoid These Common Cooking Mistakes
- Not Whisking Long Enough: Failing to whisk the pudding mix adequately can result in a runny texture; ensure it thickens properly.
- Overmixing the Cool Whip: This can lead to a watery consistency; always fold gently to maintain its lightness.
- Using Stale Twinkies: Stale Twinkies can affect flavor and texture; always use fresh ones for the best results.
- Not Chilling Long Enough: If you skip the chilling step, the flavors won’t meld; chill for at least 2 hours.
- Layering Too Much Pudding: Overly rich layers can overwhelm the dessert; balance the layers for a harmonious taste.
- Skipping the Banana Slices: Missing this key flavor component can diminish the overall experience; always include them.
- Not Using Clear Cups: Hiding the beautiful layers defeats the purpose; opt for transparent containers to showcase your creation.
Creative Variations & Customizations
- Chocolate Twinkie Banana Pudding Cups: Use chocolate Twinkies for a richer flavor profile.
- Vegan Version: Substitute the pudding mix with a plant-based alternative and use coconut whipped cream.
- Nutty Delight: Add crushed nuts between layers for an extra crunch and flavor.
- Seasonal Twist: Incorporate seasonal fruits like strawberries or peaches for a refreshing change.
- Banana Foster Style: Drizzle with caramel sauce and add a sprinkle of cinnamon for a decadent touch.
Perfect Pairings: What to Serve With Twinkie Banana Pudding Cups
- Caramel Sauce: A drizzle adds an extra layer of sweetness and richness.
- Vanilla Ice Cream: A scoop on the side enhances the creamy texture and adds a classic touch.
- Crushed Nilla Wafers: Sprinkle on top for added crunch and flavor.
- Fresh Berries: Serve alongside for a fruity contrast that brightens the dish.
- Coffee: A cup of coffee pairs beautifully, balancing the sweetness of the dessert.
- Cold Milk: Enhances the creamy texture and is a nostalgic pairing.
- Picnic Treat: Perfect for outdoor gatherings, making it a fun, portable dessert option.
- Birthday Parties: A nostalgic twist that appeals to both kids and adults alike.
Storage & Meal Prep Instructions
- Refrigerator Storage: Keep the cups covered in the fridge for up to 3 days. The flavors will continue to meld, enhancing the taste.
- Freezer Storage: While not recommended for long-term storage due to texture changes, you can freeze the pudding mixture separately for up to a month. Thaw in the fridge before assembling.
- Reheating: These cups are best served chilled and do not require reheating.
Nutrition Facts & Health Insights
| Nutrient | Amount per Serving |
|---|---|
| Serving Size | 1 cup |
| Calories | 320 |
| Sugar | 22 grams |
| Sodium | 180 milligrams |
| Fat | 12 grams |
| Saturated Fat | 6 grams |
| Unsaturated Fat | 4 grams |
| Trans Fat | 0 grams |
| Carbohydrates | 48 grams |
| Fiber | 1 gram |
| Protein | 4 grams |
| Cholesterol | 15 milligrams |
Health Insights: The bananas provide potassium and dietary fiber, while the pudding mix offers a quick source of energy. Enjoying this dessert in moderation can be a delightful treat without compromising your health goals.
Frequently Asked Questions
- Can I use a different flavor of pudding mix? Yes, feel free to experiment with different flavors like vanilla or chocolate for a unique twist.
- How long can I store the cups? They can be stored in the refrigerator for up to 3 days for the best taste and texture.
- Can I make this dessert gluten-free? Use gluten-free cookies instead of Nilla Wafers to accommodate gluten sensitivities.
- What can I substitute for Cool Whip? You can use homemade whipped cream or a dairy-free alternative for a lighter option.
- Is it possible to make this dessert without bananas? Yes, you can omit the bananas or replace them with another fruit like strawberries or peaches.
- Can I prepare this dessert in advance? Absolutely! These cups can be made a day ahead and stored in the refrigerator.
- What if I don’t have mason jars? Any clear cup or dessert dish will work; just ensure it’s transparent to showcase the layers.
- How can I make this dessert lower in calories? Use sugar-free pudding mix and light Cool Whip for a healthier version.
Final Inspiration & Kitchen Confidence
As you prepare your Twinkie Banana Pudding Cups, remember that cooking is not just about following a recipe; it’s about creating memories and sharing joy with loved ones. Celebrate your achievements in the kitchen, and don’t hesitate to put your own spin on this delightful dessert. With each layer you build, you’re crafting a sweet experience that will be cherished by all who indulge. So gather your ingredients, unleash your creativity, and enjoy the bliss of this creamy, nostalgic treat!
Print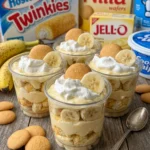
Twinkie Banana Pudding Cups: Creamy, Juicy Bliss!
- Total Time: 2 hours 20 minutes
- Yield: 6 servings 1x
- Diet: Vegetarian
Description
Twinkie Banana Pudding Cups are a delightful fusion of creamy banana pudding and soft, spongy Twinkies, creating a luscious dessert experience. Each spoonful offers a burst of sweetness from ripe bananas and a satisfying crunch from Nilla Wafers, making it a perfect treat for any occasion.
Ingredients
- 1 box Hostess Twinkies
- 1 box Jell-O Banana Cream Instant Pudding Mix
- 2 cups Fairlife Whole Milk
- 1 tub (8 oz) Cool Whip Original
- 3 Chiquita Bananas, sliced
- 1 box (11 oz) Nabisco Nilla Wafers
Instructions
- In a large bowl, whisk the Jell-O banana cream pudding mix and Fairlife milk together until thickened, about 2 minutes.
- Fold in half of the Cool Whip gently until well combined.
- Unwrap the Hostess Twinkies and slice them into bite-sized rounds.
- In clear cups or mason jars, layer the sliced Twinkies, a scoop of banana pudding, sliced Chiquita bananas, and Nabisco Nilla Wafers.
- Repeat the layers until the cups are full, ensuring the last layer is pudding.
- Top each cup with a dollop of the remaining Cool Whip, a Nilla Wafer, and a slice of banana.
- Chill for 2 hours before serving to allow flavors to meld.
Notes
- Make-ahead: These cups can be prepared a day in advance and stored in the refrigerator.
- Storage: Keep covered in the fridge for up to 3 days for best freshness.
- Substitutions: Use sugar-free pudding mix and light Cool Whip for a lower-calorie option.
- Prep Time: 20 minutes
- Cook Time: 0 minutes
- Category: desserts
- Method: no-bake
- Cuisine: American
Nutrition
- Serving Size: 1 cup
- Calories: 320
- Sugar: 22 grams
- Sodium: 180 milligrams
- Fat: 12 grams
- Saturated Fat: 6 grams
- Unsaturated Fat: 4 grams
- Trans Fat: 0 grams
- Carbohydrates: 48 grams
- Fiber: 1 gram
- Protein: 4 grams
- Cholesterol: 15 milligrams
Keywords: Twinkie Banana Pudding Cups, banana pudding, dessert cups, no-bake dessert, Hostess Twinkies, banana cream pudding, easy dessert, party dessert, layered dessert, nostalgic treats, creamy dessert, quick dessert, summer dessert, kid-friendly dessert