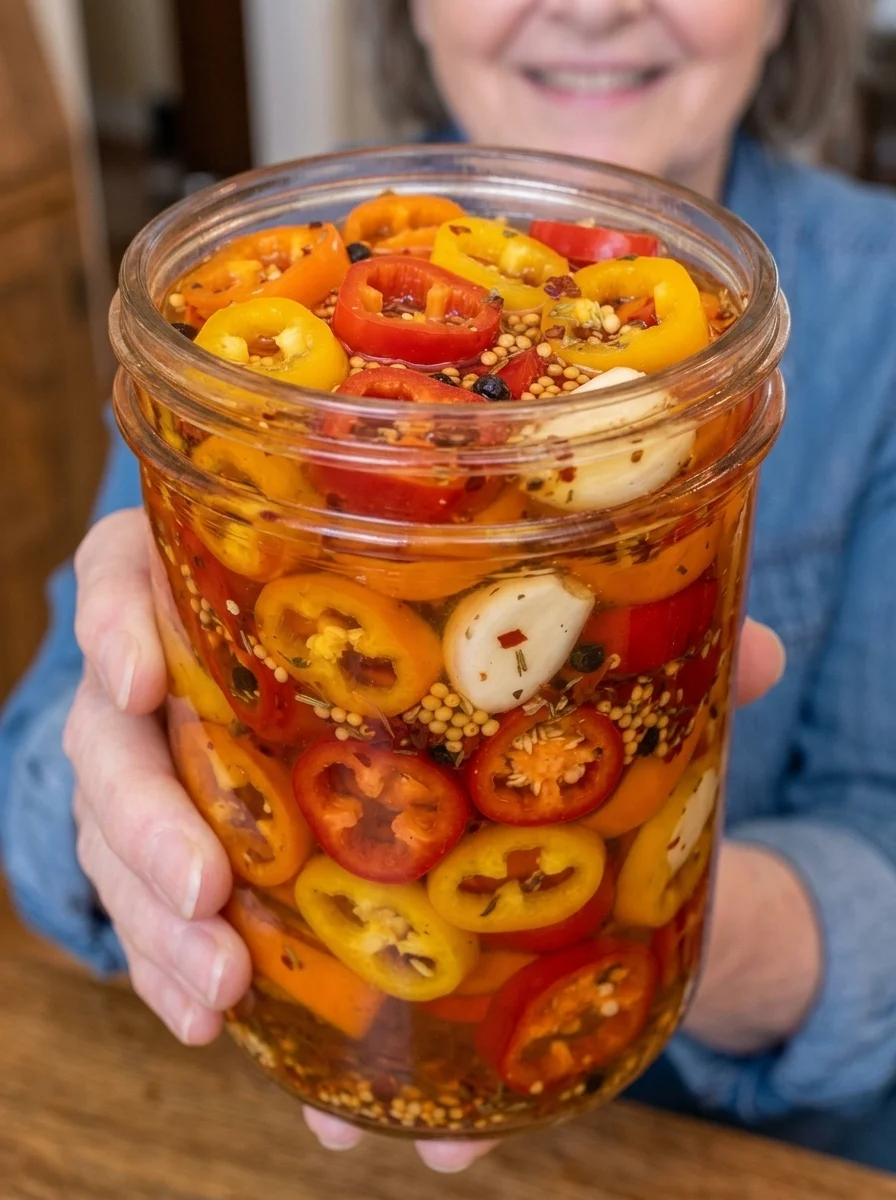
Colorful mini sweet peppers, a bright vinegar brine, and a little chile heat make these refrigerator peppers a useful addition to sandwiches, burgers, and snack boards. The peppers retain a fresh bite, while sugar rounds out the tang and garlic, mustard seeds, and peppercorns add savory flavor.
The preparation is simple: cut the peppers, heat the brine, combine, and refrigerate. After a day of chilling, the slices begin taking on the sweet-and-spicy seasoning. Thin rings are particularly convenient for sandwiches, while halves give you larger pieces for an antipasto platter.
Despite the name, mini sweet peppers themselves are generally mild. The red pepper flakes supply the heat in this recipe. Removing the sweet pepper seeds changes texture and appearance, not the intended spice level. Reduce the flakes if you want a gentler batch.
Recipe note: This supplied recipe has not been independently tested for acidity or shelf life. It is intended as a refrigerated quick-pickle recipe, not a shelf-stable preserve. Use commercial white vinegar labeled 5% acidity, keep the peppers refrigerated, and do not treat a sealed jar as a substitute for a tested canning process.
Why You’ll Love These Peppers
- Their red, orange, and yellow colors make an attractive condiment.
- A simple brine uses familiar pantry ingredients.
- Pepper flakes let you adjust the heat without changing the sweet peppers.
- Rings are easy to layer onto sandwiches and burgers.
- The recipe requires no canning equipment or room-temperature fermentation.
Recipe at a Glance
- Prep time: Approximately 15 minutes
- Brine heating: About 5–10 minutes
- Flavor rest: At least 24 hours refrigerated
- Total time: About 24 hours 20–25 minutes, plus brief cooling
- Servings: Approximately 8 condiment portions
- Yield: 1 pound peppers plus brine; container volume varies with the cut and packing
- Storage: Refrigerated only
Ingredients
- 1 pound mini sweet peppers, washed and cut into rings or halves
- 1 cup distilled white vinegar labeled 5% acidity
- 1 cup water
- 2 tablespoons granulated sugar
- 1 tablespoon kosher salt
- 3 garlic cloves, peeled and lightly crushed
- 1 teaspoon red pepper flakes, or less to taste
- 1 teaspoon mustard seeds
- 1/2 teaspoon black peppercorns
- 1/2 teaspoon dried oregano, optional
Ingredient Notes
Mini Sweet Peppers
Choose firm, glossy peppers without soft spots, mold, or deep damage. A mixture of colors makes the finished jar attractive, but use whichever colors are available. Wash under running water and remove the stems.
For rings, cut crosswise into pieces around 1/4 inch thick. For halves, cut lengthwise and remove loose seeds and excess inner tissue. Larger pieces may take longer to taste evenly seasoned than thin rings.
Mini sweet pepper seeds are not the source of the recipe’s heat. Remove them if you prefer a cleaner look or smoother bite, but adjust the red pepper flakes to control spiciness.
White Vinegar
Use commercial vinegar with 5% acidity clearly stated on the label. Do not use homemade vinegar or a low-acidity drinking vinegar. Distilled white vinegar gives a straightforward tang and allows the pepper colors to remain the focus.
The brine is not a tested canning formula simply because it contains equal quantities of vinegar and water. The food quantity, ingredients, handling, and processing all matter. Keep this preparation refrigerated and follow a validated recipe for pantry preservation.
Water
Measure the water rather than estimating. Do not add extra plain water to cover a jar that is packed awkwardly. Use a better-fitting container or make additional brine in the same proportions if needed.
Sugar
Two tablespoons provide a lightly sweet balance rather than a candy-like pickle. Sugar helps soften the impression of vinegar, but it is not being used here as the primary preservation method.
You can add a small amount more for flavor, but do not reduce vinegar or increase water to make the brine taste less sharp. A serving can also be paired with rich or mild foods to balance its tang.
Kosher Salt
Kosher salt crystal size varies by brand, so a tablespoon can produce different saltiness. Use your usual product consistently and avoid tightly compressing flaky crystals into the spoon.
This is not a fermentation recipe, and the salt does not turn the jar into a shelf-stable product. Avoid assuming that changing salt or sugar establishes a longer storage life.
Garlic
Lightly crushed cloves release flavor while remaining easy to remove. Choose sound, firm cloves and peel completely. The flavor can be noticeable after a day or two, so use fewer cloves if you prefer a milder garlic note.
No oil is included in this recipe. Do not add an oil layer to the storage jar in an attempt to preserve the vegetables.
Pepper Flakes and Whole Spices
Pepper flakes provide the heat. Start with 1/2 teaspoon for a gentler version, or the listed teaspoon if you enjoy warmth. Their strength varies, so a teaspoon is not a fixed heat level across all brands.
Mustard seeds and black peppercorns season the brine gradually. They may settle at the bottom or cling to pepper slices. Serve with a fork and shake off unwanted whole spices if preferred.
Equipment and Jar Size
Use a small nonreactive saucepan, a knife, a cutting board, and clean heat-safe food containers. Stainless steel works well for the brine. Avoid reactive copper, brass, or uncoated iron equipment with acidic liquids.
A pound of peppers plus two cups of brine may need more space than one pint jar provides. Have two smaller jars or a larger wide-mouth container ready. Halves create more empty spaces than rings, so the volume depends on how you cut and arrange them.
Use jars suited to warm liquid and follow their temperature guidance. Do not pour hot brine into an ordinary cold glass container. A container that is clean and heat-safe is still not a shelf-stable preserve once filled.
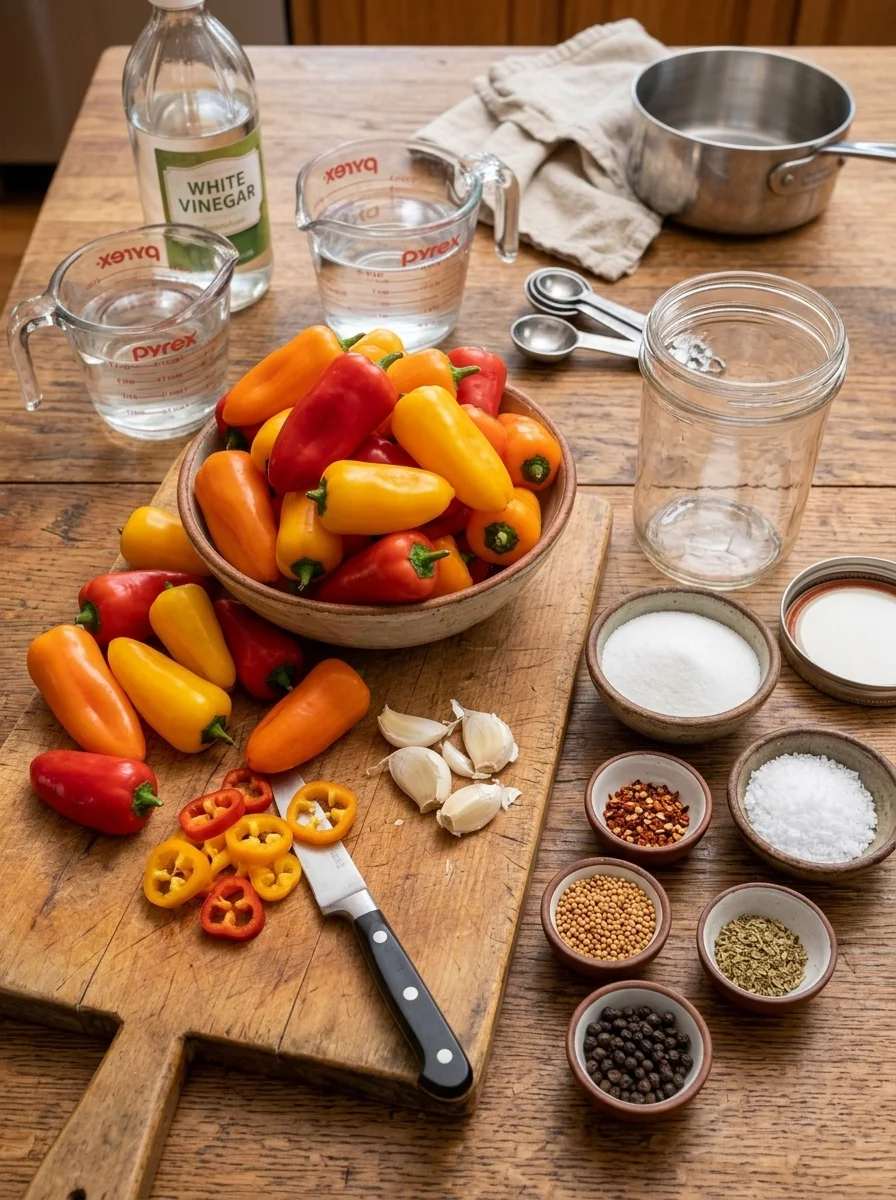
How to Make Sweet Heat Pickled Mini Sweet Peppers
1. Prepare the Peppers
Wash the peppers thoroughly. Remove stems and cut into rings or halves. Remove loose seeds if desired and discard any damaged pieces.
Pack into the prepared containers without crushing. Leave space for the garlic and spices, and avoid packing so tightly that liquid cannot move between the pieces.
2. Add the Seasonings
Distribute the garlic, red pepper flakes, mustard seeds, peppercorns, and optional oregano among the containers. Tuck the garlic between pepper pieces rather than leaving everything at the top.
3. Heat the Brine
Combine vinegar, water, sugar, and salt in a nonreactive saucepan. Heat over medium, stirring until the sugar and salt dissolve. Bring just to a gentle simmer, then remove from the heat.
There is no need to boil hard or reduce the mixture. Extended boiling changes concentration and can leave too little liquid to cover the vegetables.
4. Pour Carefully
Let the brine stand briefly if needed to suit your container’s temperature guidance. Pour over the peppers until covered. Move the pieces gently with a clean utensil to release trapped air.
If the liquid does not cover the peppers, divide them differently or prepare more brine in the same proportions. Do not top up with plain water. Use a suitable food-safe weight if needed to keep pieces beneath the liquid.
5. Cool Briefly and Refrigerate
Allow active steaming to subside briefly, then refrigerate promptly in suitable containers. Do not wait for a large jar to become completely cold on the counter. Smaller containers cool more efficiently.
Cover and keep at 40°F or below. Label the preparation date so the marinating time and storage period are easy to track.
6. Allow Flavor to Develop
Wait at least 24 hours before tasting. The peppers should taste tangy with garlic and a little chile warmth. A 2–3 day rest may develop a fuller flavor, though it does not begin a new storage period afterward.
Turn the container gently or use a clean utensil to redistribute spices if needed. Keep peppers covered by brine and return promptly to the refrigerator after checking.
7. Serve Cold
Lift out a portion with a clean fork. Drain briefly before adding to bread so the brine does not soak the sandwich. Serve cold alongside burgers, tacos, or a cheese platter.
Do not return served peppers to the main jar, and do not add fresh peppers to used brine to restart the process.
Tips for a Crisp, Balanced Result
Start With Fresh Peppers
A firm pepper has a better chance of retaining a pleasant bite than one already soft or wrinkled. Pickling flavors a vegetable; it does not restore freshness.
Choose a Consistent Cut
Similar-sized rings season and soften more evenly. Very thin slices absorb flavor quickly but can become softer, while thick halves keep more of their fresh pepper character.
Avoid Prolonged Heat
The warm brine helps dissolve seasonings, but long hot soaking can soften peppers. Cool briefly and refrigerate promptly rather than leaving the jar on a warm counter for hours.
Adjust Spice, Not the Acid Balance
Reduce pepper flakes for less heat. Do not dilute with extra water to fix a spicy batch. Pair a small portion with mild food or make the next batch with less chile.
Remember That the Brine Is Concentrated
A spoonful of liquid tastes sharper and saltier than a drained pepper on a sandwich. Judge the finished condiment in the way you plan to eat it rather than trying to make the brine taste like a beverage.
Serving Ideas
Layer drained rings onto cheeseburgers, turkey sandwiches, or grilled vegetable wraps. Their sweetness and tang contrast nicely with cheese, rich spreads, and roasted meats. Chop a small amount for a relish-style topping if you prefer even distribution.
Add a few slices to tacos or grain bowls just before serving. They provide a bright accent without needing another sauce. Start with a modest amount so the brine does not dominate other flavors.
For a snack board, offer a small bowl with a serving fork alongside cheese, crackers, olives, and fresh vegetables. Keep the main batch refrigerated and replenish the serving bowl rather than leaving the whole jar out.
In salads, drained chopped peppers can replace part of a tangy garnish. Taste before adding extra salt or vinegar to the dressing, since the peppers already supply both.
Flavor Variations
Milder Sweet Peppers
Use 1/2 teaspoon pepper flakes or less. The sweet peppers remain the same; removing their seeds alone does not change the heat supplied by dried chile.
A Little Sweeter
Add another teaspoon of sugar to the brine if desired. This balances flavor but does not reduce acidity or establish a different storage period.
More Herbal
Use the optional oregano for an Italian-inspired note. A little goes a long way in a small batch. Avoid adding large amounts of fresh ingredients while assuming the original formula remains unchanged.
Extra Heat at Serving
Add a small pinch of pepper flakes to an individual portion. This lets you customize one serving without making the entire batch hotter.
Jalapeño Variation
A few thin jalapeño slices can add fresh chile flavor, but they change the vegetable mixture. Treat this as an untested short-term variation and do not use it as a canning recipe. For a consistent base, add jalapeño to individual servings instead.
Chopped Pepper Relish
Chop a drained portion and spoon onto a sandwich immediately. Keep the remaining peppers in their original brine and do not return chopped leftovers to the jar.
Make-Ahead and Storage
Prepare a small batch a day before you want to serve it. Keep covered at 40°F or below throughout marinating and storage. Use clean utensils each time, and keep the vegetables covered by brine.
The supplied recipe suggests using within 2 weeks for quality. Because this exact formula has not been tested for a validated shelf life, that should be presented as a recipe estimate rather than a guaranteed safety period. For a cautious short-term approach, make only what you will use within several days; use a tested refrigerator-pickle recipe when you need a documented storage window.
Do not store the jar at room temperature, even if the lid seals as it cools. This is not a fermentation project, and unusual bubbling should not be encouraged as a sign of progress.
Freezing is not recommended for the intended crunchy texture because peppers may soften after thawing. Do not reuse vegetable-exposed brine for a new batch. Discard questionable food rather than tasting it to decide whether it is safe; appearance and smell cannot detect every hazard.
For serving, set out a small portion and return the main batch promptly to refrigeration. Avoid leaving perishable servings out longer than 2 hours, or 1 hour when temperatures exceed 90°F.
Troubleshooting
The Peppers Are Softer Than Expected
They may have been less fresh, cut very thinly, or held warm too long. Choose firm peppers, use a consistent cut, and refrigerate promptly. Some softening is normal as the peppers sit in brine.
The Brine Does Not Cover Everything
The container may be too wide or awkwardly packed. Divide between smaller containers or prepare additional brine in the same proportions. Do not add plain water.
The Peppers Are Too Spicy
Use smaller portions with mild food. For the next batch, reduce pepper flakes. Removing sweet pepper seeds will not remove the heat already introduced by the brine.
The Mixture Tastes Too Salty
Kosher salt density and packing vary. Use the same brand consistently and avoid extra salt at serving. Pair a small portion with unsalted food rather than diluting the entire jar.
There Are Spices at the Bottom
Settling is normal for whole spices and oregano. Gently redistribute before serving if desired. New mold, unusual bubbling, or other concerning changes are different from ordinary spice sediment.
Frequently Asked Questions
Are Mini Sweet Peppers Spicy?
They are generally mild. In this recipe, red pepper flakes provide the intended heat. Occasionally mislabeled or mixed peppers can differ, so know what you are using.
Should I Remove the Seeds?
Remove them for texture or appearance if desired. They do not make sweet peppers hot. The red pepper flakes are the main heat adjustment.
Can I Use Bell Peppers?
You can make a variation with sliced bell peppers. Their wall thickness and cut size may change the texture and container volume. The recipe remains untested for long storage or canning.
Can I Use Apple Cider Vinegar?
A commercial product labeled 5% acidity can provide a different flavor, but it changes the recipe. White vinegar gives the clean tang intended here. Do not substitute vinegar with unknown acidity.
Can I Can These for Pantry Storage?
No. Use a tested pepper-pickling recipe with its exact processing instructions. A hot brine and sealed jar alone are not a canning method.
Can I Reuse the Brine?
Do not start another batch with brine that has already held vegetables. Its composition changes as the peppers exchange water and acid with the liquid. Prepare fresh brine each time.
Are They About 35 Calories per Serving?
That estimate depends on portion size and how much sweetened brine is eaten. A drained serving may differ from a serving that includes liquid. Calculate from actual ingredients and portions if you need a closer figure; no verified nutrition analysis is provided.
Print
Sweet Heat Pickled Mini Sweet Peppers
Description
Prep time: About 15 minutes
Brine heating: 5–10 minutes
Flavor rest: At least 24 hours refrigerated
Servings: Approximately 8
Ingredients
- 1 pound mini sweet peppers, cut into rings or halves
- 1 cup distilled white vinegar, 5% acidity
- 1 cup water
- 2 tablespoons sugar
- 1 tablespoon kosher salt
- 3 garlic cloves, lightly crushed
- 1 teaspoon red pepper flakes, or less to taste
- 1 teaspoon mustard seeds
- 1/2 teaspoon black peppercorns
- 1/2 teaspoon dried oregano, optional
Instructions
- Wash peppers, remove stems, and cut evenly. Remove loose seeds if desired. Pack into clean, suitable heat-safe containers without crushing.
- Distribute garlic, pepper flakes, mustard seeds, peppercorns, and optional oregano among the peppers.
- Heat vinegar, water, sugar, and salt in a nonreactive saucepan, stirring to dissolve. Bring to a gentle simmer and remove from heat.
- Pour carefully into temperature-appropriate containers, covering the peppers. Release trapped air with a clean utensil. Do not top up with plain water.
- Cool briefly and refrigerate promptly at 40°F or below. Do not wait for complete counter cooling.
- Allow at least 24 hours for flavor, keeping peppers covered by brine. Serve with clean utensils.
Storage: Refrigerated only. The supplied two-week period is not validated for this exact formula; make a small batch for short-term use or follow a tested recipe for a documented storage period. Do not can or store at room temperature. Freezing is not recommended for crunch.