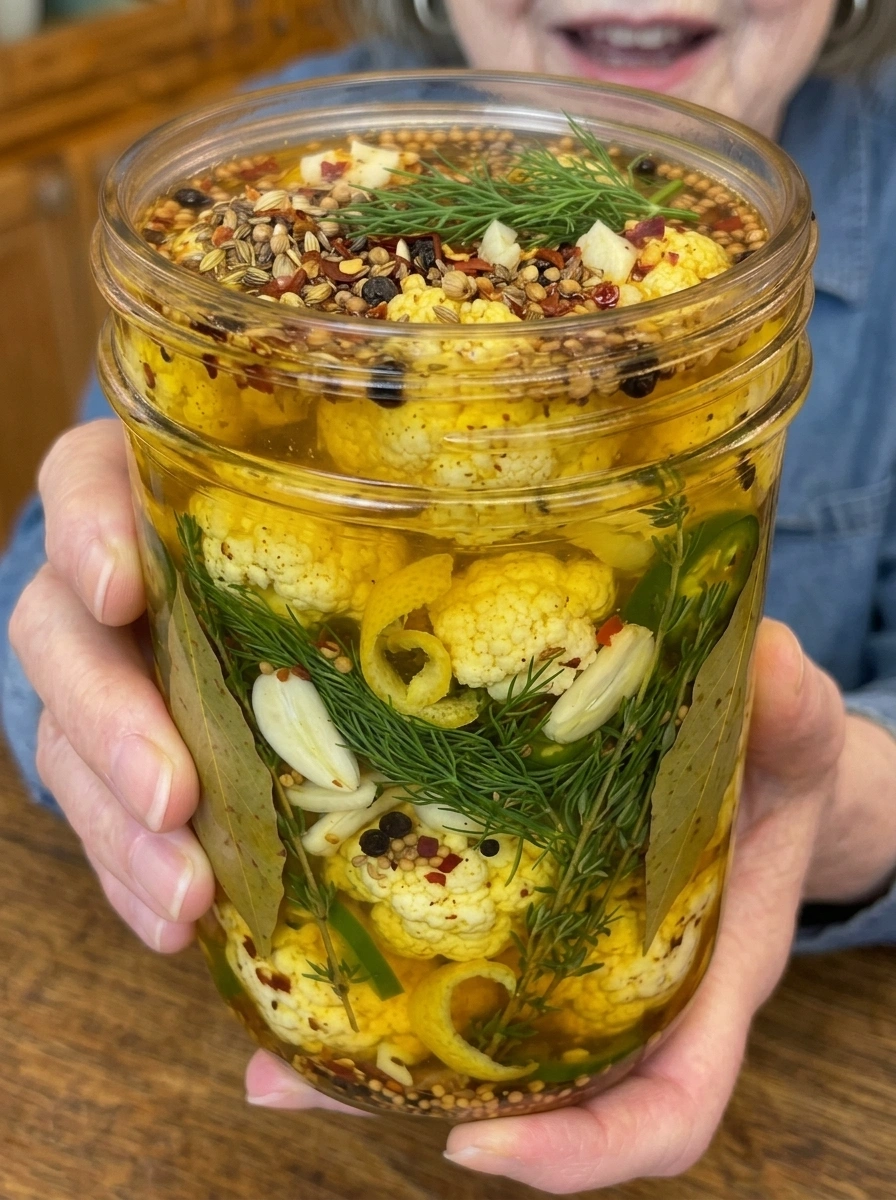
Pickled Cauliflower Bites: The Crisp, Garlicky Snack You’ll Sneak Straight from the Jar
There’s a special kind of satisfaction that comes from cracking open a jar of homemade pickles, and Pickled Cauliflower Bites deliver that satisfaction in every single piece. These cauliflower bites are crisp, tangy, and bursting with garlic, fresh dill, and aromatic pickling spices for an irresistibly crunchy snack. One bite and you’ll be piling them onto charcuterie boards, tossing them into salads, serving them with sandwiches, and sneaking them straight from the jar more often than you’d like to admit.
Cauliflower might not be the first vegetable that comes to mind when you think of a classic pickle, but its sturdy texture and mild flavor make it an ideal canvas for a bold, garlicky brine. This recipe keeps things wonderfully classic, leaning on fresh garlic, dill, thyme, and a well-rounded blend of whole pickling spices, while also offering a range of optional add-ins for those who want to customize the flavor with heat, color, or extra aromatics. The result is a versatile, crowd-pleasing pickle that’s every bit as satisfying as a traditional dill pickle, with a texture and shape that make it perfect for snacking.
This complete guide covers everything you need to know to make perfect Pickled Cauliflower Bites at home, including a full ingredient breakdown, detailed step-by-step instructions, expert tips for the best texture and flavor, creative variations, serving suggestions, storage guidelines, and answers to the most frequently asked questions about pickling cauliflower.
What Are Pickled Cauliflower Bites?
Pickled Cauliflower Bites are made by briefly blanching bite-sized cauliflower florets, then submerging them in a tangy vinegar brine infused with garlic, fresh dill, fresh thyme, and a classic blend of whole pickling spices, including mustard seeds, coriander seeds, celery seeds, and black peppercorns. The quick blanching step firms up the cauliflower and helps it absorb the brine more effectively, while an immediate ice bath locks in its crisp texture, preventing it from becoming soft during the extended pickling period.
This recipe is built around a classic, garlicky dill pickle flavor profile, similar to a traditional dill pickle spear but applied to cauliflower instead of cucumber. It also includes a range of optional flavor add-ins, such as sliced jalapeños for heat, turmeric for color, dill seed and fennel seeds for extra aromatic depth, and thin strips of lemon peel for brightness, allowing you to customize the recipe to your exact taste preferences.
The result is a pickle that’s crisp, tangy, garlicky, and herbaceous, with a satisfying crunch that holds up beautifully over weeks in the refrigerator.
Why This Recipe Works So Well
There are several reasons this recipe consistently produces crisp, flavorful, well-balanced results.
Blanching and ice-bathing preserve that signature crunch. A quick 2 minute blanch followed by an immediate ice bath is the key to keeping cauliflower crisp rather than soft after pickling, locking in both texture and a bright, appealing color.
Fresh garlic and herbs create real depth. Rather than relying only on dried spices, this recipe incorporates lightly crushed fresh garlic cloves along with fresh dill and thyme sprigs, infusing the brine with a lively, aromatic quality that dried ingredients alone can’t fully replicate.
A classic blend of whole pickling spices adds timeless complexity. Mustard seeds, coriander seeds, celery seeds, and black peppercorns are staples of traditional pickling for a reason, each contributing its own subtle, complementary note that works beautifully with the cauliflower’s mild flavor.
Optional add-ins make this recipe endlessly customizable. Whether you want to add heat with sliced jalapeños, a golden hue with turmeric, extra aromatic depth with dill seed and fennel seeds, or brightness with lemon peel, this recipe provides a flexible framework that can be adjusted to suit your exact preferences.
Extended pickling time rewards patience. While the cauliflower is ready to eat after 48 hours, letting it pickle for a full 5 to 7 days allows the garlicky, herbaceous brine to fully penetrate each floret, resulting in a much bolder, more well-rounded flavor throughout.
Ingredients You’ll Need
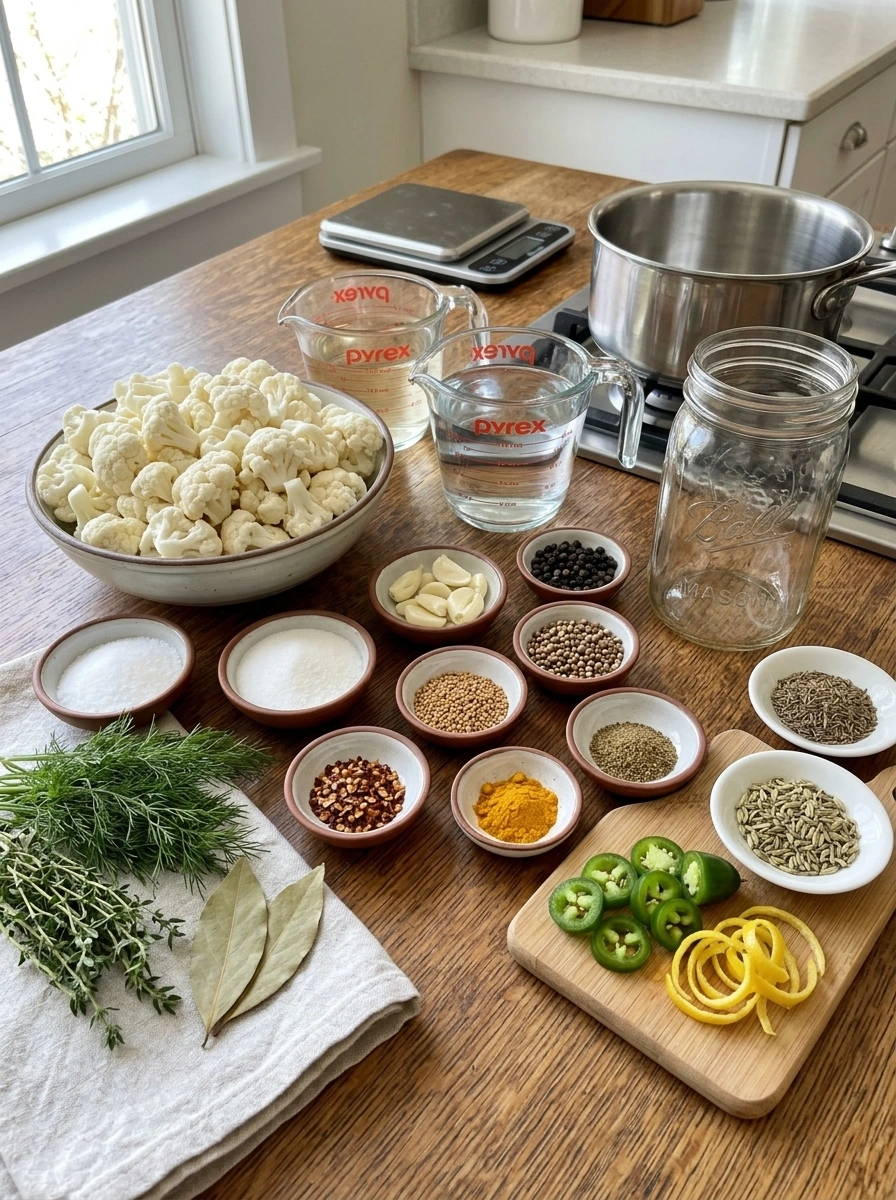
Here’s everything required to make a full batch of Pickled Cauliflower Bites.
For the cauliflower:
- 2 lbs fresh cauliflower florets, cut into bite-sized pieces
For the brine:
- 2 cups white vinegar
- 2 cups water
- 2 tablespoons pickling salt or kosher salt
- 1 tablespoon granulated sugar
Aromatics and spices:
- 6 cloves garlic, peeled and lightly crushed
- 2 sprigs fresh dill
- 2 sprigs fresh thyme
- 1 teaspoon whole black peppercorns
- 1 teaspoon mustard seeds
- 1 teaspoon coriander seeds
- 1/2 teaspoon celery seeds
- 1/2 teaspoon crushed red pepper flakes (optional)
- 2 bay leaves
Optional flavor add-ins:
- 2 small jalapeños, sliced
- 1/2 teaspoon turmeric (for a golden color)
- 1 teaspoon dill seed
- 1/2 teaspoon fennel seeds
- Thin strips of lemon peel
A Closer Look at the Key Ingredients
Fresh cauliflower is the foundation of this recipe. Look for a firm, fresh head with tightly packed florets and no dark spots or sliminess. Its naturally mild flavor and sturdy texture make it an excellent vehicle for absorbing the garlicky, herbaceous brine, especially once briefly blanched to prepare it for pickling.
White vinegar provides the sharp acidity necessary for pickling while delivering that classic tangy bite that pairs beautifully with the garlic and fresh herbs.
Pickling salt or kosher salt dissolves cleanly into the brine without clouding it, ensuring both proper preservation and a clean, balanced flavor throughout.
Granulated sugar, used in a modest amount, softens the sharp edges of the vinegar without making the pickle noticeably sweet, keeping the flavor focused on tang and garlic.
Garlic, lightly crushed rather than sliced, releases its pungent flavor gradually into the brine, mellowing slightly over the pickling period while still delivering real garlicky punch in every bite.
Fresh dill and fresh thyme contribute a bright, herbaceous quality that’s classic in traditional pickle recipes, infusing the brine with a lively freshness that dried herbs alone can’t fully replicate.
Whole black peppercorns, mustard seeds, coriander seeds, and celery seeds each bring their own earthy, slightly citrusy, or peppery notes, layering complexity into the brine that goes well beyond a simple vinegar pickle.
Crushed red pepper flakes, while optional, allow you to add a bit of extra heat for those who want their pickled cauliflower with a subtle kick.
Bay leaves contribute a mild herbal backbone that rounds out the overall flavor profile of the brine.
The optional flavor add-ins allow you to customize this recipe further: sliced jalapeños add fresh, bright heat; turmeric contributes a warm, earthy note along with a beautiful golden color; dill seed and fennel seeds deepen the aromatic, herbaceous quality of the brine; and thin strips of lemon peel introduce a subtle citrusy brightness.
Step-by-Step Instructions
Making Pickled Cauliflower Bites is a straightforward process, and following these steps closely will help ensure the best possible texture and flavor.
Step 1: Prep the Cauliflower
Wash the cauliflower thoroughly and cut it into evenly sized bite-sized florets.
Step 2: Blanch the Cauliflower
Bring a large pot of water to a boil. Blanch the cauliflower florets for 2 minutes, then immediately transfer them to an ice bath to stop the cooking. Drain well and pat dry.
Step 3: Pack the Jars
Pack the cooled cauliflower tightly into one large glass jar, or two quart-sized sterilized jars.
Step 4: Add the Aromatics and Spices
Divide the garlic, dill, thyme, bay leaves, peppercorns, mustard seeds, coriander seeds, celery seeds, and any optional flavor add-ins evenly among the jars.
Step 5: Build the Brine
In a medium saucepan, combine the white vinegar, water, pickling salt, and sugar.
Step 6: Heat Gently
Heat over medium heat, stirring until the salt and sugar dissolve completely. Do not let the brine boil vigorously.
Step 7: Cool Slightly
Remove the saucepan from the heat and allow the brine to cool for about 5 minutes before pouring it over the cauliflower.
Step 8: Pour Over the Cauliflower
Carefully pour the warm brine over the cauliflower until fully submerged. Use a pickle weight or another food-safe weight if necessary to keep the florets beneath the brine.
Step 9: Cool and Seal
Allow the jars to cool to room temperature. Seal tightly and refrigerate.
Step 10: Wait for the Best Flavor
Refrigerate for at least 48 hours before serving. For the best flavor and crunch, let the cauliflower pickle for 5 to 7 days, giving the brine time to fully penetrate each floret.
Tips for the Best Pickled Cauliflower Bites
Choose small to medium florets. Cutting the cauliflower into bite-sized, relatively uniform pieces ensures the brine penetrates evenly and results in a more consistent texture across every floret.
Don’t skip the blanching or ice bath. These two steps together are essential for achieving cauliflower that stays crisp rather than turning soft after an extended pickling period.
Crush the garlic rather than mincing it. Lightly crushing the garlic cloves, rather than mincing or thinly slicing them, allows the flavor to release more gradually into the brine, resulting in a milder, more mellow garlic presence than a fully minced version would provide.
Experiment with the optional add-ins. This recipe is designed to be a flexible base, so don’t be afraid to try different combinations of jalapeños, turmeric, dill seed, fennel seeds, and lemon peel to find your favorite version.
Use a pickle weight if needed. Cauliflower can sometimes float, especially once the brine is added, so a small, clean, food-safe weight helps ensure every floret stays beneath the surface, which is essential for even flavor and food safety.
Be patient for the best crunch and flavor. While the cauliflower is safe to eat after 48 hours, the full 5 to 7 day pickling period allows the garlicky, herbaceous brine to fully develop throughout each floret while the crunch remains intact.
Flavor Variations to Try
Since this recipe is already built with a flexible, customizable framework in mind, here are a few specific combinations worth trying.
Spicy Garlic Dill Version: Add the optional sliced jalapeños and a full teaspoon of crushed red pepper flakes for a genuinely spicy take on this classic garlic dill flavor profile.
Golden Turmeric Version: Add the optional turmeric for a beautiful golden color and subtle earthy warmth, reminiscent of a classic bread-and-butter style brine but without the added sweetness.
Extra Aromatic Version: Include both the dill seed and fennel seeds for a deeper, more complex herbaceous flavor that layers beautifully with the fresh dill and thyme.
Bright Citrus Version: Add a few thin strips of lemon peel for a subtle citrusy brightness that lifts the overall flavor of the brine.
Fully Loaded Version: Combine all of the optional add-ins together, jalapeños, turmeric, dill seed, fennel seeds, and lemon peel, for a truly complex, multi-layered pickle that showcases everything this recipe has to offer.
How to Serve Pickled Cauliflower Bites
These crisp, garlicky cauliflower bites are wonderfully versatile and can be enjoyed in a variety of ways.
- On a charcuterie or antipasto board: Arranged alongside cured meats, cheeses, and olives, they add a bold, tangy contrast to richer, milder items.
- On relish trays: A natural addition to a classic relish tray alongside olives, pickles, and other briny snacks.
- In salads: Chopped and tossed into a green salad or grain bowl for an instant boost of crunch and tang.
- On sandwiches: Sliced and layered onto a sandwich for a tangy, garlicky addition that replaces or complements traditional pickles.
- On tacos and burgers: Chopped and added as a crunchy, tangy topping for tacos or burgers.
- Straight from the jar: A simple, low-calorie snack that satisfies a craving for something crunchy, tangy, and garlicky all at once.
Storage Information
Proper storage is essential for keeping your Pickled Cauliflower Bites crisp, flavorful, and safe to eat.
- Store in an airtight jar in the refrigerator. Keep the cauliflower refrigerated at all times, never at room temperature.
- Use within three weeks. For the best quality, flavor, and food safety, plan to enjoy your pickled cauliflower within 3 weeks of making it.
- Keep the cauliflower completely submerged. This is essential to maintain its crisp texture and fresh flavor, as any exposed florets are more prone to spoilage.
- Enjoy within the first two weeks for the best quality. While the cauliflower remains safe to eat for up to three weeks, its texture and flavor are at their best during the first two weeks.
- These are refrigerator pickles only. This recipe is not intended for shelf-stable canning and should always be stored in the refrigerator rather than a pantry.
- Use clean utensils when serving. Always remove cauliflower with a clean fork or tongs rather than your fingers to help prevent contamination and extend freshness.
- Watch for signs of spoilage. If you notice an off smell, sliminess, unusual discoloration, or a bulging jar lid, discard the cauliflower immediately.
Recipe Overview
- Prep Time: 20 minutes
- Cook Time: 5 minutes
- Total Time: 25 minutes (plus chilling time)
- Servings: 10
- Calories: Approximately 35 per serving
Frequently Asked Questions
How long does Pickled Cauliflower need to sit before eating it? At a minimum, refrigerate the cauliflower for 48 hours so the brine has time to penetrate. For the best flavor and crunch, let it pickle for 5 to 7 days.
Can I can this recipe for shelf-stable, long-term storage? No. This recipe is designed as a refrigerator pickle and is not intended for shelf-stable canning. It should always be stored in the refrigerator and enjoyed within a few weeks.
Do I need to blanch the cauliflower before pickling? Yes, blanching is an important step. It softens the cauliflower just enough to allow the brine to penetrate effectively while helping preserve its texture, and the subsequent ice bath locks in its crisp bite.
Why do I need to use an ice bath after blanching? The ice bath immediately stops the cooking process, preventing residual heat from continuing to soften the cauliflower. This is the key step that keeps it crisp rather than mushy after pickling.
Can I use the optional add-ins together, or should I choose just one? You can absolutely combine multiple optional add-ins if you’d like a more complex, layered flavor. This recipe is designed to be flexible, so feel free to experiment with different combinations to find your favorite version.
Do I need to boil the brine? No. You only need to heat the brine gently, just until the salt and sugar dissolve completely, avoiding a vigorous boil. This is enough to properly dissolve the solids without dulling the brine’s fresher, brighter qualities.
How long does this cauliflower last in the refrigerator? When stored properly, fully submerged in brine and refrigerated at all times, Pickled Cauliflower Bites will stay fresh for up to 3 weeks, though the best quality is within the first 2 weeks.
Can I freeze pickled cauliflower? Freezing isn’t recommended, as it will cause the cauliflower to lose its crisp texture and become mushy once thawed. Refrigeration is the best storage method for maintaining both flavor and texture.
Why is my garlic lightly crushed rather than minced in this recipe? Lightly crushing the garlic rather than mincing it allows the flavor to release more gradually into the brine over the pickling period, resulting in a milder, more mellow garlic presence throughout the jar rather than an overpowering, sharp bite.
Final Thoughts
Pickled Cauliflower Bites bring classic, garlicky, herbaceous pickle flavor to a vegetable that’s often overlooked outside of a simple roasted side dish. With a quick blanch to preserve its signature crunch, fresh garlic and herbs, and a flexible range of optional add-ins, this cauliflower delivers a customizable, crave-worthy snack that you can tailor exactly to your taste.
Once you make your first jar, don’t be surprised if it becomes a permanent staple in your refrigerator, with a new flavor variation to try every time you make a fresh batch. Gather your ingredients, prep that garlicky brine, and get ready to enjoy one of the crispest, most versatile pickled snacks you’ll ever make at home.
Print
Pickled Cauliflower Bites
- Total Time: 25 minutes (plus chilling time)
Ingredients
Here’s everything required to make a full batch of Pickled Cauliflower Bites.
For the cauliflower:
-
- 2 lbs fresh cauliflower florets, cut into bite-sized pieces
For the brine:
-
- 2 cups white vinegar
- 2 cups water
- 2 tablespoons pickling salt or kosher salt
- 1 tablespoon granulated sugar
Aromatics and spices:
-
- 6 cloves garlic, peeled and lightly crushed
- 2 sprigs fresh dill
- 2 sprigs fresh thyme
-
- 1 teaspoon whole black peppercorns
- 1 teaspoon mustard seeds
- 1 teaspoon coriander seeds
-
- 1/2 teaspoon celery seeds
- 1/2 teaspoon crushed red pepper flakes (optional)
- 2 bay leaves
Optional flavor add-ins:
-
- 2 small jalapeños, sliced
- 1/2 teaspoon turmeric (for a golden color)
-
- 1 teaspoon dill seed
- 1/2 teaspoon fennel seeds
- Thin strips of lemon peel
Instructions
Making Pickled Cauliflower Bites is a straightforward process, and following these steps closely will help ensure the best possible texture and flavor.
Step 1: Prep the Cauliflower
Wash the cauliflower thoroughly and cut it into evenly sized bite-sized florets.
Step 2: Blanch the Cauliflower
Bring a large pot of water to a boil. Blanch the cauliflower florets for 2 minutes, then immediately transfer them to an ice bath to stop the cooking. Drain well and pat dry.
Step 3: Pack the Jars
Pack the cooled cauliflower tightly into one large glass jar, or two quart-sized sterilized jars.
Step 4: Add the Aromatics and Spices
Divide the garlic, dill, thyme, bay leaves, peppercorns, mustard seeds, coriander seeds, celery seeds, and any optional flavor add-ins evenly among the jars.
Step 5: Build the Brine
In a medium saucepan, combine the white vinegar, water, pickling salt, and sugar.
Step 6: Heat Gently
Heat over medium heat, stirring until the salt and sugar dissolve completely. Do not let the brine boil vigorously.
Step 7: Cool Slightly
Remove the saucepan from the heat and allow the brine to cool for about 5 minutes before pouring it over the cauliflower.
Step 8: Pour Over the Cauliflower
Carefully pour the warm brine over the cauliflower until fully submerged. Use a pickle weight or another food-safe weight if necessary to keep the florets beneath the brine.
Step 9: Cool and Seal
Allow the jars to cool to room temperature. Seal tightly and refrigerate.
Step 10: Wait for the Best Flavor
Refrigerate for at least 48 hours before serving. For the best flavor and crunch, let the cauliflower pickle for 5 to 7 days, giving the brine time to fully penetrate each floret.
- Prep Time: 20 minutes
- Cook Time: 5 minutes
Nutrition
- Serving Size: 10
- Calories: Approximately 35 per serving