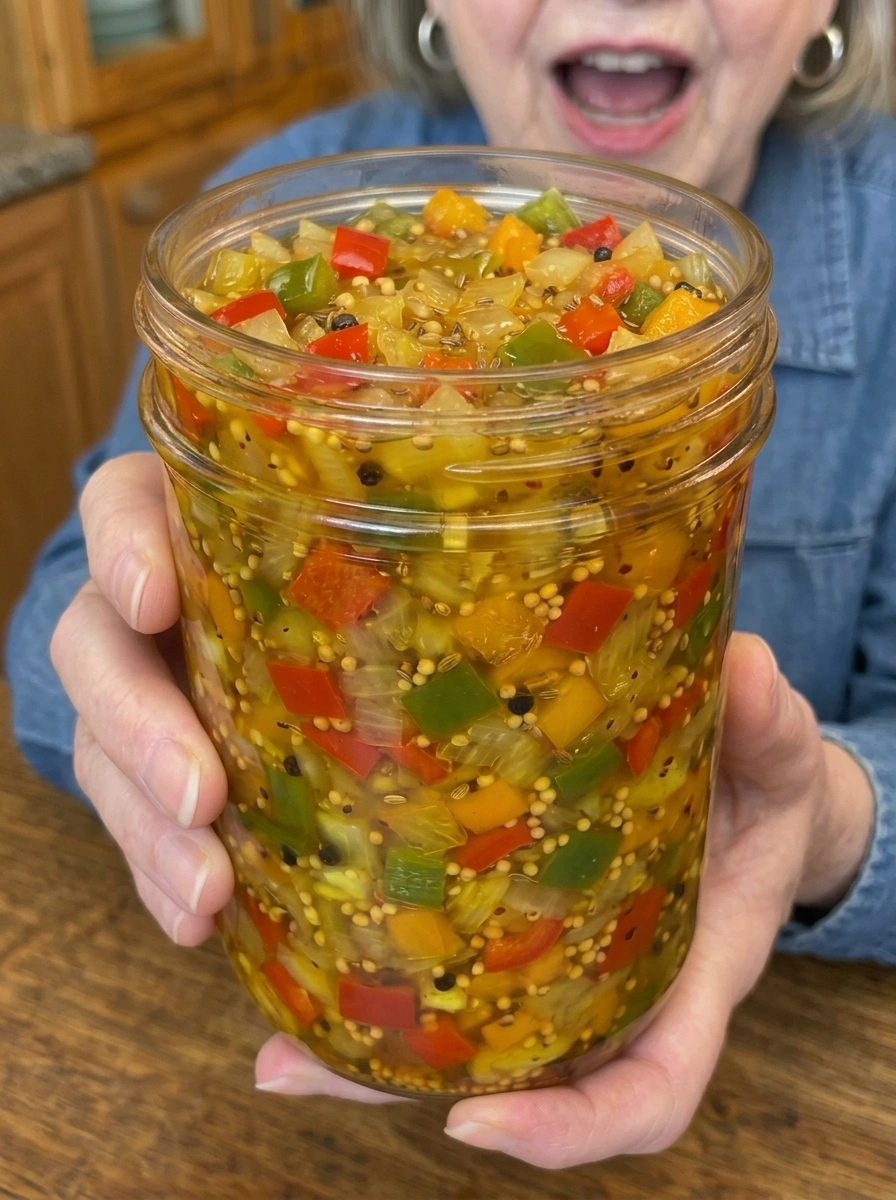
This Old-Fashioned Sweet Onion & Pepper Relish is sweet, tangy, and packed with colorful bell peppers and sweet onions. A classic homemade condiment perfect for hot dogs, burgers, and more!
If you love the sweet, tangy crunch of classic pepper relish but want to make your own version at home, this Old-Fashioned Sweet Onion & Pepper Relish is exactly what you need. Sweet onions and a colorful mix of green, red, and yellow bell peppers are finely chopped, then simmered in a sweet-and-tangy vinegar brine infused with mustard seed, celery seed, and turmeric. The result is a classic, old-fashioned relish bursting with color and that beloved homemade condiment flavor.
This recipe is a wonderful, time-honored way to preserve the sweet flavor of summer peppers and onions into a versatile condiment that adds a burst of flavor to everything from hot dogs to breakfast potatoes. Whether you grew up with a version of this relish in the family recipe box or are making it for the first time, this recipe walks through every step of this classic preparation.
Let’s dive into everything you need to know to make this sweet, tangy, old-fashioned onion and pepper relish at home.
What Is Sweet Pepper Relish?
Sweet pepper relish is a classic preserved condiment made from finely chopped bell peppers and onions, simmered in a sweet-and-tangy vinegar brine. Unlike hot pepper relishes built around chile heat, this version leans into the natural sweetness of bell peppers and sweet onions, resulting in a relish that’s bright, tangy, and only mildly spicy (or not spicy at all, if the optional jalapeño is omitted). This style of relish has deep roots in home canning traditions and is a beloved topping across the South and Midwest.
Why You’ll Love This Old-Fashioned Sweet Onion & Pepper Relish
There are so many reasons to make a batch of this classic, colorful relish:
Classic, nostalgic flavor. The sweet-and-tangy brine, infused with mustard seed and turmeric, delivers that beloved old-fashioned relish flavor many people remember from family cookouts.
Beautiful, colorful presentation. The mix of green, red, and yellow peppers creates a vibrant, eye-catching relish that’s as pretty as it is delicious.
Incredibly versatile. This relish works beautifully on hot dogs, burgers, sandwiches, and so much more, making it a useful condiment to always have on hand.
A great make-ahead recipe. Since the flavor continues to develop overnight, this relish is perfect for making ahead of a cookout or gathering.
Long shelf life. Stored properly, this relish keeps well in the refrigerator for a few weeks, or can be canned for shelf-stable storage using a tested recipe.
A rewarding preservation project. This relish is a wonderful introduction to home preserving, using classic techniques passed down through generations.
Ingredients You’ll Need
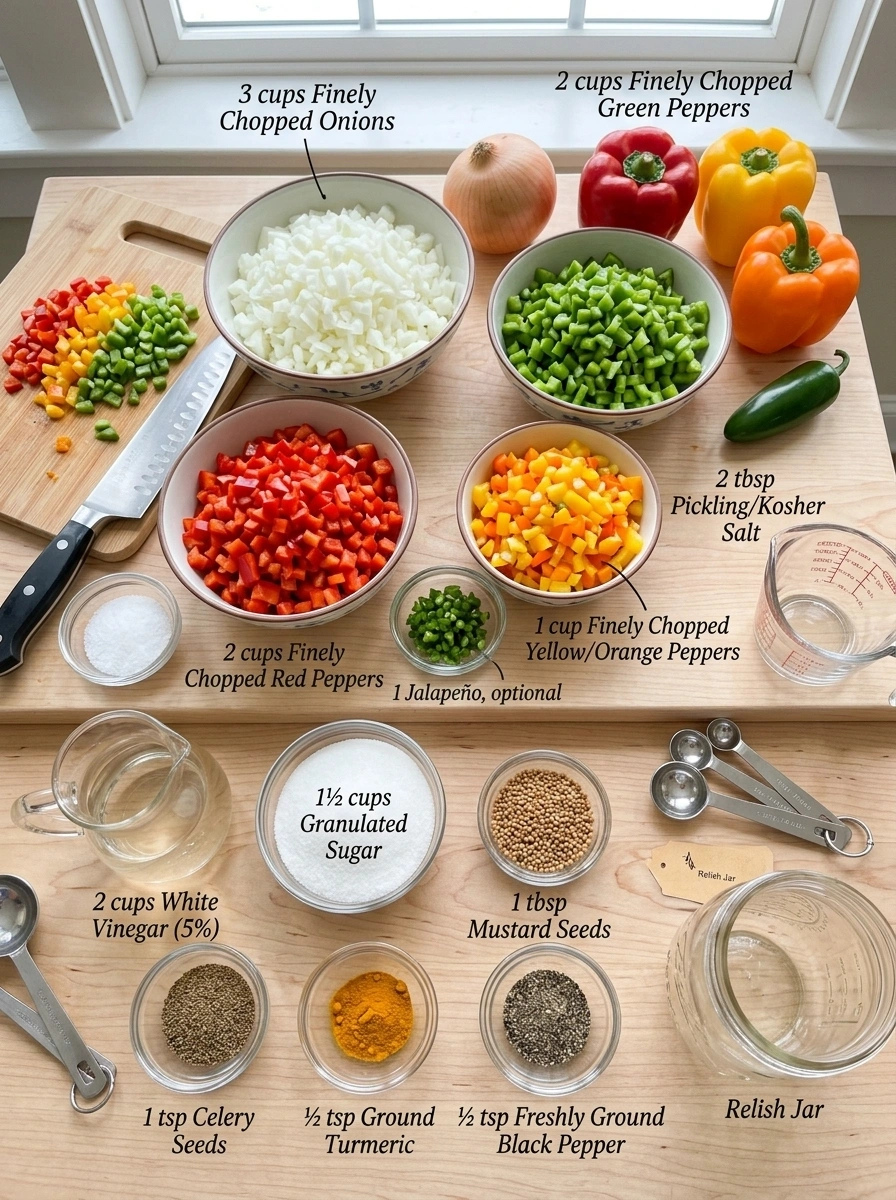
Here’s a breakdown of what goes into this classic, sweet-and-tangy relish and why each ingredient plays a role.
For the Relish
- 3 cups finely chopped sweet onions — Adds natural sweetness and savory depth once cooked down in the brine.
- 2 cups finely chopped green bell peppers — Contributes a slightly bitter, grassy contrast that’s classic in traditional relish recipes.
- 2 cups finely chopped red bell peppers — Adds sweetness and vibrant red color throughout the relish.
- 1 cup finely chopped yellow or orange bell pepper — Adds even more color variety and a touch of extra sweetness.
- 1 jalapeño, finely chopped, optional — For those who want to add a bit of heat to the classic sweet relish.
- 2 tbsp pickling or kosher salt — Used to draw out excess moisture from the vegetables before cooking, which helps concentrate their flavor and texture.
For the Sweet & Tangy Brine
- 2 cups white vinegar (5% acidity) — Forms the tangy, acidic base of the brine essential to a proper relish.
- 1½ cups granulated sugar — Provides the classic sweetness that balances the tangy vinegar and gives this relish its signature sweet-and-tangy flavor.
- 1 tbsp mustard seeds — Contributes a classic pickling spice flavor with a subtle, tangy bite.
- 1 tsp celery seeds — Adds a subtle, savory note typical of traditional relish recipes.
- ½ tsp ground turmeric — Contributes warm, earthy flavor along with the relish’s classic golden-tinged color.
- ½ tsp freshly ground black pepper — Adds a subtle, warm bite to round out the flavor.
How to Make Old-Fashioned Sweet Onion & Pepper Relish
This recipe involves a salting step to draw out moisture, followed by a simmer in the sweet-tangy brine. Here’s exactly how to make it.
Step 1: Prepare the Vegetables
Wash the peppers thoroughly and remove the stems, seeds, and membranes. Peel the onions. Finely chop the peppers and onions into small, relatively uniform relish-sized pieces. If using jalapeño, remove the seeds for a milder relish or leave some for extra heat.
Step 2: Salt the Vegetables
Place the chopped onions and peppers in a large bowl. Sprinkle with 2 tablespoons salt and toss thoroughly.
Step 3: Draw Out Moisture
Let the vegetables rest for approximately 1–2 hours. This draws out excess moisture and helps concentrate their texture.
Step 4: Rinse and Drain
Transfer the vegetables to a colander. Rinse thoroughly under cold water to remove excess salt. Drain extremely well, gently pressing out excess liquid.
Step 5: Make the Brine
Add the white vinegar, sugar, mustard seeds, celery seeds, turmeric, and black pepper to a large saucepan. Bring to a gentle boil over medium-high heat, stirring until the sugar completely dissolves.
Step 6: Cook the Relish
Add the drained onion and pepper mixture. Return to a gentle boil, then reduce the heat. Simmer uncovered for approximately 15–20 minutes, stirring occasionally. The vegetables should become tender while retaining a little texture.
Step 7: Adjust the Consistency
If the relish looks too watery, continue simmering uncovered for another 5–10 minutes. The finished mixture should be juicy and glossy but still thick enough to spoon onto a sandwich without immediately running everywhere.
Step 8: Cool and Jar
Remove from the heat and allow the relish to cool slightly. Spoon it into clean glass jars or airtight containers, distributing the vegetables and brine evenly.
Step 9: Refrigerate
Once cooled, cover tightly and refrigerate. For the best flavor, let the relish rest for at least 24 hours before serving. This gives the sweet onions, peppers, vinegar, and spices time to blend together.
Serving Ideas for Sweet Onion & Pepper Relish
This classic relish is wonderfully versatile. Here are some of the best ways to enjoy it:
- Hot dogs and bratwurst — A classic, beloved pairing for a backyard cookout.
- Hamburgers and cheeseburgers — Adds a sweet, tangy crunch that cuts through rich, savory beef.
- Pulled pork — The sweet-tangy flavor pairs perfectly with smoky, saucy pulled pork.
- Grilled sausages — A traditional accompaniment that complements the richness of sausage beautifully.
- Roast beef sandwiches — Adds a bright, tangy contrast to rich, savory roast beef.
- Grilled chicken — Serve alongside grilled chicken for a punch of sweet, tangy flavor.
- Pinto or baked beans — A classic Southern pairing that adds extra flavor to a simple pot of beans.
- Meatloaf — Serve alongside or mix a spoonful into the meatloaf mixture for extra flavor.
- Eggs and breakfast potatoes — Adds a tangy, unexpected twist to a simple breakfast.
- Crackers with cream cheese — A simple, classic way to serve this relish as an appetizer.
Flavor Variations
Spicy Pepper Relish: Add 2 jalapeños or a serrano pepper for a spicier version of this classic relish.
Extra-Sweet Relish: Add a little more sugar to taste while the brine is hot for an even sweeter, more classic old-fashioned flavor.
Mustard Relish: Increase the mustard seeds and add a small amount of prepared yellow mustard for a tangier, more mustard-forward relish.
Garden Relish: Add finely chopped cucumber or green tomato for additional texture and a slightly different flavor profile.
Tips for the Best Sweet Onion & Pepper Relish
Chop the vegetables uniformly. Finely and evenly chopping the peppers and onions ensures a consistent texture throughout the finished relish.
Don’t skip the salting step. Salting and resting the vegetables before cooking is essential for drawing out excess moisture, which helps prevent a watery relish and concentrates the flavor.
Rinse and drain thoroughly. Be sure to rinse off the excess salt and drain the vegetables very well before adding them to the brine.
Simmer until the texture is right. Cook the relish until the vegetables are tender but still have a bit of texture, rather than cooking them down until mushy.
Let it rest before serving. While technically ready after cooking, this relish tastes noticeably better after resting in the refrigerator for at least 24 hours.
Use clean, sterilized jars. Starting with clean glass jars helps ensure the best flavor and longest shelf life for your finished relish.
Recipe Variations and Substitutions
This classic sweet pepper relish recipe is easy to customize based on your preferences:
- Add heat: Include a jalapeño or serrano pepper for a spicier version of this traditionally mild, sweet relish.
- Adjust the sweetness: Reduce the sugar slightly for a more tangy, less sweet relish, or increase it for an even sweeter, more classic old-fashioned flavor.
- Add extra vegetables: Some variations include finely chopped cucumber, celery, or green tomato alongside the classic peppers and onions.
- Try different onions: While sweet onions like Vidalia or Walla Walla are classic for this recipe, yellow onions can be substituted for a slightly sharper flavor.
- Adjust the spice blend: Some variations include a pinch of ground cloves or allspice for a slightly different, warmly spiced flavor profile.
Storage Information
Keep the relish in clean, tightly sealed containers in the refrigerator and enjoy within about 2–3 weeks. Important: this version is intended as a refrigerator relish. For shelf-stable pantry storage, use a tested home-canning recipe and follow its exact ingredient ratios, vinegar acidity, jar size, processing time, and altitude adjustments, as these factors are essential for safe, shelf-stable canning.
Frequently Asked Questions
What are the best onions to use for this relish? Sweet onion varieties like Vidalia or Walla Walla work best for this recipe, as their natural sweetness complements the sweet-tangy brine. Yellow onions can be substituted for a slightly sharper flavor.
Why do I need to salt and rinse the vegetables first? Salting the vegetables draws out excess moisture, which helps concentrate their flavor and prevents the finished relish from becoming watery. Rinsing afterward removes the excess salt before cooking.
How long does this relish last in the refrigerator? Stored in clean, tightly sealed containers in the refrigerator, this relish should be used within about 2–3 weeks for the best quality.
Can I can this relish for shelf-stable storage? This recipe as written is intended as a refrigerator relish. For shelf-stable, pantry-safe jars, you’ll need to follow a tested home-canning recipe with the exact acidity levels, ingredient proportions, jar sizes, and processing times required for safe canning.
Is this relish spicy? As written without the optional jalapeño, this relish has a classic sweet-and-tangy flavor with no heat. Adding the jalapeño will introduce a mild kick of spice.
Why is my relish watery? A watery relish is often the result of not draining the salted vegetables thoroughly enough before adding them to the brine, or not simmering long enough to reduce excess liquid. Continue simmering uncovered for an additional 5–10 minutes if needed.
Recipe Summary
What to Expect: A sweet, tangy relish packed with colorful bell peppers and sweet onions, delivering that classic old-fashioned, homemade condiment flavor.
This Old-Fashioned Sweet Onion & Pepper Relish transforms simple onions and peppers into a vibrant, versatile condiment with deep, nostalgic roots. With its perfect balance of sweet and tangy flavors, this classic relish is guaranteed to become a cherished addition to your homemade pantry, whether served at a summer cookout or spooned onto a simple sandwich.
Make a batch this season, and get ready for this sweet, tangy relish to become a new family tradition!
Print
Old-Fashioned Sweet Onion & Pepper Relish
Ingredients
Here’s a breakdown of what goes into this classic, sweet-and-tangy relish and why each ingredient plays a role.
For the Relish
- 3 cups finely chopped sweet onions — Adds natural sweetness and savory depth once cooked down in the brine.
- 2 cups finely chopped green bell peppers — Contributes a slightly bitter, grassy contrast that’s classic in traditional relish recipes.
- 2 cups finely chopped red bell peppers — Adds sweetness and vibrant red color throughout the relish.
- 1 cup finely chopped yellow or orange bell pepper — Adds even more color variety and a touch of extra sweetness.
- 1 jalapeño, finely chopped, optional — For those who want to add a bit of heat to the classic sweet relish.
- 2 tbsp pickling or kosher salt — Used to draw out excess moisture from the vegetables before cooking, which helps concentrate their flavor and texture.
For the Sweet & Tangy Brine
- 2 cups white vinegar (5% acidity) — Forms the tangy, acidic base of the brine essential to a proper relish.
- 1½ cups granulated sugar — Provides the classic sweetness that balances the tangy vinegar and gives this relish its signature sweet-and-tangy flavor.
- 1 tbsp mustard seeds — Contributes a classic pickling spice flavor with a subtle, tangy bite.
- 1 tsp celery seeds — Adds a subtle, savory note typical of traditional relish recipes.
- ½ tsp ground turmeric — Contributes warm, earthy flavor along with the relish’s classic golden-tinged color.
- ½ tsp freshly ground black pepper — Adds a subtle, warm bite to round out the flavor.
Instructions
This recipe involves a salting step to draw out moisture, followed by a simmer in the sweet-tangy brine. Here’s exactly how to make it.
Wash the peppers thoroughly and remove the stems, seeds, and membranes. Peel the onions. Finely chop the peppers and onions into small, relatively uniform relish-sized pieces. If using jalapeño, remove the seeds for a milder relish or leave some for extra heat.
Place the chopped onions and peppers in a large bowl. Sprinkle with 2 tablespoons salt and toss thoroughly.
Let the vegetables rest for approximately 1–2 hours. This draws out excess moisture and helps concentrate their texture.
Transfer the vegetables to a colander. Rinse thoroughly under cold water to remove excess salt. Drain extremely well, gently pressing out excess liquid.
Add the white vinegar, sugar, mustard seeds, celery seeds, turmeric, and black pepper to a large saucepan. Bring to a gentle boil over medium-high heat, stirring until the sugar completely dissolves.
Add the drained onion and pepper mixture. Return to a gentle boil, then reduce the heat. Simmer uncovered for approximately 15–20 minutes, stirring occasionally. The vegetables should become tender while retaining a little texture.
If the relish looks too watery, continue simmering uncovered for another 5–10 minutes. The finished mixture should be juicy and glossy but still thick enough to spoon onto a sandwich without immediately running everywhere.
Remove from the heat and allow the relish to cool slightly. Spoon it into clean glass jars or airtight containers, distributing the vegetables and brine evenly.
Once cooled, cover tightly and refrigerate. For the best flavor, let the relish rest for at least 24 hours before serving. This gives the sweet onions, peppers, vinegar, and spices time to blend together.