Sensory-Rich Introduction with Immediate Craving
Imagine slicing into a Mint Chocolate Chip Icebox Cake, the cool, creamy layers beckoning you with their inviting aroma of fresh mint and rich chocolate. As you take your first bite, the velvety whipped cream melts in your mouth, perfectly complemented by the satisfying crunch of chocolate wafer cookies. Each mouthful is a delightful dance of flavors, where the refreshing mint invigorates your senses, while the chocolate adds a touch of indulgence. It’s a dessert that not only looks stunning with its layered presentation but also tastes like a celebration of summer in every bite.
This cake holds a special place in my heart, as it was the star of our family gatherings during those warm summer evenings. I remember my grandmother meticulously layering the cookies and cream, her laughter filling the kitchen as we eagerly awaited the first slice. It was a tradition that brought us together, a sweet reminder of the love and joy shared around the table. The Mint Chocolate Chip Icebox Cake became synonymous with our summer celebrations, a dessert that marked birthdays, barbecues, and even simple family dinners.
As the sun set and the fireflies danced outside, we would gather on the porch, plates in hand, savoring the coolness of the cake against the warm summer air. The nostalgia of those moments lingers, making this cake not just a recipe, but a cherished memory that I love to recreate for my own family now. Whether it’s a birthday party, a summer barbecue, or a holiday gathering, this cake shines as the perfect ending to any meal, bringing smiles and satisfied sighs from everyone at the table.
Why You’ll Love This Mint Chocolate Chip Icebox Cake
Let me tell you, this Mint Chocolate Chip Icebox Cake is not just a dessert; it’s an experience that tantalizes your taste buds and brings joy to your gatherings. Here’s why you’ll fall head over heels for this delightful treat:
- Texture Contrast: Picture this: the smooth, airy whipped cream layers contrasting beautifully with the crunchy chocolate wafer cookies. Each bite offers a delightful play of textures that keeps your palate engaged and craving more.
- Flavor Balance: The refreshing mint flavor dances harmoniously with the rich, decadent chocolate. It’s like a cool breeze on a hot summer day, perfectly complementing the sweetness without overwhelming your senses.
- Versatility: This cake is a chameleon! Whether it’s a birthday party, a summer barbecue, or a cozy family dinner, it fits right in. Plus, you can easily customize it to suit different tastes—add some crushed berries for a fruity twist or swap in different cookies for a unique spin.
- Ease of Preparation: If you’re short on time or cooking skills, fear not! This no-bake recipe is incredibly simple and requires minimal effort. You’ll be amazed at how quickly you can whip it up and impress your guests.
- Universal Appeal: Whether you’re a die-hard mint lover or a chocolate enthusiast, this cake has something for everyone. It’s a crowd-pleaser that brings smiles to faces young and old, making it the perfect addition to any gathering.
Trust me, once you serve this cake, it will become a staple in your dessert repertoire. It’s not just about the flavors; it’s about the memories you’ll create while sharing this delightful treat with your loved ones.
Essential Tools & Preparation Strategy
Before diving into the delightful world of the Mint Chocolate Chip Icebox Cake, let’s gather our tools and set the stage for success. Having the right equipment not only makes the process smoother but also enhances the joy of creating this creamy masterpiece.
- Mixing Bowl: A large mixing bowl is essential for whipping the cream and mixing all the ingredients. I recommend using a glass or stainless steel bowl, as they help maintain the cold temperature of the cream.
- Electric Mixer: An electric mixer is a game-changer for achieving the perfect whipped cream consistency quickly. If you have a stand mixer, even better! It allows you to multitask while the cream whips to fluffy perfection.
- Spatula: A silicone spatula is your best friend for gently folding in the chocolate chips without deflating the whipped cream. Trust me, this step is crucial for maintaining that light, airy texture.
- Serving Platter: Choose a large, flat serving platter to assemble and present your cake beautifully. A round platter adds a nice touch, but any large surface will do.
- Plastic Wrap: This is important for covering the cake while it chills in the refrigerator, ensuring it sets properly and stays fresh.
- Measuring Cups and Spoons: Accurate measurements are key to achieving the best results, so don’t skip this step! A set of dry and liquid measuring cups will serve you well.
- Optional: If you want to make cleanup a breeze, consider using parchment paper to line your platter. It makes for easy removal and keeps your presentation neat.
With your tools ready, you’re one step closer to creating a dessert that will have everyone asking for seconds. Let’s get those hands moving and prepare for the delicious layers of minty goodness!
Ingredients & Their Roles in This Mint Chocolate Chip Icebox Cake
Understanding the ingredients in your Mint Chocolate Chip Icebox Cake is key to mastering this delightful dessert. Each component plays a vital role in creating the perfect balance of flavor and texture. Let’s break it down:
For the Cake:
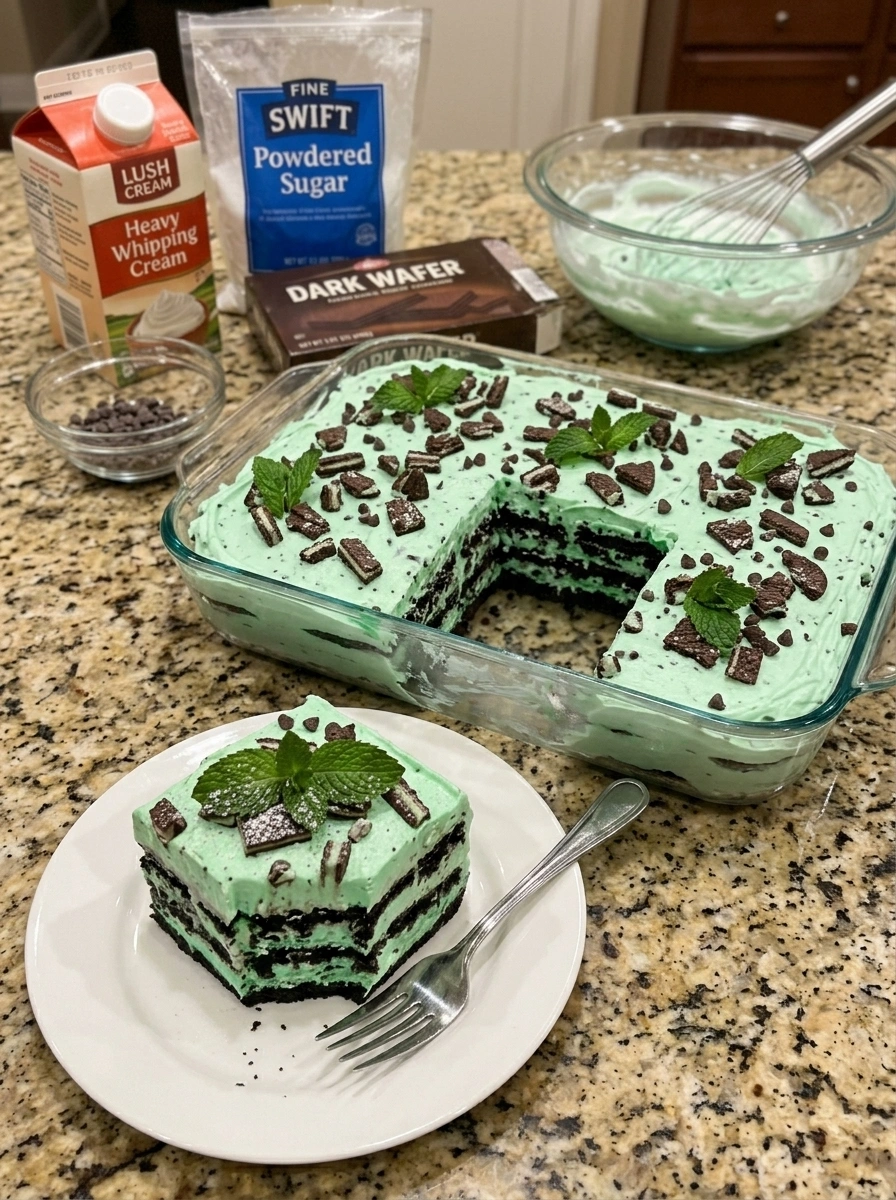
- Heavy Whipping Cream: This is the star of the show! It provides a rich, creamy base that forms the luscious layers of the cake. When whipped, it transforms into a light and airy texture that melts in your mouth.
- Powdered Sugar: Not only does it sweeten the cream, but it also helps stabilize it, ensuring that your whipped cream holds its shape beautifully. The fine texture of powdered sugar blends seamlessly, avoiding any graininess.
- Peppermint Extract: This ingredient infuses the cake with a refreshing mint flavor that elevates the entire dessert. A little goes a long way, so start with a teaspoon and adjust to your taste preference.
- Mini Chocolate Chips: These little bursts of chocolate add delightful texture and flavor throughout the cake. Their small size ensures that they distribute evenly, providing a perfect chocolatey contrast to the creamy layers.
- Chocolate Wafer Cookies: These cookies form the structural backbone of the cake. Their crunchy texture contrasts beautifully with the smooth cream, creating a satisfying bite that keeps you coming back for more.
For Garnish:
- Fresh Mint Leaves: Not only do they enhance the visual appeal of your cake, but they also add a fresh aroma that complements the mint flavor beautifully. A few sprigs on top make for a stunning presentation!
- Additional Chocolate Chips: Sprinkling some extra chocolate chips on top not only looks inviting but also adds an extra layer of chocolate flavor that chocolate lovers will appreciate.
Substitutions:
- If you have dietary restrictions, consider using gluten-free chocolate wafer cookies to make this cake accessible to everyone.
- For those looking to reduce sugar, alternative sweeteners can be used in place of powdered sugar. Just be sure to check the conversion ratios for the best results!
With these ingredients in hand, you’re well on your way to creating a Mint Chocolate Chip Icebox Cake that will impress your family and friends. Each component is carefully chosen to ensure a delightful experience, so let’s get ready to layer up some deliciousness!
Step-by-Step Guide to Perfect Mint Chocolate Chip Icebox Cake
Now that we have our ingredients and tools ready, it’s time to dive into the fun part: assembling our Mint Chocolate Chip Icebox Cake! Follow these simple steps, and you’ll have a stunning dessert that’s sure to impress.
- Whip the Cream: In a large mixing bowl, whip the heavy cream using an electric mixer on medium speed until soft peaks form. This should take about 2-3 minutes. The cream should be thick enough to hold its shape but still soft and fluffy.
- Add Sweetness and Flavor: Gradually add the powdered sugar and peppermint extract to the whipped cream. Continue to whip on medium-high speed until stiff peaks form, which will take another 2-3 minutes. You’ll know it’s ready when the cream holds its shape firmly and has a glossy finish.
- Incorporate Chocolate Chips: Gently fold in the mini chocolate chips using a spatula. Be careful not to deflate the whipped cream; use a gentle folding motion to maintain that light, airy texture.
- Layer the Cookies: On a serving platter, lay down a single layer of chocolate wafer cookies, slightly overlapping them. This will create a solid base for your cake.
- Spread the Cream: Using a spatula, spread a generous layer of the mint cream mixture over the cookies, smoothing it out evenly. Make sure to cover the cookies completely for a delicious bite every time.
- Repeat the Layers: Continue the layering process by adding another layer of cookies followed by more mint cream. Repeat until all ingredients are used, finishing with a final layer of cream on top. This will create a beautiful, tall cake that’s visually appealing.
- Chill the Cake: Cover the cake with plastic wrap and refrigerate for at least 4 hours, or overnight for the best results. This chilling time allows the flavors to meld and the cake to set properly, making it easier to slice.
- Garnish and Serve: Before serving, garnish your cake with fresh mint leaves and additional chocolate chips for that extra touch of elegance. This not only enhances the visual appeal but also adds a burst of freshness.
And there you have it! A step-by-step guide to creating a Mint Chocolate Chip Icebox Cake that’s as delightful to look at as it is to eat. Trust me, the anticipation while it chills is worth every moment when you finally slice into this creamy, cool delight!
Chef’s Notes & Pro Tips for Flawless Results
As you embark on your journey to create the perfect Mint Chocolate Chip Icebox Cake, here are some invaluable tips and tricks that I’ve gathered over the years. These insights will help you achieve a dessert that not only looks stunning but tastes absolutely divine!
- Make-Ahead Instructions: One of the best features of this cake is its make-ahead capability. You can prepare it up to 2 days in advance, allowing the flavors to meld beautifully. This is a lifesaver for busy schedules, especially when you want to impress guests without the last-minute rush!
- Storage: To maintain the cake’s freshness, keep it covered in the refrigerator. This will prevent it from absorbing any unwanted odors and ensure that each slice remains as delightful as the first.
- Equipment Recommendations: If you have a stand mixer, I highly recommend using it for whipping the cream. It saves time and effort, allowing you to multitask while achieving that perfect fluffy consistency. Plus, it’s a great way to avoid arm fatigue!
- Customization Options: Feel free to adjust the amount of peppermint extract based on your personal preference. If you’re a mint enthusiast, go ahead and add a bit more! Additionally, consider adding crushed chocolate wafer cookies into the cream for an extra layer of texture and flavor that will surprise your taste buds.
With these pro tips in your back pocket, you’re well-equipped to create a Mint Chocolate Chip Icebox Cake that will leave everyone raving. Remember, cooking is all about experimenting and having fun, so don’t hesitate to make this recipe your own!
Avoid These Common Cooking Mistakes
As you embark on your journey to create the perfect Mint Chocolate Chip Icebox Cake, it’s essential to be aware of some common pitfalls that can affect your dessert’s outcome. Here are the mistakes to avoid, along with tips to ensure your cake turns out flawlessly:
- Over-whipping the cream: This can lead to a grainy texture that’s less than desirable. To avoid this, stop whipping as soon as stiff peaks form. You want the cream to be thick and fluffy, not over-processed.
- Not chilling long enough: If you don’t allow the cake to chill adequately, it may fall apart when you slice it. Make sure to refrigerate for at least 4 hours, or even better, overnight. This chilling time is crucial for the layers to set properly.
- Using stale cookies: Stale cookies can negatively impact the texture of your cake. Always ensure that your chocolate wafer cookies are fresh and crisp for the best results. A quick taste test can help you determine their freshness!
- Too much peppermint extract: While mint is the star of this dessert, too much can overpower the flavor. Start with less and adjust to taste. You can always add more, but it’s hard to take it out once it’s in!
- Not folding gently: When incorporating the chocolate chips into the whipped cream, be gentle! Not folding carefully can deflate the whipped cream, resulting in a denser texture. Use a gentle folding motion to keep that light, airy quality.
- Skipping the garnish: Don’t underestimate the power of presentation! Skipping the garnish can miss out on visual appeal. Always add fresh mint leaves and a sprinkle of chocolate chips on top for that extra touch of elegance.
- Using the wrong type of chocolate chips: The type of chocolate chips you use can alter the taste and texture of your cake. Stick to mini chocolate chips for the best distribution and a delightful bite in every slice.
By keeping these common mistakes in mind, you’ll be well on your way to creating a stunning and delicious Mint Chocolate Chip Icebox Cake that will impress your family and friends. Happy baking!
Creative Variations & Customizations
One of the best things about the Mint Chocolate Chip Icebox Cake is its versatility! You can easily adapt this recipe to suit different dietary needs or to simply mix things up a bit. Here are some creative variations and customizations that will keep your dessert game exciting:
- Gluten-Free Version: For those with gluten sensitivities, simply swap out the regular chocolate wafer cookies for gluten-free chocolate wafer cookies. This way, everyone can enjoy a slice of this delightful cake without worry!
- Vegan Option: If you’re looking for a dairy-free alternative, substitute the heavy cream with coconut cream. Just chill a can of coconut milk overnight, scoop out the solidified cream, and whip it up! Pair it with dairy-free chocolate chips for a completely vegan treat.
- Seasonal Twist: Embrace the flavors of the season by adding crushed seasonal fruits like strawberries or raspberries between the layers. This not only adds a pop of color but also a refreshing fruity layer that complements the mint beautifully.
- Chocolate Lovers: For those who can’t get enough chocolate, consider incorporating layers of chocolate pudding between the mint cream layers. This extra richness will take your cake to a whole new level of indulgence!
- Mint Chocolate Swirl: For a fun visual twist, swirl in some chocolate sauce into the mint cream mixture before layering. This creates a beautiful marbled effect that’s as pleasing to the eye as it is to the palate.
These variations not only keep the Mint Chocolate Chip Icebox Cake fresh and exciting but also allow you to cater to different tastes and dietary preferences. So, don’t hesitate to get creative and make this recipe your own!
Perfect Pairings: What to Serve With Mint Chocolate Chip Icebox Cake
When it comes to enjoying your Mint Chocolate Chip Icebox Cake, the right accompaniments can elevate the experience to new heights. Here are some delightful pairings that will complement the refreshing mint and rich chocolate flavors beautifully:
- Vanilla Ice Cream: A scoop of creamy vanilla ice cream enhances the overall creaminess of the cake while balancing the mint flavor. The cold, smooth texture of the ice cream is a perfect match for the cake’s layers.
- Fresh Berries: Strawberries or raspberries add a tart contrast to the sweetness of the cake. Their vibrant colors and juicy texture not only brighten up the plate but also provide a refreshing burst of flavor with each bite.
- Chocolate Sauce: Drizzling some rich chocolate sauce over each slice adds an indulgent touch. The extra layer of chocolate enhances the dessert experience, making it even more decadent and satisfying.
- Mint Tea: A warm cup of mint tea complements the mint flavor of the cake and offers a refreshing beverage option. It’s a lovely way to cleanse the palate and enhance the overall minty experience.
- Rich Chocolate Cake: For those who can’t get enough chocolate, serving a slice of rich chocolate cake alongside the icebox cake creates a double chocolate experience that chocolate lovers will adore.
- Whipped Cream: For those who enjoy extra creaminess, a dollop of freshly whipped cream on top of each slice adds a luxurious touch. It’s a classic pairing that never goes out of style!
- Fruity Dessert Wine: A light, fruity dessert wine can balance the sweetness of the cake while adding a sophisticated touch to your dessert spread. It’s a delightful way to elevate your dining experience.
- Summer Barbecue: This cake is the perfect refreshing end to a hearty meal, especially during warm weather gatherings. Its cool, creamy texture is a delightful contrast to grilled meats and savory dishes.
With these perfect pairings, your Mint Chocolate Chip Icebox Cake will shine even brighter, creating a memorable dessert experience that your guests will rave about. So, gather your loved ones, serve up some slices, and enjoy the delightful combinations!
Storage & Meal Prep Instructions
Once you’ve created your stunning Mint Chocolate Chip Icebox Cake, it’s essential to know how to store it properly to maintain its deliciousness. Here are some handy storage and meal prep instructions to keep your cake fresh and ready to enjoy:
- Fridge Storage: Keep the cake covered in the refrigerator for up to 2 days. This will help preserve its creamy texture and prevent it from absorbing any unwanted odors from the fridge. Just make sure it’s well-wrapped or in an airtight container to keep it fresh!
- Freezer Storage: If you want to enjoy your cake later, it can be frozen for up to a month. To do this, wrap it tightly in plastic wrap and then in foil to prevent freezer burn. This way, you can have a delightful dessert ready for unexpected guests or a sweet craving!
- Reheating Methods: When you’re ready to serve your frozen cake, simply thaw it in the refrigerator overnight. This gentle thawing method ensures that the texture remains intact and the flavors stay vibrant. Remember, once thawed, do not refreeze the cake, as this can affect its quality.
With these storage tips, you can enjoy your Mint Chocolate Chip Icebox Cake at your leisure, whether it’s a last-minute dessert for a gathering or a sweet treat just for you. Happy storing!
Nutrition Facts & Health Insights
As you indulge in the delightful Mint Chocolate Chip Icebox Cake, it’s essential to be aware of its nutritional profile. This cake not only satisfies your sweet tooth but also offers some health benefits thanks to its key ingredients. Here’s a closer look at the nutrition facts:
| Nutrient | Amount per Serving (1 slice, 1/12 of the cake) |
|---|---|
| Calories | 320 |
| Sugar | 25 grams |
| Sodium | 50 milligrams |
| Fat | 22 grams |
| Saturated Fat | 14 grams |
| Unsaturated Fat | 6 grams |
| Trans Fat | 0 grams |
| Carbohydrates | 30 grams |
| Fiber | 1 gram |
| Protein | 3 grams |
| Cholesterol | 60 milligrams |
Beyond the numbers, let’s talk about the health benefits of some of the key ingredients in this cake:
- Mint: Not only does mint provide a refreshing flavor, but it also aids digestion. It can help soothe an upset stomach and promote healthy digestion, making it a great addition to your dessert.
- Dark Chocolate: The mini chocolate chips in this cake can be a source of antioxidants, which are known to combat free radicals in the body. Dark chocolate has also been linked to heart health, as it may help improve blood flow and lower blood pressure.
So, while you enjoy your Mint Chocolate Chip Icebox Cake, you can feel good knowing that it offers some nutritional benefits along with its delicious taste. It’s a sweet treat that not only delights the palate but also contributes to your well-being!
Frequently Asked Questions
As you embark on your journey to create the perfect Mint Chocolate Chip Icebox Cake, you might have a few questions along the way. Here are some common queries and their answers to help you navigate this delightful dessert:
- Can I use regular chocolate chips instead of mini?
Yes, you can use regular chocolate chips, but keep in mind that they may not distribute as evenly throughout the cake. Mini chocolate chips provide a better texture and a delightful burst of chocolate in every bite. - How long can I store the cake in the fridge?
The cake can be stored in the refrigerator for up to 2 days. Just make sure it’s well-covered to maintain its freshness and prevent it from absorbing any odors. - What can I substitute for heavy cream?
If you’re looking for a lighter option, you can use whipped coconut cream or a non-dairy whipped topping. Just ensure that the substitute can be whipped to a similar consistency for the best results. - Can I make this cake dairy-free?
Absolutely! Substitute the heavy cream with coconut cream and use dairy-free chocolate chips. This way, you can enjoy a delicious dairy-free version of this classic dessert. - How do I know when the cream is whipped enough?
You’ll know the cream is whipped enough when it forms stiff peaks. This means that when you lift the whisk or mixer, the cream holds its shape without collapsing. Be careful not to over-whip, as it can become grainy. - Is it necessary to use peppermint extract?
While peppermint extract is key to achieving that refreshing mint flavor, you can adjust the amount to suit your taste. If you prefer a milder mint flavor, start with less and add more as needed. - Can I add other flavors to the cream?
Yes! Feel free to experiment with other flavors like vanilla or almond extract. Just remember to balance the flavors so that the mint still shines through. - What if I don’t have chocolate wafer cookies?
If you can’t find chocolate wafer cookies, you can use graham crackers or even chocolate sandwich cookies as a substitute. Just be aware that the texture and flavor may vary slightly. - How can I make this cake more visually appealing?
To enhance the visual appeal, consider adding fresh mint leaves and a sprinkle of chocolate chips on top. You can also drizzle some chocolate sauce or add colorful berries for a pop of color. - Can I freeze the cake?
Yes, you can freeze the cake for up to a month. Just wrap it tightly in plastic wrap and foil to prevent freezer burn. When you’re ready to enjoy it, thaw it in the refrigerator overnight.
With these FAQs answered, you’re well-equipped to tackle any challenges that may arise while making your Mint Chocolate Chip Icebox Cake. Enjoy the process and happy baking!
Final Inspiration & Kitchen Confidence
As you stand back and admire your stunning Mint Chocolate Chip Icebox Cake, take a moment to celebrate the joy of creating a dessert that not only tantalizes the taste buds but also brings people together. There’s something truly magical about sharing a homemade treat with loved ones, and this cake is sure to be the centerpiece of many happy gatherings.
Mastering a no-bake cake like this one is no small feat! You’ve navigated the steps with care, whipped the cream to perfection, and layered the flavors just right. Trust me, your guests will be thoroughly impressed when you present this delightful dessert. It’s a testament to your culinary skills and creativity, proving that you can whip up something extraordinary without turning on the oven.
So, I encourage you to dive into this recipe with confidence! Try it out, share your experiences, and don’t forget to snap a few photos of your masterpiece. Whether it’s a family gathering, a summer barbecue, or a cozy night in, the Mint Chocolate Chip Icebox Cake is bound to bring smiles and satisfied sighs from everyone at the table. Enjoy every bite and the memories you create along the way!
Print
Mint Chocolate Chip Icebox Cake: Creamy, Cool Delight!
- Total Time: 4 hours 20 minutes
- Yield: 12 servings 1x
- Diet: Vegetarian
Description
This Mint Chocolate Chip Icebox Cake is a luscious, creamy dessert that combines the refreshing taste of mint with rich chocolate. Each bite offers a delightful contrast of smooth, velvety layers and crunchy chocolate chips, creating a refreshing treat perfect for warm days.
Ingredients
- For the Cake:
- 2 cups heavy whipping cream
- 1 cup powdered sugar
- 1 teaspoon peppermint extract
- 1 cup mini chocolate chips
- 1 package (14 oz) chocolate wafer cookies
- For Garnish:
- Fresh mint leaves
- Additional chocolate chips
Instructions
- In a large mixing bowl, whip the heavy cream until soft peaks form.
- Gradually add the powdered sugar and peppermint extract, continuing to whip until stiff peaks form.
- Fold in the mini chocolate chips gently to maintain the fluffiness.
- On a serving platter, lay down a single layer of chocolate wafer cookies, slightly overlapping them.
- Spread a layer of the mint cream mixture over the cookies, smoothing it out evenly.
- Repeat the layering process (cookies and cream) until all ingredients are used, finishing with a layer of cream on top.
- Cover the cake with plastic wrap and refrigerate for at least 4 hours, or overnight for best results.
- Before serving, garnish with fresh mint leaves and additional chocolate chips.
Notes
- This cake can be made up to 2 days in advance and stored in the refrigerator.
- For a gluten-free version, use gluten-free chocolate wafer cookies.
- Feel free to adjust the amount of peppermint extract to suit your taste preference.
- Prep Time: 20 minutes
- Cook Time: 0 minutes
- Category: desserts
- Method: no-bake
- Cuisine: American
Nutrition
- Serving Size: 1 slice (1/12 of the cake)
- Calories: 320
- Sugar: 25 grams
- Sodium: 50 milligrams
- Fat: 22 grams
- Saturated Fat: 14 grams
- Unsaturated Fat: 6 grams
- Trans Fat: 0 grams
- Carbohydrates: 30 grams
- Fiber: 1 gram
- Protein: 3 grams
- Cholesterol: 60 milligrams
Keywords: Mint Chocolate Chip Icebox Cake, no-bake dessert, mint dessert, chocolate dessert, summer cake, easy dessert recipe, creamy cake, chocolate wafer cookies, refreshing dessert, party cake, make-ahead dessert, mint chocolate treat, chilled cake