Loaded Pickled Bell Peppers: The Crisp, Zesty Jar You’ll Reach for Constantly
If you love a pickle that delivers crunch, sweetness, tang, and heat all at once, Loaded Pickled Bell Peppers are about to become your new favorite jar in the fridge. These peppers are crisp, sweet, tangy, garlicky, and packed with bold herbs, spicy peppers, and zesty pickling flavor in every colorful bite. They’re the perfect addition to charcuterie boards, sandwiches, salads, pizzas, burgers, or simply enjoying straight from the jar whenever a craving strikes.
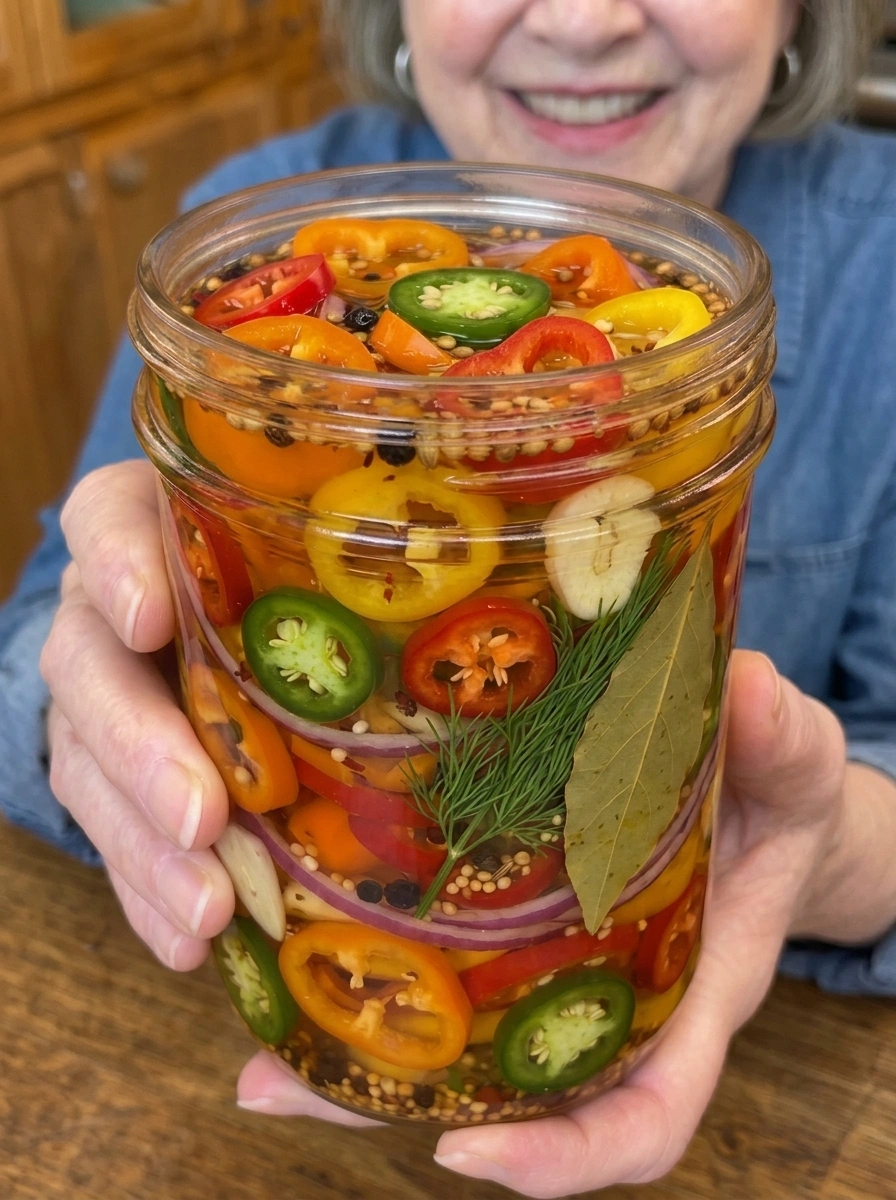
This recipe truly earns its “loaded” name, layering sweet bell peppers with garlic, jalapeño, serrano pepper, red onion, and a generous blend of whole spices and Italian seasoning. Rather than a single-note pickle, this brine builds real complexity, sweet from the peppers, tangy from the vinegar, aromatic from the herbs, and spicy from two different fresh chilies. The result is a pickle that’s as visually vibrant as it is flavorful, with colorful pepper rings suspended in a brine loaded with texture and aroma.
This complete guide covers everything you need to know to make perfect Loaded Pickled Bell Peppers at home, including a full ingredient breakdown, detailed step-by-step instructions, expert tips for the best texture and flavor, creative variations, serving suggestions, storage guidelines, and answers to the most frequently asked questions about pickling bell peppers.
What Are Loaded Pickled Bell Peppers?
Loaded Pickled Bell Peppers are sliced sweet bell peppers submerged in a tangy vinegar brine loaded with garlic, jalapeño, serrano pepper, red onion, and a robust blend of whole spices, dried herbs, and smoked paprika. Unlike a simpler pickled pepper recipe that relies on just vinegar and salt, this version is intentionally “loaded” with additional aromatics and flavorings, creating a pickle with genuine depth and complexity.
Using either mini sweet bell peppers or larger bell peppers sliced into rings or strips, this recipe allows the brine to fully penetrate the peppers over several days in the refrigerator. The combination of jalapeño and serrano pepper provides layered, building heat, while Italian seasoning and smoked paprika introduce a herbaceous, slightly smoky quality that sets this pickle apart from a more traditional version.
The result is a snack that’s crisp, sweet, tangy, garlicky, herby, and spicy all at once, delivering something new and interesting in every single bite.
Why This Recipe Works So Well
There are several reasons this recipe consistently produces crisp, flavorful, well-balanced results.
Bell peppers offer natural sweetness that balances the bold seasoning. Their inherent sweetness provides a built-in contrast to the tangy vinegar, spicy peppers, and savory herbs, keeping the overall flavor balanced rather than one-dimensional.
Layering two types of fresh peppers builds complex heat. Combining jalapeño and serrano pepper creates a more nuanced, building spiciness rather than a single-note burn, giving this pickle real depth.
Italian seasoning adds an unexpected herbaceous quality. Rather than relying solely on classic pickling spices, this recipe incorporates Italian seasoning, a blend typically including basil, oregano, and rosemary, introducing a slightly different, herb-garden flavor profile that sets this pickle apart.
Red onion adds another layer of savory sweetness. Thinly sliced and pickled alongside the peppers, the onion softens slightly while contributing its own distinct flavor and a beautiful pop of color throughout the jar.
Smoked paprika ties everything together with subtle depth. This modest addition introduces a gentle smokiness that rounds out the sweet, tangy, spicy, and herbaceous elements of the brine.
Ingredients You’ll Need
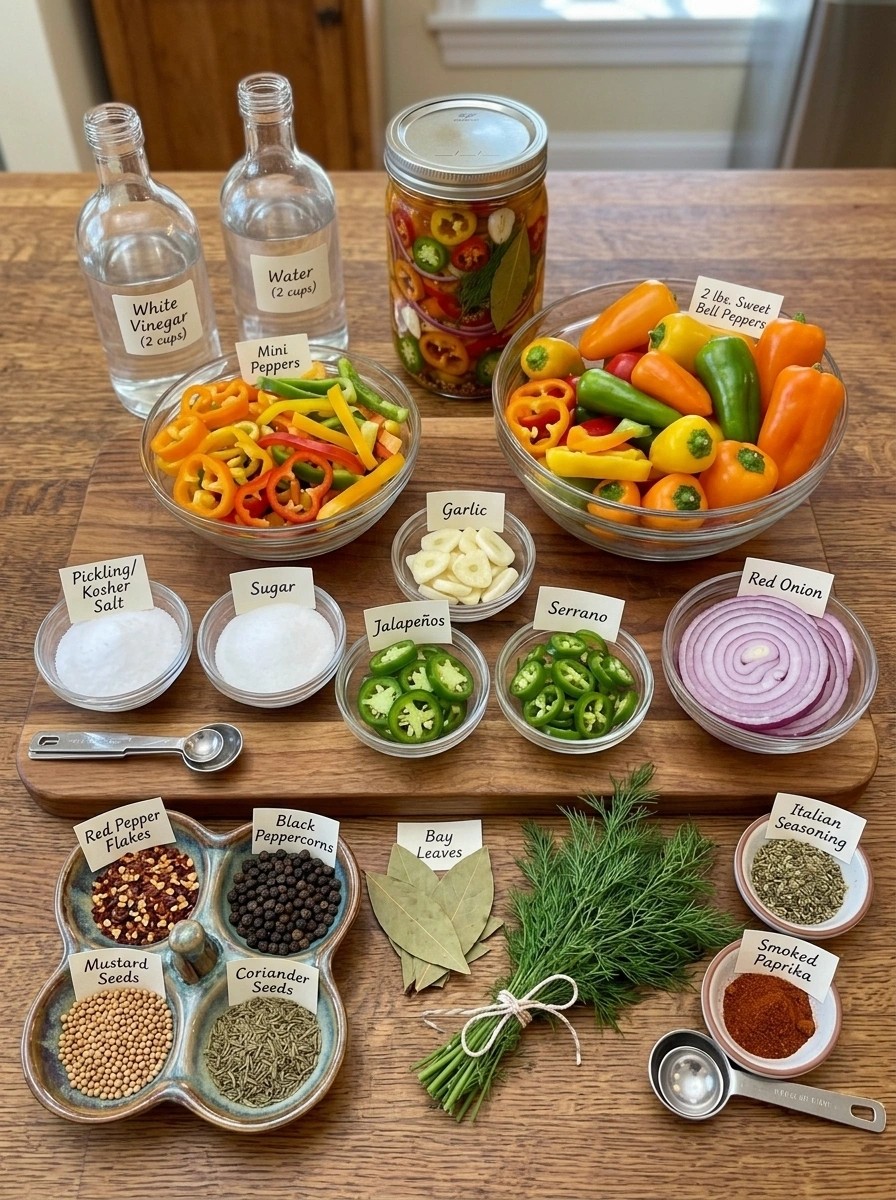
Here’s everything required to make a full batch of Loaded Pickled Bell Peppers.
For the peppers:
- 2 lbs mini sweet bell peppers (or 4–5 large bell peppers), sliced into rings or strips
For the brine:
- 2 cups white vinegar
- 2 cups water
- 2 tablespoons pickling salt or kosher salt
- 1 tablespoon sugar
Aromatics and spices:
- 6 cloves garlic, thinly sliced
- 2 jalapeños, thinly sliced
- 1 serrano pepper, thinly sliced
- 1 small red onion, thinly sliced
- 1 teaspoon crushed red pepper flakes
- 1 teaspoon whole black peppercorns
- 1 teaspoon mustard seeds
- 1 teaspoon coriander seeds
- 1 teaspoon dill seeds (or 2 sprigs fresh dill)
- 1 teaspoon Italian seasoning
- 1/2 teaspoon smoked paprika
- 2 bay leaves
A Closer Look at the Key Ingredients
Mini sweet bell peppers or large bell peppers form the foundation of this recipe. Mini peppers offer a naturally sweet flavor and require minimal prep, while larger bell peppers sliced into rings or strips work equally well and offer a more classic pickled pepper shape. Look for peppers that are firm, glossy, and free of soft spots.
White vinegar provides the sharp acidity necessary for safe pickling while delivering that classic tangy bite that balances against the peppers’ natural sweetness.
Pickling salt or kosher salt dissolves cleanly into the brine without clouding it, ensuring both proper preservation and a clean, balanced flavor throughout.
Sugar enhances the peppers’ natural sweetness while softening the sharp edges of the vinegar, creating a well-rounded flavor.
Garlic infuses the brine with pungent, savory depth that mellows slightly as it pickles, adding a rich background flavor to every piece.
Jalapeños and serrano pepper work together to create layered, building heat, with the serrano typically bringing a slightly sharper, more intense spice compared to the jalapeño’s more rounded heat.
Red onion contributes a savory-sweet flavor and vibrant color, softening slightly as it pickles alongside the peppers.
Crushed red pepper flakes add an additional layer of background heat and a bit of visual texture throughout the brine.
Whole black peppercorns, mustard seeds, coriander seeds, and dill seeds each bring their own earthy, slightly citrusy notes, layering complexity into the brine.
Italian seasoning introduces an herb-garden quality, typically incorporating basil, oregano, and rosemary, that gives this pickle a distinctly different character from a more traditional pickling spice blend.
Smoked paprika adds a subtle smokiness that rounds out the overall flavor profile, while the bay leaves contribute a mild herbal backbone that ties everything together.
Step-by-Step Instructions
Making Loaded Pickled Bell Peppers is a simple process, and following these steps closely will help ensure the best possible texture and flavor.
Step 1: Prep the Peppers
Wash the bell peppers thoroughly. Remove the stems and seeds, then slice them into rings or strips.
Step 2: Pack the Jar
Pack the peppers into a clean glass jar or airtight container. A wide-mouth jar makes this process easier and allows the aromatics to be distributed evenly throughout.
Step 3: Add the Aromatics and Spices
Add the sliced garlic, jalapeños, serrano pepper, red onion, black peppercorns, mustard seeds, coriander seeds, dill seeds, Italian seasoning, crushed red pepper flakes, smoked paprika, and bay leaves throughout the jar, distributing everything evenly so the flavor infuses consistently.
Step 4: Build the Brine
In a saucepan, combine the white vinegar, water, pickling salt, and sugar.
Step 5: Heat Gently
Heat over medium heat, stirring until the salt and sugar dissolve completely. Do not let the brine boil.
Step 6: Pour Over the Peppers
Carefully pour the warm brine over the peppers until they are fully submerged. If necessary, gently press the peppers down or add a small amount of additional vinegar and water in equal parts to ensure complete coverage.
Step 7: Cool and Seal
Allow the jar to cool to room temperature, then seal tightly with a lid.
Step 8: Refrigerate and Wait
Refrigerate for at least 48 hours before serving. For the boldest flavor, let the peppers pickle for 5 to 7 days, giving the brine time to fully penetrate each piece.
Step 9: Shake Daily
Shake the jar gently once a day to evenly distribute the seasonings throughout the pickling period.
Tips for the Best Loaded Pickled Bell Peppers
Choose firm, glossy peppers. Fresh, high-quality bell peppers will produce the best texture and flavor. Avoid any peppers with soft spots, wrinkled skin, or signs of bruising.
Slice the peppers to a consistent size. Uniform rings or strips ensure the brine penetrates evenly, resulting in a more consistent texture and flavor throughout the jar.
Adjust the heat to your preference. The combination of jalapeño, serrano, and crushed red pepper flakes creates a genuinely spicy baseline. If you prefer a milder version, omit the serrano pepper and use just one jalapeño with the seeds removed.
Don’t skip shaking the jar daily. This simple step helps redistribute the spices and seasonings throughout the pickling period, ensuring a more consistent flavor from the first pepper to the last.
Keep the peppers fully submerged. Any peppers poking above the brine line are more susceptible to spoilage and won’t pick up the seasoning as evenly. If needed, use a small, clean, food-safe weight to keep everything submerged.
Be patient for the boldest flavor. While the peppers are safe to eat after 48 hours, the full 5 to 7 day pickling period allows the sweet, tangy, herby, and spicy flavors to fully develop throughout each piece.
Flavor Variations to Try
Once you’ve made the classic version, here are a few ways to customize Loaded Pickled Bell Peppers to your taste.
Extra Fiery Version: Add a sliced habanero pepper along with the jalapeños and serrano for those who want serious, take-no-prisoners heat.
Extra Herby Version: Increase the Italian seasoning, or add fresh basil leaves alongside the fresh dill, for an even more pronounced herb-garden flavor.
Sweet and Spicy Version: Increase the sugar slightly for a more pronounced sweet-and-spicy balance that highlights the peppers’ natural sweetness even further.
Smoky Chipotle Twist: Add a chopped chipotle pepper in adobo sauce to the brine for a deep, smoky heat that layers beautifully with the existing spices.
Milder Family-Friendly Version: Omit the serrano pepper entirely, use just one jalapeño with the seeds removed, and reduce the crushed red pepper flakes by half for a much gentler version that still carries plenty of tangy, garlicky flavor.
How to Serve Loaded Pickled Bell Peppers
These crisp, loaded peppers are wonderfully versatile and can be enjoyed in a variety of ways.
- On a charcuterie or antipasto board: Arranged alongside cured meats, cheeses, and olives, they add a bold, colorful contrast to richer, milder items.
- On sandwiches: Sliced and layered onto a sandwich for a tangy, spicy, slightly sweet addition that replaces or complements traditional pickles.
- In salads: Sliced and tossed into a green salad or grain bowl for an instant boost of color, crunch, and heat.
- On pizza: Scattered over a pizza before or after baking for a spicy, tangy pop of flavor that cuts through rich, cheesy toppings.
- On burgers: Layered onto a burger for a crunchy, tangy, spicy addition that elevates a classic burger.
- Straight from the jar: A simple, low-calorie snack that satisfies a craving for something crunchy, sweet, tangy, and spicy all at once.
Storage Information
Proper storage is essential for keeping your Loaded Pickled Bell Peppers crisp, flavorful, and safe to eat.
- Store in an airtight jar in the refrigerator. Keep the peppers refrigerated at all times, never at room temperature.
- Use within one month. For the best quality, flavor, and food safety, plan to enjoy your pickled bell peppers within 1 month of making them.
- Keep the peppers completely submerged. This is essential to maintain their crisp texture and vibrant flavor, as any exposed peppers are more prone to spoilage.
- Use clean utensils when serving. Always remove peppers with a clean fork or tongs rather than your fingers to help prevent contamination and extend freshness.
- Watch for signs of spoilage. If you notice an off smell, sliminess, unusual discoloration, or a bulging jar lid, discard the peppers immediately.
Recipe Overview
- Prep Time: 15 minutes
- Cook Time: 5 minutes
- Total Time: 20 minutes (plus pickling time)
- Servings: 10
- Calories: Approximately 30 per serving
Frequently Asked Questions
How long do Loaded Pickled Bell Peppers need to sit before eating them? At a minimum, refrigerate the peppers for 48 hours so the brine has time to penetrate. For the boldest flavor, let them pickle for 5 to 7 days.
Can I make these less spicy? Yes. Omit the serrano pepper, use just one jalapeño with the seeds removed, and reduce the crushed red pepper flakes. The garlic, onion, and herbs will still deliver plenty of flavor without intense heat.
Do I need to boil the brine? No. You only need to heat the brine gently, just until the salt and sugar dissolve completely. A full boil isn’t necessary and can dull some of the brine’s fresher, brighter qualities.
Why should I shake the jar daily? Shaking the jar helps redistribute the spices, herbs, and seasonings throughout the pickling period, ensuring a more even, consistent flavor across every pepper in the jar rather than having ingredients settle in one spot.
Can I use mini sweet peppers instead of large bell peppers, or vice versa? Yes, either works well in this recipe. Mini sweet peppers require less prep since they can often be sliced into rings without much trimming, while large bell peppers sliced into strips offer a more classic pickled pepper shape.
How long do these peppers last in the refrigerator? When stored properly, fully submerged in brine and refrigerated at all times, Loaded Pickled Bell Peppers will stay fresh for up to 1 month.
Can I freeze pickled peppers? Freezing isn’t recommended, as it will cause the peppers to lose their crisp texture and become soft and watery once thawed. Refrigeration is the best storage method for maintaining both flavor and texture.
Should I wear gloves when slicing the jalapeño and serrano peppers? Yes, it’s a good idea. Jalapeño and serrano peppers can leave irritating oils on your skin, so wearing gloves during preparation is a simple, worthwhile precaution, especially if you plan to touch your face or eyes afterward.
Can I reuse the brine for a second batch of peppers? It’s best to make a fresh batch of brine for each new batch of peppers, since reusing brine dilutes its acidity and flavor strength over time, which can affect both taste and food safety.
Final Thoughts
Loaded Pickled Bell Peppers bring bold, sweet, tangy, herby, and spicy flavor to a snack that’s as colorful as it is craveable. With a well-balanced brine, layered heat from fresh jalapeño and serrano peppers, and a distinctive herbaceous twist from Italian seasoning, these peppers deliver a crisp, flavorful bite that’s just as satisfying eaten straight from the jar as it is piled onto sandwiches, salads, pizza, or burgers.
Once you make your first batch, don’t be surprised if it becomes a permanent staple in your refrigerator. Gather your ingredients, get that brine simmering, and get ready to enjoy one of the most loaded, flavor-packed pickled snacks you’ll ever make at home.
Print
Loaded Pickled Bell Peppers
- Total Time: 20 minutes (plus pickling time)
Ingredients
Here’s everything required to make a full batch of Loaded Pickled Bell Peppers.
For the peppers:
- 2 lbs mini sweet bell peppers (or 4–5 large bell peppers), sliced into rings or strips
For the brine:
-
- 2 cups white vinegar
-
- 2 cups water
- 2 tablespoons pickling salt or kosher salt
- 1 tablespoon sugar
Aromatics and spices:
-
- 6 cloves garlic, thinly sliced
- 2 jalapeños, thinly sliced
-
- 1 serrano pepper, thinly sliced
- 1 small red onion, thinly sliced
- 1 teaspoon crushed red pepper flakes
-
- 1 teaspoon whole black peppercorns
- 1 teaspoon mustard seeds
- 1 teaspoon coriander seeds
-
- 1 teaspoon dill seeds (or 2 sprigs fresh dill)
- 1 teaspoon Italian seasoning
- 1/2 teaspoon smoked paprika
- 2 bay leaves
Instructions
Making Loaded Pickled Bell Peppers is a simple process, and following these steps closely will help ensure the best possible texture and flavor.
Step 1: Prep the Peppers
Wash the bell peppers thoroughly. Remove the stems and seeds, then slice them into rings or strips.
Step 2: Pack the Jar
Pack the peppers into a clean glass jar or airtight container. A wide-mouth jar makes this process easier and allows the aromatics to be distributed evenly throughout.
Step 3: Add the Aromatics and Spices
Add the sliced garlic, jalapeños, serrano pepper, red onion, black peppercorns, mustard seeds, coriander seeds, dill seeds, Italian seasoning, crushed red pepper flakes, smoked paprika, and bay leaves throughout the jar, distributing everything evenly so the flavor infuses consistently.
Step 4: Build the Brine
In a saucepan, combine the white vinegar, water, pickling salt, and sugar.
Step 5: Heat Gently
Heat over medium heat, stirring until the salt and sugar dissolve completely. Do not let the brine boil.
Step 6: Pour Over the Peppers
Carefully pour the warm brine over the peppers until they are fully submerged. If necessary, gently press the peppers down or add a small amount of additional vinegar and water in equal parts to ensure complete coverage.
Step 7: Cool and Seal
Allow the jar to cool to room temperature, then seal tightly with a lid.
Step 8: Refrigerate and Wait
Refrigerate for at least 48 hours before serving. For the boldest flavor, let the peppers pickle for 5 to 7 days, giving the brine time to fully penetrate each piece.
Step 9: Shake Daily
Shake the jar gently once a day to evenly distribute the seasonings throughout the pickling period.
- Prep Time: 15 minutes
- Cook Time: 5 minutes
Nutrition
- Serving Size: 10
- Calories: Approximately 30 per serving