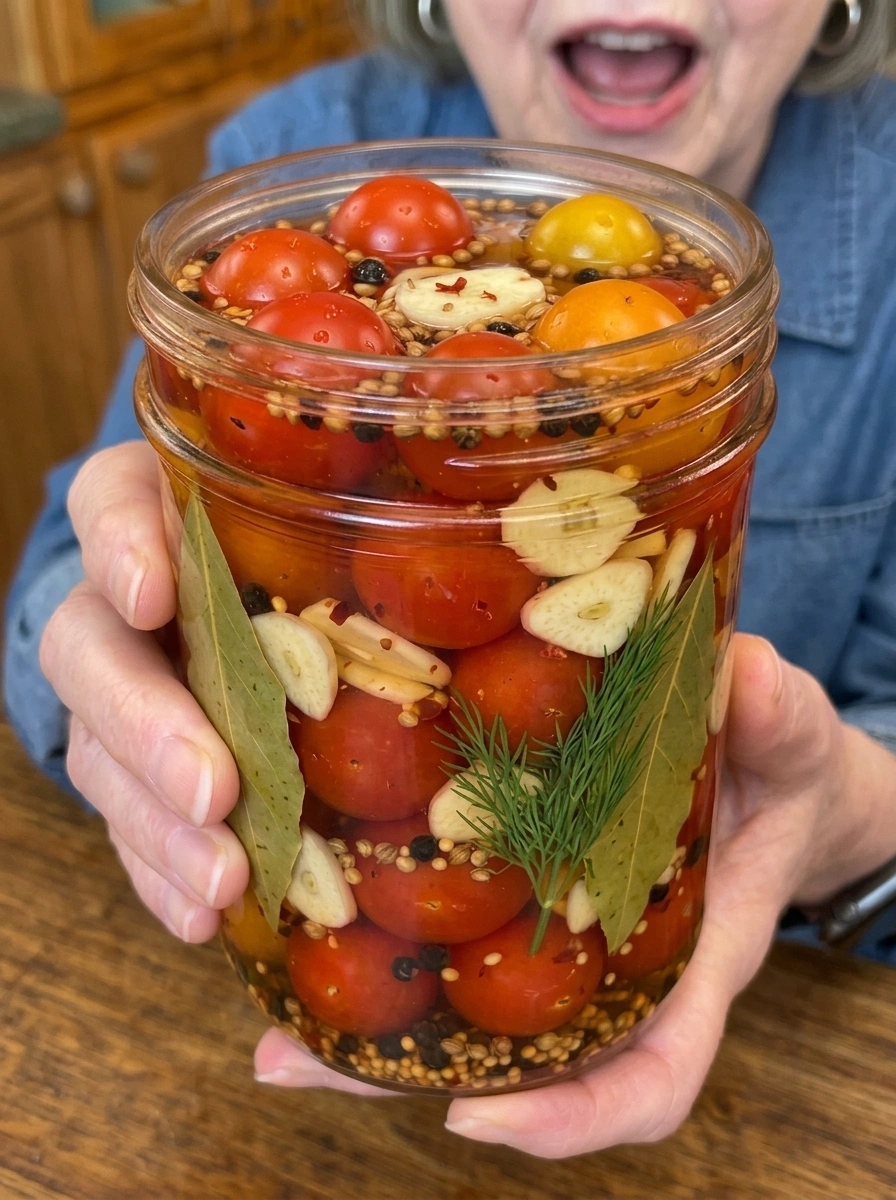
Honey Garlic Pickled Cherry Tomatoes: The Sweet, Juicy Snack You Won’t Be Able to Put Down
There’s a special kind of magic that happens when you combine juicy cherry tomatoes with a sweet, garlicky brine, and Honey Garlic Pickled Cherry Tomatoes capture that magic perfectly. These tomatoes are sweet, tangy, and bursting with juicy flavor, fresh garlic, and a hint of honey in every bite. One bite and you’ll be adding them to salads, charcuterie boards, sandwiches, and enjoying them straight from the jar before you’ve even had a chance to sit down.
This recipe takes the concept of classic pickled cherry tomatoes and gives it a gentler, sweeter spin by introducing honey directly into the brine. Rather than leaning into sharp tang or spicy heat, this version balances the tomatoes’ natural sweetness and acidity with a genuinely honeyed brine, generously spiked with garlic and fresh dill. The result is a pickle that’s approachable, versatile, and completely irresistible, appealing to those who love pickled snacks but prefer something a little gentler than an intensely spicy or sour version.
This complete guide covers everything you need to know to make perfect Honey Garlic Pickled Cherry Tomatoes at home, including a full ingredient breakdown, detailed step-by-step instructions, expert tips for the best flavor and texture, creative variations, serving suggestions, storage guidelines, and answers to the most frequently asked questions about pickling cherry tomatoes.
What Are Honey Garlic Pickled Cherry Tomatoes?
Honey Garlic Pickled Cherry Tomatoes are small, whole cherry tomatoes that are lightly pricked and submerged in a tangy vinegar brine sweetened with honey and infused with garlic, fresh dill, and a blend of whole spices. Because cherry tomatoes are pickled whole rather than sliced, they burst with concentrated, sweet-tangy juice when bitten into, offering a completely different eating experience than a fresh tomato straight off the vine.
The gentle pricking step, done with a toothpick or small skewer before pickling, is essential to this recipe. Without it, the tomato’s skin can act as a barrier, preventing the brine from fully penetrating and leaving the inside relatively unseasoned. With a small prick near the stem end of each tomato, the honeyed, garlicky brine can seep inside over the following days, resulting in a tomato that’s flavorful from the skin all the way through to the juicy center.
The result is a snack that’s sweet, tangy, garlicky, and juicy all at once, delivering a delightful pop of flavor in every bite.
Why This Recipe Works So Well
There are several reasons this recipe consistently produces juicy, flavorful, well-balanced results.
Pricking the tomatoes is the key technique. This simple step allows the brine to penetrate past the tomato’s skin, ensuring that the inside becomes just as flavorful as the outside, rather than leaving you with a sweet exterior and a bland, watery center.
Honey creates a genuinely sweet, well-rounded brine. Rather than relying on just a touch of sugar to soften the vinegar’s edge, this recipe uses a full quarter cup of honey, resulting in a brine that’s noticeably sweet and pairs beautifully with the tomatoes’ natural tang.
A generous amount of garlic adds real savory depth. With six cloves infusing the brine, this recipe delivers a genuinely garlicky pickle, with the garlic mellowing slightly over the pickling period while still packing plenty of pungent flavor.
Fresh dill adds brightness without overwhelming the sweetness. Rather than relying only on dried spices, this recipe incorporates fresh dill sprigs directly into the jars, infusing the brine with a grassy, slightly citrusy freshness that complements both the tomatoes and the honey.
The optional red pepper flakes allow for customizable heat. While not essential to the recipe’s core flavor, a touch of red pepper flakes offers a subtle background warmth for those who want a bit of spice alongside the sweet and tangy notes.
Ingredients You’ll Need
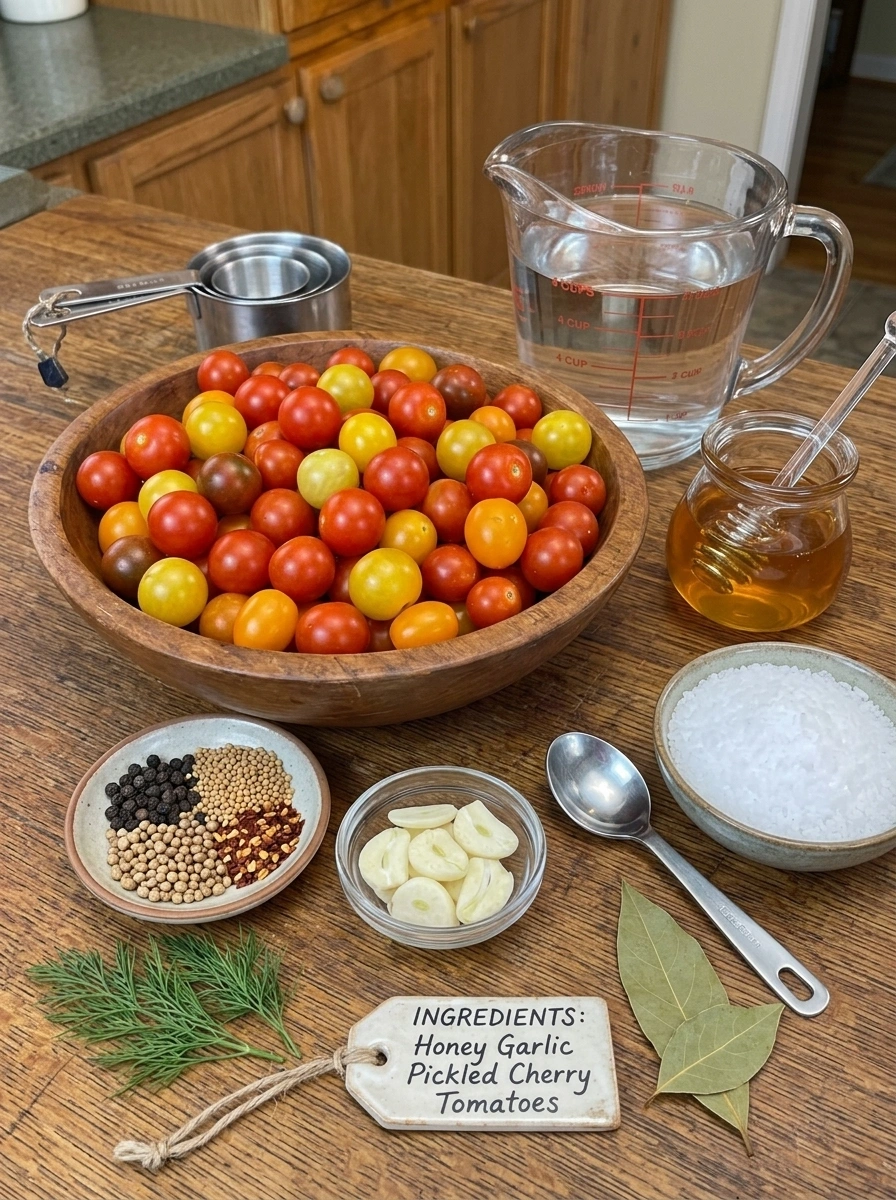
Here’s everything required to make a full batch of Honey Garlic Pickled Cherry Tomatoes.
For the tomatoes:
- 2 lbs cherry tomatoes
For the brine:
- 2 cups white vinegar
- 2 cups water
- 2 tablespoons pickling salt or kosher salt
- 1/4 cup honey
Aromatics and spices:
- 6 cloves garlic, thinly sliced
- 2 sprigs fresh dill (or 1 teaspoon dill seeds)
- 1 teaspoon whole black peppercorns
- 1 teaspoon mustard seeds
- 1 teaspoon coriander seeds
- 1/2 teaspoon red pepper flakes (optional)
- 2 bay leaves
A Closer Look at the Key Ingredients
Cherry tomatoes are the star of this recipe. Look for tomatoes that are firm, brightly colored, and free of any splitting or soft spots. Their small size and relatively thick skin make them well-suited to whole pickling, especially once lightly pricked to allow the brine inside.
White vinegar provides the sharp acidity necessary for safe pickling while delivering that classic tangy bite that pairs beautifully with the tomatoes’ natural sweetness and the honey in the brine.
Pickling salt or kosher salt dissolves cleanly into the brine without clouding it, ensuring both proper preservation and a clean, balanced flavor throughout.
Honey is the defining sweetener in this recipe, introducing genuine sweetness along with subtle floral notes that give this pickle its gentle, approachable character.
Garlic is used generously in this recipe, infusing the brine with pungent, savory depth that mellows slightly as it pickles while still delivering real garlicky punch in every bite.
Fresh dill contributes a bright, grassy freshness that pairs wonderfully with both tomatoes and garlic, while the red pepper flakes, though optional, add a touch of background heat for those who want a bit of spice alongside the sweet and tangy flavors.
Whole black peppercorns, mustard seeds, and coriander seeds each bring their own earthy, slightly citrusy notes, layering complexity into the brine that goes well beyond a simple sweet-and-sour pickle.
Bay leaves contribute a mild herbal backbone that rounds out the overall flavor profile.
Step-by-Step Instructions
Making Honey Garlic Pickled Cherry Tomatoes is a simple process, and following these steps closely will help you achieve the best possible flavor and texture.
Step 1: Prep the Tomatoes
Wash the cherry tomatoes thoroughly and pat them dry.
Step 2: Prick the Tomatoes
Using a toothpick or small skewer, gently prick each tomato once near the stem end. This small step is essential, as it allows the brine to penetrate past the tomato’s skin and season the inside as well as the outside, while keeping the tomatoes intact.
Step 3: Pack the Jars
Pack the cherry tomatoes into a large, clean glass jar, or divide them evenly between two quart-sized jars.
Step 4: Add the Aromatics and Spices
Add the sliced garlic, fresh dill, bay leaves, black peppercorns, mustard seeds, coriander seeds, and crushed red pepper flakes evenly throughout the jars, distributing everything so the flavor infuses consistently across every tomato.
Step 5: Build the Brine
In a medium saucepan, combine the white vinegar, water, pickling salt, and honey.
Step 6: Heat Gently
Heat over medium heat, stirring until the salt is dissolved and the honey is fully incorporated. Do not let the brine boil, as this can affect the honey’s delicate flavor.
Step 7: Pour Over the Tomatoes
Carefully pour the warm brine over the tomatoes, making sure they are completely submerged.
Step 8: Cool and Seal
Seal the jars tightly and allow them to cool to room temperature. This step helps prevent pressure buildup inside the jars and preserves the freshness of the aromatics.
Step 9: Refrigerate and Wait
Refrigerate for at least 48 hours before serving. For the richest sweet and tangy flavor, allow the tomatoes to pickle for 5 to 7 days, giving the brine time to fully penetrate each tomato through the small prick made earlier.
Tips for the Best Honey Garlic Pickled Cherry Tomatoes
Don’t skip the pricking step. This is the single most important technique in this recipe. Without a small prick in each tomato, the brine will struggle to penetrate the skin, leaving you with sweet, tangy exteriors and relatively unseasoned interiors.
Choose firm, unblemished tomatoes. Fresh, high-quality cherry tomatoes will hold up best to the pickling process. Avoid any tomatoes with splits, soft spots, or signs of overripeness, as these can become mushy more quickly in the brine.
Use a good-quality honey. Since honey is the defining sweetener in this recipe, choosing a flavorful, good-quality honey will make a noticeable difference in the final taste. A mild wildflower or clover honey works particularly well without overpowering the other flavors.
Adjust the heat to your preference. The red pepper flakes are entirely optional, meaning this recipe works equally well as a mild, gentle pickle or a slightly spicier version, depending on how much you include.
Don’t skip the cooling step before sealing. Sealing a jar of hot brine immediately can trap steam and create unwanted pressure inside the jar. Letting it cool naturally on the counter is a simple but important safety measure.
Enjoy them within the first week for the best texture. Because tomatoes are more delicate than firmer vegetables like cucumbers or carrots, they’re best enjoyed relatively soon after making, even though they’ll keep safely for up to two weeks.
Flavor Variations to Try
Once you’ve made the classic version, here are a few ways to customize Honey Garlic Pickled Cherry Tomatoes to your taste.
Spicy Honey Garlic Version: Increase the red pepper flakes, or add a sliced jalapeño to the jars for those who want a spicier version alongside the sweet and tangy flavors.
Herb-Forward Version: Increase the fresh dill, or add a few sprigs of fresh basil alongside it, for a more herbaceous, garden-fresh flavor profile.
Extra Garlicky Version: Increase the garlic even further for those who can’t get enough of that pungent, savory depth in every bite.
Balsamic Twist: Replace a portion of the white vinegar with balsamic vinegar for a deeper, richer sweetness that pairs beautifully with the honey.
Mediterranean-Inspired Version: Add a handful of pitted kalamata olives and a splash of olive oil to the brine for a Mediterranean-inspired twist that pairs beautifully with the garlic and tomatoes.
How to Serve Honey Garlic Pickled Cherry Tomatoes
These sweet, tangy, garlicky tomatoes are wonderfully versatile and can be enjoyed in a variety of ways.
- As a stand-alone snack: Straight from the jar, they make a satisfying, low-calorie snack that’s bursting with sweet and tangy flavor.
- On a charcuterie board: Arranged alongside cured meats, cheeses, and olives, they add a bright, sweet-tangy contrast to richer, milder items.
- On avocado toast: Sliced or left whole and layered over avocado toast for a tangy, sweet, savory upgrade to a classic breakfast or snack.
- In salads: Halved and tossed into a green salad or grain bowl for an instant boost of juicy, sweet-tangy flavor.
- On pasta: Added to a simple pasta dish for a burst of sweet, tangy, garlicky flavor in every bite.
- On sandwiches and burgers: Sliced and layered onto a sandwich or burger for a tangy, sweet addition that replaces or complements traditional pickles.
Storage Information
Proper storage is key to keeping your Honey Garlic Pickled Cherry Tomatoes fresh, juicy, and safe to eat.
- Store in an airtight jar in the refrigerator. Keep the tomatoes refrigerated at all times, never at room temperature.
- Use within two weeks. For the best quality, flavor, and food safety, plan to enjoy your pickled cherry tomatoes within 2 weeks of making them.
- Keep the tomatoes fully submerged. This is essential for the best flavor and freshness, as any exposed tomatoes are more prone to spoilage.
- Enjoy within the first week for the best texture. Because tomatoes are more delicate than firmer vegetables, they’re best enjoyed within the first week, even though they’ll keep safely for up to two weeks.
- Use clean utensils when serving. Always remove tomatoes with a clean fork or spoon rather than your fingers to help prevent contamination and extend freshness.
- Watch for signs of spoilage. If you notice an off smell, sliminess, unusual discoloration, or a bulging jar lid, discard the tomatoes immediately.
Recipe Overview
- Prep Time: 15 minutes
- Cook Time: 5 minutes
- Total Time: 20 minutes (plus chilling time)
- Servings: 10
- Calories: Approximately 35 per serving
Frequently Asked Questions
How long do Honey Garlic Pickled Cherry Tomatoes need to sit before eating them? At a minimum, refrigerate the tomatoes for 48 hours so the brine has time to penetrate. For the richest sweet and tangy flavor, allow them to pickle for 5 to 7 days.
Why do I need to prick each tomato before pickling? Pricking the tomatoes creates a small opening that allows the brine to penetrate past the skin and season the interior of the tomato, not just the outside. Without this step, the tomatoes may taste sweet and tangy on the surface but remain relatively bland inside.
Can I make these spicier? Yes. Increase the red pepper flakes, or add a sliced jalapeño to the jars along with the garlic and dill for a spicier version that still retains the classic sweet, honeyed flavor base.
Do I need to boil the brine? No. You only need to heat the brine gently, just until the salt dissolves and the honey is fully incorporated. A full boil isn’t necessary and can affect the honey’s delicate flavor.
Can I use a different type of small tomato? Yes. Grape tomatoes work well in this recipe using the same method, though you may want to adjust the pricking technique slightly given their slightly different size and shape.
Why should I eat these within the first week? Tomatoes are more delicate than firmer pickled vegetables like cucumbers or carrots, so while they’ll remain safe to eat for up to two weeks when properly stored, their texture is at its best during the first week.
How long do these tomatoes last in the refrigerator? When stored properly, fully submerged in brine and refrigerated at all times, Honey Garlic Pickled Cherry Tomatoes will stay fresh for up to 2 weeks, though the best texture is within the first week.
Can I freeze pickled cherry tomatoes? Freezing isn’t recommended, as it will cause the tomatoes to lose their juicy, firm texture and become mushy and watery once thawed. Refrigeration is the best storage method for maintaining both flavor and texture.
Can I reuse the brine for a second batch of tomatoes? It’s best to make a fresh batch of brine for each new batch of tomatoes, since reusing brine dilutes its sweetness and acidity over time, which can affect both taste and food safety.
Final Thoughts
Honey Garlic Pickled Cherry Tomatoes bring a gentle, sweet-and-tangy twist to a classic pickled snack, transforming juicy cherry tomatoes into something that’s genuinely hard to stop eating once you start. Thanks to a quick pricking technique, a genuinely sweet honey-based brine, and a generous amount of garlic and fresh dill, these tomatoes deliver a burst of balanced, well-rounded flavor in every single bite.
Once you make your first jar, don’t be surprised if it becomes a permanent fixture in your refrigerator. Gather your ingredients, warm up that honeyed brine, and get ready to enjoy one of the juiciest, most approachable pickled snacks you’ll ever make at home.
Print
Honey Garlic Pickled Cherry Tomatoes
- Total Time: 20 minutes (plus chilling time)
Ingredients
Here’s everything required to make a full batch of Honey Garlic Pickled Cherry Tomatoes.
For the tomatoes:
-
- 2 lbs cherry tomatoes
For the brine:
-
- 2 cups white vinegar
- 2 cups water
- 2 tablespoons pickling salt or kosher salt
- 1/4 cup honey
Aromatics and spices:
-
- 6 cloves garlic, thinly sliced
- 2 sprigs fresh dill (or 1 teaspoon dill seeds)
- 1 teaspoon whole black peppercorns
-
- 1 teaspoon mustard seeds
- 1 teaspoon coriander seeds
- 1/2 teaspoon red pepper flakes (optional)
- 2 bay leaves
Instructions
Making Honey Garlic Pickled Cherry Tomatoes is a simple process, and following these steps closely will help you achieve the best possible flavor and texture.
Step 1: Prep the Tomatoes
Wash the cherry tomatoes thoroughly and pat them dry.
Step 2: Prick the Tomatoes
Using a toothpick or small skewer, gently prick each tomato once near the stem end. This small step is essential, as it allows the brine to penetrate past the tomato’s skin and season the inside as well as the outside, while keeping the tomatoes intact.
Step 3: Pack the Jars
Pack the cherry tomatoes into a large, clean glass jar, or divide them evenly between two quart-sized jars.
Step 4: Add the Aromatics and Spices
Add the sliced garlic, fresh dill, bay leaves, black peppercorns, mustard seeds, coriander seeds, and crushed red pepper flakes evenly throughout the jars, distributing everything so the flavor infuses consistently across every tomato.
Step 5: Build the Brine
In a medium saucepan, combine the white vinegar, water, pickling salt, and honey.
Step 6: Heat Gently
Heat over medium heat, stirring until the salt is dissolved and the honey is fully incorporated. Do not let the brine boil, as this can affect the honey’s delicate flavor.
Step 7: Pour Over the Tomatoes
Carefully pour the warm brine over the tomatoes, making sure they are completely submerged.
Step 8: Cool and Seal
Seal the jars tightly and allow them to cool to room temperature. This step helps prevent pressure buildup inside the jars and preserves the freshness of the aromatics.
Step 9: Refrigerate and Wait
Refrigerate for at least 48 hours before serving. For the richest sweet and tangy flavor, allow the tomatoes to pickle for 5 to 7 days, giving the brine time to fully penetrate each tomato through the small prick made earlier.
- Prep Time: 15 minutes
- Cook Time: 5 minutes
Nutrition
- Serving Size: 10
- Calories: Approximately 35 per serving