Crunchy Refrigerator Pickled Vegetables: The Easiest Homemade Pickle Mix You’ll Ever Make
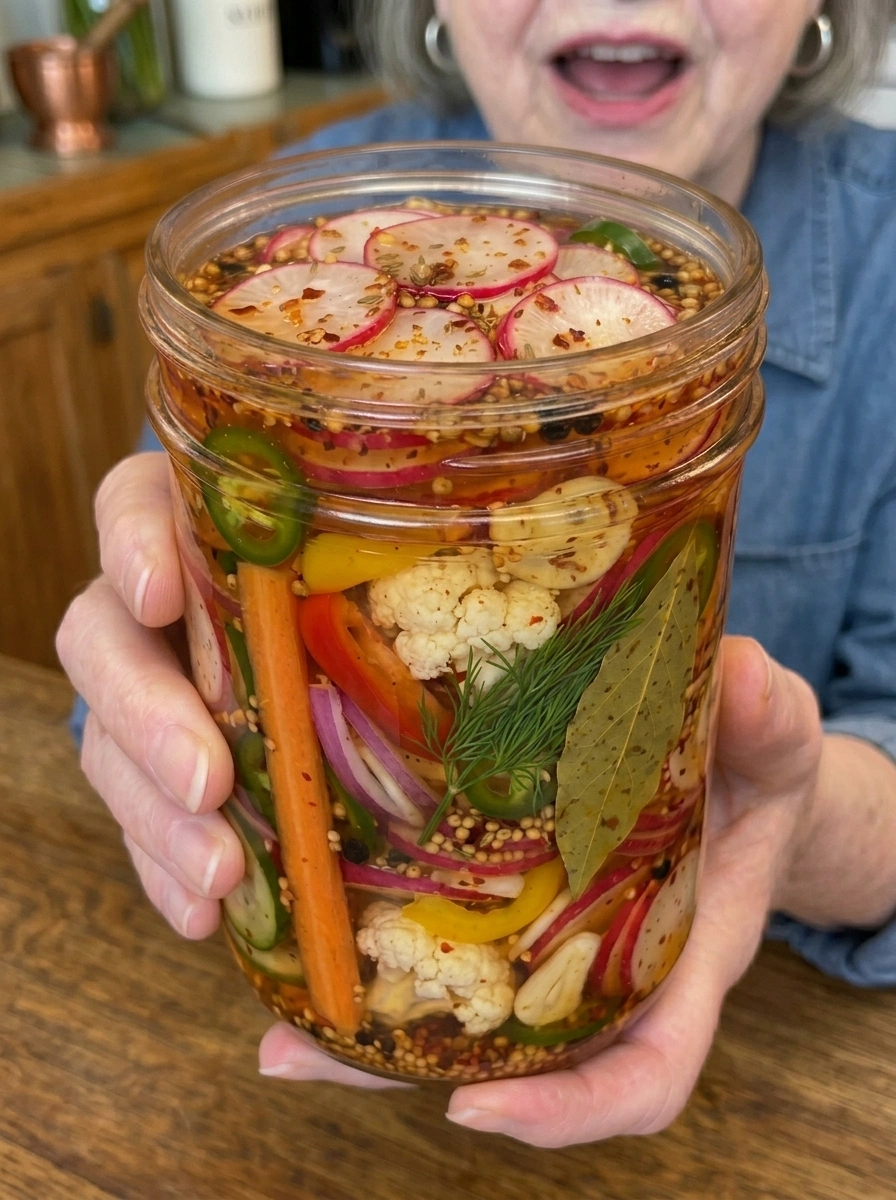
If you’ve been searching for a way to turn a pile of fresh produce into something bold, crunchy, and downright addictive, these Crunchy Refrigerator Pickled Vegetables are exactly what your kitchen needs. Packed with crisp cucumbers, carrots, cauliflower, bell peppers, radishes, and garlic, and steeped in a bright, herb-infused vinegar brine, this colorful jar of pickled vegetables delivers big tangy flavor without any of the fuss of traditional canning.
What makes this recipe so appealing is just how effortless it is. There’s no water bath canning, no special equipment, and no complicated food safety timing to worry about. You simply pack your vegetables into jars, pour over a warm brine, and let the refrigerator do the rest. Within a day, you’ll have a jar of crunchy, tangy pickled vegetables ready to snack on straight from the fridge, pile onto sandwiches, or serve alongside your favorite grilled dinner.
This is the kind of recipe that becomes a summer staple fast. Once you have a jar of these in your fridge, you’ll find yourself reaching for them constantly — as a topping, a side, a snack, or a bright addition to just about any meal. Let’s break down exactly why this recipe works so well and how to make your own perfect batch.
What Are Refrigerator Pickled Vegetables?
Refrigerator pickled vegetables, sometimes called quick pickles, are vegetables that have been submerged in a vinegar-based brine and left to marinate in the refrigerator rather than being processed through traditional shelf-stable canning methods. Unlike canned pickles, which require careful sterilization and sealing to be stored at room temperature, refrigerator pickles are meant to be kept cold at all times and enjoyed within a few weeks.
The appeal of this method is speed and simplicity. Instead of spending an afternoon sterilizing jars and processing them in a hot water bath, you can have a batch of crisp, flavorful pickled vegetables ready to eat in as little as 24 hours, with the flavor only improving the longer they sit.
This particular recipe uses a colorful mix of cucumbers, carrots, cauliflower, bell peppers, radishes, and red onion, all pickled together in one bright, herby, slightly spicy brine. The result is a versatile jar of pickled veggies that works as well on a snack plate as it does piled onto a burger.
Why This Recipe Works
There’s a reason this pickled vegetable mix has become such a go-to in home kitchens, and it comes down to a few key details done right.
No cooking of the vegetables required. These vegetables are never blanched or cooked before pickling, which is exactly why they stay so wonderfully crisp and crunchy. The vegetables simply sit in the warm brine and absorb flavor while retaining their natural bite.
A well-balanced brine. The combination of white vinegar, water, sugar, and salt creates that classic tangy-sweet pickle flavor, while mustard seeds, black peppercorns, coriander seeds, and red pepper flakes add layers of warmth, spice, and complexity that store-bought pickles simply can’t match.
Fresh herbs make a big difference. Fresh dill and bay leaves infuse the brine with a fragrant, herbaceous quality that ties all the vegetables together and gives the whole jar that unmistakable “homemade” flavor.
A variety of vegetables means variety of texture. Cucumbers bring that classic pickle crunch, carrots and radishes add a satisfying snap, cauliflower brings a heartier bite, and bell peppers add a touch of natural sweetness — every bite from the jar is a little different.
It’s endlessly customizable. Whether you want more heat, extra garlic, or a totally different vegetable lineup, this brine formula works as a flexible base you can adjust again and again.
Altogether, this recipe delivers restaurant-quality pickled vegetables with a fraction of the time and effort of traditional canning.
Ingredients You’ll Need
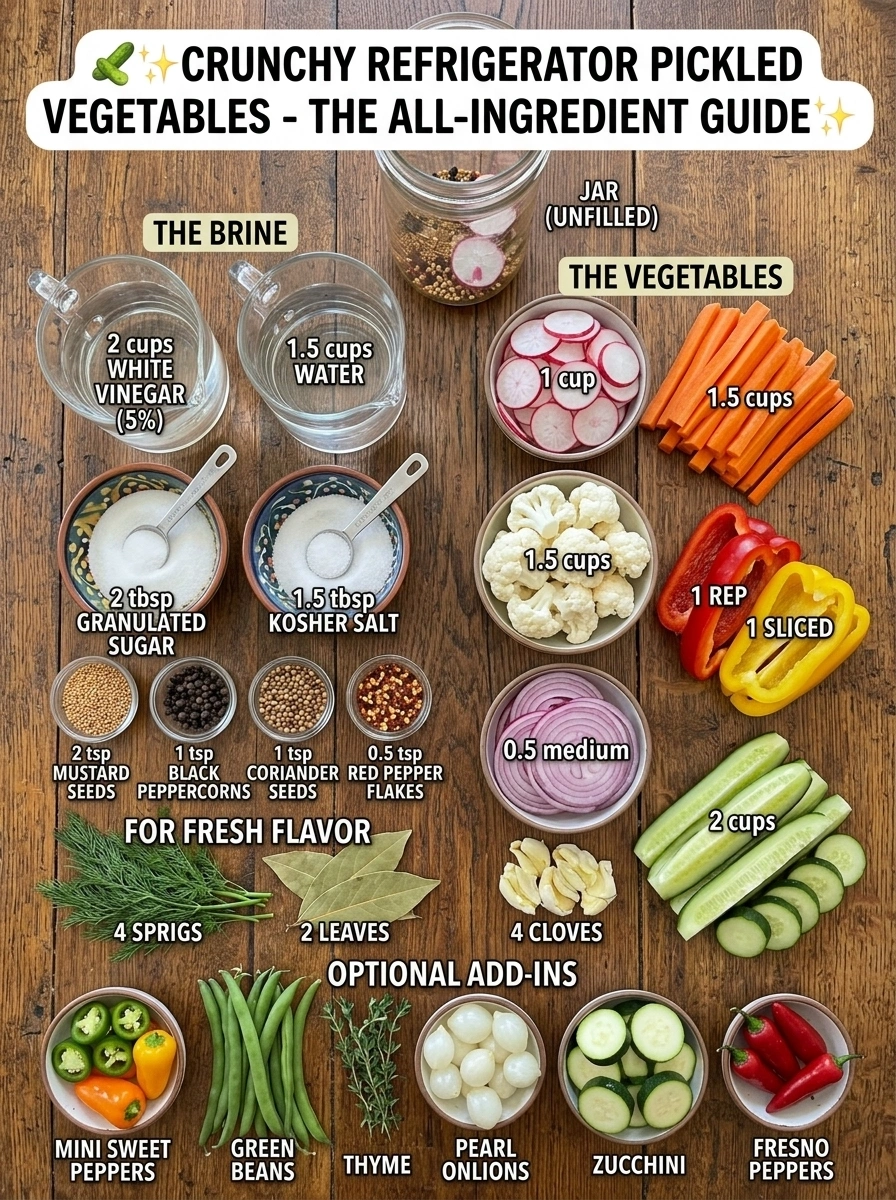
Here’s everything required to make a full batch of Crunchy Refrigerator Pickled Vegetables, yielding about 12 servings.
For the Vegetables:
- 2 cups cucumber slices or spears
- 1½ cups carrots, cut into thin sticks
- 1½ cups small cauliflower florets
- 1 red bell pepper, sliced
- 1 yellow bell pepper, sliced
- 1 cup radishes, thinly sliced
- ½ medium red onion, thinly sliced
- 4 cloves garlic, smashed
For the Pickling Brine:
- 2 cups white vinegar (5% acidity)
- 1½ cups water
- 2 tbsp granulated sugar
- 1½ tbsp kosher or pickling salt
- 2 tsp mustard seeds
- 1 tsp black peppercorns
- 1 tsp coriander seeds
- ½ tsp red pepper flakes
For Fresh Flavor:
- 4 sprigs fresh dill
- 2 bay leaves
Optional Add-Ins:
- Sliced jalapeños
- Mini sweet peppers
- Green beans
- Celery
- Zucchini
- Pearl onions
- Fresh thyme
- Extra garlic
- Fresno peppers for extra heat
A Closer Look at the Key Ingredients
White vinegar with 5% acidity is essential for both flavor and food safety in pickling. This standard acidity level ensures the brine is tangy enough to properly preserve the vegetables while staying refrigerator-safe.
Kosher or pickling salt is preferred over table salt because it dissolves cleanly without the additives found in iodized salt, which can sometimes cloud the brine or affect flavor.
Mustard seeds, black peppercorns, and coriander seeds are classic pickling spices that infuse the brine with warmth and subtle complexity as they steep, giving the vegetables a well-rounded, slightly spiced flavor.
Fresh dill and bay leaves add that unmistakable herby, aromatic quality that’s central to a great pickle flavor. Dried dill can be used in a pinch, but fresh sprigs offer a much brighter, more fragrant result.
Garlic cloves, smashed rather than minced, release plenty of flavor into the brine while staying easy to fish out or nibble on later.
Step-by-Step Instructions
Follow these simple steps for a perfectly crisp and flavorful batch of refrigerator pickled vegetables.
- Prep the vegetables. Wash all vegetables thoroughly and cut them into evenly sized pieces so they pickle consistently and are easy to serve.
- Pack the jars. Divide the cucumber, carrots, cauliflower, bell peppers, radishes, red onion, garlic, dill, and bay leaves between clean glass jars. Pack the vegetables snugly, but don’t crush them.
- Make the brine. In a saucepan, combine the white vinegar, water, sugar, salt, mustard seeds, black peppercorns, coriander seeds, and red pepper flakes.
- Simmer the brine. Bring the mixture to a gentle simmer over medium heat, stirring until the sugar and salt completely dissolve, then remove from the heat.
- Cool slightly. Allow the brine to cool for about 10 minutes so it’s still warm but won’t shock or wilt the vegetables too quickly.
- Pour over the vegetables. Carefully pour the warm brine over the vegetables in the jars until they are completely covered.
- Release air bubbles. Gently tap the jars against the counter to release trapped air bubbles, and add additional brine if necessary to keep the vegetables fully submerged.
- Cool and seal. Allow the jars to cool to room temperature, then seal tightly.
- Refrigerate. Refrigerate for at least 24 hours before eating. For deeper flavor, refrigerate for 2–3 days before serving.
- Serve. Serve chilled as a crunchy snack or alongside burgers, sandwiches, grilled meats, barbecue, tacos, salads, and charcuterie boards.
Tips for Extra-Crunchy Pickles
- Use very fresh, firm vegetables and avoid overcooking or blanching them, since raw vegetables retain far more crunch than cooked ones.
- Keep vegetables fully submerged in the brine while refrigerated, as any pieces sticking above the liquid can soften or spoil more quickly.
- Choose the right cucumbers. Small pickling cucumbers generally stay crunchier than large slicing cucumbers, which tend to have more water content and softer flesh.
- Don’t skip the cooling step. Letting the brine cool slightly before pouring helps preserve the vegetables’ crisp texture rather than partially cooking them with overly hot liquid.
- Use clean jars and utensils. Always use clean, dry jars and a clean utensil each time you serve to help the pickles stay fresh longer.
- Slice consistently. Cutting vegetables into similar sizes ensures they pickle at the same rate and makes for a more visually appealing jar.
Flavor Variations
This pickled vegetable base is wonderfully adaptable. Here are a few ways to customize it:
- Spicy Pickle Mix: Add sliced jalapeños or Fresno peppers to the jars for an extra kick of heat alongside the red pepper flakes already in the brine.
- Garden Medley: Swap in green beans, celery, or zucchini for some of the listed vegetables to use up whatever’s fresh from the garden.
- Sweet Pepper Version: Add mini sweet peppers for a pop of color and natural sweetness that balances the tangy brine.
- Extra Garlicky Pickles: Double the garlic cloves for a bolder, more pungent flavor throughout the jar.
- Herb-Forward Pickles: Add fresh thyme sprigs alongside the dill for a more layered, herbaceous flavor profile.
- Pearl Onion Addition: Toss in whole pearl onions for a milder, sweeter onion flavor and an extra bit of crunch.
Serving Suggestions
These pickled vegetables are incredibly versatile and can be used in more ways than you might expect:
- Snack straight from the jar for a low-calorie, crunchy, tangy treat any time of day.
- Top burgers and sandwiches for a bright, acidic crunch that cuts through rich, savory flavors.
- Add to charcuterie or grazing boards for a colorful, flavorful addition alongside cheeses, cured meats, and crackers.
- Serve alongside grilled meats and barbecue to balance smoky, rich flavors with something tangy and refreshing.
- Chop and toss into salads for an extra pop of flavor and texture.
- Pile onto tacos in place of traditional pickled jalapeños or onions for a fun, colorful twist.
Storage Information
Proper storage is essential for keeping these pickled vegetables safe, crisp, and flavorful.
These are refrigerator pickles, not shelf-stable canned vegetables, so they must always be kept refrigerated rather than stored at room temperature.
Refrigerator: Store sealed jars in the refrigerator and use a clean utensil each time you serve to avoid introducing bacteria into the brine.
Shelf Life: For the best texture and quality, enjoy these pickled vegetables within about 3–4 weeks.
Signs to Discard: If you notice an off smell, unusual cloudiness beyond normal brine settling, mold, or a slimy texture, discard the jar rather than risking spoilage.
Recipe Overview
Recipe Name: Crunchy Refrigerator Pickled Vegetables Category: Pickled & Fermented Foods / Condiments Servings: 12 Prep Time: 20 minutes Pickling Time: 24 hours Total Time: 24 hours 20 minutes Calories: Approximately 35 per serving Difficulty: Easy Storage: Refrigerate and enjoy within 3–4 weeks
Frequently Asked Questions
1. Can I use apple cider vinegar instead of white vinegar? Yes, apple cider vinegar can be substituted, though it will give the pickles a slightly sweeter, more mellow flavor and a warmer color compared to white vinegar.
2. Do I need to sterilize the jars for refrigerator pickles? While full sterilization isn’t required the way it is for shelf-stable canning, it’s still a good idea to use clean, well-washed glass jars to keep the pickles fresh longer.
3. How long do I need to wait before eating these pickles? At minimum, refrigerate for 24 hours to allow the flavors to develop. For the best flavor, waiting 2–3 days is even better.
4. Can I reuse the brine for a second batch of vegetables? It’s best to make a fresh batch of brine for each round of vegetables, since the brine’s acidity and flavor weaken after the first use.
5. Why did my pickles turn out soft instead of crunchy? This usually happens if the vegetables aren’t fresh enough, the brine was too hot when poured, or the vegetables weren’t kept fully submerged in the liquid.
6. Can I make this recipe without sugar? Yes, the sugar can be reduced or omitted for a more purely tangy pickle, though it does help balance the acidity of the vinegar.
7. Is this recipe shelf-stable for pantry storage? No, these are strictly refrigerator pickles and must be kept cold at all times. They are not processed for shelf-stable, room-temperature storage.
8. Can I use this brine for other vegetables not listed? Absolutely. This brine works well with a wide variety of vegetables, including green beans, zucchini, celery, and pearl onions, as noted in the optional add-ins.
9. How spicy is this recipe as written? As written, this recipe has a mild warmth from the red pepper flakes. For more heat, add sliced jalapeños or Fresno peppers to the jars before pouring in the brine.
Save This Recipe and Stock Your Fridge
These Crunchy Refrigerator Pickled Vegetables are the kind of recipe that quickly becomes a kitchen staple once you try them. With minimal hands-on time and a brine that’s endlessly adaptable, you’ll always have a jar of crisp, tangy, colorful pickled vegetables ready to elevate sandwiches, snack plates, and dinner sides all summer long.
Save this recipe for your next trip to the farmers market, share it with anyone who loves a good homemade pickle, and keep a jar stocked in your fridge at all times. Once you taste the difference fresh, homemade pickled vegetables make, store-bought jars just won’t compare.
Print
Crunchy Refrigerator Pickled Vegetables
Ingredients
Here’s everything required to make a full batch of Crunchy Refrigerator Pickled Vegetables, yielding about 12 servings.
For the Vegetables:
- 2 cups cucumber slices or spears
- 1½ cups carrots, cut into thin sticks
- 1½ cups small cauliflower florets
- 1 red bell pepper, sliced
- 1 yellow bell pepper, sliced
- 1 cup radishes, thinly sliced
- ½ medium red onion, thinly sliced
- 4 cloves garlic, smashed
For the Pickling Brine:
- 2 cups white vinegar (5% acidity)
- 1½ cups water
- 2 tbsp granulated sugar
- 1½ tbsp kosher or pickling salt
- 2 tsp mustard seeds
- 1 tsp black peppercorns
- 1 tsp coriander seeds
- ½ tsp red pepper flakes
For Fresh Flavor:
- 4 sprigs fresh dill
- 2 bay leaves
Optional Add-Ins:
- Sliced jalapeños
- Mini sweet peppers
- Green beans
- Celery
- Zucchini
- Pearl onions
- Fresh thyme
- Extra garlic
- Fresno peppers for extra heat
Instructions
Follow these simple steps for a perfectly crisp and flavorful batch of refrigerator pickled vegetables.
- Prep the vegetables. Wash all vegetables thoroughly and cut them into evenly sized pieces so they pickle consistently and are easy to serve.
- Pack the jars. Divide the cucumber, carrots, cauliflower, bell peppers, radishes, red onion, garlic, dill, and bay leaves between clean glass jars. Pack the vegetables snugly, but don’t crush them.
- Make the brine. In a saucepan, combine the white vinegar, water, sugar, salt, mustard seeds, black peppercorns, coriander seeds, and red pepper flakes.
- Simmer the brine. Bring the mixture to a gentle simmer over medium heat, stirring until the sugar and salt completely dissolve, then remove from the heat.
- Cool slightly. Allow the brine to cool for about 10 minutes so it’s still warm but won’t shock or wilt the vegetables too quickly.
- Pour over the vegetables. Carefully pour the warm brine over the vegetables in the jars until they are completely covered.
- Release air bubbles. Gently tap the jars against the counter to release trapped air bubbles, and add additional brine if necessary to keep the vegetables fully submerged.
- Cool and seal. Allow the jars to cool to room temperature, then seal tightly.
- Refrigerate. Refrigerate for at least 24 hours before eating. For deeper flavor, refrigerate for 2–3 days before serving.
- Serve. Serve chilled as a crunchy snack or alongside burgers, sandwiches, grilled meats, barbecue, tacos, salads, and charcuterie boards.
Tips for Extra-Crunchy Pickles
- Use very fresh, firm vegetables and avoid overcooking or blanching them, since raw vegetables retain far more crunch than cooked ones.
- Keep vegetables fully submerged in the brine while refrigerated, as any pieces sticking above the liquid can soften or spoil more quickly.
- Choose the right cucumbers. Small pickling cucumbers generally stay crunchier than large slicing cucumbers, which tend to have more water content and softer flesh.
- Don’t skip the cooling step. Letting the brine cool slightly before pouring helps preserve the vegetables’ crisp texture rather than partially cooking them with overly hot liquid.
- Use clean jars and utensils. Always use clean, dry jars and a clean utensil each time you serve to help the pickles stay fresh longer.
- Slice consistently. Cutting vegetables into similar sizes ensures they pickle at the same rate and makes for a more visually appealing jar.