Cookie Butter Cheesecake Cup: Decadently Creamy Bliss!
Sensory-Rich Introduction with Immediate Craving
Imagine sinking your spoon into a velvety cheesecake cup, the rich aroma of cookie butter wafting through the air, enticing your senses. Each bite reveals a luscious filling that melts in your mouth, perfectly complemented by a buttery graham cracker crust that adds a delightful crunch. This Cookie Butter Cheesecake Cup is not just a dessert; it’s an experience that evokes memories of cozy gatherings and sweet celebrations. Whether it’s a birthday party, a holiday feast, or a simple afternoon treat, these cheesecake cups are sure to impress and satisfy your sweet tooth.
Why You’ll Love This Cookie Butter Cheesecake Cup
- Texture Contrast: The creamy cheesecake filling contrasts beautifully with the crunchy graham cracker crust, creating a delightful mouthfeel.
- Flavor Balance: The warm, spiced notes of cookie butter harmonize with the sweetness of the cheesecake, offering a balanced flavor profile that’s irresistible.
- Versatility: Perfect for any occasion, these cheesecake cups can be served at parties, family gatherings, or as a special treat for yourself.
- Ease of Preparation: With simple ingredients and straightforward steps, this recipe is accessible for bakers of all skill levels.
- Universal Appeal: Loved by both kids and adults, these cheesecake cups are a crowd-pleaser that will leave everyone asking for seconds.
Essential Tools & Preparation Strategy
- Muffin Tin: Essential for shaping the individual cheesecake cups, ensuring they hold their form.
- Mixing Bowls: Needed for combining ingredients smoothly; opt for glass or stainless steel for easy cleaning.
- Electric Mixer: Helps achieve a creamy texture for the cheesecake filling; a hand mixer works just as well.
- Rubber Spatula: Useful for scraping down the sides of the bowl and folding ingredients without deflating the mixture.
- Measuring Cups and Spoons: Ensures accurate ingredient quantities for perfect results; consider using a kitchen scale for precision.
- Whisk: Handy for mixing the filling and incorporating air for a light texture; a balloon whisk is ideal.
- Cooling Rack: Allows the cheesecake cups to cool evenly after baking, preventing sogginess.
- Plastic Wrap: For covering the cheesecake cups while they chill in the refrigerator, keeping them fresh.
Ingredients & Their Roles in This Cookie Butter Cheesecake Cup
For the Crust:
- Graham Cracker Crumbs: Provides a sweet, crunchy base.
- Granulated Sugar: Enhances sweetness and helps bind the crust.
- Unsalted Butter: Adds richness and moisture, helping the crust hold together.
For the Cheesecake Filling:
- Cream Cheese: The main ingredient that gives the cheesecake its creamy texture.
- Cookie Butter: Infuses the filling with a spiced, sweet flavor.
- Powdered Sugar: Sweetens the filling and helps achieve a smooth consistency.
- Vanilla Extract: Adds depth of flavor to the cheesecake.
- Eggs: Provide structure and stability to the filling.
For the Topping:
- Whipped Cream: Adds a light, airy texture and balances the richness of the cheesecake.
- Melted Cookie Butter: A drizzle on top enhances the cookie butter flavor.
- Crushed Cookies: Provides a decorative touch and additional crunch.
Step-by-Step Guide to Perfect Cookie Butter Cheesecake Cup
- Preheat the Oven: Set your oven to 325°F (160°C) to prepare for baking.
- Prepare the Crust: In a mixing bowl, combine graham cracker crumbs, sugar, and melted butter until well mixed. Press the mixture firmly into the bottom of cupcake liners in a muffin tin.
- Bake the Crust: Bake for 8-10 minutes until lightly golden. Remove from the oven and let cool completely.
- Make the Filling: In a large bowl, beat the softened cream cheese until smooth. Add cookie butter, powdered sugar, and vanilla extract, mixing until well combined.
- Incorporate Eggs: Add eggs one at a time, mixing on low speed until just incorporated. Avoid overmixing to prevent cracks.
- Fill the Cups: Pour the cheesecake filling over the cooled crusts, filling each cup about 3/4 full to allow for rising.
- Bake the Cheesecakes: Bake for 20-25 minutes until the edges are set but the center is slightly jiggly. Remove from the oven and let cool to room temperature.
- Chill: Refrigerate for at least 4 hours or overnight for best results.
- Serve: Before serving, top each cheesecake cup with whipped cream, a drizzle of melted cookie butter, and crushed cookies.
Chef’s Notes & Pro Tips for Flawless Results
- Make-Ahead: These cheesecake cups can be made up to 2 days in advance and stored in the refrigerator.
- Storage: Keep covered in the refrigerator for up to 5 days to maintain freshness.
- Substitutions: For a gluten-free option, use gluten-free graham crackers or almond flour for the crust.
- Customization: Feel free to add spices like cinnamon or nutmeg to the filling for an extra flavor kick.
Avoid These Common Cooking Mistakes
- Overmixing the Filling: This can lead to cracks in the cheesecake. Mix just until combined.
- Not Cooling the Crust: A warm crust can cause the filling to melt. Always let it cool completely.
- Skipping the Chilling Step: Cheesecakes need time to set. Chill for at least 4 hours for the best texture.
- Using Cold Cream Cheese: This can create lumps. Always soften cream cheese before mixing.
- Filling Cups Too Full: Leave space for the cheesecake to rise. Fill only 3/4 full.
- Baking at Too High a Temperature: This can cause the cheesecake to crack. Stick to 325°F for even baking.
- Not Using a Water Bath: This helps prevent cracks. Consider using one for a smoother texture.
- Neglecting to Check for Doneness: The center should be slightly jiggly; overbaking can lead to a dry texture.
Creative Variations & Customizations
- Chocolate Cookie Butter Cheesecake Cup: Add cocoa powder to the filling for a chocolate twist.
- Pumpkin Spice Cheesecake Cup: Incorporate pumpkin puree and spices for a seasonal flavor.
- Nutty Variation: Mix in crushed nuts like pecans or walnuts for added texture.
- Fruit-Infused: Top with fresh fruit like strawberries or raspberries for a refreshing contrast.
- Vegan Option: Substitute cream cheese with a vegan alternative and use flax eggs for binding.
Perfect Pairings: What to Serve With Cookie Butter Cheesecake Cup
- Hot Coffee: The bitterness of coffee complements the sweetness of the cheesecake.
- Vanilla Ice Cream: Adds an extra layer of indulgence and creaminess.
- Fresh Berries: Their tartness balances the sweetness of the cheesecake.
- Dessert Wine: Enhances the flavors and adds a sophisticated touch.
- Caramel Sauce: A drizzle adds richness and a sweet contrast.
- Mini Dessert Assortment: Serve alongside other mini desserts for variety at gatherings.
- Chocolate Stout: The rich flavors of stout pair beautifully with the cheesecake.
- Cookie Dough Ice Cream: A dream for cookie lovers, enhancing the cookie flavor profile.
Storage & Meal Prep Instructions
- Refrigeration: Store covered in the refrigerator for up to 5 days.
- Freezing: For longer storage, freeze the cheesecake cups for up to 2 months. Thaw in the refrigerator before serving.
- Reheating: Best served chilled; however, if desired, let them sit at room temperature for 15-20 minutes before serving for a softer texture.
Nutrition Facts & Health Insights
| Nutrient | Amount per Serving |
|---|---|
| Serving Size | 1 cheesecake cup |
| Calories | 320 |
| Sugar | 22 grams |
| Sodium | 210 milligrams |
| Fat | 22 grams |
| Saturated Fat | 12 grams |
| Unsaturated Fat | 8 grams |
| Trans Fat | 0 grams |
| Carbohydrates | 30 grams |
| Fiber | 1 gram |
| Protein | 4 grams |
| Cholesterol | 80 milligrams |
Health Benefits of Key Ingredients
- Cream Cheese: Provides calcium and protein.
- Cookie Butter: Offers a unique flavor profile with spices that can enhance mood.
- Graham Crackers: A source of carbohydrates for energy.
Frequently Asked Questions
- Can I use low-fat cream cheese? Yes, but it may affect the creaminess of the filling.
- How do I know when the cheesecake cups are done? The edges should be set, and the center should be slightly jiggly.
- Can I make these cheesecake cups gluten-free? Absolutely! Use gluten-free graham crackers.
- What can I substitute for cookie butter? You can use peanut butter or Nutella for a different flavor.
- How long do these cheesecake cups last? They can be stored in the refrigerator for up to 5 days.
- Can I freeze these cheesecake cups? Yes, they freeze well for up to 2 months.
- What if I don’t have a muffin tin? You can use ramekins or silicone molds as alternatives.
- Can I add chocolate chips to the filling? Yes, chocolate chips can add a delightful surprise in each bite.
Final Inspiration & Kitchen Confidence
As you embark on making these Cookie Butter Cheesecake Cups, remember that baking is not just about following a recipe; it’s about creating memories and sharing joy. Celebrate your achievements in the kitchen, and don’t hesitate to experiment with flavors and presentations. With each cheesecake cup you create, you’re not just making a dessert; you’re crafting a moment of bliss that will be cherished by all who indulge. So gather your ingredients, roll up your sleeves, and let your kitchen become a haven of deliciousness!
Print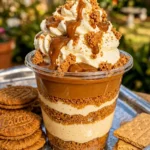
Cookie Butter Cheesecake Cup: Decadently Creamy Bliss!
- Total Time: 4 hours 30 minutes
- Yield: 12 servings 1x
- Diet: Vegetarian
Description
Indulge in the velvety smoothness of our Cookie Butter Cheesecake Cup, where the rich, spiced flavor of cookie butter meets a creamy cheesecake filling. Each bite offers a delightful crunch from the buttery graham cracker crust, perfectly balancing the sweetness and warmth of the cookie butter.
Ingredients
- For the crust:
- 1 cup graham cracker crumbs
- 1/4 cup granulated sugar
- 1/2 cup unsalted butter, melted
- For the cheesecake filling:
- 16 oz cream cheese, softened
- 1 cup cookie butter
- 1/2 cup powdered sugar
- 1 teaspoon vanilla extract
- 2 large eggs
- For the topping:
- 1/2 cup whipped cream
- 2 tablespoons cookie butter, melted
- Crushed cookies for garnish
Instructions
- Preheat your oven to 325°F (160°C).
- In a mixing bowl, combine graham cracker crumbs, sugar, and melted butter until well mixed. Press the mixture firmly into the bottom of cupcake liners in a muffin tin.
- Bake the crust for 8-10 minutes until lightly golden. Remove from the oven and let cool.
- In a large bowl, beat the softened cream cheese until smooth. Add cookie butter, powdered sugar, and vanilla extract, mixing until well combined.
- Add eggs one at a time, mixing on low speed until just incorporated. Do not overmix.
- Pour the cheesecake filling over the cooled crusts, filling each cup about 3/4 full.
- Bake for 20-25 minutes until the edges are set but the center is slightly jiggly. Remove from the oven and let cool to room temperature.
- Chill in the refrigerator for at least 4 hours or overnight for best results.
- Before serving, top each cheesecake cup with whipped cream, a drizzle of melted cookie butter, and crushed cookies.
Notes
- Make-ahead: These cheesecake cups can be made up to 2 days in advance and stored in the refrigerator.
- Storage: Keep covered in the refrigerator for up to 5 days.
- Substitutions: For a gluten-free option, use gluten-free graham crackers.
- Prep Time: 30 minutes
- Cook Time: 30 minutes
- Category: desserts
- Method: baking
- Cuisine: American
Nutrition
- Serving Size: 1 cheesecake cup
- Calories: 320
- Sugar: 22 grams
- Sodium: 210 milligrams
- Fat: 22 grams
- Saturated Fat: 12 grams
- Unsaturated Fat: 8 grams
- Trans Fat: 0 grams
- Carbohydrates: 30 grams
- Fiber: 1 gram
- Protein: 4 grams
- Cholesterol: 80 milligrams
Keywords: Cookie Butter Cheesecake Cup, cheesecake, cookie butter, dessert, easy dessert, no-bake cheesecake, creamy dessert, sweet treat, individual desserts, party desserts, American desserts, mini cheesecakes, graham cracker crust