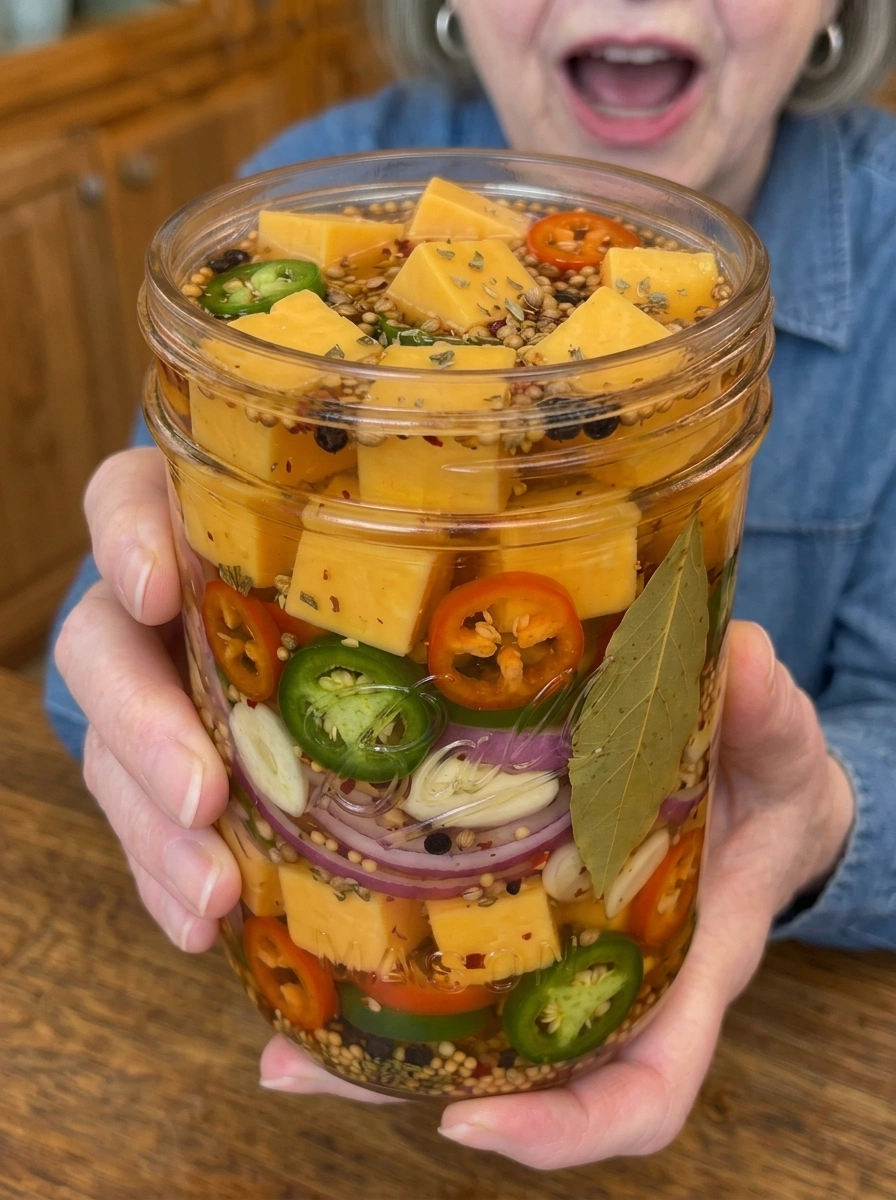
Pickled Jalapeño Cheese Cubes: The Creamy, Spicy Snack You’ll Want on Every Board
If you thought cheese cubes were just a plain party staple, Pickled Jalapeño Cheese Cubes are about to change your mind completely. These cheese cubes are creamy, tangy, garlicky, and packed with bold jalapeño heat in every delicious bite. They’re perfect for charcuterie boards, crackers, salads, sandwiches, or simply enjoying straight from the jar as a spicy, cheesy snack that’s impossible to stop eating.
This recipe takes sharp cheddar cheese, a snack that’s already beloved on its own, and elevates it into something entirely new by soaking it in a tangy, garlicky brine loaded with fresh jalapeño, serrano pepper, and a blend of aromatic spices. The vinegar brine seeps into the cheese over several days in the refrigerator, infusing it with bold, spicy flavor while the cheese itself stays firm, creamy, and satisfying to bite into.
This complete guide covers everything you need to know to make perfect Pickled Jalapeño Cheese Cubes at home, including a full ingredient breakdown, detailed step-by-step instructions, expert tips for the best flavor and texture, creative variations, serving suggestions, storage guidelines, and answers to the most frequently asked questions about pickling cheese.
What Are Pickled Jalapeño Cheese Cubes?
Pickled Jalapeño Cheese Cubes are bite-sized pieces of sharp cheddar cheese that are submerged in a tangy vinegar brine seasoned with garlic, jalapeño, serrano pepper, red onion, and a blend of whole spices. Unlike vegetable or meat pickling recipes, this method takes advantage of cheese’s firm texture and ability to absorb flavor from a surrounding liquid without breaking down or becoming mushy.
Because cheese doesn’t require any cooking before pickling, this recipe is entirely about infusing flavor. The vinegar brine works its way into the cheese cubes over a few days in the refrigerator, layering tangy, spicy, garlicky notes on top of the cheddar’s naturally sharp, creamy flavor. The result is a cheese snack that tastes completely different from a plain cube straight out of the block: bold, spicy, and deeply flavorful throughout.
Why This Recipe Works So Well
There are several reasons this recipe consistently produces flavorful, well-balanced, texturally satisfying results.
Sharp cheddar holds up beautifully to pickling. Its firm texture and bold, tangy flavor make it an ideal candidate for absorbing a spicy, acidic brine without becoming overly soft or losing its structural integrity.
A dual-vinegar brine adds complexity. Combining white vinegar with a smaller amount of apple cider vinegar creates a more layered acidity, with the apple cider vinegar contributing a subtle fruity note that complements the sharpness of the cheddar.
Fresh jalapeño and optional serrano build real heat. Rather than relying only on dried spices, this recipe incorporates fresh jalapeño and an optional serrano pepper directly into the jar, infusing the brine and cheese with bright, building heat that dried spices alone can’t replicate.
Cooling the brine before pouring protects the cheese’s texture. Because cheese can soften or even begin to melt if exposed to very hot liquid, this recipe calls for cooling the brine to warm, rather than hot, before it meets the cheese, preserving the cubes’ firm bite.
Extended marinating time deepens the flavor. While the cheese is ready to eat after 2 days, letting it marinate for 4 to 5 days allows the brine to more fully penetrate each cube, resulting in a bolder, more well-rounded spicy flavor throughout.
Ingredients You’ll Need
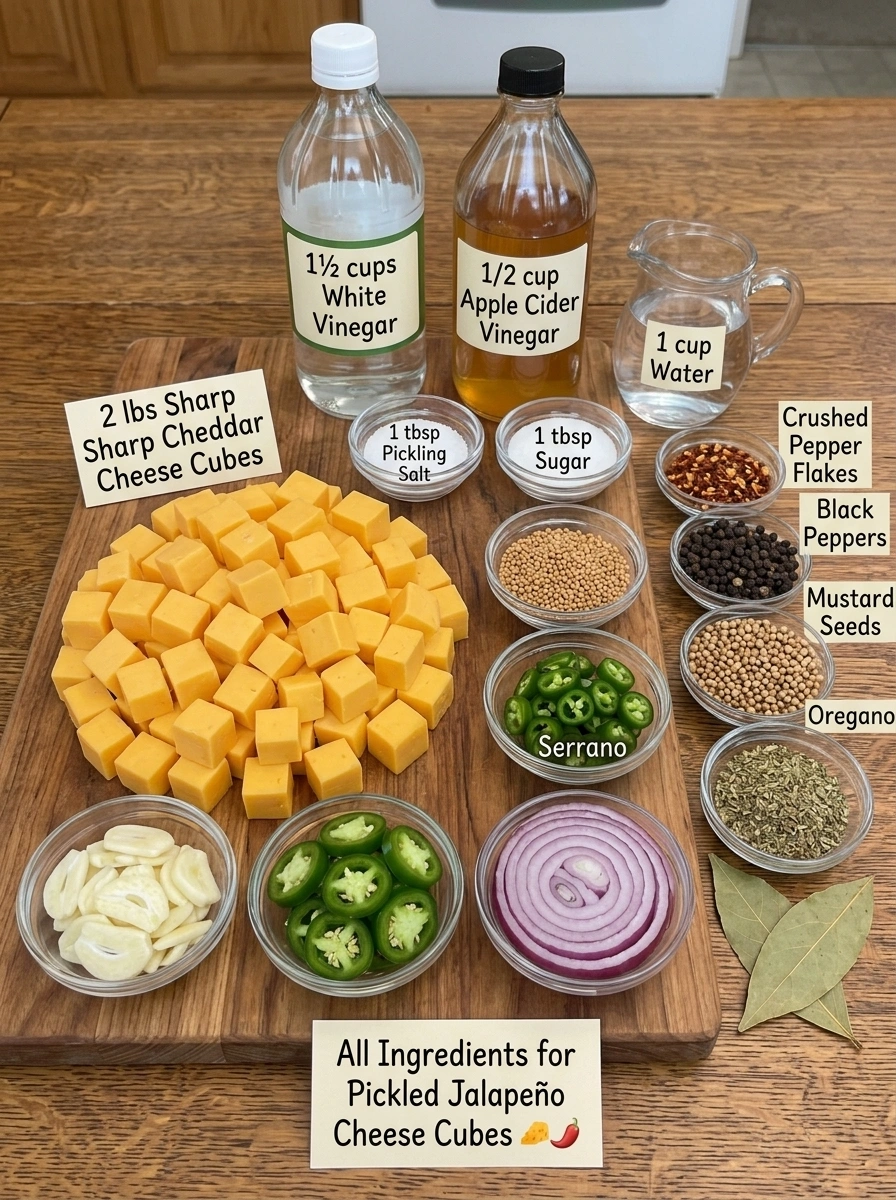
Here’s everything required to make a full batch of Pickled Jalapeño Cheese Cubes.
For the cheese:
- 2 lbs sharp cheddar cheese, cut into 1-inch cubes
For the brine:
- 1½ cups white vinegar
- 1/2 cup apple cider vinegar
- 1 cup water
- 1 tablespoon pickling salt or kosher salt
- 1 tablespoon sugar
Aromatics and spices:
- 6 cloves garlic, thinly sliced
- 3 jalapeños, thinly sliced
- 1 serrano pepper, thinly sliced (optional)
- 1 small red onion, thinly sliced
- 1 teaspoon crushed red pepper flakes
- 1 teaspoon whole black peppercorns
- 1 teaspoon mustard seeds
- 1 teaspoon coriander seeds
- 1 teaspoon dried oregano
- 2 bay leaves
A Closer Look at the Key Ingredients
Sharp cheddar cheese is the star of this recipe. Its firm texture and bold, tangy flavor make it perfectly suited to pickling, since it holds its shape well throughout the marinating process while absorbing the brine’s flavor deeply. Choosing a good-quality block of sharp cheddar, rather than a mild or pre-shredded variety, will result in a more flavorful, satisfying finished product.
White vinegar provides the primary source of sharp acidity needed for pickling, delivering that classic tangy bite that pairs beautifully with the richness of the cheese.
Apple cider vinegar adds a layer of subtle fruity complexity to the brine, rounding out the flavor beyond what white vinegar alone would provide.
Pickling salt or kosher salt dissolves cleanly into the brine without clouding it, ensuring both proper preservation and a clean, balanced flavor throughout.
Sugar softens the sharp edges of the vinegar, helping to balance the acidity with the richness of the cheese and the heat of the peppers.
Garlic and red onion infuse the brine with pungent, savory depth, softening slightly as they marinate and contributing their own distinct flavor throughout the jar.
Jalapeños provide the primary source of fresh, bright heat in this recipe, while the optional serrano pepper takes things up a notch for those who want an extra spicy result.
Crushed red pepper flakes contribute an additional layer of background heat and a bit of visual texture throughout the brine.
Whole black peppercorns, mustard seeds, and coriander seeds each bring their own earthy, slightly citrusy notes, layering complexity into the brine.
Dried oregano adds a mild herbal note, while the bay leaves contribute a subtle backbone that rounds out the overall flavor profile.
Step-by-Step Instructions
Making Pickled Jalapeño Cheese Cubes is a simple process, but a few key details will help you achieve the best possible texture and flavor.
Step 1: Cut the Cheese
Cut the cheddar cheese into evenly sized 1-inch cubes and place them into a clean glass jar or airtight container. Cutting the cubes to a consistent size ensures the brine penetrates each piece at roughly the same rate.
Step 2: Add the Aromatics and Spices
Add the sliced garlic, jalapeños, serrano pepper (if using), onion, black peppercorns, mustard seeds, coriander seeds, dried oregano, crushed red pepper flakes, and bay leaves throughout the jar, distributing everything evenly so the flavor infuses consistently.
Step 3: Build the Brine
In a saucepan, combine the white vinegar, apple cider vinegar, water, pickling salt, and sugar.
Step 4: Heat Gently
Heat the mixture over medium heat, stirring until the salt and sugar dissolve completely. Do not let the brine boil.
Step 5: Cool the Brine
Remove the brine from the heat and let it cool for about 10 to 15 minutes, until it’s warm rather than hot. This step is especially important with cheese, since very hot brine can soften or even begin to melt the cubes.
Step 6: Pour Over the Cheese
Carefully pour the warm brine over the cheese cubes, making sure they are fully submerged.
Step 7: Cool and Seal
Allow the jar to cool to room temperature before sealing it tightly with a lid. This step helps prevent pressure buildup inside the jar and preserves the freshness of the aromatics.
Step 8: Refrigerate and Wait
Refrigerate for at least 2 days before serving. For the best flavor, let the cheese marinate for 4 to 5 days, giving the brine time to fully penetrate each cube.
Step 9: Serve
Serve the pickled cheese cubes chilled with crackers, cured meats, olives, fresh vegetables, or as a flavorful addition to salads and sandwiches.
Tips for the Best Pickled Jalapeño Cheese Cubes
Choose a good-quality block of sharp cheddar. Since the cheese’s own flavor is central to this recipe, starting with a well-aged, sharp cheddar will result in a much more flavorful finished snack compared to a mild or pre-shredded variety.
Cut the cubes to a consistent size. Evenly sized cubes ensure that the brine penetrates each piece at the same rate, resulting in consistently flavored cheese throughout the jar.
Let the brine cool before pouring. This is one of the most important steps in this recipe. Pouring brine that’s too hot directly over the cheese can cause the cubes to soften, sweat, or even begin to melt, compromising their texture.
Adjust the heat to your comfort level. Three jalapeños plus an optional serrano pepper create a solid baseline of heat, and the crushed red pepper flakes add additional spice. If you prefer a milder version, omit the serrano and remove the seeds from the jalapeños before slicing.
Keep the cheese fully submerged. Any cubes poking above the brine line won’t pick up the seasoning as evenly and may dry out more quickly. If needed, use a small, clean, food-safe weight to keep everything submerged.
Always use a clean utensil when serving. Because cheese can be more susceptible to bacterial growth than some other pickled foods, using a clean fork or tongs rather than your fingers each time you remove cheese from the jar is an important food safety practice.
Flavor Variations to Try
Once you’ve made the classic version, here are a few ways to customize Pickled Jalapeño Cheese Cubes to your taste.
Extra Spicy Version: Add a habanero pepper along with the jalapeños and serrano for those who want serious heat with every bite.
Pepper Jack Version: Swap the sharp cheddar for pepper jack cheese for an extra layer of built-in spice that complements the jalapeño brine.
Herb-Forward Version: Add a few sprigs of fresh thyme or rosemary to the jar for an herbal note that rounds out the overall flavor profile.
Smoky Version: Add a teaspoon of smoked paprika to the brine for a deeper, smokier undertone that pairs beautifully with the sharp cheddar.
Milder Family-Friendly Version: Omit the serrano pepper, use just one jalapeño with the seeds removed, and reduce the crushed red pepper flakes for a version that’s still full of tangy, garlicky flavor without as much heat.
How to Serve Pickled Jalapeño Cheese Cubes
These creamy, spicy cheese cubes are wonderfully versatile and can be enjoyed in a variety of ways.
- On a charcuterie or antipasto board: Arranged alongside cured meats, crackers, and olives, they add a bold, spicy contrast to richer, milder items.
- With crackers: A simple, satisfying pairing that lets the cheese’s tangy, spicy flavor shine.
- Straight from the jar: A quick, protein-and-fat-rich snack that satisfies a craving for something creamy, tangy, and spicy all at once.
- In salads: Cubed and tossed into a green salad for an instant boost of bold, cheesy flavor.
- On sandwiches: Sliced or cubed and added to a sandwich for a spicy, tangy upgrade to a classic lunch staple.
- Paired with cold beer: These cheese cubes make an excellent bar snack, especially alongside a cold beer or a crisp cider that can stand up to the bold, spicy flavor.
Storage Information
Proper storage is key to keeping your Pickled Jalapeño Cheese Cubes flavorful, fresh, and safe to eat.
- Store in an airtight container in the refrigerator. Keep the cheese refrigerated at all times, never at room temperature.
- Use within two weeks. For the best quality, flavor, and food safety, plan to enjoy your pickled cheese cubes within 2 weeks of making them.
- Keep the cheese fully submerged. This is essential for the best flavor and texture, as any exposed cubes are more prone to drying out.
- Always use a clean utensil when removing cheese from the jar. This helps prevent contamination and extends the freshness of the remaining cheese.
- Watch for signs of spoilage. If you notice an off smell, unusual discoloration, or a bulging container lid, discard the cheese immediately.
Recipe Overview
- Prep Time: 15 minutes
- Cook Time: 5 minutes
- Total Time: 20 minutes (plus pickling time)
- Servings: 12
- Calories: Approximately 220 per serving
Frequently Asked Questions
How long do Pickled Jalapeño Cheese Cubes need to sit before eating them? At a minimum, refrigerate the cheese for 2 days so the brine has time to penetrate. For the best flavor, let it marinate for 4 to 5 days.
Why do I need to let the brine cool before pouring it over the cheese? Very hot brine can cause the cheese cubes to soften, sweat, or begin to melt, which would ruin their texture. Letting the brine cool to warm, rather than hot, protects the integrity of the cheese while still allowing it to properly absorb the brine’s flavor.
Can I make these less spicy? Yes. Omit the serrano pepper, use just one or two jalapeños with the seeds removed, and reduce the crushed red pepper flakes. The garlic, onion, and dried spices will still deliver plenty of tangy flavor without intense heat.
Do I need to boil the brine? No. You only need to heat the brine gently, just until the salt and sugar dissolve completely. A full boil isn’t necessary and could make the brine too hot to safely use with cheese even after cooling.
Can I use a different type of cheese? Yes. While sharp cheddar is classic for this recipe due to its firm texture and bold flavor, other firm cheeses like pepper jack, gouda, or a mild cheddar can also be used, though softer cheeses may not hold their shape as well throughout the pickling process.
How long do these cheese cubes last in the refrigerator? When stored properly, fully submerged in brine and refrigerated at all times, Pickled Jalapeño Cheese Cubes will stay fresh for up to 2 weeks.
Can I freeze pickled cheese? Freezing isn’t recommended, as it can significantly alter the texture of the cheese, making it crumbly or grainy once thawed. Refrigeration is the best storage method for maintaining both flavor and texture.
Why is it especially important to use clean utensils with this recipe? Cheese can be more susceptible to bacterial growth than some other pickled foods, so using a clean fork or tongs each time you remove cheese from the jar, rather than your fingers, helps minimize contamination and extend the cheese’s freshness.
Can I reuse the brine for a second batch of cheese? It’s best to make a fresh batch of brine for each new batch of cheese, since reusing brine dilutes its acidity and flavor strength over time, which can affect both taste and food safety.
Final Thoughts
Pickled Jalapeño Cheese Cubes bring bold, spicy flavor to a snack that’s already a crowd favorite in its own right. With a tangy dual-vinegar brine, fresh jalapeño and serrano peppers, and a blend of aromatic spices, these cheese cubes deliver a creamy, garlicky, spicy bite that’s just as satisfying straight from the jar as it is arranged on a charcuterie board or piled onto a sandwich.
Once you make your first batch, don’t be surprised if it becomes a permanent fixture in your refrigerator. Gather your ingredients, warm up that brine, and get ready to enjoy one of the boldest, most craveable cheese snacks you’ll ever make at home.
Print
Pickled Jalapeño Cheese Cubes
- Total Time: 20 minutes (plus pickling time)
Ingredients
Here’s everything required to make a full batch of Pickled Jalapeño Cheese Cubes.
For the cheese:
- 2 lbs sharp cheddar cheese, cut into 1-inch cubes
For the brine:
-
- 1½ cups white vinegar
- 1/2 cup apple cider vinegar
- 1 cup water
- 1 tablespoon pickling salt or kosher salt
- 1 tablespoon sugar
Aromatics and spices:
-
- 6 cloves garlic, thinly sliced
- 3 jalapeños, thinly sliced
- 1 serrano pepper, thinly sliced (optional)
-
- 1 small red onion, thinly sliced
- 1 teaspoon crushed red pepper flakes
- 1 teaspoon whole black peppercorns
-
- 1 teaspoon mustard seeds
- 1 teaspoon coriander seeds
- 1 teaspoon dried oregano
- 2 bay leaves
Instructions
Making Pickled Jalapeño Cheese Cubes is a simple process, but a few key details will help you achieve the best possible texture and flavor.
Step 1: Cut the Cheese
Cut the cheddar cheese into evenly sized 1-inch cubes and place them into a clean glass jar or airtight container. Cutting the cubes to a consistent size ensures the brine penetrates each piece at roughly the same rate.
Step 2: Add the Aromatics and Spices
Add the sliced garlic, jalapeños, serrano pepper (if using), onion, black peppercorns, mustard seeds, coriander seeds, dried oregano, crushed red pepper flakes, and bay leaves throughout the jar, distributing everything evenly so the flavor infuses consistently.
Step 3: Build the Brine
In a saucepan, combine the white vinegar, apple cider vinegar, water, pickling salt, and sugar.
Step 4: Heat Gently
Heat the mixture over medium heat, stirring until the salt and sugar dissolve completely. Do not let the brine boil.
Step 5: Cool the Brine
Remove the brine from the heat and let it cool for about 10 to 15 minutes, until it’s warm rather than hot. This step is especially important with cheese, since very hot brine can soften or even begin to melt the cubes.
Step 6: Pour Over the Cheese
Carefully pour the warm brine over the cheese cubes, making sure they are fully submerged.
Step 7: Cool and Seal
Allow the jar to cool to room temperature before sealing it tightly with a lid. This step helps prevent pressure buildup inside the jar and preserves the freshness of the aromatics.
Step 8: Refrigerate and Wait
Refrigerate for at least 2 days before serving. For the best flavor, let the cheese marinate for 4 to 5 days, giving the brine time to fully penetrate each cube.
Step 9: Serve
Serve the pickled cheese cubes chilled with crackers, cured meats, olives, fresh vegetables, or as a flavorful addition to salads and sandwiches.
- Prep Time: 15 minutes
- Cook Time: 5 minutes
Nutrition
- Serving Size: 12
- Calories: Approximately 220 per serving