Hot Honey Pickled Peppers: The Sweet, Spicy, Sticky Condiment You’ll Put on Everything
If you’ve been searching for a way to level up your pizza night, burger stacks, taco Tuesdays, or sandwich game, stop scrolling — you just found it. These Hot Honey Pickled Peppers are the perfect balance of sweet, spicy, tangy, and garlicky, finished off with a sticky hot honey glaze that makes them completely addictive. One bite and you’ll understand why this jar disappears from the fridge faster than almost anything else we make.
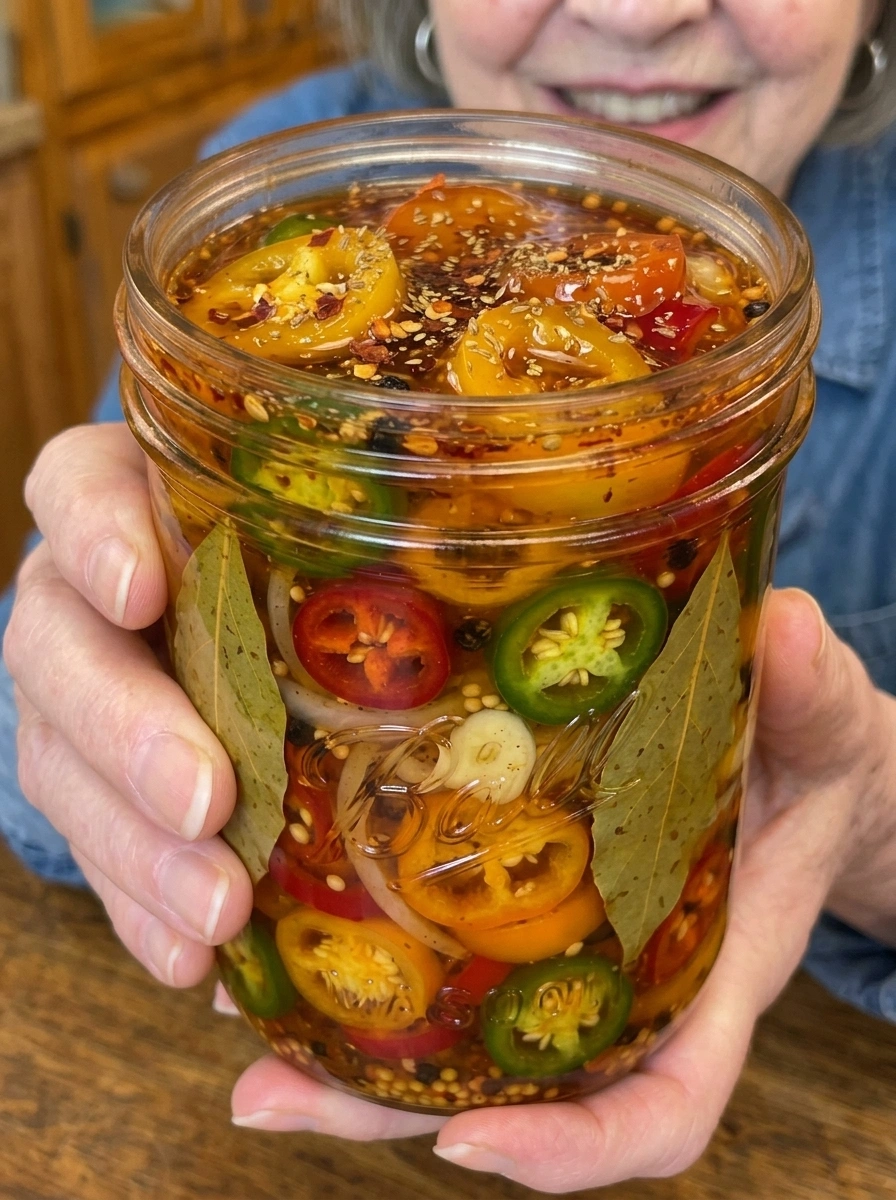
This isn’t your average pickled pepper recipe. Instead of a straight vinegar brine, we’re infusing the liquid with real hot honey, layering in warm pickling spices like coriander and mustard seed, and using a colorful mix of banana peppers, jalapeños, Fresno chiles, and mini sweet peppers for a rainbow jar that tastes as good as it looks. Whether you’re an experienced home canner or you’ve never pickled anything in your life, this recipe is simple, fast, and nearly foolproof.
Below, you’ll find everything you need to make a perfect batch: ingredient notes, step-by-step directions, storage tips, serving ideas, and answers to the most common questions people ask about pickling peppers at home. Let’s get into it.
Why You’ll Love This Hot Honey Pickled Peppers Recipe
There are a lot of pickled pepper recipes out there, but this one earns a permanent spot in your refrigerator door for a few good reasons:
- The flavor is unbeatable. Sweet hot honey meets tangy double-vinegar brine, warm spices, and fresh garlic and onion. Every ring of pepper is packed with flavor in every bite.
- It’s endlessly versatile. These peppers work on pizza, burgers, tacos, sandwiches, charcuterie boards, grain bowls, hot dogs, deviled eggs, and even straight out of the jar as a snack.
- No canning experience required. This is a quick refrigerator pickle, not a shelf-stable canning project. There’s no water bath, no special equipment, and no need to worry about processing times.
- It comes together fast. With just 15 minutes of prep and 5 minutes of cook time, you can have a jar ready to pickle in your fridge in about 20 minutes total.
- It’s naturally colorful and gorgeous. The mix of banana peppers, jalapeños, Fresno chiles, and mini sweet peppers creates a jar that looks like something from a specialty food shop.
- Customizable heat level. Leave the seeds in for maximum spice, or remove them for a milder, more approachable version that still delivers big flavor.
What Are Hot Honey Pickled Peppers?
Hot honey pickled peppers are exactly what they sound like: fresh peppers preserved in a warm, tangy brine that’s been sweetened and spiced with hot honey instead of plain sugar. The vinegar and salt do the classic pickling work — preserving the peppers and giving them that signature pucker — while the hot honey adds a sticky sweetness and a slow-building heat that plain sugar simply can’t replicate.
Because hot honey is already infused with chili, it doubles down on the sweet-heat combination that’s become so popular in modern cooking, from hot honey fried chicken to hot honey pizza. Combining that flavor profile with pickling is a natural next step, and once you taste the result, you’ll wonder why every jar of pickled peppers doesn’t come this way.
Ingredients You’ll Need
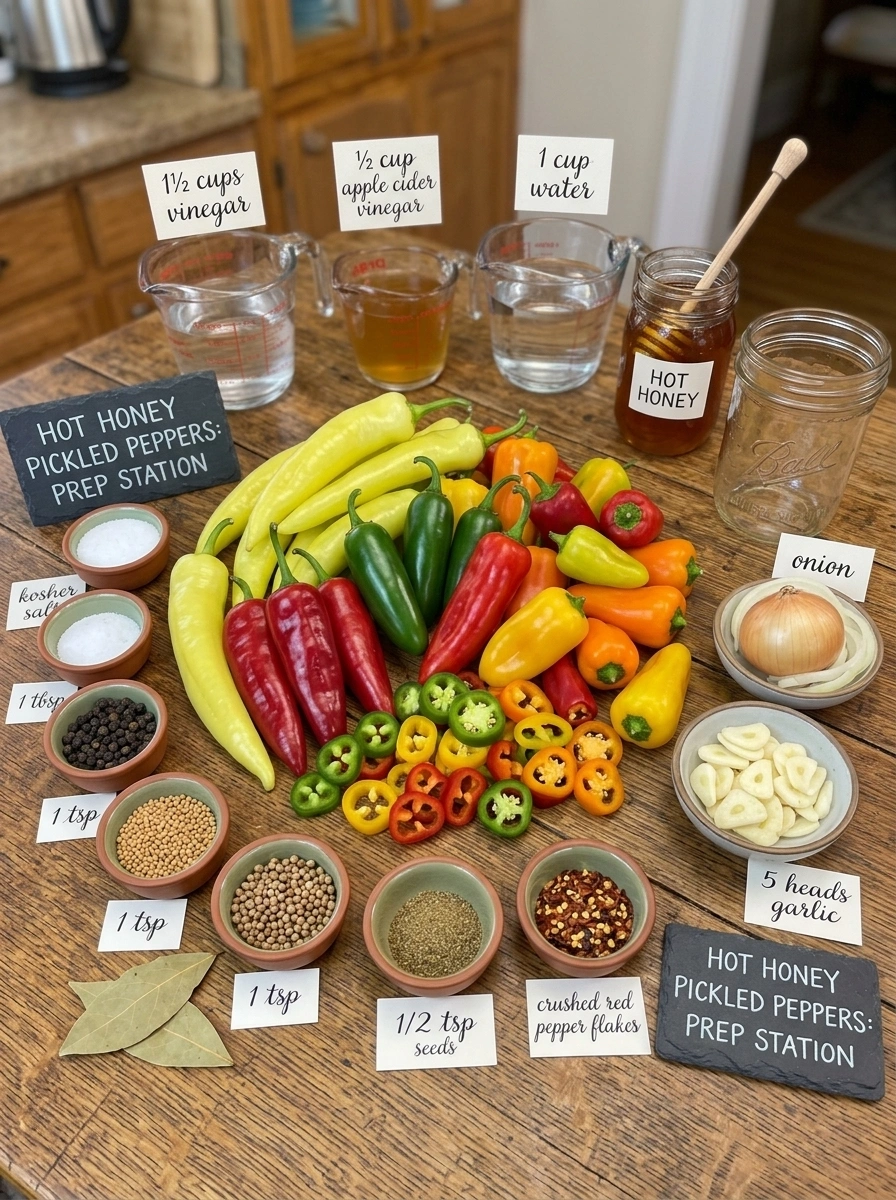
Here’s what goes into this recipe and why each ingredient matters.
The Peppers
- 1 lb mixed peppers (banana peppers, jalapeños, Fresno chiles, and mini sweet peppers), sliced into rings — using a mix of peppers gives you a range of heat levels and colors in every jar. Banana peppers and mini sweet peppers bring mild, fruity notes, while jalapeños and Fresno chiles bring the heat and a beautiful red-green color contrast.
The Brine
- 1½ cups white vinegar — the backbone of the pickling liquid, providing sharp acidity and a clean, crisp tang.
- 1/2 cup apple cider vinegar — adds a rounder, slightly fruity acidity that balances the sharpness of the white vinegar.
- 1 cup water — dilutes the vinegar just enough so the pickles aren’t overwhelmingly sour.
- 1/2 cup hot honey — the star of the show. This is what gives the brine its sticky sweetness and gentle background heat.
- 1 tbsp pickling salt or kosher salt — essential for both flavor and preservation. Pickling salt is ideal because it doesn’t contain anti-caking agents that can cloud the brine, but kosher salt works well too.
The Aromatics and Spices
- 5 cloves garlic, thinly sliced — infuses the brine with a punchy, savory garlic flavor that mellows slightly as it pickles.
- 1 small onion, thinly sliced — adds sweetness and a bit of crunch, and the onion itself becomes a delicious pickled bonus.
- 1 tsp whole black peppercorns — a classic pickling spice that adds subtle heat and earthiness.
- 1 tsp mustard seeds — brings a slight tang and pop of texture, very traditional in pickling recipes.
- 1 tsp coriander seeds — adds warm, citrusy, slightly floral notes.
- 1/2 tsp celery seeds — contributes a savory, slightly bitter depth that rounds out the brine.
- 1 tsp crushed red pepper flakes — for an extra kick layered on top of the hot honey heat.
- 2 bay leaves — add a subtle herbal backbone that ties all the spices together.
How to Make Hot Honey Pickled Peppers (Step-by-Step)
Step 1: Prep the Peppers
Wash your peppers thoroughly under cool water. Slice them into 1/4-inch rings, removing the stems as you go. This is also the moment to decide how spicy you want your final product: leave the seeds and membranes in for maximum heat, or scrape some out with the tip of your knife for a milder result. Since you’re working with a mix of peppers, you can even customize heat pepper by pepper — leave the jalapeño and Fresno seeds in, but remove the seeds from your mini sweet peppers, for example.
Step 2: Pack the Jar
Pack the sliced peppers into a clean glass jar or airtight container. Don’t be afraid to pack them in fairly snugly — they’ll shrink down slightly once the warm brine hits them, and a tightly packed jar means more flavorful peppers per bite.
Step 3: Add the Aromatics
Tuck the sliced garlic and onion throughout the jar, distributing them evenly so every layer of peppers gets some. Then scatter in the black peppercorns, mustard seeds, coriander seeds, celery seeds, crushed red pepper flakes, and bay leaves. Layering the spices as you pack rather than dumping them all on top helps distribute the flavor evenly through the whole jar.
Step 4: Make the Brine
In a saucepan, combine the white vinegar, apple cider vinegar, water, hot honey, and pickling salt. Heat over medium heat, stirring frequently, until the honey and salt have fully dissolved into the liquid. Keep an eye on it and don’t let the brine come to a full boil — you just want it hot enough to dissolve everything, not simmering and reducing.
Step 5: Pour and Seal
Carefully pour the warm brine over the peppers, making sure they’re fully submerged. If you’re short on liquid, top off with a splash of hot water or extra vinegar so nothing pokes out above the surface — any exposed peppers won’t pickle evenly and can spoil faster.
Step 6: Cool and Refrigerate
Let the jar sit at room temperature until it’s cooled down, then seal it tightly with a lid. Once sealed, transfer it to the refrigerator.
Step 7: Let Them Pickle
Refrigerate for at least 24 hours before your first taste — this gives the flavors time to start melding. For the best sweet-and-spicy balance, let the peppers pickle for 3 to 5 days before digging in. The longer they sit, the more the hot honey, garlic, and spices penetrate the peppers.
Tips for the Best Hot Honey Pickled Peppers
- Use a very clean jar. Since this is a refrigerator pickle rather than a shelf-stable canned product, starting with a clean, dry jar (washed in hot soapy water or run through the dishwasher) helps prevent any unwanted bacteria from getting a head start.
- Slice peppers evenly. Consistent 1/4-inch rings help the peppers pickle at the same rate, so you don’t end up with some rings still crunchy and raw-tasting while others are perfectly tangy.
- Don’t skip the resting time. It’s tempting to eat these the moment they hit the fridge, but the real magic happens after a few days, once the hot honey brine has had time to work its way into every ring.
- Keep everything submerged. Use a small weight, a fermentation weight, or simply push the peppers down with a clean spoon before sealing to make sure nothing floats above the brine line.
- Adjust the honey to taste. If you like things extra spicy, look for a hotter honey brand or add an extra pinch of red pepper flakes. If you prefer things milder and sweeter, choose a hot honey with a gentler kick.
- Save the brine. Once the peppers are gone, don’t toss the leftover liquid. It makes an incredible addition to marinades, vinaigrettes, or even a spicy-sweet glaze for grilled chicken.
- Wear gloves when slicing hot peppers. Jalapeños and Fresno chiles contain capsaicin, which can linger on your skin and cause irritation if you touch your eyes or face afterward.
How to Serve Hot Honey Pickled Peppers
Part of what makes this recipe so much fun is how many ways you can use it. Here are some of our favorite ways to enjoy them:
- On pizza — scatter a handful over a hot-from-the-oven pizza for a sweet, spicy, tangy finishing touch that plays beautifully against melted cheese.
- On burgers — layer a few rings on top of a juicy burger patty for a pop of acidity and heat that cuts through the richness.
- In tacos — add them to fish tacos, carnitas, or grilled chicken tacos for an instant flavor upgrade.
- On sandwiches — tuck them into a deli sandwich, grilled cheese, or pulled pork sandwich for crunch, tang, and sweetness all in one bite.
- On charcuterie boards — pair them with sharp cheeses, cured meats, and crackers for a beautiful, flavorful addition to any spread.
- Straight from the jar — sometimes the best way to enjoy these is standing in front of the fridge, fork in hand, going straight for the jar.
- Chopped into dips — stir chopped pieces into cream cheese, sour cream, or hummus for a quick sweet-and-spicy dip.
- On hot dogs — swap out plain relish for a few rings of these peppers for a serious flavor bump.
Storage Information
Store your hot honey pickled peppers in an airtight jar in the refrigerator for up to 1 month. For the freshest flavor and best texture, always make sure the peppers stay completely submerged in the pickling brine. If you notice the liquid level dropping as you eat through the jar, give it a gentle shake or push the remaining peppers down so they stay covered.
Because this is a refrigerator pickle rather than a shelf-stable canned recipe, it must be kept cold at all times and isn’t designed for long-term pantry storage. If you ever notice off smells, mold, or unusual discoloration, discard the jar.
Frequently Asked Questions
Can I use only one type of pepper instead of a mix? Absolutely. If you only have jalapeños on hand, or you want an all-sweet-pepper version, feel free to swap in a single variety. Just keep the total weight around 1 lb so the pepper-to-brine ratio stays balanced.
Is this recipe very spicy? It has a noticeable kick, but the sweetness from the hot honey helps balance the heat. If you’re sensitive to spice, remove the seeds and membranes from the jalapeños and Fresno chiles, and choose a milder hot honey.
Can I make this without hot honey? You can substitute regular honey and add a bit more crushed red pepper flakes to compensate for the lost heat, though the flavor won’t be quite as complex as when using true hot honey.
Do I need to can these in a water bath? No. This recipe is designed as a quick refrigerator pickle, meaning there’s no water bath canning involved. It’s ready to eat after 24 hours and best after 3 to 5 days, but it must always be stored in the refrigerator.
How long do hot honey pickled peppers last? When stored properly in the refrigerator, fully submerged in brine, they’ll keep for up to 1 month.
Can I reuse the brine to make a second batch of peppers? It’s best to make a fresh batch of brine each time for food safety and flavor reasons, since the used brine will be diluted and less potent after the first batch of peppers has pickled in it.
What’s the best jar to use? A wide-mouth glass mason jar works wonderfully because it makes it easy to pack the peppers and pull them out later. Any clean, airtight glass container will do the job.
Recipe Card
Hot Honey Pickled Peppers Prep Time: 15 minutes Cook Time: 5 minutes Total Time: 20 minutes (plus at least 24 hours to pickle) Servings: 10 Calories: ~40 per serving
Ingredients
- 1 lb mixed peppers (banana peppers, jalapeños, Fresno chiles, and mini sweet peppers), sliced into rings
- 1½ cups white vinegar
- 1/2 cup apple cider vinegar
- 1 cup water
- 1/2 cup hot honey
- 1 tbsp pickling salt or kosher salt
- 5 cloves garlic, thinly sliced
- 1 small onion, thinly sliced
- 1 tsp whole black peppercorns
- 1 tsp mustard seeds
- 1 tsp coriander seeds
- 1/2 tsp celery seeds
- 1 tsp crushed red pepper flakes
- 2 bay leaves
Directions
- Wash the peppers thoroughly and slice them into 1/4-inch rings, removing the stems. Leave the seeds in for extra heat or remove some for a milder flavor.
- Pack the sliced peppers into a clean glass jar or airtight container.
- Add the garlic, onion, black peppercorns, mustard seeds, coriander seeds, celery seeds, crushed red pepper flakes, and bay leaves throughout the jar.
- In a saucepan, combine the white vinegar, apple cider vinegar, water, hot honey, and pickling salt. Heat over medium heat, stirring until the honey and salt dissolve completely. Do not let the brine boil.
- Carefully pour the warm brine over the peppers until they are fully submerged.
- Allow the jar to cool to room temperature, then seal tightly with a lid.
- Refrigerate for at least 24 hours before serving. For the perfect sweet-and-spicy flavor, let the peppers pickle for 3–5 days.
Storage
Store in an airtight jar in the refrigerator for up to 1 month. Keep the peppers completely submerged in the pickling brine for the freshest flavor and best texture.
Final Thoughts
These Hot Honey Pickled Peppers are the kind of condiment that quietly takes over your fridge door and becomes a staple in your weekly cooking rotation. They’re sweet, spicy, tangy, and garlicky all at once, finished with that sticky hot honey glaze that makes them impossible to stop eating. Whether you pile them onto pizza, burgers, tacos, and sandwiches, or eat them straight from the jar as a snack, one batch is never enough. Make a jar this weekend, let it pickle for a few days, and get ready for your new favorite way to add sweet heat to just about anything.
Print
Hot Honey Pickled Peppers
- Total Time: 20 minutes (plus at least 24 hours to pickle)
Ingredients
-
- 1 lb mixed peppers (banana peppers, jalapeños, Fresno chiles, and mini sweet peppers), sliced into rings
- 1½ cups white vinegar
- 1/2 cup apple cider vinegar
-
- 1 cup water
- 1/2 cup hot honey
- 1 tbsp pickling salt or kosher salt
-
- 5 cloves garlic, thinly sliced
- 1 small onion, thinly sliced
- 1 tsp whole black peppercorns
-
- 1 tsp mustard seeds
- 1 tsp coriander seeds
- 1/2 tsp celery seeds
- 1 tsp crushed red pepper flakes
- 2 bay leaves
Instructions
Step 1: Prep the Peppers
Wash your peppers thoroughly under cool water. Slice them into 1/4-inch rings, removing the stems as you go. This is also the moment to decide how spicy you want your final product: leave the seeds and membranes in for maximum heat, or scrape some out with the tip of your knife for a milder result. Since you’re working with a mix of peppers, you can even customize heat pepper by pepper — leave the jalapeño and Fresno seeds in, but remove the seeds from your mini sweet peppers, for example.
Step 2: Pack the Jar
Pack the sliced peppers into a clean glass jar or airtight container. Don’t be afraid to pack them in fairly snugly — they’ll shrink down slightly once the warm brine hits them, and a tightly packed jar means more flavorful peppers per bite.
Step 3: Add the Aromatics
Tuck the sliced garlic and onion throughout the jar, distributing them evenly so every layer of peppers gets some. Then scatter in the black peppercorns, mustard seeds, coriander seeds, celery seeds, crushed red pepper flakes, and bay leaves. Layering the spices as you pack rather than dumping them all on top helps distribute the flavor evenly through the whole jar.
Step 4: Make the Brine
In a saucepan, combine the white vinegar, apple cider vinegar, water, hot honey, and pickling salt. Heat over medium heat, stirring frequently, until the honey and salt have fully dissolved into the liquid. Keep an eye on it and don’t let the brine come to a full boil — you just want it hot enough to dissolve everything, not simmering and reducing.
Step 5: Pour and Seal
Carefully pour the warm brine over the peppers, making sure they’re fully submerged. If you’re short on liquid, top off with a splash of hot water or extra vinegar so nothing pokes out above the surface — any exposed peppers won’t pickle evenly and can spoil faster.
Step 6: Cool and Refrigerate
Let the jar sit at room temperature until it’s cooled down, then seal it tightly with a lid. Once sealed, transfer it to the refrigerator.
Step 7: Let Them Pickle
Refrigerate for at least 24 hours before your first taste — this gives the flavors time to start melding. For the best sweet-and-spicy balance, let the peppers pickle for 3 to 5 days before digging in. The longer they sit, the more the hot honey, garlic, and spices penetrate the peppers.
- Prep Time: 15 minutes
- Cook Time: 5 minutes
Nutrition
- Serving Size: 10
- Calories: 40 per serving