Brussels sprouts have had quite the glow-up over the past decade. They went from the most dreaded vegetable on the dinner table to a restaurant darling — roasted, charred, shaved into salads, and now, pickled to absolute perfection. If you’ve never tried pickled Brussels sprouts, prepare to have your world rocked. These little bites are bold, tangy, and packed with a satisfying crunch that makes them completely impossible to stop eating. One taste, and you’ll be reaching back into the jar again and again.
This guide covers everything you need to know: a tried-and-true recipe, step-by-step instructions, pro tips for maximum crunch, creative ways to serve them, and answers to the most common questions about pickling Brussels sprouts at home.
What Are Pickled Brussels Sprouts?
Pickled Brussels sprouts are Brussels sprouts preserved in a seasoned vinegar brine — the same quick-pickling technique used for cucumbers, jalapeños, red onions, and other vegetables. The brine transforms the raw sprout from something faintly bitter and vegetal into something deeply savory, pleasantly tangy, and surprisingly addictive.
Unlike roasted Brussels sprouts, which are soft and caramelized, pickled Brussels sprouts stay crisp and snappy. The brine penetrates the leaves and tenderizes their sharpest edges while preserving their natural crunch. The result is a vegetable that feels entirely new — familiar enough to be comforting, bold enough to be exciting.
They’re a staple at craft cocktail bars (they make an incredible garnish for a Bloody Mary), a beloved addition to charcuterie boards, and a condiment that belongs in every home cook’s refrigerator.
The Recipe: Pickled Brussels Sprouts
Ingredients
The Vegetables:
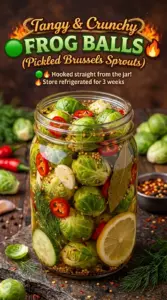
- 1 lb Brussels sprouts, trimmed and halved
- 4 cloves garlic, smashed
- 1–2 red chili peppers or dried chili flakes, to taste
- 1 tsp black peppercorns
- 1 tsp mustard seeds
- 1/2 tsp coriander seeds
- 1/2 tsp celery seeds
- 2 bay leaves
- 1 small shallot, thinly sliced (optional, adds sweetness)
The Brine:
- 1½ cups white wine vinegar (or apple cider vinegar)
- 1 cup water
- 2 tbsp sugar
- 1 tbsp pickling salt or kosher salt
Directions
- Prep the Brussels sprouts. Trim the stem end of each sprout and remove any damaged outer leaves. Halve them lengthwise — this increases the surface area in contact with the brine and speeds up flavor absorption. For small sprouts, you can leave them whole; for very large ones, quarter them.
- Blanch briefly (optional but recommended). Bring a pot of salted water to a boil and blanch the Brussels sprouts for 2 minutes. Transfer immediately to a bowl of ice water to stop the cooking. Drain well. This step softens the outer layers just enough to help the brine absorb more deeply while keeping the center crunchy.
- Pack the jar. Place the garlic, chili peppers, peppercorns, mustard seeds, coriander seeds, celery seeds, and bay leaves into the bottom of a clean 1-quart glass jar. Add the Brussels sprouts, packing them in tightly. If using shallot, scatter the slices among the sprouts as you pack.
- Make the brine. Combine the vinegar, water, sugar, and salt in a small saucepan over medium heat. Stir until the sugar and salt dissolve completely, about 3–4 minutes. Remove from heat.
- Pour the brine. Carefully pour the hot brine over the Brussels sprouts until every piece is fully submerged. Press the sprouts down gently if needed.
- Cool and refrigerate. Let the jar cool to room temperature — about 30 to 45 minutes. Seal the lid tightly and refrigerate.
- Wait (the hardest part). The sprouts are edible after 24 hours, but they’re significantly better after 48 to 72 hours. For the deepest, most developed flavor and the best texture, give them a full 3 to 5 days before digging in.
Prep Time: 15 minutes | Cook Time: 5 minutes | Total Time: 20 minutes (plus 24–72 hours chilling) Servings: 8–10 | Calories: ~30 per serving Storage: Up to 3 weeks in the refrigerator
Why Pickled Brussels Sprouts Are Worth Making
The Bitterness Disappears
Raw Brussels sprouts have a sulfurous edge that puts a lot of people off. Cooking eliminates much of it, and so does pickling. The acidic brine neutralizes the bitter compounds in the sprout, leaving behind a savory, complex flavor without any of the harshness. People who claim to dislike Brussels sprouts are often converts after trying them pickled.
The Texture Is Extraordinary
Crunchy pickled vegetables are deeply satisfying in a way that soft ones simply aren’t. Pickled Brussels sprouts have a snap to them — especially in the thicker center — that makes every bite feel substantial and exciting. The outer leaves soften slightly and absorb the brine’s flavor deeply, while the core stays firm and crunchy. It’s the best of both worlds.
They’re Packed With Nutrients
Brussels sprouts are one of the most nutritionally dense vegetables you can eat. They’re rich in vitamin C, vitamin K, folate, and fiber. They contain compounds called glucosinolates, which have been studied for their potential role in supporting cellular health. Pickling preserves much of this nutritional value, especially compared to high-heat cooking methods. At around 30 calories per serving, pickled Brussels sprouts are a powerhouse condiment.
They Keep for Weeks
Unlike fresh Brussels sprouts, which go from peak freshness to sad and wilted within a week, pickled Brussels sprouts keep for up to 3 weeks in the refrigerator. Make one big batch and enjoy them over an extended period — they actually get better as they sit.
Choosing the Best Brussels Sprouts for Pickling
Not all Brussels sprouts are created equal, and the ones you choose will directly impact your finished result.
Look for small to medium sprouts. Smaller sprouts (about 1 inch in diameter) are more tender and have a milder flavor. Large sprouts can be slightly more bitter and take longer to absorb the brine. If your grocery store only has large sprouts, quarter them rather than halving.
Choose firm, tightly packed sprouts. Loose, open leaves are a sign of age. Fresh sprouts should feel dense and solid when you squeeze them gently.
Bright green is best. Avoid sprouts with yellowing outer leaves or any visible browning. The fresher the sprout, the better the pickle.
Buy on the stalk if you can find them. Brussels sprouts sold still attached to their stalks are almost always fresher than loose ones in a bag or clamshell. If you spot them at a farmers market or specialty grocer, grab them.
The Science of Quick Pickling
Understanding a little bit about how pickling works will help you make better pickles every time.
Acidity is everything. Vinegar is acetic acid, and it’s what does the heavy lifting in a quick pickle. The acid denatures the enzymes in the vegetables that would otherwise cause them to break down and turn mushy. It also creates an inhospitable environment for harmful bacteria, which is what makes pickled vegetables safe to eat and shelf-stable (in the refrigerator, at least).
Salt draws out moisture. When vegetables are exposed to salt (either in a brine or through a dry-salting process), osmosis draws moisture out of the vegetable cells. This concentrates the flavor and changes the texture. In quick pickling, the salt is dissolved in the brine, so this process happens gradually as the vegetables soak.
Sugar creates balance. Without any sweetness, pickling brine can taste sharp and one-dimensional. Sugar rounds out the acidity and makes the overall flavor more complex and approachable. You don’t need much — just enough to soften the edge.
Spices bloom in the brine. Whole spices like peppercorns, mustard seeds, and coriander seeds release their aromatic compounds into the warm brine and continue to infuse as the pickles rest in the refrigerator. This is why pickled vegetables taste more complex and interesting than the sum of their parts.
Flavor Variations to Try
Once you’re comfortable with the base recipe, there are endless directions to take your pickled Brussels sprouts.
Spicy Dill
Add a generous handful of fresh dill fronds and two or three whole dried Thai chilies to the jar. Swap the white wine vinegar for white distilled vinegar for a more classic dill pickle profile. These are incredible alongside smoked salmon or on a charcuterie board.
Smoky and Savory
Add a teaspoon of smoked paprika to the brine and toss in a few strips of lemon zest. The smokiness pairs beautifully with the natural earthiness of Brussels sprouts and makes these a standout addition to grain bowls and sandwiches.
Honey Mustard
Replace the sugar with an equal amount of honey and double the mustard seeds. Add a teaspoon of whole-grain mustard directly to the brine. These have a sweeter, more rounded flavor that pairs wonderfully with roasted meats and cheese boards.
Garlicky and Herbaceous
Go heavy on the garlic — use 6 to 8 cloves — and add a sprig of fresh rosemary and a few fresh thyme sprigs to the jar. These pickles are deeply savory and aromatic, perfect alongside roasted chicken or tucked into a sandwich with deli meat.
Asian-Inspired
Swap the white wine vinegar for rice vinegar, replace the sugar with a tablespoon of honey, and add a tablespoon of soy sauce and a teaspoon of sesame seeds to the brine. Toss in a few slices of fresh ginger for good measure. These are spectacular on rice bowls, ramen, and banh mi.
Creative Ways to Serve Pickled Brussels Sprouts
As a Bloody Mary Garnish
This is perhaps the most famous use for pickled Brussels sprouts outside of eating them straight from the jar. A pickled Brussels sprout speared on a cocktail pick alongside a celery stalk and an olive turns a Bloody Mary from a brunch drink into a full experience. The tangy, spicy sprout is the ideal palate cleanser between sips.
On a Charcuterie Board
Pickled vegetables are a cornerstone of any great charcuterie board, and Brussels sprouts are a conversation-starting choice. Their unusual appearance draws attention, and their bold flavor pairs beautifully with cured meats, aged cheeses, and grainy mustard.
Chopped Into Potato Salad
Roughly chop a handful of pickled Brussels sprouts and fold them into potato salad in place of (or alongside) traditional pickles. They add tang, crunch, and a savory depth that takes potato salad to a new level.
On Grain Bowls and Buddha Bowls
A scoop of pickled Brussels sprouts on top of a grain bowl does the same job as a squeeze of lemon — it brightens the whole dish and cuts through the richness of any proteins or sauces. They’re especially good alongside tahini dressing, roasted sweet potato, and crispy chickpeas.
As a Sandwich and Burger Topping
Swap your standard pickles for a few halves of pickled Brussels sprouts on your next sandwich or burger. They add crunch, acidity, and a complexity that flat pickle chips simply can’t match.
Straight From the Jar
Let’s be honest — this is how most of them get eaten. There is something deeply satisfying about fishing a cold, tangy, crunchy pickled Brussels sprout out of a jar and eating it on its own. No plate required.
Tips for the Crunchiest Pickled Brussels Sprouts
- Don’t over-blanch. Two minutes in boiling water is all you need. More than that and the sprouts will soften too much during the pickling process.
- Ice bath immediately. The ice bath stops the cooking instantly. Skipping it means residual heat continues to soften the sprouts.
- Pack tightly. A tightly packed jar leaves less room for the sprouts to float and bump around, which helps them hold their shape.
- Use whole spices, not ground. Ground spices cloud the brine and can create a muddy texture. Whole peppercorns, mustard seeds, and coriander seeds look beautiful and release their flavor more gradually.
- Refrigerate as soon as the jar cools. Don’t leave the jar sitting at room temperature for longer than necessary after it cools. Get it into the fridge promptly.
- Wait patiently. The longer you wait (up to about 5 days), the better they’ll taste. Resist the temptation to crack the jar open at the 24-hour mark.
Frequently Asked Questions
Can I pickle Brussels sprouts without blanching them first? Yes, you can skip the blanching step. The sprouts will be crunchier but may take a day or two longer to fully absorb the brine. Some people prefer unblanched pickled Brussels sprouts for the extra snap.
Can I use frozen Brussels sprouts? Fresh is strongly recommended. Frozen Brussels sprouts have already been blanched and will turn soft and mushy in the brine.
Why is my brine cloudy? Some cloudiness is normal, especially from starch released by the Brussels sprouts or from whole spices. If the cloudiness is accompanied by an off smell, discard the batch. Otherwise, cloudy brine is perfectly safe.
Can I reuse the brine for a second batch? The brine weakens after the first batch, so a second batch pickled in reused brine will be less flavorful and may not be as safe. For best results, make fresh brine each time.
Are these suitable for canning? This recipe is developed for refrigerator pickles only. If you want shelf-stable pickled Brussels sprouts, consult an approved canning resource with tested ratios and processing times.
Print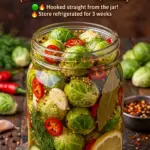
Pickled Brussels Sprouts: Bold, Tangy, and Addictively Crunchy — You’ll Be Hooked Straight From the Jar
- Total Time: 20 minutes
Ingredients
Ingredients
The Vegetables:
-
- 1 lb Brussels sprouts, trimmed and halved
- 4 cloves garlic, smashed
- 1–2 red chili peppers or dried chili flakes, to taste
-
- 1 tsp black peppercorns
- 1 tsp mustard seeds
- 1/2 tsp coriander seeds
-
- 1/2 tsp celery seeds
- 2 bay leaves
- 1 small shallot, thinly sliced (optional, adds sweetness)
The Brine:
-
- 1½ cups white wine vinegar (or apple cider vinegar)
- 1 cup water
- 2 tbsp sugar
- 1 tbsp pickling salt or kosher salt
Instructions
-
- Prep the Brussels sprouts. Trim the stem end of each sprout and remove any damaged outer leaves. Halve them lengthwise — this increases the surface area in contact with the brine and speeds up flavor absorption. For small sprouts, you can leave them whole; for very large ones, quarter them.
-
- Blanch briefly (optional but recommended). Bring a pot of salted water to a boil and blanch the Brussels sprouts for 2 minutes. Transfer immediately to a bowl of ice water to stop the cooking. Drain well. This step softens the outer layers just enough to help the brine absorb more deeply while keeping the center crunchy.
- Pack the jar. Place the garlic, chili peppers, peppercorns, mustard seeds, coriander seeds, celery seeds, and bay leaves into the bottom of a clean 1-quart glass jar. Add the Brussels sprouts, packing them in tightly. If using shallot, scatter the slices among the sprouts as you pack.
- Make the brine. Combine the vinegar, water, sugar, and salt in a small saucepan over medium heat. Stir until the sugar and salt dissolve completely, about 3–4 minutes. Remove from heat.
-
- Pour the brine. Carefully pour the hot brine over the Brussels sprouts until every piece is fully submerged. Press the sprouts down gently if needed.
- Cool and refrigerate. Let the jar cool to room temperature — about 30 to 45 minutes. Seal the lid tightly and refrigerate.
- Wait (the hardest part). The sprouts are edible after 24 hours, but they’re significantly better after 48 to 72 hours. For the deepest, most developed flavor and the best texture, give them a full 3 to 5 days before digging in.
Prep Time: 15 minutes | Cook Time: 5 minutes | Total Time: 20 minutes (plus 24–72 hours chilling) Servings: 8–10 | Calories: ~30 per serving Storage: Up to 3 weeks in the refrigerator
- Prep Time: 15 minutes
- Cook Time: 5 minutes
- Category: 30
Final Thoughts
Pickled Brussels sprouts are one of those kitchen projects that deliver enormous reward for minimal effort. Twenty minutes of active work, a few days of patience, and you have a jar of something genuinely special — bold, tangy, crunchy, and endlessly versatile. They make you look like a more sophisticated cook than the effort required, and they disappear fast once people discover the jar in the fridge.
So trim those sprouts, heat that brine, and get pickling. Your refrigerator is about to get a lot more interesting.