There is a particular kind of dessert that requires no justification — no special holiday, no elaborate table setting, no guest list to impress. It simply needs to exist: a bowl of something layered, creamy, fragrant, and profoundly satisfying. Vanilla Strawberry Banana Pudding is exactly that kind of dessert. Born from the tradition of American icebox cakes and Southern banana pudding, this version weaves together three flavors that were practically designed to be in the same bowl: the floral warmth of real vanilla, the tart brightness of fresh strawberries, and the soft, honeyed sweetness of ripe bananas. Together, layered between crisp vanilla wafers and billowy whipped cream, they create something far greater than the sum of their parts.
This article will walk you through not just the recipe — though we’ll cover every step in precise, loving detail — but the story behind it, the science that makes it work, tips to make it extraordinary, and the many ways you can make it your own. Whether you’re making this for a summer cookout, a family birthday, a potluck, or simply because you need something wonderful in your refrigerator, this pudding will not disappoint.
The Story Behind the Layers
Banana pudding has deep roots in American dessert culture, particularly in the South, where it has been a staple at church suppers, family reunions, and holiday tables for well over a century. The earliest versions were simple: a cooked vanilla custard poured over sliced bananas and vanilla wafers, perhaps topped with meringue or a cloud of whipped cream. The combination was modest in ingredients but remarkable in impact — the cookies softened into something almost custardy themselves, the bananas mellowed and sweetened, and the vanilla pudding tied everything together with its warm, floral depth.
Adding strawberries to this classic is not a modern gimmick — it’s an extension of a long tradition of pairing bananas and strawberries together. The two fruits share a natural affinity: where bananas are soft, starchy, and mellow, strawberries are juicy, acidic, and vivid. Where one soothes, the other brightens. In this pudding, the strawberries introduce a gentle tartness that cuts through the richness of the pudding and whipped cream, preventing the dessert from ever feeling cloying. They also add a visual drama that is simply irresistible — those red slices threaded through the pale layers are a feast for the eyes as much as the palate.
The vanilla, for its part, is not mere background. A real, generous measure of good vanilla extract transforms what might otherwise be a plain starch-thickened milk sauce into something aromatic and deeply pleasurable. If you have access to a vanilla bean, scraping it into the pudding alongside the extract is an act of pure indulgence that pays off in every spoonful.
Ingredients, Explained
Before you begin, it helps to understand why each ingredient is present and what role it plays. This isn’t just a recipe — it’s a small system of flavors and textures working in harmony.
For the Vanilla Pudding
- 2½ cups whole milk
- ½ cup granulated sugar
- ¼ cup cornstarch
- 2 egg yolks (optional — for creamier texture)
- 2 tsp pure vanilla extract
- Pinch of fine salt
- 2 tbsp unsalted butter
For the Layers
- 3 ripe bananas, sliced into ¼-inch rounds
- 1½ cups fresh strawberries, hulled and sliced
- Vanilla wafers or ladyfinger cookies (approximately 30–40 pieces)
For the Whipped Cream
- 1½ cups heavy whipping cream (cold)
- ⅓ cup powdered (icing) sugar
- 1 tsp pure vanilla extract
A word on milk: Whole milk produces the richest, most satisfying pudding. You can use 2% milk in a pinch, but avoid skim milk — the fat content in whole milk is what gives the pudding its silky, lush body. If you want to go even richer, replace ½ cup of the milk with heavy cream.
On the egg yolks: They are listed as optional, but they are highly recommended. Egg yolks add fat, emulsification, and a subtle golden color that makes the pudding look even more luxurious. They also deepen the flavor, giving the pudding a gentle custard quality rather than a purely starch-thickened texture.
On the bananas: Ripe is the operative word. You want bananas that are fully yellow with a few brown speckles — that is when their sugar is fully developed and their flavor is at its peak. Under-ripe bananas are starchy and bland; over-ripe bananas will turn mushy and dark too quickly in the pudding.
Step-by-Step Instructions
Build the Pudding Base
In a heavy-bottomed saucepan, whisk together the sugar, cornstarch, and salt until fully combined with no lumps. Slowly pour in the cold milk, whisking constantly as you go. This gradual addition prevents clumping and ensures a completely smooth pudding. Place the pan over medium heat and stir continuously with a whisk or silicone spatula.
Cook Until Thickened
Continue stirring over medium heat. After about 7–10 minutes, you will notice the mixture beginning to thicken. Don’t rush this with high heat — patience here prevents scorching. The pudding is ready when it coats the back of a spoon thickly and a line drawn through it holds its shape. It will thicken further as it cools.
Temper the Egg Yolks (If Using)
Whisk the egg yolks in a small bowl. Slowly ladle a few spoonfuls of the hot pudding mixture into the yolks while whisking vigorously — this raises their temperature gradually without scrambling them. Pour the tempered yolk mixture back into the saucepan and cook for 2 more minutes, stirring constantly, until the pudding is glossy and thick.
Finish with Butter and Vanilla
Remove the pan from the heat. Stir in the butter until fully melted and incorporated — it adds a beautiful gloss and richness. Add the vanilla extract and stir to combine. Press a sheet of plastic wrap directly onto the surface of the pudding (this prevents a skin from forming) and let it cool to room temperature, or speed it up in the refrigerator for 30 minutes.
Whip the Cream
In a cold bowl (chilling the bowl for 10 minutes in the freezer helps), whip the heavy cream on medium-high speed. Once it begins to thicken, add the powdered sugar and vanilla extract. Continue whipping until soft, billowy peaks form — the cream should hold its shape but still look lush and cloud-like, not stiff or grainy. Refrigerate until ready to use.
Assemble the Layers
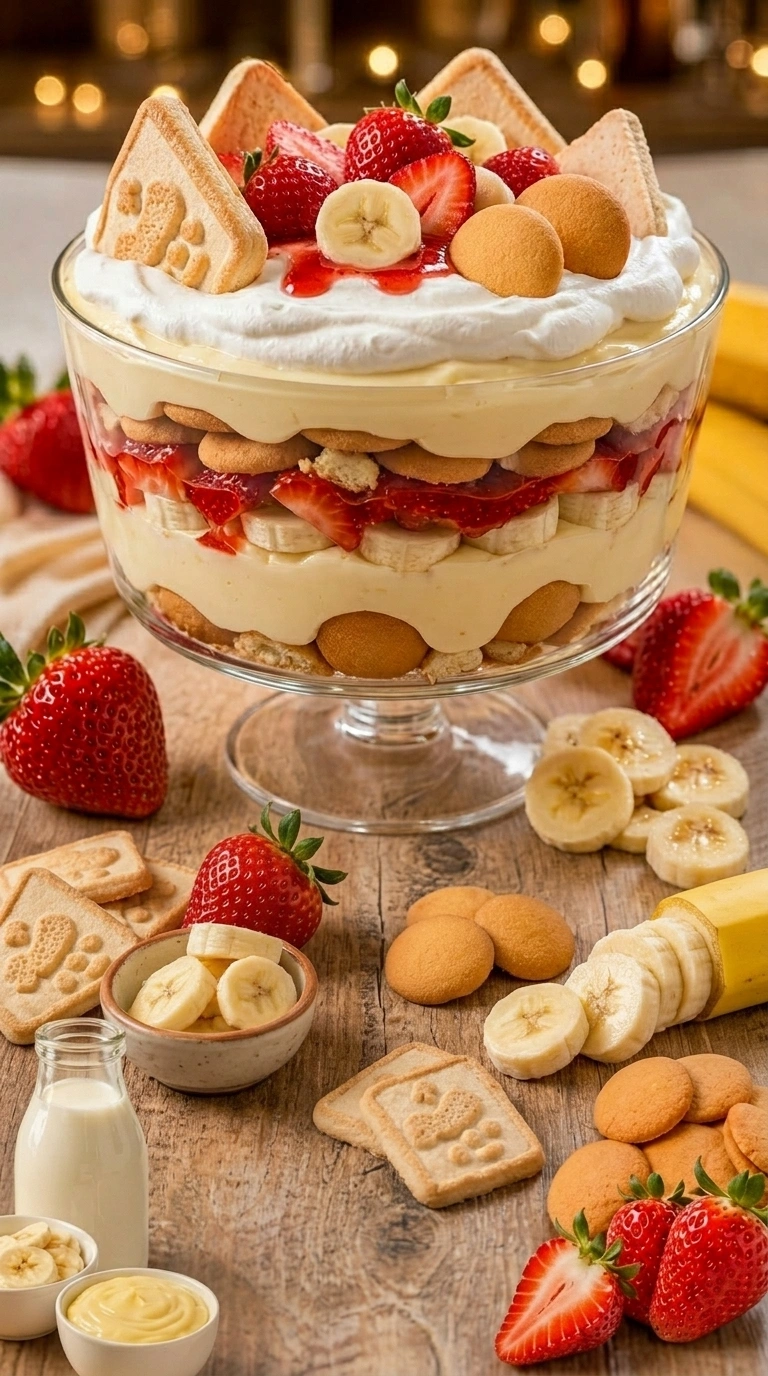
In a large trifle dish, glass bowl, or 9×13 inch baking dish, begin your first layer with vanilla wafers arranged in a single, overlapping layer. Add the banana slices, then the strawberry slices. Pour a generous layer of pudding over the fruit. Spoon or pipe a layer of whipped cream. Repeat the layers until the dish is full, finishing with whipped cream on top. Garnish with additional strawberry slices and banana rounds.
Chill and Serve
Cover the assembled pudding loosely with plastic wrap and refrigerate for a minimum of 2 hours, though overnight is ideal. During this resting time, the vanilla wafers soften into luscious, cake-like layers that absorb the pudding and become part of the dessert rather than a separate element. Serve cold, straight from the dish, with a large spoon.
The Science of a Perfect Pudding
Understanding a little of the chemistry behind this recipe will help you troubleshoot and adapt with confidence. The thickening agent here is cornstarch, a fine white powder made from the endosperm of corn. When cornstarch is heated in liquid, its starch granules absorb water and swell dramatically in a process called gelatinization, which is what turns your runny milk-sugar mixture into a thick, creamy pudding.
The key to lump-free pudding is ensuring the cornstarch is fully dispersed in the cold liquid before heat is applied. Once the mixture is on the heat, constant stirring prevents the starch from settling on the bottom of the pan, where it could scorch and create an unpleasant flavor. Stirring also ensures even heat distribution, so the pudding thickens uniformly throughout rather than in patches.
The egg yolks, when used, introduce a secondary thickening mechanism through protein coagulation, as well as the emulsifying power of lecithin — a fat naturally present in yolks. This emulsification is what gives custard-style puddings their uniquely smooth, almost velvety texture that purely cornstarch puddings lack. It’s a small addition with an outsized effect.
Flavor Profile
What makes this particular combination so harmonious is the interplay of complementary and contrasting flavor notes across five dimensions:
Tips for an Extraordinary Result
Pro Kitchen Notes
- Use real vanilla extract — not imitation. The difference in flavor is significant and worth the small extra expense. For an even more intense vanilla flavor, steep a split vanilla bean in the milk for 15 minutes before making the pudding.
- Keep bananas from browning by tossing the slices in a tablespoon of fresh lemon juice before assembling. This preserves their color and adds a subtle brightness.
- Chill your bowl and beaters before whipping cream. Fat in heavy cream holds air better when cold, giving you a more stable whipped cream that won’t weep or collapse.
- Let it rest overnight if you can. The 2-hour chill is the minimum; overnight transforms the wafers into something ethereal — soft, pudding-soaked, almost cake-like layers.
- Layer strategically — putting the bananas in the middle of the pudding layers (rather than on the very edges where they’ll be visible) protects them from browning when people serve themselves.
- Use a trifle dish if you want maximum visual impact. The glass sides reveal all those beautiful layers, making it as much a centerpiece as a dessert.
- Stabilize your whipped cream for longer shelf life by adding ½ tsp of unflavored gelatin dissolved in 1 tbsp cold water, beaten into the cream at the soft peak stage.
Variations to Try
Once you’ve mastered the base recipe, the possibilities for variation are genuinely endless. Here are three directions worth exploring:
Chocolate Swirl
Add a thin drizzle of melted dark chocolate between the pudding and cream layers for a sophisticated twist.
Tropical Version
Swap strawberries for mango slices and add a layer of toasted coconut flakes for a tropical getaway in a bowl.
Lemon-Vanilla
Add 1 tsp lemon zest to the pudding base and replace the strawberries with fresh blueberries for a brighter flavor.
Serving and Storage
Vanilla Strawberry Banana Pudding is best served within 24 to 48 hours of assembly, while the textures are at their most interesting — the cookies still have a slight resistance at the very center, the fruit is fresh and vibrant, and the cream is at its most billowy. Beyond 48 hours, the cookies will become very soft (which many people actually prefer), but the bananas will continue to darken and the strawberries may release some juice that thins the bottom layer slightly.
Store the pudding tightly covered with plastic wrap in the refrigerator. Do not freeze — the pudding will become grainy and the whipped cream will separate upon thawing. If you’re making it ahead for an event, you can prepare the pudding base and whipped cream separately up to 2 days in advance and assemble within 4 hours of serving for the freshest result.
For serving at a gathering, consider building individual portions in mason jars or clear plastic cups. Not only does this eliminate the need for serving spoons and plates, it also showcases those beautiful layers at eye level for each guest — and people genuinely light up when they receive their own personal jar of pudding.
Approximate Nutrition (Per Serving)
| Nutrient | Amount | % Daily Value |
|---|---|---|
| Calories | ~320 kcal | 16% |
| Total Fat | 16 g | 21% |
| Saturated Fat | 9 g | 45% |
| Carbohydrates | 42 g | 15% |
| Sugars | 28 g | — |
| Protein | 5 g | 10% |
| Calcium | 120 mg | 12% |
| Vitamin C | 18 mg | 20% |
Note: Values are estimates based on standard ingredients and will vary with specific brands and portion sizes. Based on 10 servings per recipe.
A Final Word
The greatest compliment a dessert can receive is not lavish praise — it’s silence. That moment when someone takes a first spoonful, pauses, and then quietly reaches for another. This pudding earns that silence regularly. It is the kind of dessert that people remember. They ask for the recipe. They request it for their birthday. They make it for their own families and call it their own, which is, in the end, the highest form of flattery a recipe can receive.
Make it once and it becomes yours. The layers are yours to adjust — more strawberries if you love their tartness, extra wafers if you love the softened-cookie texture, a deeper chill if you love a firmer pudding. Cooking is always a conversation between the recipe and the cook, and this particular recipe is a wonderfully willing conversationalist.
Print
Vanilla Strawberry Banana Pudding
Ingredients
Ingredients, Explained
Before you begin, it helps to understand why each ingredient is present and what role it plays. This isn’t just a recipe — it’s a small system of flavors and textures working in harmony.
For the Vanilla Pudding
-
- 2½ cups whole milk
- ½ cup granulated sugar
- ¼ cup cornstarch
-
- 2 egg yolks (optional — for creamier texture)
- 2 tsp pure vanilla extract
- Pinch of fine salt
- 2 tbsp unsalted butter
For the Layers
-
- 3 ripe bananas, sliced into ¼-inch rounds
- 1½ cups fresh strawberries, hulled and sliced
- Vanilla wafers or ladyfinger cookies (approximately 30–40 pieces)
For the Whipped Cream
-
- 1½ cups heavy whipping cream (cold)
- ⅓ cup powdered (icing) sugar
- 1 tsp pure vanilla extract
A word on milk: Whole milk produces the richest, most satisfying pudding. You can use 2% milk in a pinch, but avoid skim milk — the fat content in whole milk is what gives the pudding its silky, lush body. If you want to go even richer, replace ½ cup of the milk with heavy cream.
On the egg yolks: They are listed as optional, but they are highly recommended. Egg yolks add fat, emulsification, and a subtle golden color that makes the pudding look even more luxurious. They also deepen the flavor, giving the pudding a gentle custard quality rather than a purely starch-thickened texture.
On the bananas: Ripe is the operative word. You want bananas that are fully yellow with a few brown speckles — that is when their sugar is fully developed and their flavor is at its peak. Under-ripe bananas are starchy and bland; over-ripe bananas will turn mushy and dark too quickly in the pudding.
Instructions
Build the Pudding Base
In a heavy-bottomed saucepan, whisk together the sugar, cornstarch, and salt until fully combined with no lumps. Slowly pour in the cold milk, whisking constantly as you go. This gradual addition prevents clumping and ensures a completely smooth pudding. Place the pan over medium heat and stir continuously with a whisk or silicone spatula.
Cook Until Thickened
Continue stirring over medium heat. After about 7–10 minutes, you will notice the mixture beginning to thicken. Don’t rush this with high heat — patience here prevents scorching. The pudding is ready when it coats the back of a spoon thickly and a line drawn through it holds its shape. It will thicken further as it cools.
Temper the Egg Yolks (If Using)
Whisk the egg yolks in a small bowl. Slowly ladle a few spoonfuls of the hot pudding mixture into the yolks while whisking vigorously — this raises their temperature gradually without scrambling them. Pour the tempered yolk mixture back into the saucepan and cook for 2 more minutes, stirring constantly, until the pudding is glossy and thick.
Finish with Butter and Vanilla
Remove the pan from the heat. Stir in the butter until fully melted and incorporated — it adds a beautiful gloss and richness. Add the vanilla extract and stir to combine. Press a sheet of plastic wrap directly onto the surface of the pudding (this prevents a skin from forming) and let it cool to room temperature, or speed it up in the refrigerator for 30 minutes.
Whip the Cream
In a cold bowl (chilling the bowl for 10 minutes in the freezer helps), whip the heavy cream on medium-high speed. Once it begins to thicken, add the powdered sugar and vanilla extract. Continue whipping until soft, billowy peaks form — the cream should hold its shape but still look lush and cloud-like, not stiff or grainy. Refrigerate until ready to use.
Assemble the Layers
In a large trifle dish, glass bowl, or 9×13 inch baking dish, begin your first layer with vanilla wafers arranged in a single, overlapping layer. Add the banana slices, then the strawberry slices. Pour a generous layer of pudding over the fruit. Spoon or pipe a layer of whipped cream. Repeat the layers until the dish is full, finishing with whipped cream on top. Garnish with additional strawberry slices and banana rounds.
Chill and Serve
Cover the assembled pudding loosely with plastic wrap and refrigerate for a minimum of 2 hours, though overnight is ideal. During this resting time, the vanilla wafers soften into luscious, cake-like layers that absorb the pudding and become part of the dessert rather than a separate element. Serve cold, straight from the dish, with a large spoon.