There’s a reason banana pudding has graced Southern potlucks, holiday tables, and family gatherings for generations. It’s comforting, nostalgic, and effortlessly crowd-pleasing. But add a deep, velvety layer of chocolate pudding to the mix, and you’ve transformed a beloved classic into something truly extraordinary.
This Chocolate Banana Pudding recipe is the dessert you make when you want to impress without stress. It requires no baking, no fancy equipment, and no professional pastry skills. What it does require is a little patience — because the magic really happens in the refrigerator, where layers of cookies soften into cake-like tenderness, bananas meld with rich cocoa cream, and every spoonful becomes a complete dessert experience in itself.
Whether you’re making this for a birthday party, a holiday potluck, a backyard barbecue, or simply because Tuesday deserves a treat, this recipe delivers. Read on for everything you need to know — from choosing the right bananas to assembling like a pro and storing your masterpiece properly.
Why This Flavor Combination Works So Well
Before we get to the kitchen, let’s talk flavor science — because understanding why chocolate and banana work so harmoniously together makes you a more intuitive cook.
Ripe bananas are intensely sweet, with floral, tropical notes and a creamy texture that coats the palate. Unsweetened cocoa powder, on the other hand, delivers deep bitterness, earthy richness, and a dry intensity that cuts right through sweetness. Together, they balance each other with remarkable elegance. The banana’s natural sugars soften the cocoa’s edge; the cocoa’s depth prevents the banana from tasting cloying. It’s a partnership that belongs right up there with peanut butter and jelly.
Add to this the contrasting textures — softened cookies for a cake-like base, silky pudding, pillowy whipped cream, and the slight bite of fresh banana — and every mouthful becomes a multi-sensory experience. This isn’t just a dessert. It’s an architecture of pleasure.
Ingredients You’ll Need
One of the best things about this recipe is how pantry-friendly it is. You’re likely to have most of these ingredients already on hand. Here’s a complete breakdown:
Full Ingredient List
- For the Chocolate Pudding
- 2½ cups whole milk
- ½ cup granulated sugar
- ¼ cup unsweetened cocoa powder
- ¼ cup cornstarch
- 2 egg yolks (optional, for richness)
- 1 tsp pure vanilla extract
- Pinch of fine sea salt
- 2 tbsp unsalted butter
- For the Layers
- 3–4 ripe bananas, sliced
- Chocolate wafers or vanilla wafers
- 1½ cups heavy whipping cream
- ⅓ cup powdered sugar
- 1 tsp vanilla extract
Ingredient Notes & Smart Substitutions
Milk: Whole milk produces the creamiest pudding. You can use 2% in a pinch, but avoid skim — the fat content matters for texture. For a dairy-free version, full-fat oat milk or coconut milk both work beautifully, adding their own subtle flavor dimension.
Cocoa Powder: Use unsweetened natural cocoa for the classic chocolate-forward flavor. Dutch-process cocoa will give you a smoother, more mellow chocolate taste with a deeper color — both are excellent choices depending on your preference.
Egg Yolks: These are optional but highly recommended. They add richness, body, and a custardy quality that elevates the pudding from “good” to “restaurant-worthy.” If you skip them, your pudding will still set up nicely, just a touch lighter in texture.
Bananas: Ripe is key. Look for bananas with plenty of brown spots — they’ll be sweeter and softer, which means they integrate into the layers more harmoniously. Firm, underripe bananas can taste starchy and out of place.
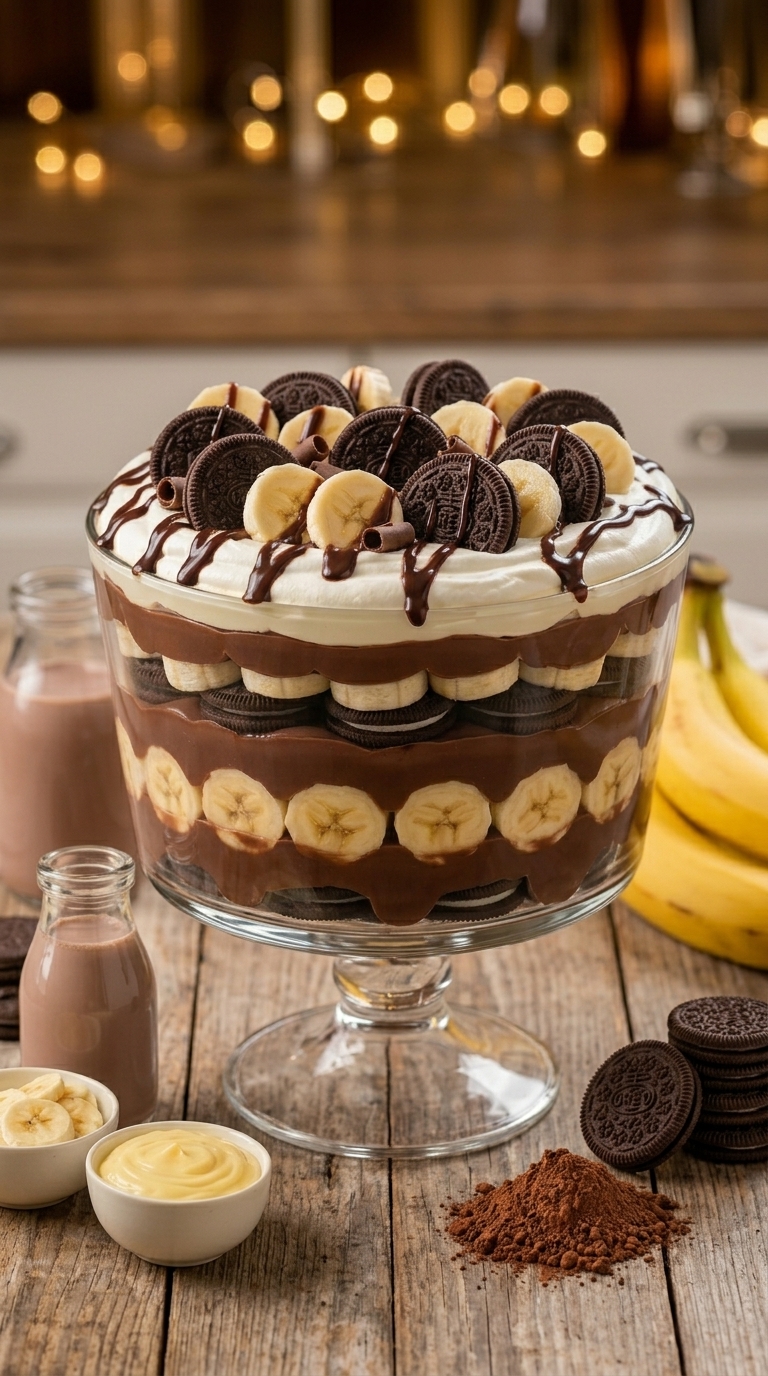
Cookies: Classic Nilla wafers are the traditional choice. Chocolate wafers deepen the cocoa theme throughout the dessert. Oreos (with or without the filling) are a popular modern twist. Even graham crackers work if that’s what you have.
Step-by-Step Instructions
-
1Make the Chocolate PuddingIn a medium saucepan, whisk together the sugar, cocoa powder, cornstarch, and salt until there are no lumps. Gradually pour in the milk while whisking continuously — this prevents clumping. Place over medium heat and stir constantly with a wooden spoon or silicone spatula, making sure to scrape the bottom and corners of the pan. After about 8–12 minutes, the mixture will thicken noticeably. If using egg yolks, ladle a small amount of the hot pudding into the yolks while whisking, then pour the yolk mixture back into the pot. Cook for another 1–2 minutes. Remove from heat and stir in butter and vanilla until glossy and smooth. Press plastic wrap directly onto the surface to prevent a skin from forming, and let it cool slightly before assembling.
-
2Whip the CreamPour the cold heavy cream into a chilled bowl (a few minutes in the freezer helps). Add powdered sugar and vanilla extract. Using a hand mixer or stand mixer, whip on medium-high speed until soft, billowy peaks form — this typically takes 3–4 minutes. Don’t over-whip or you’ll head toward butter territory. Refrigerate the whipped cream until you’re ready to assemble.
-
3Assemble the LayersIn a large trifle bowl, casserole dish, or individual serving glasses, begin with a layer of cookies on the bottom. Add a layer of banana slices, then spoon over the chocolate pudding, then dollop and spread the whipped cream. Repeat these four layers — cookies, bananas, pudding, whipped cream — until you’ve used everything up. Finish with a generous layer of whipped cream on top to seal everything in.
-
4Chill Until PerfectCover the dish tightly with plastic wrap and refrigerate for a minimum of 4 hours. Overnight is truly ideal. This resting period is where the transformation happens: the cookies absorb moisture from the pudding and cream, softening into a tender, almost cake-like layer. The flavors deepen and meld together in a way that can’t be rushed.
-
5Garnish and ServeJust before serving, top the pudding with fresh banana slices, a flurry of chocolate shavings made with a vegetable peeler, and a scattering of crushed cookies for crunch and visual drama. Scoop into generous portions and serve immediately. Watch it disappear.
To prevent banana slices from browning, toss them with a teaspoon of fresh lemon juice before layering. The slight citrus tang actually enhances the overall flavor profile of the dessert.
Expert Tips for a Perfect Chocolate Banana Pudding
After testing this recipe extensively, here are the insider tips that make the biggest difference between a good pudding and a truly memorable one:
Don’t Rush the Pudding
Cooking pudding requires patience. Low-to-medium heat and constant stirring are your friends. Crank the heat to speed things up and you risk scorched milk and lumpy texture. Give it time — the result is absolutely worth it.
Layer Strategically
Start and end with pudding or whipped cream against the bowl walls so every side-view slice looks beautiful. The cookie layer should be next to a moist layer — tucked between pudding and bananas — so it softens evenly during chilling.
Chill Overnight for Maximum Flavor
A 4-hour minimum chill is fine, but overnight is genuinely transformative. The flavors meld together in a way that makes the dessert taste like a unified whole rather than individual components stacked together.
Keep Bananas as Fresh as Possible
Add freshly sliced banana to the top garnish only when you’re about to serve, as these will brown quickly. The internal banana layers are protected by the pudding and cream and won’t discolor significantly.
Creative Variations to Try
Once you’ve mastered the classic, these variations are a natural next step for adventurous bakers:
Make-Ahead & Storage Guide
Chocolate Banana Pudding is one of the best make-ahead desserts in existence. The pudding itself can be made up to 3 days in advance and kept refrigerated with plastic wrap pressed directly on the surface. The fully assembled dish keeps beautifully in the refrigerator for up to 2 days, though the cookies will continue to soften over time (which many people actually prefer).
For best results, add your fresh garnishes — banana slices, chocolate shavings, crushed cookies — only moments before serving. This preserves the visual drama and textural contrast that makes the first impression so stunning.
Can you freeze it? Technically yes, but the texture suffers significantly upon thawing. The pudding can become watery and the bananas turn mushy. It’s best enjoyed fresh from the refrigerator within the first two days.
This recipe scales beautifully. Double it for a large crowd in a 9×13 dish, or halve it to make individual servings in mason jars — perfect for dinner party presentation or meal-prepped single-serve treats throughout the week.
Frequently Asked Questions
Can I use instant chocolate pudding instead of homemade?
Absolutely. Two 3.9 oz boxes of instant chocolate pudding prepared according to package directions can substitute for the homemade pudding in this recipe. The flavor won’t be quite as deep or rich, but the result is still delicious and significantly faster. It’s a great option for weeknight dessert emergencies.
My pudding has lumps — how do I fix it?
If lumps form, pass the hot pudding through a fine-mesh sieve while it’s still warm. This removes any cooked bits and results in a perfectly smooth, silky texture. For prevention, keep the heat at medium (not high) and whisk consistently from the start.
What’s the best dish to use for this recipe?
A clear glass trifle bowl is the most visually stunning option because the layers are visible from the sides. A 9×13 inch baking dish works perfectly for feeding a crowd. Individual mason jars or parfait glasses create elegant single-serve portions — ideal for dinner parties or gifting.
How ripe should the bananas be?
Aim for bananas that are fully yellow with some brown speckles. These are at peak sweetness and have a soft-firm texture that holds up in the layers without turning to mush. Avoid green bananas (too starchy) and very heavily spotted brown bananas (can be too soft and overripe in flavor).
Can I make this recipe egg-free?
Yes — simply skip the egg yolks. The cornstarch alone is sufficient to thicken the pudding to a scoopable consistency. The texture will be slightly lighter and less custardy, but still very delicious and perfectly appropriate for guests with egg allergies.
Can I make a vegan version of this dessert?
Yes! Use full-fat oat milk or coconut milk in place of whole milk, skip the butter (or use vegan butter), omit the egg yolks, and substitute whipped coconut cream for the heavy cream. Choose dairy-free cookies as your base layer. The result is a wonderfully rich vegan dessert that most people can’t distinguish from the original.
Serving Suggestions & Presentation Ideas
Presentation elevates this dessert from humble to showstopping. Here are a few ideas to help you serve it beautifully:
The Classic Trifle: Use a large clear glass trifle bowl and scoop servings tableside so guests can see the full layer structure as you dig in. It’s theatrical in the best way.
Individual Mason Jars: Assemble in 8 oz mason jars, seal with lids, and refrigerate. These are perfect for picnics, potlucks, or pre-portioned fridge treats. They also make a charming edible gift.
Sheet Pan Style: Spread into a 9×13 inch pan and cut into squares for easy serving at large gatherings. This style is especially practical for outdoor events where trifle bowls might be cumbersome.
Garnish Drama: Curl chocolate ribbons using a warm vegetable peeler on a quality chocolate bar. Fan banana slices in a spiral pattern on top. Dust lightly with cocoa powder using a fine sieve. These small finishing touches make a disproportionately large visual impact.
Final Thoughts: Make This Your Signature Dessert
There are desserts you make because you need something sweet, and then there are desserts that become part of your story — the thing people ask you to bring to every gathering, the recipe that gets shared and requested and passed down. Chocolate Banana Pudding is the latter.
It takes humble, everyday ingredients and transforms them through patience and technique into something far greater than the sum of its parts. The chocolate is deep and satisfying. The banana is bright and sweet. The whipped cream is light and airy. The cookies become tender and almost cake-like. Together, they create harmony in a bowl.
Make it once this weekend, and we’re confident you’ll be making it for years to come. Your family will thank you. Your friends will ask for the recipe. And you’ll find yourself sneaking one more spoonful straight from the dish at midnight — because some desserts are just that good.