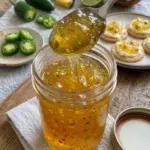
Ingredients
- 2 cups pineapple juice
- 1 cup crushed pineapple, very well drained
- 1/2 cup finely minced jalapeños, seeds removed for milder heat
- 1/4 cup finely minced jalapeños, seeds included for more heat
- 1/4 cup fresh lime juice
- 1/2 cup unsweetened coconut milk
- 4 1/2 cups granulated sugar
- 1 pouch (3 oz) liquid pectin
- 1/4 tsp salt
- 1/2 tsp coconut extract
- 1/2 tsp vanilla extract
Instructions
Step 1: Prepare the Jalapeños
Wear food-safe gloves while handling the peppers.
Remove the stems.
For the milder portion, remove the seeds and pale interior membranes before finely mincing the peppers.
For additional heat, leave some seeds and membranes in the remaining jalapeños.
Finely mince enough peppers to make:
- 1/2 cup seeded jalapeños
- 1/4 cup hotter jalapeños with some seeds retained
Keep the pieces small so they’re distributed throughout the finished jelly.
Important Jalapeño Handling Tip
Capsaicin—the compound responsible for chile heat—can remain on your hands.
Avoid touching your eyes, nose, or face while preparing the peppers.
Gloves are strongly recommended.
Wash your hands, knife, cutting board, and other equipment thoroughly afterward.
Step 2: Drain the Crushed Pineapple
Measure the crushed pineapple after draining it thoroughly.
Press away excess juice if necessary.
You want 1 cup well-drained crushed pineapple.
This gives the jelly pineapple texture without introducing unnecessary extra liquid.
Step 3: Combine the Tropical Fruit Mixture 🍍🥥
Choose a large, deep saucepan.
Add:
- 2 cups pineapple juice
- 1 cup well-drained crushed pineapple
- 1/2 cup seeded minced jalapeños
- 1/4 cup minced jalapeños with some seeds
- 1/4 cup fresh lime juice
- 1/2 cup unsweetened coconut milk
- 1/4 teaspoon salt
Stir thoroughly.
Why Use a Large Saucepan?
Jelly mixtures can rise considerably once they reach a vigorous boil.
Using a saucepan that seems much larger than the initial volume gives the bubbling mixture room to expand and makes stirring safer.
Avoid using a pan that’s filled close to the top.
Step 4: Add the Sugar
Add 4 1/2 cups granulated sugar.
Stir until the sugar is evenly incorporated throughout the pineapple mixture.
Step 5: Bring to a Full Rolling Boil
Place the saucepan over medium-high heat.
Cook while stirring frequently.
Bring the mixture to a full rolling boil.
A full rolling boil means the mixture continues bubbling vigorously even while you’re stirring it.
Don’t begin the final pectin timing while the mixture is only gently simmering.
Step 6: Add the Liquid Pectin
Once you’ve reached the rolling boil, pour in the entire 3-ounce pouch of liquid pectin.
Stir constantly.
Step 7: Return to a Hard Boil
Continue heating until the mixture returns to a full rolling boil.
Once it does, boil hard for approximately 1 minute, stirring constantly.
Watch the pan carefully because the mixture will be extremely hot and can bubble vigorously.
Step 8: Remove from the Heat
After the hard-boil period, remove the saucepan from the burner.
Don’t continue cooking unnecessarily.
Step 9: Add the Coconut and Vanilla Extracts
Stir in:
- 1/2 teaspoon coconut extract
- 1/2 teaspoon vanilla extract
Adding the extracts after removing the saucepan from direct heat helps preserve more of their aromatic character.
Step 10: Remove Excess Foam
If foam has accumulated across the surface, skim it away carefully with a clean spoon.
A little foam won’t ruin the jelly, but removing it can create a cleaner-looking finished product.
Step 11: Transfer to Clean Containers
Carefully ladle the hot jelly mixture into clean, heat-safe containers suitable for refrigerated storage.
Leave enough room at the top, especially if you plan to freeze some of the jelly later.
Avoid thermal shock by making sure your containers are appropriate for hot contents.
Step 12: Let the Jelly Cool
Allow the containers to cool before covering and refrigerating according to safe food-handling practices.
The jelly will continue thickening as it cools.
Don’t judge the final consistency while it’s still hot.
Step 13: Refrigerate
Once cooled, cover tightly and refrigerate.
For the best texture, allow the jelly plenty of time to chill and set before serving.
- Prep Time: 15 minutes
- Cook Time: approximately 10 minutes
Nutrition
- Calories: approximately 55 calories per tablespoon