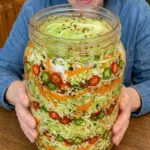
Ingredients
- 1 medium green cabbage, about 2 1/2 lbs, finely shredded
- 1 medium carrot, grated
- 2–3 fresh hot peppers, thinly sliced
- 4 garlic cloves, finely minced
- 1 1/2 tbsp kosher salt
- 1 tsp crushed red pepper flakes
- 1 tsp caraway seeds, optional
- 1/2 tsp black pepper
- 1 tbsp grated fresh ginger, optional
Instructions
Step 1: Prepare the Cabbage
Remove any damaged outer leaves.
Reserve one clean cabbage leaf.
Cut the remaining cabbage into quarters.
Remove the hard core.
Finely shred the cabbage.
Try to keep the pieces relatively uniform so they ferment at a similar rate.
Step 2: Salt the Cabbage
Place the shredded cabbage in a large clean mixing bowl.
Sprinkle 1 1/2 tablespoons kosher salt evenly over the cabbage.
Toss briefly to distribute the salt.
Step 3: Massage the Cabbage
Using thoroughly clean hands, massage and squeeze the cabbage for approximately 5–8 minutes.
At first, the cabbage will feel dry and bulky.
As you continue working it, the salt draws moisture from the leaves.
The cabbage will gradually:
- Soften
- Reduce in volume
- Become glossy
- Release liquid
That liquid becomes the natural fermentation brine.
How Do You Know When You’ve Massaged It Enough?
Grab a handful of cabbage and squeeze firmly.
You should see liquid dripping from it.
You should also have visible liquid collecting in the bottom of the bowl.
Don’t discard that liquid.
It’s your brine.
Step 4: Add the Vegetables and Seasonings
Add:
- 1 grated carrot
- 2–3 thinly sliced hot peppers
- 4 minced garlic cloves
- 1 teaspoon crushed red pepper flakes
- 1/2 teaspoon black pepper
- 1 teaspoon caraway seeds, if using
- 1 tablespoon grated ginger, if using
Toss thoroughly.
The carrot, peppers, garlic, and spices should be distributed evenly throughout the cabbage.
Step 5: Pack the Jar
Transfer a handful of the cabbage mixture into a clean fermentation jar.
Press it down firmly with a clean spoon, tamper, or your clean hand.
Add another handful.
Press again.
Continue until all the cabbage has been packed tightly.
Firm packing helps eliminate large trapped air pockets and encourages the brine to rise above the vegetables.
Step 6: Add All the Natural Brine
Pour any liquid remaining in the mixing bowl into the jar.
Press the cabbage down again.
The liquid should rise above the packed vegetables.
Step 7: Add the Reserved Cabbage Leaf
Trim the reserved cabbage leaf so it fits inside the jar.
Place it over the shredded vegetables.
Push the leaf below the brine.
This helps keep small cabbage pieces from floating to the surface.
Step 8: Add a Fermentation Weight
If you have a fermentation weight, place it over the cabbage leaf.
Press gently until the vegetables remain submerged beneath the brine.
This is preferable to repeatedly pushing floating vegetables down with a utensil.
Keep the Vegetables Under the Brine
This is one of the most important principles in this recipe.
The cabbage and other vegetable pieces should remain submerged beneath the brine during fermentation.
Small pieces floating at the surface are more exposed to oxygen and are more susceptible to undesirable surface growth.
A fermentation weight makes this much easier.
Step 9: Leave Headspace
Leave approximately 1–2 inches of headspace between the contents and the top of the jar.
Fermentation creates carbon dioxide.
The contents may expand and brine may rise, particularly during the most active stage.
Don’t pack the jar completely to the rim.
Step 10: Cover the Jar
Attach a fermentation lid or airlock according to its instructions.
If you’re using a different lid system, make sure fermentation gases can be safely released rather than allowing excessive pressure to accumulate.
Place the jar on a plate or shallow tray.
Active fermentation can push some brine out of the jar.
Step 11: Ferment Away from Direct Sunlight
Keep the jar at a moderate room temperature away from direct sunlight.
Ferment for approximately 5–14 days, depending on temperature and your preferred flavor.
Fermentation is not controlled by the calendar alone.
Warmer conditions generally accelerate fermentation, while cooler conditions slow it.
Step 12: Observe the Fermentation
During the first several days, you may notice signs of active fermentation such as:
- Small bubbles
- Brine movement
- A gently sour aroma
- Increasing acidity
- Some pressure inside the fermentation system
Those can be normal signs that fermentation is progressing.
Continue making sure the vegetables remain below the brine.
Step 13: Start Tasting Around Day 5
Using a clean utensil, taste a small amount.
At this point, the cabbage may still taste relatively fresh with only moderate sourness.
If you like it, you can refrigerate it.
If you want a more pronounced fermented flavor, allow it to continue.
Taste periodically until it reaches the balance of sourness, spice, and crunch you prefer.
Step 14: Refrigerate
Once you’re happy with the flavor, remove the fermentation setup as appropriate, close the jar, and transfer it to the refrigerator.
Cold temperatures dramatically slow fermentation, although they don’t necessarily stop it completely.
The flavor can continue developing gradually during refrigerated storage.
- Prep Time: 20 minutes
- Cook Time: approximately 5–14 days
Nutrition
- Serving Size: approximately 12
- Calories: approximately 22 calories per serving