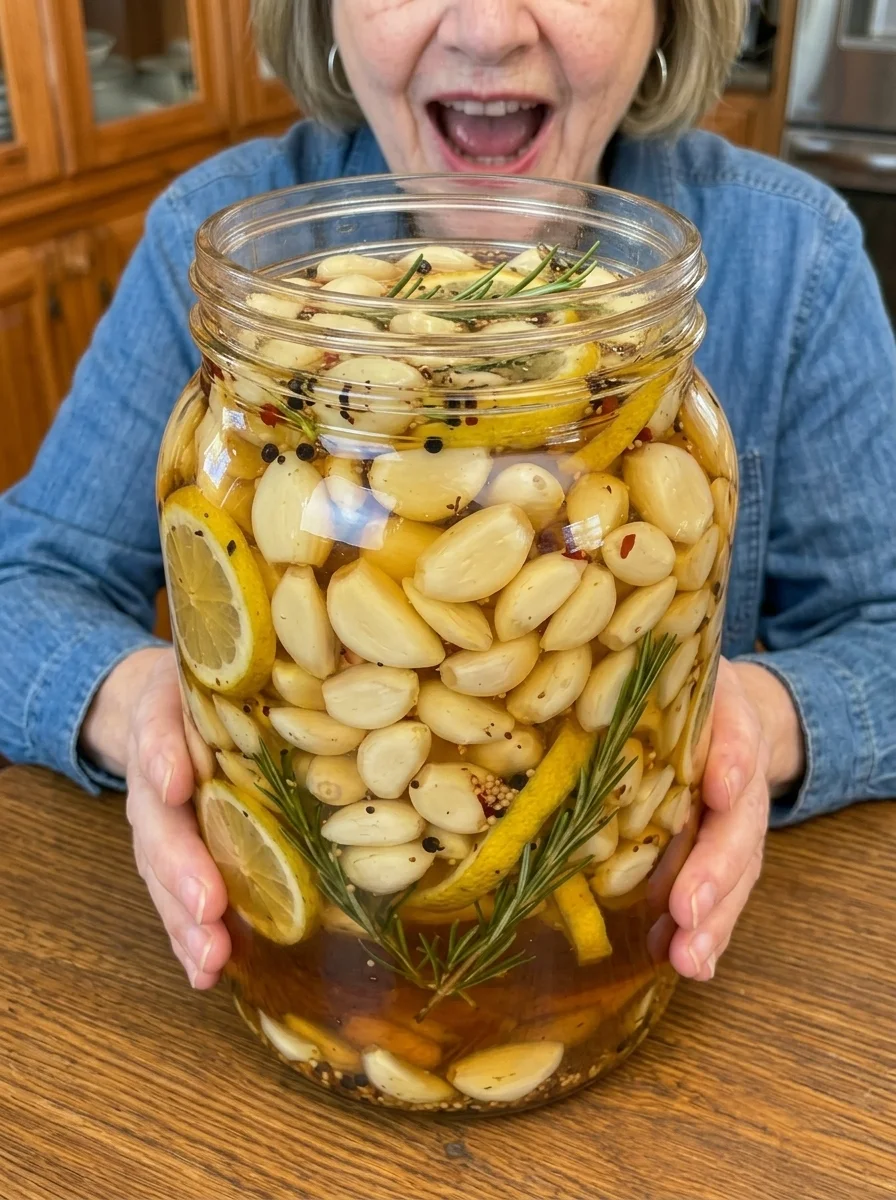
Sweet, tangy, garlicky, and wonderfully bright, this Honey Lemon Pickled Garlic transforms whole garlic cloves into a flavorful refrigerator pickle with the perfect balance of sweetness and acidity.
Fresh garlic cloves are gently simmered in a brine made with apple cider vinegar, honey, fresh lemon juice, lemon zest, rosemary, peppercorns, and mustard seeds. After chilling in the refrigerator, the sharp raw-garlic bite begins to mellow while the cloves absorb the sweet, citrusy brine.
The result is a versatile little flavor bomb you can serve with cheese boards, chop into salads, tuck into sandwiches, add to grain bowls, spoon alongside roasted vegetables, or simply eat straight from the jar.
Best of all, the active preparation takes less than 20 minutes. Give the garlic at least 24 hours in the refrigerator before serving, and the flavor gets even better after a few days.
Why You’ll Love This Honey Lemon Pickled Garlic
Sweet and tangy. Honey balances the sharpness of vinegar and fresh lemon.
Loaded with garlic flavor. Whole cloves remain the star of the recipe.
Quick preparation. The active cooking process takes only a few minutes.
No complicated canning. This is designed specifically as a refrigerated quick pickle.
Gets better as it rests. The flavor continues developing over the first several days.
Versatile. Use the cloves in salads, sandwiches, bowls, appetizers, vegetables, and more.
Flavorful brine. Even the honey-lemon pickling liquid can be useful as a tangy accent.
Easy to customize. Add optional red pepper flakes for a subtle sweet-heat finish.
What Is Honey Lemon Pickled Garlic?
Honey Lemon Pickled Garlic is a refrigerator pickle made by briefly cooking whole peeled garlic cloves in an acidic, sweetened brine and then refrigerating them.
Unlike raw garlic stored in oil, this recipe uses a vinegar-and-lemon-based liquid and is kept refrigerated.
The brief simmer starts softening the cloves and reducing some of their harsh raw bite without cooking them until mushy.
Then the refrigerator does the rest.
As the garlic sits in the brine, the cloves take on flavors from the honey, lemon, rosemary, peppercorns, mustard seeds, and vinegar.
After 24 hours, they’re flavorful enough to eat.
After 3–4 days, the flavors become more integrated.
Ingredients 🫙
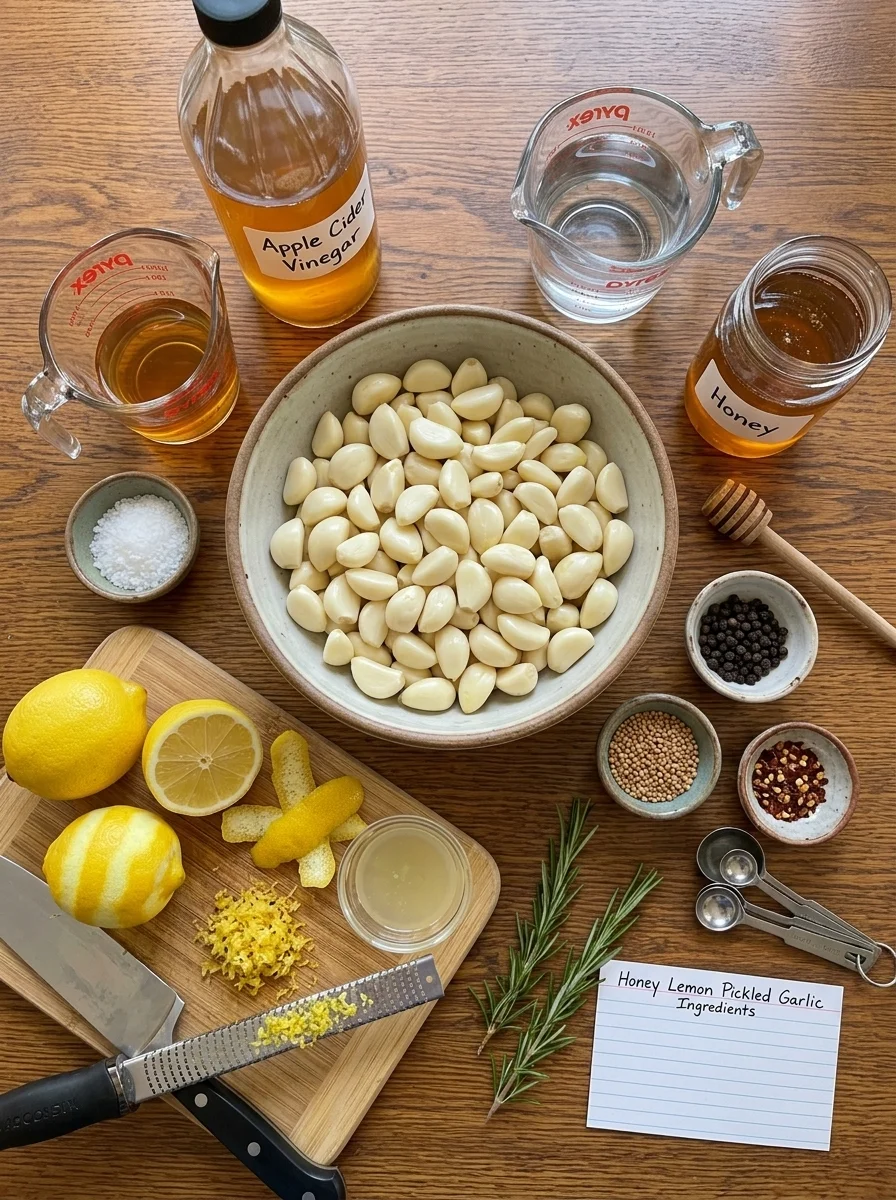
- 2 cups peeled garlic cloves
- 1/2 cup apple cider vinegar
- 1/2 cup water
- 1/4 cup honey
- 2 tbsp fresh lemon juice
- 1 tsp finely grated lemon zest
- 1 tsp kosher salt
- 1/2 tsp whole black peppercorns
- 1/2 tsp mustard seeds
- 1 small sprig fresh rosemary
- 1 small strip lemon peel
- 1/4 tsp red pepper flakes, optional
Ingredient Notes
Fresh Garlic 🧄
Use firm, fresh garlic cloves without soft spots, mold, or obvious deterioration.
Keep the cloves whole.
Whole cloves retain more texture during the brief simmer and look especially attractive in the finished jar.
Trim away any tough root ends after peeling.
Apple Cider Vinegar
Apple cider vinegar supplies the main acidity in the brine while contributing a slightly fruity flavor that pairs naturally with honey.
Water
Water dilutes the vinegar enough to keep the brine pleasantly tangy rather than aggressively sharp.
Honey 🍯
Honey provides sweetness and gives this recipe its characteristic sweet-and-sour balance.
The finished garlic shouldn’t taste like candy. Instead, the honey rounds out the vinegar, lemon, and natural pungency of the garlic.
Fresh Lemon Juice 🍋
Fresh lemon juice gives the brine a brighter citrus flavor.
Lemon Zest
Zest provides concentrated lemon aroma without requiring much additional liquid.
Finely grate only the yellow outer portion of the lemon and avoid the bitter white pith underneath.
Kosher Salt
Salt seasons both the brine and garlic.
Black Peppercorns
Whole peppercorns provide gentle warmth and complexity without turning the brine spicy.
Mustard Seeds
Mustard seeds add another traditional pickling note and a subtle savory sharpness.
Fresh Rosemary 🌿
A small rosemary sprig adds an aromatic herbal background.
A little goes a long way, so one small sprig is enough.
Lemon Peel
A small strip of lemon peel reinforces the citrus aroma while the jar rests.
Try to include as little white pith as possible.
Red Pepper Flakes 🌶️
These are optional.
A small amount creates gentle background heat that works especially well against the honey.
How to Make Honey Lemon Pickled Garlic
Step 1: Prepare the Garlic
Peel enough fresh garlic to make 2 cups of whole cloves.
Trim off any dry or tough root ends.
Inspect the cloves and discard any that are soft, moldy, badly damaged, or otherwise showing signs of spoilage.
Keep the cloves whole rather than chopping them.
Step 2: Prepare the Lemon
Finely grate approximately 1 teaspoon lemon zest.
Then cut a small strip of peel from the lemon.
Avoid taking too much of the white pith because it can add bitterness.
Squeeze enough fresh lemon juice to measure 2 tablespoons.
Step 3: Make the Honey-Lemon Brine 🍯🍋
In a small saucepan, combine:
- 1/2 cup apple cider vinegar
- 1/2 cup water
- 1/4 cup honey
- 2 tablespoons fresh lemon juice
- 1 teaspoon lemon zest
- 1 teaspoon kosher salt
- 1/2 teaspoon black peppercorns
- 1/2 teaspoon mustard seeds
- 1 small rosemary sprig
- 1 small strip lemon peel
- 1/4 teaspoon red pepper flakes, if using
Step 4: Heat the Brine
Place the saucepan over medium heat.
Bring the mixture to a gentle simmer while stirring occasionally.
Continue stirring until the honey and salt have completely dissolved into the liquid.
You don’t need a vigorous boil.
A gentle simmer is enough.
Step 5: Add the Garlic 🧄
Carefully add the whole peeled garlic cloves to the simmering brine.
Reduce the heat to low.
Step 6: Simmer for 5–7 Minutes
Gently simmer the garlic for approximately 5–7 minutes.
The goal isn’t to completely cook the garlic until soft.
You want the cloves to begin losing some of their raw firmness while still retaining a pleasant bite.
Avoid vigorous boiling, which can cook the exterior too aggressively.
Step 7: Transfer to a Clean Jar
Using a clean spoon, carefully transfer the hot garlic cloves into a clean, heat-safe glass jar.
Pour the hot brine, spices, rosemary, and lemon peel over the garlic.
Step 8: Keep the Garlic Submerged
Make sure the garlic cloves are covered by the brine.
If necessary, gently reposition the cloves with a clean utensil.
Keeping the garlic submerged helps it pickle evenly.
Step 9: Cool
Leave the jar uncovered at room temperature for approximately 30 minutes to begin cooling.
Do not leave it sitting out for an extended period.
Step 10: Refrigerate
Once the jar has cooled sufficiently, cover it tightly and transfer it to the refrigerator.
This recipe must remain refrigerated.
Step 11: Wait at Least 24 Hours
Allow the garlic to pickle in the refrigerator for at least 24 hours before tasting.
The garlic will already have absorbed noticeable flavor by then.
For an even better balance of garlic, honey, lemon, herbs, and vinegar, give it 3–4 days.
Why the Garlic Gets Better After a Few Days
Fresh garlic has a strong, pungent flavor.
Three things happen in this recipe:
The brief simmer starts softening its raw bite.
The acidic brine continues flavoring the cloves.
Honey, lemon, herbs, and spices gradually become more integrated.
That’s why a clove eaten immediately after preparation won’t taste exactly like one eaten three days later.
The refrigerated resting period is an important part of the recipe.
Recipe Information ⏱️
Prep Time: 10 minutes
Cook Time: approximately 7 minutes
Active Total Time: approximately 17 minutes
Pickling Time: at least 24 hours
Servings: about 8
Estimated Calories: approximately 35 calories per 1/4-cup serving
The calorie estimate is approximate and will vary depending on how much honey-containing brine is consumed with each serving and the exact serving size.
How Does Honey Lemon Pickled Garlic Taste?
The first flavor is bright and tangy from the vinegar and lemon.
Then you get the mellow sweetness of honey.
Garlic remains prominent, but the brief cooking and pickling process takes the edge off the intense raw-garlic bite.
Rosemary adds a subtle herbal aroma.
Black peppercorns and mustard seeds contribute background warmth.
If you include the red pepper flakes, there’s a mild chile finish.
The overall result is sweet, tangy, citrusy, savory, and garlicky rather than intensely sugary.
How Long Should Garlic Pickle Before Eating?
Wait at least 24 hours.
That’s enough time for the brine to begin noticeably flavoring the cloves.
However, if you can wait longer, 3–4 days gives the flavors more time to develop.
The honey, lemon, rosemary, spices, and garlic become more integrated as they sit together.
Tips for the Best Pickled Garlic
Use fresh, firm garlic. The quality of the cloves matters.
Keep the cloves whole. This gives you a better final texture.
Use fresh lemon. Both the juice and zest contribute to the bright citrus flavor.
Don’t aggressively boil the garlic. A gentle simmer is enough.
Don’t overcook it. You’re looking for slightly softened cloves, not mushy garlic.
Use a clean, heat-safe jar. The hot brine goes directly into it.
Keep the cloves covered with brine. This promotes even pickling.
Refrigerate after cooling. This isn’t a pantry-storage recipe.
Wait before eating. Twenty-four hours is good; several days is even better.
Use a clean utensil. Avoid introducing unnecessary contamination into the jar.
What to Serve with Honey Lemon Pickled Garlic
Cheese Boards 🧀
The sweet acidity and garlic flavor pair especially well with cheese, crackers, nuts, and other antipasto-style ingredients.
Sandwiches 🥪
Thinly slice or chop a clove and scatter it across sandwiches.
Salads 🥗
Chopped pickled garlic provides acidity, sweetness, and savory flavor all at once.
Grain Bowls
Slice the cloves and add them to rice, quinoa, farro, or other grain bowls.
Roasted Vegetables 🥕
Chopped garlic and a small spoonful of the honey-lemon brine can add a bright finishing note to roasted vegetables.
Grilled Chicken
Serve a few chopped cloves alongside grilled chicken for a sweet-tangy garlic accent.
Flatbreads
Slice the garlic and scatter it over warm flatbread with cheese, herbs, or roasted vegetables.
Pasta
Chop the cloves and add them to warm or cold pasta dishes.
Ways to Use the Honey-Lemon Brine
The flavorful liquid doesn’t necessarily need to be ignored once you’ve eaten some of the garlic.
You can use a little of the refrigerated brine as a flavoring ingredient.
Try it:
- Drizzled lightly over roasted vegetables
- Whisked into a salad dressing
- Added to grain bowls
- Spoon over cooked vegetables
- Mixed into a vinaigrette
Remember that the brine contains vinegar, honey, salt, and strong garlic flavor, so start with a small amount.
For best quality and food handling, keep the brine refrigerated with the garlic and use clean utensils.
Easy Variations
Spicy Honey Lemon Garlic 🌶️
Increase the red pepper flakes slightly for a stronger sweet-heat combination.
Rosemary Honey Garlic 🌿
Use a slightly more pronounced rosemary flavor, but avoid adding too much because rosemary can quickly dominate.
Peppercorn Honey Garlic
Increase the black peppercorns slightly for more peppery warmth.
Extra-Lemony Pickled Garlic 🍋
Add a little more lemon zest rather than dramatically increasing the juice.
This strengthens the citrus aroma without substantially changing the liquid ratio.
Honey Mustard Pickled Garlic
Increase the mustard seeds slightly for a more pronounced pickling-spice flavor.
Herb Pickled Garlic
Experiment with a small amount of another compatible herb, keeping the original honey-lemon flavor as the main profile.
Can I Make It Spicier?
Yes.
The easiest way is to increase the crushed red pepper flakes gradually.
You could also add a small amount of sliced fresh chile for a variation, but keep in mind that adding other fresh ingredients changes the original recipe and may affect storage quality.
For the most predictable version, stick with dried red pepper flakes.
Can I Reduce the Honey?
You can adjust sweetness to preference, but reducing honey will change the flavor balance.
The honey is there primarily for sweetness rather than preservation.
If you want a more tart, garlic-forward pickle, a modest reduction may suit your taste.
Don’t reduce the acidic ingredients with the assumption that honey will preserve the garlic.
Why Simmer the Garlic?
The short 5–7 minute simmer serves mainly as a texture and flavor step.
Raw garlic can be extremely sharp.
Briefly heating the cloves begins softening their texture and mellowing some of that raw intensity.
At the same time, the cloves are surrounded by the hot flavored brine.
The goal isn’t to cook them until completely soft.
Why Keep the Garlic Submerged?
Keeping the cloves covered helps expose them evenly to the pickling liquid.
Use a clean utensil to reposition any cloves that are sitting well above the brine.
Don’t add oil to the jar to increase the liquid level.
Storage Information 🥡
Keep the Honey Lemon Pickled Garlic refrigerated at all times after the initial cooling period.
Make sure the garlic remains covered by the brine.
Use a clean utensil whenever removing cloves.
For best quality, use within 2 weeks.
If you notice mold, an unpleasant or unexpected odor, unusual fermentation, or other clear signs of spoilage, discard the entire batch rather than tasting it.
Important: This Is a Refrigerator Pickle
This recipe is intended strictly for refrigerated storage.
It should not be stored in a pantry, cupboard, or at room temperature.
It also should not be treated as a shelf-stable canning recipe.
The acidity and processing method in this recipe have not been established as a tested home-canning process for room-temperature storage.
If you want shelf-stable canned pickled garlic, use a specifically tested canning recipe from a reliable food-preservation authority and follow its ingredient ratios, jar size, processing method, and processing time exactly.
Can I Store It at Room Temperature?
No.
Once the initial cooling period is finished, seal the jar and keep it refrigerated.
This recipe is designed for refrigerator storage only.
Can I Can This Recipe for Pantry Storage?
No—not as written.
A refrigerator pickle and a tested shelf-stable canning recipe are not interchangeable.
Don’t use this ingredient ratio or method for pantry storage.
Can I Freeze Pickled Garlic?
Freezing isn’t the preferred storage method.
The garlic’s texture can change significantly after freezing and thawing.
Since this recipe is designed to be enjoyed within approximately two weeks, refrigerated storage provides the best texture.
Why Did My Garlic Change Color?
Garlic can sometimes develop blue-green coloration during acidic pickling.
This can result from natural compounds in garlic reacting under certain conditions.
Color change alone isn’t necessarily an indication that the garlic is spoiled.
However, appearance isn’t the only consideration. If you notice mold, unusual fermentation, a clearly unpleasant odor, or other signs of spoilage, discard the batch.
Troubleshooting
Why is my garlic too sharp?
It may simply need more time.
The garlic’s flavor becomes more integrated after several days in the refrigerator.
Why is my garlic too soft?
It may have simmered too long or too vigorously.
Keep the brine at a gentle simmer and begin checking around 5 minutes.
Why is my garlic still very firm?
That’s not necessarily a problem.
This recipe is intended to retain some bite.
The texture will continue changing somewhat as the cloves sit in the brine.
Why is the brine too sweet?
Your honey may have a particularly strong sweetness.
Serve the garlic with savory foods or adjust the honey slightly in a future batch.
Why is the brine too tart?
Honey balances the vinegar and lemon.
Make sure the honey is completely dissolved before judging the final flavor.
The taste also becomes more integrated after refrigeration.
Why is my garlic floating?
Some cloves may float initially.
Use a clean utensil to keep the garlic as well covered by the brine as practical.
Why did the garlic turn blue or green?
Natural compounds in garlic can sometimes react during acidic pickling and create blue-green pigments.
Color change by itself isn’t automatically spoilage.
Why is the brine cloudy?
Ingredients such as honey, garlic, mustard seeds, lemon zest, and other natural compounds can affect clarity.
If cloudiness appears alongside obvious spoilage signs such as mold, an unexpectedly unpleasant odor, or unusual fermentation, discard the batch.
Frequently Asked Questions
What is Honey Lemon Pickled Garlic?
It’s whole garlic cloves briefly simmered and then refrigerated in a sweet-tangy brine made with apple cider vinegar, honey, lemon, salt, herbs, and spices.
Does the garlic stay crunchy?
The cloves soften slightly during simmering and pickling but should retain some bite when they’re not overcooked.
How long should I wait before eating it?
At least 24 hours.
When does it taste best?
The flavor becomes especially well developed after approximately 3–4 days in the refrigerator.
Is it sweet?
It has noticeable honey sweetness, but vinegar and lemon keep the overall flavor tangy and balanced.
Is it spicy?
Only mildly if you use the optional red pepper flakes. Omit them for a non-spicy version.
Can I use bottled lemon juice?
For the flavor profile of this refrigerator recipe, fresh lemon juice and fresh zest give the brightest result.
Can I use another type of vinegar?
Changing the vinegar will change both the flavor and acidity profile. For this recipe, use the specified apple cider vinegar.
Do I have to cook the garlic?
For this particular recipe, yes. The short simmer is part of the intended method and texture.
Can I eat it immediately?
You can taste it, but it won’t have the same pickled flavor. Give it at least 24 hours.
Can I use the brine?
A small amount can be used as a flavorful addition to dressings, vegetables, and grain bowls while the batch is within its refrigerated storage period.
How long does it keep?
For best quality, keep it refrigerated and use within 2 weeks.
Does it need to stay refrigerated?
Yes.
Can I leave the jar on the counter?
Only during the brief initial cooling period. After that, keep it refrigerated.
Is this a canning recipe?
No. It is a refrigerator pickle only.
Final Thoughts
This Honey Lemon Pickled Garlic is an easy way to turn fresh garlic cloves into something sweet, tangy, citrusy, and incredibly versatile. 🍯🍋🧄
Whole cloves are gently simmered in a flavorful mixture of apple cider vinegar, honey, fresh lemon, rosemary, peppercorns, mustard seeds, and optional red pepper flakes, then refrigerated until those flavors have had time to mingle.
Give the garlic at least 24 hours before digging in, or wait 3–4 days for an even more developed flavor.
Chop the cloves into salads, tuck them into sandwiches, add them to grain bowls, pair them with cheese and crackers, or serve them alongside roasted vegetables.
Just remember that this is strictly a refrigerator pickled garlic recipe—not a shelf-stable canning recipe. Keep the cloves refrigerated and covered with brine, use clean utensils, and enjoy within about two weeks for the best quality.
Print
Honey Lemon Pickled Garlic
Ingredients
- 2 cups peeled garlic cloves
- 1/2 cup apple cider vinegar
- 1/2 cup water
- 1/4 cup honey
- 2 tbsp fresh lemon juice
- 1 tsp finely grated lemon zest
- 1 tsp kosher salt
- 1/2 tsp whole black peppercorns
- 1/2 tsp mustard seeds
- 1 small sprig fresh rosemary
- 1 small strip lemon peel
- 1/4 tsp red pepper flakes, optional
Instructions
Step 1: Prepare the Garlic
Peel enough fresh garlic to make 2 cups of whole cloves.
Trim off any dry or tough root ends.
Inspect the cloves and discard any that are soft, moldy, badly damaged, or otherwise showing signs of spoilage.
Keep the cloves whole rather than chopping them.
Step 2: Prepare the Lemon
Finely grate approximately 1 teaspoon lemon zest.
Then cut a small strip of peel from the lemon.
Avoid taking too much of the white pith because it can add bitterness.
Squeeze enough fresh lemon juice to measure 2 tablespoons.
Step 3: Make the Honey-Lemon Brine 🍯🍋
In a small saucepan, combine:
- 1/2 cup apple cider vinegar
- 1/2 cup water
- 1/4 cup honey
- 2 tablespoons fresh lemon juice
- 1 teaspoon lemon zest
- 1 teaspoon kosher salt
- 1/2 teaspoon black peppercorns
- 1/2 teaspoon mustard seeds
- 1 small rosemary sprig
- 1 small strip lemon peel
- 1/4 teaspoon red pepper flakes, if using
Step 4: Heat the Brine
Place the saucepan over medium heat.
Bring the mixture to a gentle simmer while stirring occasionally.
Continue stirring until the honey and salt have completely dissolved into the liquid.
You don’t need a vigorous boil.
A gentle simmer is enough.
Step 5: Add the Garlic 🧄
Carefully add the whole peeled garlic cloves to the simmering brine.
Reduce the heat to low.
Step 6: Simmer for 5–7 Minutes
Gently simmer the garlic for approximately 5–7 minutes.
The goal isn’t to completely cook the garlic until soft.
You want the cloves to begin losing some of their raw firmness while still retaining a pleasant bite.
Avoid vigorous boiling, which can cook the exterior too aggressively.
Step 7: Transfer to a Clean Jar
Using a clean spoon, carefully transfer the hot garlic cloves into a clean, heat-safe glass jar.
Pour the hot brine, spices, rosemary, and lemon peel over the garlic.
Step 8: Keep the Garlic Submerged
Make sure the garlic cloves are covered by the brine.
If necessary, gently reposition the cloves with a clean utensil.
Keeping the garlic submerged helps it pickle evenly.
Step 9: Cool
Leave the jar uncovered at room temperature for approximately 30 minutes to begin cooling.
Do not leave it sitting out for an extended period.
Step 10: Refrigerate
Once the jar has cooled sufficiently, cover it tightly and transfer it to the refrigerator.
This recipe must remain refrigerated.
Step 11: Wait at Least 24 Hours
Allow the garlic to pickle in the refrigerator for at least 24 hours before tasting.
The garlic will already have absorbed noticeable flavor by then.
For an even better balance of garlic, honey, lemon, herbs, and vinegar, give it 3–4 days.
Why the Garlic Gets Better After a Few Days
Fresh garlic has a strong, pungent flavor.
Three things happen in this recipe:
The brief simmer starts softening its raw bite.
The acidic brine continues flavoring the cloves.
Honey, lemon, herbs, and spices gradually become more integrated.
That’s why a clove eaten immediately after preparation won’t taste exactly like one eaten three days later.
The refrigerated resting period is an important part of the recipe.