
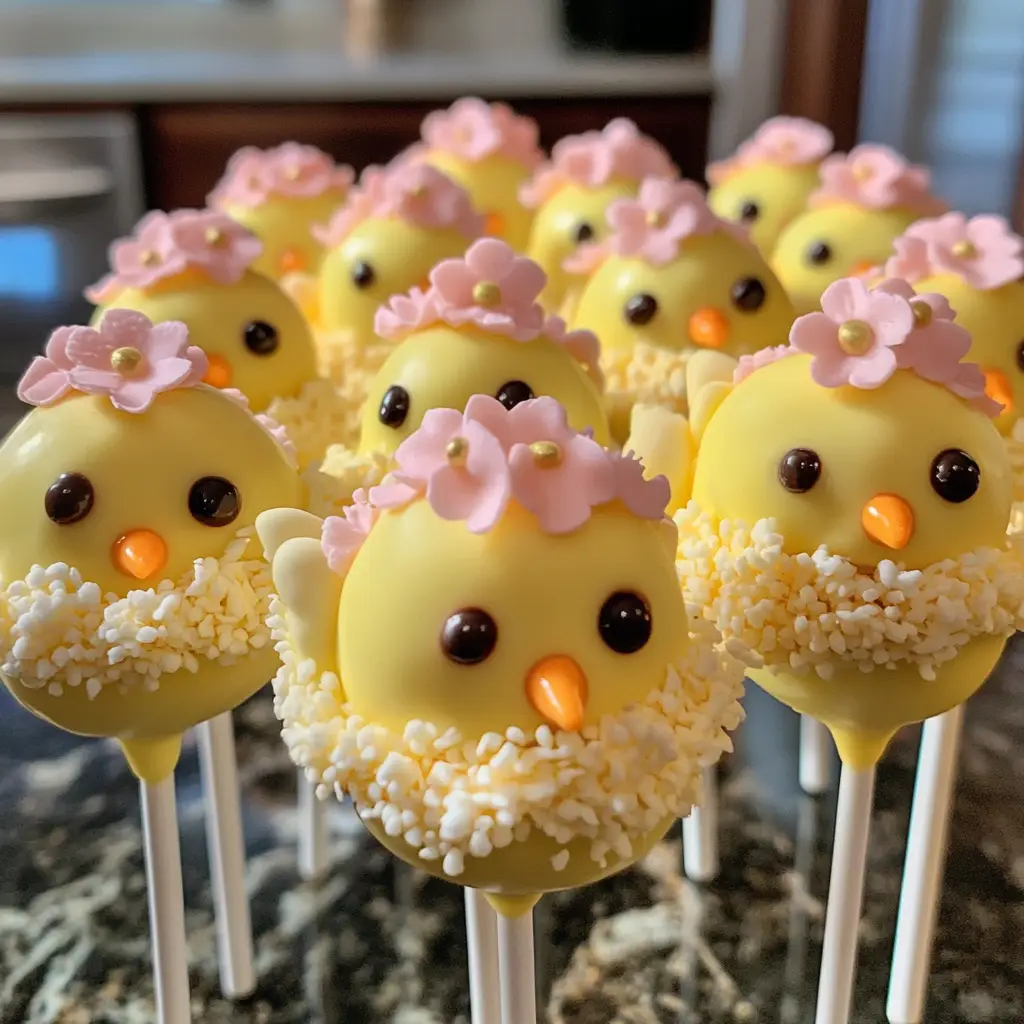
Introduction to Spring Chick Cake Pops
As the flowers bloom and the sun shines brighter, I find myself drawn to the kitchen, eager to whip up something delightful. Spring is a season of renewal, and what better way to celebrate than with a fun and festive treat? Enter the Spring Chick Cake Pops! These adorable little bites are not just a feast for the eyes; they’re a burst of flavor that brings joy to any gathering.
My love for cake pops began during a family gathering a few years ago. I remember watching my niece’s eyes light up as she took a bite of a colorful cake pop shaped like a bunny. It was then that I realized how much fun it is to create treats that spark joy and laughter. Inspired by that moment, I decided to craft my own version for spring, and thus, the Spring Chick Cake Pops were born!
These cake pops are perfect for Easter celebrations, spring parties, or simply as a sweet surprise for loved ones. They’re easy to make, and the best part? You can get creative with the decorations! Whether you want to keep them simple or go all out with vibrant colors and fun designs, the choice is yours.
In this article, I’ll guide you through the process of making these delightful treats, sharing tips and tricks along the way. So, grab your apron, and let’s dive into the world of Spring Chick Cake Pops. Trust me, your taste buds will thank you!
Ingredients for Spring Chick Cake Pops
Before we embark on this delightful journey of creating Spring Chick Cake Pops, let’s gather our ingredients. Having everything ready makes the process smoother and more enjoyable. Here’s what you’ll need:
Main Ingredients
- 1 box of cake mix (any flavor you love, but vanilla or lemon works wonderfully for spring)
- 3 large eggs
- 1 cup of water
- 1/2 cup of vegetable oil
- 1 cup of frosting (store-bought or homemade; I prefer cream cheese frosting for a tangy twist)
- 1 pound of yellow candy melts (for that cheerful chick color)
- Chocolate chips (for eyes; mini chocolate chips work best)
- Sprinkles (optional, but they add a fun touch!)
When choosing your ingredients, I always recommend going for high-quality products. A good cake mix can make a world of difference, and fresh eggs will give your cake a lovely texture. If you’re feeling adventurous, you can even bake your cake from scratch using your favorite recipe!
Optional Add-ons
- Food coloring (if you want to tint your frosting or candy melts)
- Edible glitter (for a sparkly finish)
- Different flavored cake mixes (like chocolate or red velvet for a unique twist)
- Shredded coconut (to mimic feathers, if you’re feeling creative)
These optional ingredients can elevate your Spring Chick Cake Pops to a whole new level. I love experimenting with flavors and colors, so don’t hesitate to let your imagination run wild! Remember, the goal is to have fun and create something that brings a smile to your face and those around you.
How to Prepare Spring Chick Cake Pops
Now that we have our ingredients ready, it’s time to roll up our sleeves and get to the fun part—preparing our Spring Chick Cake Pops! I promise, this process is as enjoyable as it is rewarding. Let’s break it down step by step.
Step 1: Bake the Cake
First things first, we need to bake our cake. Preheat your oven to 350°F (175°C). Prepare your cake mix according to the package instructions, mixing in the eggs, water, and vegetable oil. Pour the batter into a greased cake pan and bake for about 25-30 minutes, or until a toothpick comes out clean.
Tips for Baking the Perfect Cake
- Make sure your oven is fully preheated before placing the cake inside. This helps it rise evenly.
- Check your cake a few minutes before the suggested baking time. Ovens can vary, and you don’t want a dry cake!
- Let the cake cool completely before moving on to the next step. This will make crumbling much easier.
Step 2: Crumble the Cake
Once your cake has cooled, it’s time to crumble it into fine pieces. I like to use my hands for this, but you can also use a food processor if you prefer. Just make sure there are no large chunks left; we want a nice, even crumble.
Tips for Crumbling Cake Evenly
- Break the cake into smaller pieces before crumbling. This makes the process quicker and easier.
- Don’t be afraid to get your hands messy! It’s part of the fun, and you can feel the texture better.
- Ensure the cake is completely cool; warm cake can clump together and make it harder to crumble.
Step 3: Mix with Frosting
Now comes the magic! In a large bowl, combine the crumbled cake with your frosting. Start with half a cup of frosting and mix it in. You want the mixture to be moist but not overly sticky. If it feels too dry, add a bit more frosting until you reach the right consistency.
Tips for Achieving the Right Consistency
- Mix thoroughly but gently. You want to combine the cake and frosting without overworking it.
- Use a spatula or your hands to mix. This helps you gauge the texture better.
- Remember, you can always add more frosting, but you can’t take it out once it’s in!
Step 4: Shape into Chicks
With our cake and frosting mixture ready, it’s time to shape our cake pops! Take a small amount of the mixture and roll it into a ball, about the size of a golf ball. Then, gently pinch one end to create a chick shape. Place the shaped pops on a baking sheet lined with parchment paper.
Tips for Shaping Cake Pops
- Keep your hands slightly damp to prevent the mixture from sticking to your fingers.
- Don’t worry about making them perfect; each chick will have its own personality!
- Make sure to leave some space between each shaped pop on the baking sheet to avoid sticking.
Step 5: Coat with Chocolate
Next, it’s time to coat our adorable chicks! Melt the yellow candy melts in a microwave-safe bowl, heating in 30-second intervals and stirring in between until smooth. Dip each cake pop into the melted chocolate, ensuring it’s fully coated. Let the excess chocolate drip off before placing it back on the parchment paper.
Tips for Melting Chocolate Smoothly
- Use a deep bowl for melting; it makes dipping easier.
- If the chocolate is too thick, add a teaspoon of vegetable oil to thin it out.
- Work quickly, as the chocolate can start to set if it cools down too much.
Step 6: Decorate the Cake Pops
Finally, it’s time to bring our Spring Chick Cake Pops to life! While the chocolate is still wet, add mini chocolate chips for eyes and any sprinkles or edible glitter you desire. Get creative! This is where your personality shines through.
Tips for Creative Decoration
- Use different colors of candy melts for a variety of chicks.
- Try using melted white chocolate for a fun contrast with the yellow.
- Let your kids help with the decorating; it’s a great way to bond and have fun!
And there you have it! Your Spring Chick Cake Pops are ready to be enjoyed. I can’t wait for you to experience the joy of making and sharing these delightful treats!
Equipment Needed for Spring Chick Cake Pops
Before we dive into the delightful world of Spring Chick Cake Pops, let’s make sure we have all the right tools at our fingertips. Having the right equipment can make the process smoother and more enjoyable. Here’s what you’ll need:
- Mixing bowls: A couple of medium-sized bowls will do the trick for mixing your cake and frosting.
- Measuring cups and spoons: Accurate measurements are key to achieving the perfect consistency.
- Spatula: A sturdy spatula is great for mixing and transferring your cake mixture.
- Baking sheet: Line it with parchment paper to prevent sticking when you shape your cake pops.
- Microwave-safe bowl: This is essential for melting your candy melts smoothly.
- Cookie scoop or melon baller: These tools help in portioning out the cake mixture evenly for uniform pops.
- Styrofoam block or cake pop stand: This is perfect for holding your cake pops upright while they set. If you don’t have one, a simple cardboard box with holes can work just as well!
Don’t worry if you don’t have all the fancy tools. I’ve made cake pops using just the basics, and they turned out just as delightful! The most important thing is to have fun and enjoy the process. So, gather your equipment, and let’s get ready to create some adorable Spring Chick Cake Pops!
Variations of Spring Chick Cake Pops
While the classic Spring Chick Cake Pops are undeniably adorable, there’s always room for creativity in the kitchen! I love experimenting with different flavors and designs to keep things fresh and exciting. Here are a few fun variations you might want to try:
- Chocolate Chick Cake Pops: Swap out the vanilla or lemon cake mix for a rich chocolate cake mix. The contrast of yellow chocolate coating with a chocolate cake center is simply divine!
- Rainbow Chicks: Use different colored candy melts to create a rainbow of chicks. Each one can have its own personality, and kids will love the vibrant colors!
- Carrot Cake Chicks: For a seasonal twist, use carrot cake mix and cream cheese frosting. These will be a hit at any spring gathering!
- Fruit-Flavored Chicks: Experiment with flavored cake mixes like strawberry or lemon. Pair them with matching frosting for a delightful burst of flavor.
- Chick with Accessories: Get creative with decorations! Add little hats or bows made from fondant or edible paper to give your chicks a unique flair.
These variations not only add a fun twist to your cake pops but also allow you to cater to different tastes and preferences. I encourage you to let your imagination run wild and create your own signature Spring Chick Cake Pops. After all, the kitchen is a playground for creativity!
Cooking Notes for Spring Chick Cake Pops
As I dive into the delightful world of Spring Chick Cake Pops, I’ve learned a few cooking notes that can make your experience even more enjoyable. These little tips can save you time and help you achieve the best results!
- Room Temperature Ingredients: For the best texture, make sure your eggs and frosting are at room temperature. This helps them blend more smoothly into the cake mix.
- Chill the Cake Pops: After shaping your chicks, pop them in the fridge for about 30 minutes before coating. This helps them hold their shape better when dipped in chocolate.
- Use a Candy Thermometer: If you’re melting chocolate, a candy thermometer can help you avoid overheating. Aim for a temperature of around 90°F (32°C) for the best consistency.
- Storage Tips: If you have leftovers (which is rare!), store your cake pops in an airtight container in the fridge. They’ll stay fresh for up to a week!
- Have Fun with Flavors: Don’t hesitate to mix and match flavors! A hint of almond extract or a splash of vanilla can elevate your cake pops to a whole new level.
These cooking notes are just a few of the little secrets I’ve picked up along the way. Remember, the most important ingredient is your enthusiasm! Enjoy the process, and your Spring Chick Cake Pops will surely be a hit!
Serving Suggestions for Spring Chick Cake Pops
Now that our Spring Chick Cake Pops are all dressed up and ready to go, it’s time to think about how to serve them! Presentation can elevate these delightful treats from simple snacks to show-stopping desserts. Here are some of my favorite serving suggestions that will make your cake pops the star of the show:
- On a Decorative Stand: Place your cake pops in a cute cake pop stand or a styrofoam block covered with colorful paper. This not only keeps them upright but also adds a festive touch to your table.
- In a Basket: Arrange your cake pops in a small basket lined with pastel-colored tissue paper. This creates a charming spring vibe, perfect for Easter brunch or garden parties.
- As Party Favors: Wrap each cake pop in a clear cellophane bag and tie it with a ribbon. These make adorable party favors that guests can take home and enjoy later!
- With a Sweet Dip: Serve your cake pops alongside a small bowl of melted chocolate or a fruit dip. This adds an interactive element, allowing guests to customize their treats.
- On a Dessert Table: Include your cake pops as part of a larger dessert spread. Pair them with cupcakes, cookies, and other spring-themed treats for a delightful dessert buffet.
These serving suggestions not only enhance the visual appeal of your Spring Chick Cake Pops but also create a fun and inviting atmosphere for your gatherings. I love seeing the smiles on my friends’ faces when they spot these cheerful treats! So, get creative with your presentation, and let the festivities begin!
Tips for Making the Best Spring Chick Cake Pops
As I’ve journeyed through the delightful world of Spring Chick Cake Pops, I’ve gathered a treasure trove of tips that can help you create the best treats possible. These little nuggets of wisdom can make all the difference in your cake pop-making adventure!
- Be Patient: Take your time with each step. Rushing can lead to uneven cake pops or messy decorations. Enjoy the process!
- Use Quality Ingredients: High-quality cake mix and frosting can elevate your cake pops. Fresh ingredients make a noticeable difference in flavor.
- Chill Before Coating: After shaping your cake pops, chill them for at least 30 minutes. This helps them hold their shape when you dip them in chocolate.
- Experiment with Flavors: Don’t be afraid to mix and match flavors! A hint of orange zest or a splash of almond extract can add a delightful twist.
- Have Fun with Decorations: Let your creativity shine! Use different colors, sprinkles, and edible decorations to make each chick unique.
- Practice Makes Perfect: If your first batch doesn’t turn out as expected, don’t be discouraged. Each attempt is a learning experience, and soon you’ll be a pro!
These tips are like little guiding stars on your cake pop journey. Remember, the joy of making Spring Chick Cake Pops lies not just in the final product but in the fun and laughter shared along the way. So, roll up your sleeves, and let’s create some magic in the kitchen!
Breakdown of Time for Spring Chick Cake Pops
As a passionate home cook, I know that time management is key to a successful baking adventure. When it comes to making Spring Chick Cake Pops, it’s helpful to have a clear idea of how long each step will take. Here’s a quick breakdown of the time you’ll need:
- Prep Time: Approximately 20 minutes. This includes gathering your ingredients, measuring them out, and preparing your baking equipment.
- Cooking Time: About 30 minutes. This is the time it takes to bake your cake to perfection. Remember to let it cool completely before moving on!
- Assembly Time: Roughly 45 minutes. This includes crumbling the cake, mixing it with frosting, shaping the pops, coating them in chocolate, and decorating.
Total Time: Around 1 hour and 35 minutes. With a little patience and creativity, you’ll have a delightful batch of Spring Chick Cake Pops ready to impress your family and friends!
Keep in mind that these times can vary based on your experience and kitchen setup. The most important part is to enjoy the process and have fun while creating these adorable treats!
Nutritional Information for Spring Chick Cake Pops
As I whip up my delightful Spring Chick Cake Pops, I often think about the balance between indulgence and nutrition. While these treats are certainly a sweet delight, it’s good to have an idea of what we’re enjoying. Here’s a general breakdown of the nutritional information for one cake pop, assuming you make about 20 pops from the recipe:
- Calories: Approximately 150 calories
- Fat: 7 grams
- Saturated Fat: 3.5 grams
- Carbohydrates: 20 grams
- Fiber: 0.5 grams
- Sugar: 10 grams
- Protein: 2 grams
Keep in mind that these values can vary based on the specific ingredients you choose, especially the type of cake mix and frosting. If you opt for lower-sugar or healthier alternatives, you can easily adjust the nutritional profile. I always say, enjoy these treats in moderation, and don’t forget to savor every bite!
Frequently Asked Questions about Spring Chick Cake Pops
As I’ve shared my love for Spring Chick Cake Pops, I’ve often received questions from fellow home cooks eager to try their hand at these delightful treats. Here are some of the most common questions I’ve encountered, along with my answers to help you on your cake pop journey!
Can I use a different flavor of cake mix?
Absolutely! One of the best things about cake pops is their versatility. You can use any flavor of cake mix you love. Chocolate, red velvet, or even funfetti can add a unique twist to your Spring Chick Cake Pops. Just remember to match your frosting flavor to complement the cake!
How do I store leftover cake pops?
If you happen to have any cake pops left (which is rare in my house!), store them in an airtight container in the fridge. They’ll stay fresh for up to a week. Just make sure to separate layers with parchment paper to prevent sticking!
Can I make these cake pops ahead of time?
Yes, you can! I often make my cake pops a day or two in advance. Just coat them in chocolate and store them in the fridge until you’re ready to serve. This makes them perfect for parties or gatherings, as you can focus on other preparations!
What can I use instead of candy melts?
If you can’t find candy melts, you can use chocolate chips or even white chocolate. Just melt them down the same way you would with candy melts. If using chocolate chips, consider adding a bit of vegetable oil to achieve a smoother consistency for coating.
Can I freeze cake pops?
Yes, you can freeze cake pops! Just make sure they are fully set and wrapped individually in plastic wrap or stored in an airtight container. They can be frozen for up to three months. When you’re ready to enjoy them, let them thaw in the fridge for a few hours before serving.
How do I get my cake pops to stand up?
Using a styrofoam block or a cake pop stand is the best way to keep your cake pops upright while they set. If you don’t have either, you can use a cardboard box with holes poked in it to hold the sticks. This keeps them from toppling over and helps maintain their shape!
These FAQs are just a glimpse into the wonderful world of Spring Chick Cake Pops. If you have more questions or need further assistance, feel free to reach out! I’m always here to help fellow home cooks create delicious memories in the kitchen.
Conclusion on Spring Chick Cake Pops
As we wrap up our delightful journey into the world of Spring Chick Cake Pops, I can’t help but feel a sense of joy and accomplishment. These charming treats are not just a feast for the eyes; they’re a celebration of creativity, flavor, and the joy of sharing with loved ones. Whether you’re making them for a festive occasion or simply to brighten someone’s day, these cake pops are sure to bring smiles all around.
What I love most about Spring Chick Cake Pops is their versatility. You can customize them to fit any theme or flavor preference, making them a perfect addition to any gathering. Plus, the process of creating them is filled with laughter and fun, especially when you involve family or friends. It’s a wonderful way to bond and create lasting memories in the kitchen.
So, as you embark on your own cake pop adventure, remember to embrace the process and let your creativity shine. With each bite, you’ll not only taste the sweetness of the cake but also the love and joy that went into making them. Happy baking, and may your Spring Chick Cake Pops bring as much happiness to your table as they have to mine!


