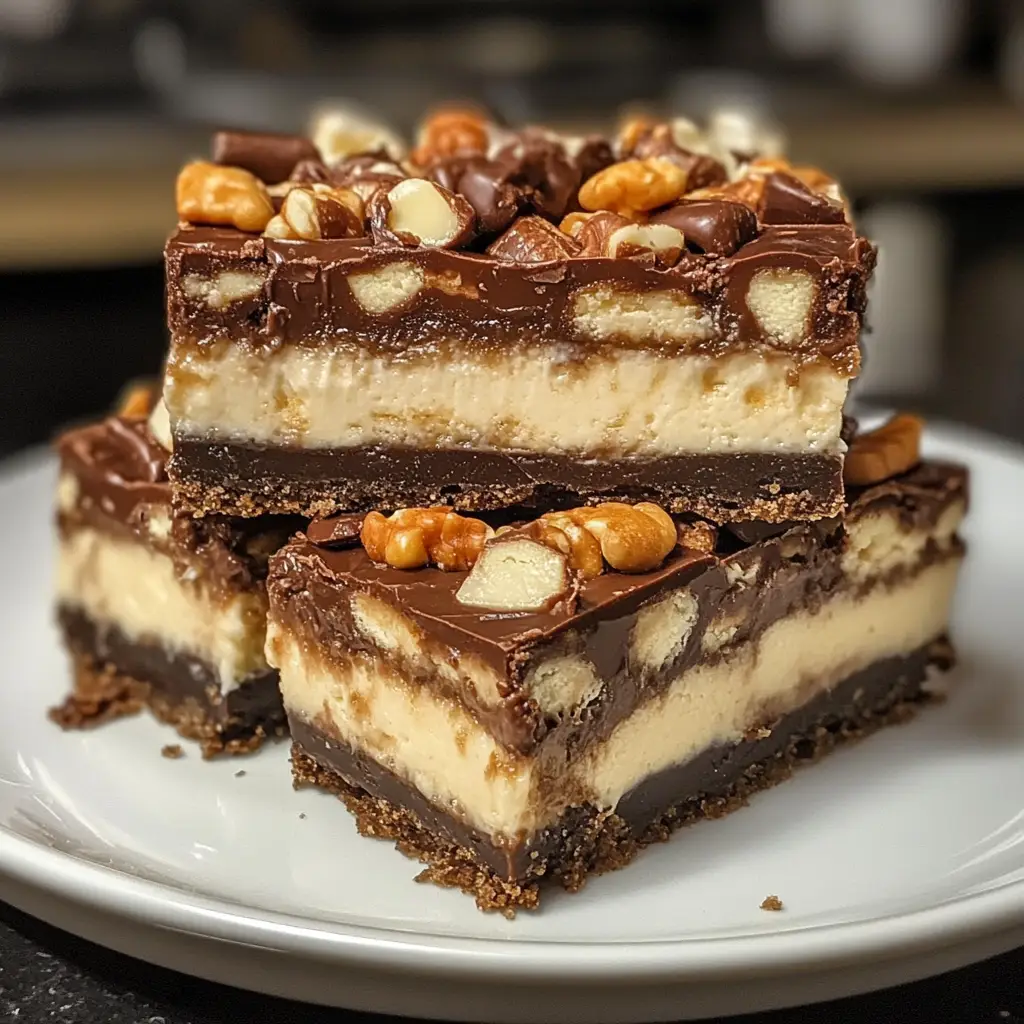
Introduction to Snickers Cheesecake Bars
Ah, Snickers Cheesecake Bars! Just the name makes my mouth water. I remember the first time I stumbled upon this delightful treat. It was during a family gathering, and my cousin had brought a batch that disappeared faster than you could say “chocolate.” The combination of creamy cheesecake, crunchy peanuts, and rich caramel was simply irresistible. I knew right then that I had to recreate this magic in my own kitchen.
As a passionate home cook, I love experimenting with flavors and textures. Snickers Cheesecake Bars are a perfect canvas for my culinary creativity. They blend the classic flavors of a Snickers candy bar with the smoothness of cheesecake, creating a dessert that’s both indulgent and satisfying. Each bite is like a little celebration, a sweet reminder of childhood treats, and a perfect way to impress friends and family.
What I adore most about these bars is their versatility. You can whip them up for a special occasion or just because you want to treat yourself. Plus, they’re surprisingly easy to make! With just a few simple ingredients, you can create a dessert that looks and tastes like it came from a fancy bakery. Trust me, once you try these Snickers Cheesecake Bars, you’ll want to make them again and again.
So, grab your apron and let’s dive into the world of Snickers Cheesecake Bars. I promise you, this recipe will become a staple in your dessert repertoire. Let’s get started!
Ingredients for Snickers Cheesecake Bars
Before we dive into the delightful process of making Snickers Cheesecake Bars, let’s gather our ingredients. Having everything ready makes the cooking experience smoother and more enjoyable. I always find that when I have my ingredients prepped, I can focus on the fun part—creating something delicious!
Main Ingredients
- 1 ½ cups graham cracker crumbs
- ½ cup unsalted butter, melted
- 2 (8 oz) packages cream cheese, softened
- 1 cup granulated sugar
- 2 large eggs
- 1 teaspoon vanilla extract
- 1 cup sour cream
- 4 fun-sized Snickers bars, chopped (plus more for topping)
- ½ cup caramel sauce
- ½ cup chopped peanuts
When choosing your ingredients, I recommend using high-quality cream cheese and real vanilla extract. It makes a noticeable difference in flavor. And don’t skimp on the Snickers bars—after all, they’re the star of the show!
Optional Add-ons
- 1 cup mini chocolate chips for extra chocolatey goodness
- Sea salt for a touch of contrast
- Whipped cream for serving
- Chocolate drizzle for a fancy finish
Feel free to get creative! Sometimes, I like to sprinkle a little sea salt on top before serving. It enhances the sweetness and adds a delightful crunch. And if you’re feeling extra indulgent, a drizzle of chocolate sauce never hurts!
How to Prepare Snickers Cheesecake Bars
Now that we have our ingredients ready, it’s time to roll up our sleeves and get cooking! Making Snickers Cheesecake Bars is a delightful journey, and I can’t wait to share each step with you. Trust me, the aroma that fills your kitchen will be worth every moment spent. Let’s dive into the steps!
Step 1: Prepare the Crust
First things first, we need to create a solid foundation for our cheesecake bars. The crust is where the magic begins!
- In a mixing bowl, combine the graham cracker crumbs and melted butter. Stir until the crumbs are evenly coated.
- Press the mixture firmly into the bottom of a greased 9×9-inch baking pan. Make sure it’s packed tightly for a sturdy crust.
Tips for Step 1
To make the crust extra crunchy, I like to use a flat-bottomed measuring cup to press it down evenly. It helps create a nice, even layer. If you want a hint of sweetness, you can add a tablespoon of sugar to the crumb mixture!
Step 2: Make the Cheesecake Filling
Next up is the creamy filling that will make your taste buds dance! This part is super simple and oh-so-satisfying.
- In a large mixing bowl, beat the softened cream cheese until smooth and creamy.
- Add in the granulated sugar, eggs, and vanilla extract. Mix until everything is well combined.
- Finally, fold in the sour cream and chopped Snickers bars gently.
Tips for Step 2
Make sure your cream cheese is at room temperature. This helps avoid lumps in your filling. I always take it out of the fridge about an hour before I start. And when folding in the Snickers, be gentle! You want those delicious chunks to stay intact.
Step 3: Layer the Snickers and Bake
Now comes the fun part—layering! This is where the magic truly happens.
- Pour the cheesecake filling over the prepared crust, spreading it evenly.
- Drizzle the caramel sauce over the top and sprinkle the chopped peanuts.
- Bake in a preheated oven at 325°F (160°C) for about 30-35 minutes, or until the edges are set but the center is still slightly jiggly.
Tips for Step 3
Keep an eye on the bars as they bake. Every oven is different! If you notice the edges browning too quickly, you can cover them with foil. And don’t worry if the center jiggles a bit; it will firm up as it cools!
Step 4: Cool and Chill
Patience is key here! After baking, we need to let our bars cool down before they can be enjoyed.
- Remove the baking pan from the oven and let it cool at room temperature for about 30 minutes.
- Once cooled, cover the pan and refrigerate for at least 4 hours, or overnight if you can wait!
Tips for Step 4
Chilling the bars overnight is my secret weapon! It allows the flavors to meld beautifully. Plus, they’re easier to cut into neat squares when they’re fully chilled. Trust me, the wait is worth it!
Equipment Needed for Snickers Cheesecake Bars
Before we embark on our Snickers Cheesecake Bars adventure, let’s gather the essential tools. Having the right equipment makes the process smoother and more enjoyable. Here’s what you’ll need:
- 9×9-inch baking pan: This is perfect for baking your cheesecake bars. If you don’t have one, an 8×8-inch pan will work too; just keep an eye on the baking time.
- Mixing bowls: A couple of medium-sized bowls will do the trick for mixing the crust and filling.
- Electric mixer: While a whisk can work, I find that an electric mixer makes it easier to achieve that smooth, creamy filling.
- Rubber spatula: This handy tool is great for folding in the Snickers and scraping down the sides of the bowl.
- Measuring cups and spoons: Accurate measurements are key to a successful recipe, so don’t forget these!
- Plastic wrap or foil: You’ll need this to cover the pan while chilling the bars in the fridge.
If you’re missing any of these items, don’t fret! You can often improvise. For example, a large mixing bowl can double as a serving bowl if you’re in a pinch. Just remember, the goal is to have fun and create something delicious!
Variations of Snickers Cheesecake Bars
While I absolutely adore the classic Snickers Cheesecake Bars, there’s something thrilling about mixing things up! Variations can add a new twist to this beloved dessert, making it even more exciting. Here are a few ideas that I’ve tried and loved:
- Peanut Butter Snickers Cheesecake Bars: If you’re a peanut butter lover like me, swirl in some creamy peanut butter into the cheesecake filling. It adds a rich, nutty flavor that pairs perfectly with the Snickers.
- Chocolate Chip Snickers Cheesecake Bars: For an extra chocolatey treat, fold in mini chocolate chips along with the Snickers. The little bursts of chocolate will make each bite even more decadent!
- Salted Caramel Snickers Cheesecake Bars: Drizzle a bit of salted caramel sauce on top before serving. The salty-sweet combination is simply divine and elevates the flavor profile.
- Nut-Free Version: If you need a nut-free option, simply omit the peanuts and use a nut-free caramel sauce. You can still enjoy the creamy goodness without the crunch!
These variations are just the tip of the iceberg! I encourage you to get creative and experiment with your favorite flavors. After all, cooking is all about having fun and making it your own!
Cooking Notes for Snickers Cheesecake Bars
As I’ve learned through my culinary adventures, a few cooking notes can make all the difference when preparing Snickers Cheesecake Bars. Here are some tips that I’ve gathered over time to ensure your bars turn out perfectly every time:
- Room Temperature Ingredients: Always use room temperature cream cheese and eggs. This helps create a smooth filling without lumps. I usually take them out of the fridge an hour before I start.
- Don’t Overmix: When mixing the cheesecake filling, be careful not to overmix. This can introduce too much air, causing the bars to crack while baking. Just mix until everything is combined!
- Cooling Time: Allow the bars to cool completely before refrigerating. This helps set the filling and enhances the flavors. I often let them cool for a full hour on the counter.
- Storage: These bars can be stored in an airtight container in the fridge for up to a week. They also freeze well! Just wrap them tightly in plastic wrap and foil for up to three months.
- Serving Temperature: For the best flavor and texture, serve the bars chilled but not too cold. Let them sit at room temperature for about 10-15 minutes before serving. This way, the flavors really shine!
With these cooking notes in mind, you’ll be well on your way to creating Snickers Cheesecake Bars that are not only delicious but also visually stunning. Happy baking!
Serving Suggestions for Snickers Cheesecake Bars
Now that our Snickers Cheesecake Bars are ready to be devoured, let’s talk about how to serve them for maximum enjoyment! Presentation can elevate any dessert, and these bars are no exception. Here are some of my favorite serving suggestions that will make your bars shine:
- Chilled and Cut: For a clean look, use a sharp knife to cut the bars into neat squares. I like to dip the knife in hot water before cutting, which helps create smooth edges.
- Garnish with Whipped Cream: A dollop of freshly whipped cream on top adds a light, airy touch. It complements the richness of the cheesecake beautifully!
- Drizzle with Caramel and Chocolate: For an extra indulgent treat, drizzle some caramel and chocolate sauce over the top just before serving. It adds a lovely visual appeal and a burst of flavor.
- Sprinkle with Sea Salt: A light sprinkle of flaky sea salt can enhance the sweetness and provide a delightful contrast. It’s a simple touch that makes a big difference!
- Serve with Ice Cream: Pairing these bars with a scoop of vanilla or chocolate ice cream creates a delightful dessert experience. The cold ice cream against the creamy bars is simply heavenly!
These serving suggestions not only make your Snickers Cheesecake Bars look irresistible but also enhance the overall flavor experience. Whether it’s a family gathering or a cozy night in, these bars are sure to impress. Enjoy every delicious bite!
Tips for Perfect Snickers Cheesecake Bars
As I’ve whipped up countless batches of Snickers Cheesecake Bars, I’ve gathered a treasure trove of tips to ensure they turn out perfectly every time. Here are my top secrets that will elevate your baking game and make your bars the talk of the town:
- Chill Your Tools: If you have time, chill your mixing bowls and beaters before making the cheesecake filling. This helps keep the mixture cool and prevents it from becoming too warm, which can lead to a less-than-perfect texture.
- Use a Water Bath: For an ultra-smooth filling, consider baking your bars in a water bath. Just place your baking pan inside a larger pan filled with hot water. This gentle heat helps prevent cracks and keeps the cheesecake creamy.
- Don’t Rush the Cooling: Allow your bars to cool completely in the pan before transferring them to the fridge. This step is crucial for setting the filling and achieving that perfect slice.
- Experiment with Toppings: Don’t be afraid to get creative with toppings! Try crushed Snickers, chocolate shavings, or even a sprinkle of crushed graham crackers for added texture and flavor.
- Slice with Care: When it’s time to cut your bars, use a sharp knife and wipe it clean between cuts. This ensures each piece looks neat and appetizing, making your dessert even more inviting!
With these tips in your back pocket, you’ll be well on your way to creating Snickers Cheesecake Bars that are not only delicious but also visually stunning. Happy baking, and may your kitchen be filled with sweet success!
Breakdown of Time for Snickers Cheesecake Bars
When it comes to baking, timing is everything! I’ve learned that understanding the time commitment can help you plan your baking adventure better. Here’s a quick breakdown of the time you’ll need to whip up these delightful Snickers Cheesecake Bars:
- Prep Time: 20 minutes. This includes gathering your ingredients, preparing the crust, and mixing the cheesecake filling. It’s the perfect time to get your kitchen organized and ready for some fun!
- Cooking Time: 30-35 minutes. This is when the magic happens in the oven! You’ll want to keep an eye on your bars as they bake to ensure they’re just right.
- Cooling Time: 30 minutes at room temperature, followed by at least 4 hours in the fridge. I often recommend chilling them overnight for the best flavor and texture, but if you’re in a hurry, just a few hours will do!
Total Time: Approximately 5 hours (including cooling time). While it may seem like a long wait, trust me, the end result is worth every minute! You’ll have a delicious dessert that’s perfect for sharing or indulging in all by yourself.
So, set aside some time, gather your ingredients, and let’s create something truly special together. Happy baking!
Nutritional Information for Snickers Cheesecake Bars
As a passionate home cook, I believe it’s important to enjoy our treats while being mindful of what goes into them. Snickers Cheesecake Bars are undeniably indulgent, but knowing the nutritional information can help you savor them even more. Here’s a general breakdown of the nutrition per serving, assuming you cut the bars into 12 pieces:
- Calories: Approximately 250
- Protein: 4g
- Fat: 15g
- Carbohydrates: 27g
- Fiber: 1g
- Sugar: 18g
Keep in mind that these values can vary based on the specific brands of ingredients you use and any optional add-ons you choose to include. If you’re looking to lighten things up a bit, consider using reduced-fat cream cheese or a sugar substitute. However, I always say that moderation is key! Enjoying a Snickers Cheesecake Bar as an occasional treat is part of the joy of cooking and baking.
So, whether you’re sharing these bars at a gathering or enjoying them on a cozy night in, remember to relish every delicious bite. Happy baking!
Frequently Asked Questions about Snickers Cheesecake Bars
As I’ve shared my love for Snickers Cheesecake Bars, I often get questions from fellow home cooks eager to try their hand at this delightful dessert. I love answering these queries because it shows just how much excitement there is around this treat! Here are some of the most frequently asked questions I receive, along with my personal insights:
Can I make Snickers Cheesecake Bars ahead of time?
Absolutely! In fact, I recommend making them a day in advance. The flavors meld beautifully as they chill overnight, making them even more delicious. Just be sure to store them in an airtight container in the fridge to keep them fresh!
Can I freeze Snickers Cheesecake Bars?
Yes, you can! I often freeze leftovers for a sweet treat later on. Just wrap the bars tightly in plastic wrap and then in foil. They can last up to three months in the freezer. When you’re ready to enjoy them, simply thaw them in the fridge overnight.
What can I use instead of cream cheese?
If you’re looking for a lighter option, you can use Greek yogurt or a dairy-free cream cheese alternative. Just keep in mind that the texture and flavor may vary slightly. I’ve tried Greek yogurt before, and it still turned out delicious!
How do I know when the cheesecake bars are done baking?
The edges should be set, while the center will still have a slight jiggle. It’s important not to overbake them, as they will continue to firm up as they cool. Trust me, a little jiggle is perfectly fine!
Can I use other candy bars instead of Snickers?
Definitely! While Snickers are my favorite, you can experiment with other candy bars like Milky Way, Reese’s, or even M&M’s. Each will bring its own unique flavor to the bars, so feel free to get creative!
These questions reflect the curiosity and enthusiasm that surrounds Snickers Cheesecake Bars. I hope my answers help you feel more confident in your baking journey. Remember, cooking is all about experimenting and having fun, so don’t hesitate to make this recipe your own!
Conclusion on Snickers Cheesecake Bars
In conclusion, Snickers Cheesecake Bars are more than just a dessert; they are a delightful experience that brings joy to any occasion. The combination of creamy cheesecake, crunchy peanuts, and rich caramel creates a symphony of flavors that dance on your palate. Each bite is a nostalgic reminder of childhood treats, making them perfect for sharing with family and friends.
What I love most about this recipe is its versatility. Whether you’re celebrating a special event or simply indulging in a sweet craving, these bars are sure to impress. Plus, they’re surprisingly easy to make, allowing even novice bakers to create something truly special.
So, if you’re looking to add a touch of sweetness to your life, I encourage you to try making Snickers Cheesecake Bars. With a little love and creativity, you’ll have a dessert that not only tastes amazing but also brings smiles to everyone who tries it. Happy baking, and may your kitchen be filled with the sweet aroma of success!