
Introduction to Salted Caramel Chocolate Bark Recipe
Ah, salted caramel chocolate bark! Just the name makes my heart skip a beat. I remember the first time I tasted this delightful treat. It was during a cozy holiday gathering at a friend’s house. The moment I took a bite, the rich chocolate melted in my mouth, and the sweet, buttery caramel danced on my taste buds. The sprinkle of sea salt was like a tiny burst of magic, elevating the flavors to a whole new level. I was hooked!
As a passionate home cook, I love experimenting with flavors and textures. This salted caramel chocolate bark recipe has become a staple in my kitchen. It’s not just a dessert; it’s a celebration of sweet and salty goodness. The best part? It’s incredibly easy to make! Whether you’re preparing for a festive occasion or simply indulging yourself, this recipe is sure to impress.
What I adore most about this bark is its versatility. You can customize it with your favorite nuts, dried fruits, or even a sprinkle of crushed cookies. Each batch can be a unique creation, reflecting your personal taste. Plus, it makes for a fantastic gift! Imagine wrapping up a beautiful piece of homemade bark and sharing it with friends and family. It’s a heartfelt gesture that’s sure to bring smiles.
So, grab your apron and let’s dive into the world of salted caramel chocolate bark. I promise you, once you try making it at home, you’ll never want to go back to store-bought versions. Let’s create some sweet memories together!
Ingredients for Salted Caramel Chocolate Bark Recipe
Before we embark on this delicious journey, let’s gather our ingredients. Having everything ready makes the process smoother and more enjoyable. Trust me, there’s nothing worse than scrambling for an ingredient halfway through! Here’s what you’ll need for the salted caramel chocolate bark recipe.
Main Ingredients
- 2 cups of high-quality dark chocolate chips (I prefer using chocolate with at least 60% cocoa for a rich flavor.)
- 1 cup of granulated sugar (This will be the base for our luscious caramel.)
- 1/2 cup of unsalted butter (Make sure it’s at room temperature for easy mixing.)
- 1/2 cup of heavy cream (This adds creaminess to the caramel. Don’t skimp on quality here!)
- 1 teaspoon of vanilla extract (A splash of vanilla enhances the overall flavor.)
- 1 teaspoon of sea salt (This is for that perfect salty finish.)
Optional Add-ons
Now, let’s talk about the fun part—customizing your bark! Here are some optional ingredients you can add to make your creation even more special:
- 1/2 cup of chopped nuts (Almonds, pecans, or walnuts work beautifully.)
- 1/2 cup of dried fruits (Think cranberries or apricots for a chewy texture.)
- 1/4 cup of crushed cookies (Oreo or graham crackers add a delightful crunch.)
- 1/4 cup of flaky sea salt (For an extra salty kick on top!)
When selecting your ingredients, I always recommend going for the best quality you can find. The chocolate is the star of the show, so choose one that you truly enjoy. The better the ingredients, the more delicious your salted caramel chocolate bark will be. Now that we have our ingredients ready, let’s move on to the fun part—preparing this delightful treat!
How to Prepare Salted Caramel Chocolate Bark Recipe
Now that we have our ingredients all lined up, it’s time to roll up our sleeves and get cooking! Making salted caramel chocolate bark is a delightful process that fills your kitchen with sweet aromas. I can almost taste the chocolate melting in my mouth as I write this! Let’s dive into the steps to create this heavenly treat.
Step 1: Melting the Chocolate
First things first, we need to melt our chocolate. I like to use a double boiler for this, but a microwave works just as well. Just be careful not to overheat it!
Tips for Melting Chocolate
- When using a double boiler, make sure the water doesn’t touch the bottom of the bowl. This prevents the chocolate from burning.
- If you’re using a microwave, heat the chocolate in 30-second intervals, stirring in between. This helps it melt evenly.
- Keep an eye on it! Chocolate can go from melted to burnt in a flash.
Step 2: Preparing the Caramel
Next up is the caramel! This step is where the magic happens. The sweet, buttery aroma of caramel is simply irresistible. In a medium saucepan, combine the sugar and butter over medium heat.
Tips for Making Caramel
- Stir the mixture constantly until the sugar dissolves completely. This helps prevent any burning.
- Once the sugar is dissolved, stop stirring and let it bubble away. Watch it closely until it turns a beautiful amber color.
- When it reaches the right color, carefully add the heavy cream and vanilla extract. It will bubble up, so be cautious!
Step 3: Combining Chocolate and Caramel
Now comes the fun part—combining the melted chocolate and caramel! Pour half of the melted chocolate onto a parchment-lined baking sheet, spreading it evenly.
Tips for Layering
- Use a spatula to spread the chocolate smoothly. Don’t worry about perfection; it will all come together in the end!
- Drizzle the caramel over the chocolate, then use a toothpick or knife to swirl it together. This creates beautiful marbled patterns.
- Pour the remaining chocolate on top, covering the caramel completely.
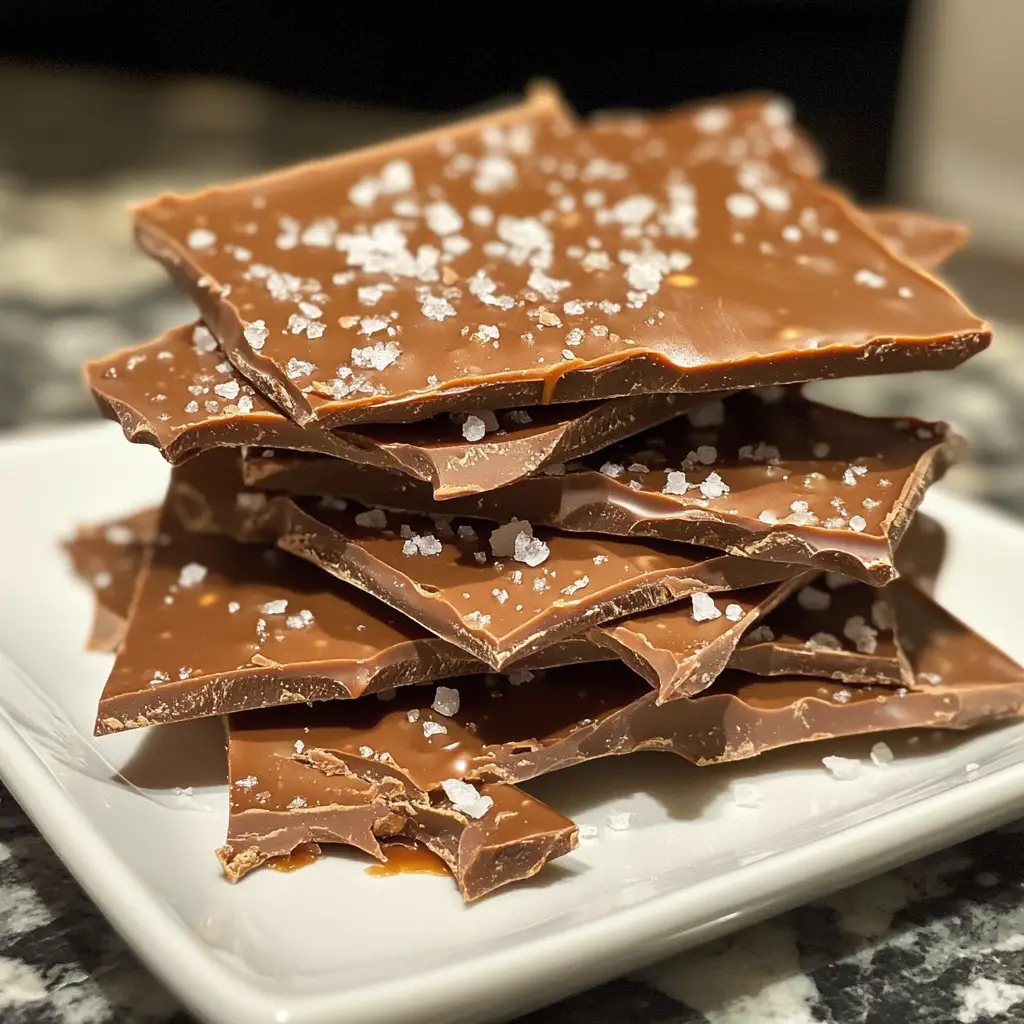
Step 4: Adding Sea Salt
It’s time to sprinkle on that magical sea salt! This is what makes the bark truly special. While the chocolate is still warm, generously sprinkle the sea salt over the top.
Tips for Salt Distribution
- Don’t be shy with the salt! It enhances the sweetness of the chocolate and caramel.
- For a gourmet touch, consider using flaky sea salt. It adds a lovely texture and flavor.
Step 5: Cooling and Setting
Finally, we need to let our creation cool and set. This is the hardest part—waiting! Place the baking sheet in the refrigerator for about 1-2 hours until the bark is firm.
Tips for Proper Cooling
- Make sure it’s completely set before breaking it into pieces. Patience is key here!
- Once set, you can break the bark into irregular pieces for a rustic look. It adds to the charm!
And there you have it! Your salted caramel chocolate bark is ready to be enjoyed. I can already picture the smiles on everyone’s faces as they take that first bite. Let’s move on to the next section, where we’ll talk about the equipment you’ll need for this delightful recipe.
Equipment Needed for Salted Caramel Chocolate Bark Recipe
Before we dive into the kitchen, let’s make sure we have all the right tools at our fingertips. Having the right equipment can make the process smoother and more enjoyable. Here’s what you’ll need to whip up your salted caramel chocolate bark:
- Double Boiler or Microwave-Safe Bowl: A double boiler is perfect for melting chocolate gently. If you don’t have one, a microwave-safe bowl works just as well. Just remember to melt in short bursts!
- Medium Saucepan: This is essential for making the caramel. A heavy-bottomed saucepan helps distribute heat evenly, preventing burning.
- Parchment Paper: Line your baking sheet with parchment paper to make removing the bark a breeze. It also helps with easy cleanup!
- Baking Sheet: A standard baking sheet is perfect for spreading out the chocolate and caramel mixture.
- Spatula: A silicone spatula is great for spreading the melted chocolate and caramel evenly. It’s also handy for scraping down the sides of bowls.
- Toothpick or Knife: Use this for swirling the caramel into the chocolate. It’s a simple tool that creates beautiful patterns!
- Refrigerator: While not a tool per se, you’ll need a fridge to cool and set your bark. Patience is key here!
Don’t worry if you don’t have a double boiler; you can easily improvise with a heatproof bowl over a pot of simmering water. The goal is to melt the chocolate gently without burning it. With these tools in hand, you’re all set to create your delicious salted caramel chocolate bark!
Variations of Salted Caramel Chocolate Bark Recipe
One of the things I love most about making salted caramel chocolate bark is how easy it is to switch things up! It’s like a blank canvas waiting for your creative touch. Here are a few variations that I’ve tried and absolutely adored:
- Nutty Delight: Add a mix of your favorite nuts, like almonds, hazelnuts, or pistachios. The crunchiness pairs perfectly with the smooth chocolate and gooey caramel.
- Fruity Twist: Toss in some dried fruits like cherries, apricots, or even coconut flakes. The fruity sweetness adds a lovely contrast to the rich flavors.
- Spicy Kick: For those who enjoy a little heat, sprinkle in some crushed red pepper flakes or a dash of cayenne pepper. It’s a surprising twist that will leave your taste buds tingling!
- Cookie Crumble: Crush up your favorite cookies, like Oreos or ginger snaps, and mix them into the chocolate before it sets. This adds a delightful crunch and extra flavor.
- Minty Fresh: Add a few drops of peppermint extract to the chocolate for a refreshing minty flavor. It’s perfect for the holiday season!
These variations not only make the bark more exciting but also allow you to tailor it to your personal taste or the preferences of your loved ones. I often find myself experimenting with whatever I have on hand, and it’s always a fun surprise to see how each batch turns out. So, don’t be afraid to get creative and make this recipe your own!
Cooking Notes for Salted Caramel Chocolate Bark Recipe
As I’ve learned through my culinary adventures, a few cooking notes can make all the difference in achieving that perfect salted caramel chocolate bark. Here are some tips that I’ve gathered over time, which I hope will help you on your journey:
- Quality Matters: Always choose high-quality chocolate and fresh ingredients. The better the quality, the richer the flavor of your bark will be.
- Temperature Control: When making caramel, keep the heat at medium. Too high, and you risk burning the sugar; too low, and it may not caramelize properly.
- Patience is Key: Allow the chocolate and caramel to cool slightly before combining. This helps prevent them from mixing too much and losing their distinct layers.
- Storage Tips: Store your finished bark in an airtight container at room temperature. If it’s warm, you can refrigerate it, but be sure to let it come to room temperature before serving for the best texture.
- Experiment with Flavors: Don’t hesitate to try different flavor combinations! Adding spices or extracts can elevate your bark to new heights.
These little notes have helped me refine my technique and create batches of salted caramel chocolate bark that I’m proud to share. Remember, cooking is all about having fun and making it your own. Enjoy the process, and happy cooking!
Serving Suggestions for Salted Caramel Chocolate Bark Recipe
Now that your salted caramel chocolate bark is ready, it’s time to think about how to serve it! This delightful treat is not only a feast for the taste buds but also a visual delight. Here are some serving suggestions that I’ve found to elevate the experience:
- Gift it with Love: Cut the bark into beautiful pieces and package them in a decorative box or jar. Tie it with a ribbon for a thoughtful homemade gift that’s perfect for any occasion.
- Pair with Coffee or Tea: Serve the bark alongside a warm cup of coffee or tea. The rich flavors of the chocolate and caramel complement the warmth of your drink beautifully.
- Ice Cream Topping: Crumble the bark over a scoop of vanilla or salted caramel ice cream. It adds a delightful crunch and an extra layer of flavor that’s simply irresistible!
- Charcuterie Board Star: Include the bark on a dessert charcuterie board. Pair it with fresh fruits, nuts, and cheeses for a stunning presentation that will wow your guests.
- Movie Night Treat: Break the bark into bite-sized pieces and serve it in a bowl during your next movie night. It’s a sweet snack that everyone will love!
These serving ideas not only enhance the enjoyment of your salted caramel chocolate bark but also make it a versatile treat for any gathering. I love how a simple piece of bark can bring people together, sparking joy and sweet memories. So, get creative and enjoy sharing this delicious treat with your loved ones!
Tips for Perfecting Salted Caramel Chocolate Bark Recipe
As I’ve spent countless hours perfecting my salted caramel chocolate bark, I’ve gathered a treasure trove of tips that can help you achieve that perfect balance of flavors and textures. Here are some of my favorite nuggets of wisdom to elevate your bark-making game:
- Use a Candy Thermometer: If you want to take the guesswork out of caramel making, a candy thermometer is your best friend. Aim for a temperature of around 240°F (115°C) for the perfect soft ball stage.
- Chill Your Tools: Before melting chocolate, chill your mixing bowl and spatula in the fridge. This helps keep the chocolate from seizing up when you mix in the caramel.
- Layer Wisely: When layering chocolate and caramel, allow the first layer to set slightly before adding the next. This creates distinct layers and prevents them from blending too much.
- Experiment with Salt: Try different types of salt! Flaky sea salt, smoked salt, or even flavored salts can add a unique twist to your bark.
- Store Properly: To keep your bark fresh, store it in an airtight container with parchment paper between layers. This prevents sticking and keeps it crunchy.
These tips have transformed my salted caramel chocolate bark from good to absolutely divine! Remember, cooking is a journey, and each batch is an opportunity to learn and grow. So, don’t hesitate to experiment and find what works best for you. Happy baking!
Breakdown of Time for Salted Caramel Chocolate Bark Recipe
Now that we’ve covered the ingredients, equipment, and all the delightful steps to create our salted caramel chocolate bark, let’s talk about the time it takes to whip up this sweet treat. I always find it helpful to know how long each part of the process will take, especially when planning for gatherings or special occasions. Here’s a quick breakdown:
- Prep Time: 15 minutes – This includes gathering your ingredients, measuring them out, and getting everything ready for cooking. It’s a great time to put on your favorite music and get into the cooking spirit!
- Cooking Time: 30 minutes – This is the time spent melting the chocolate, making the caramel, and combining everything together. It’s a fun and aromatic process that fills your kitchen with delicious scents!
- Cooling Time: 1-2 hours – This is the hardest part—waiting for the bark to set in the refrigerator. I often use this time to clean up the kitchen or enjoy a cup of tea while dreaming about the tasty treat to come.
Total Time: Approximately 1 hour and 45 minutes to 2 hours and 15 minutes. This includes all the prep, cooking, and cooling time. But don’t worry, most of that time is hands-off, allowing you to relax while your delicious creation comes to life!
Knowing the time breakdown helps me plan better, especially when I’m making multiple batches or preparing for a special event. I hope this helps you too! Now, let’s move on to the nutritional information of our delightful salted caramel chocolate bark.
Nutritional Information for Salted Caramel Chocolate Bark Recipe
As a passionate home cook, I believe it’s important to enjoy our treats while being mindful of what goes into them. Here’s a quick look at the nutritional information for a typical serving of salted caramel chocolate bark. Keep in mind that these values can vary based on the specific ingredients you choose and the portion size:
- Serving Size: 1 piece (approximately 1 oz)
- Calories: 150-200 calories
- Total Fat: 10-12 grams
- Saturated Fat: 6-8 grams
- Cholesterol: 15-20 mg
- Sodium: 50-100 mg
- Total Carbohydrates: 15-20 grams
- Dietary Fiber: 1-2 grams
- Sugars: 10-12 grams
- Protein: 1-2 grams
While this salted caramel chocolate bark is certainly a treat, it’s also packed with rich flavors that make each bite satisfying. I often enjoy it in moderation, savoring the sweet and salty combination. Remember, it’s all about balance! So, indulge a little and enjoy the deliciousness of your homemade creation.
Frequently Asked Questions about Salted Caramel Chocolate Bark Recipe
As I’ve shared my salted caramel chocolate bark recipe with friends and family, I’ve noticed a few common questions pop up. It’s always great to clarify any doubts, especially when it comes to creating such a delightful treat. Here are some of the most frequently asked questions I’ve encountered, along with my answers:
Can I use milk chocolate instead of dark chocolate?
Absolutely! While I personally love the rich flavor of dark chocolate, milk chocolate can add a sweeter touch to your bark. Just keep in mind that it may alter the overall taste, making it a bit sweeter. Feel free to experiment and see what you prefer!
How long does the salted caramel chocolate bark last?
When stored properly in an airtight container, your salted caramel chocolate bark can last up to two weeks at room temperature. If you live in a warmer climate, you might want to refrigerate it to keep it fresh. Just remember to let it come to room temperature before serving for the best texture!
Can I make this recipe vegan or dairy-free?
Yes, you can! To make a vegan version, simply use dairy-free chocolate chips and substitute the butter and cream with plant-based alternatives, like coconut cream and vegan butter. The result will still be delicious and satisfying!
What can I do if my caramel is too hard?
If your caramel turns out too hard, it may have cooked for too long. To salvage it, you can try melting it down again with a splash of cream over low heat. This should help soften it up. Remember, practice makes perfect, and each batch is a learning experience!
Can I freeze the salted caramel chocolate bark?
Yes, you can freeze it! Just make sure to wrap it tightly in plastic wrap or place it in an airtight container. When you’re ready to enjoy it, let it thaw in the refrigerator for a few hours. This way, you can savor your delicious creation even longer!
These questions are just a few of the common queries I’ve encountered while making salted caramel chocolate bark. I hope my answers help you feel more confident in your baking adventure. Remember, cooking is all about having fun and experimenting, so don’t hesitate to reach out if you have more questions. Happy baking!
Conclusion on Salted Caramel Chocolate Bark Recipe
In conclusion, the salted caramel chocolate bark recipe is a delightful treat that brings together the best of both worlds—sweet and salty. It’s a simple yet elegant dessert that can be made in the comfort of your own kitchen, allowing you to create something truly special for yourself or your loved ones. The joy of making this bark lies not only in the delicious flavors but also in the memories you create while preparing it.
Whether you’re celebrating a special occasion or just indulging in a sweet craving, this recipe is versatile enough to suit any mood. With endless possibilities for customization, you can make each batch uniquely yours. Plus, it’s a fantastic gift idea that shows you care, wrapped up with love and creativity.
So, the next time you’re looking for a treat that’s sure to impress, remember this salted caramel chocolate bark recipe. It’s a sweet adventure waiting to happen, and I can’t wait for you to experience the joy of making it. Happy cooking, and may your kitchen always be filled with the sweet aroma of chocolate and caramel!


