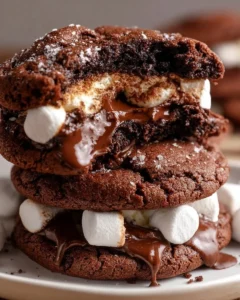
Introduction to Raspberry Truffles Recipe
Ah, raspberry truffles! Just the thought of them makes my heart skip a beat. I remember the first time I tasted these delightful little bites of heaven. It was at a quaint little café tucked away in a bustling city. The moment I popped one into my mouth, the rich chocolate mingled with the tartness of fresh raspberries, creating a symphony of flavors that danced on my taste buds. I was hooked!
As a passionate home cook, I love experimenting with flavors and textures. Raspberry truffles have become a staple in my kitchen, especially when I want to impress friends or treat myself. They’re not just a dessert; they’re an experience. The way the smooth chocolate melts in your mouth, followed by the burst of raspberry goodness, is simply magical.
What I adore most about this raspberry truffles recipe is its simplicity. With just a handful of ingredients, you can create something that feels luxurious and indulgent. Plus, they make for a perfect gift! Imagine presenting a beautifully packaged box of homemade raspberry truffles to a loved one. It’s a heartfelt gesture that speaks volumes.
In this article, I’ll guide you through my favorite raspberry truffles recipe, sharing tips and tricks along the way. Whether you’re a seasoned chef or a beginner in the kitchen, I promise you’ll find joy in making these delightful treats. So, let’s roll up our sleeves and dive into the world of raspberry truffles!
Ingredients for Raspberry Truffles Recipe
Before we embark on this delicious journey, let’s gather our ingredients. I always believe that the quality of your ingredients can make or break a recipe. For these raspberry truffles, I recommend using the freshest raspberries and the finest chocolate you can find. Trust me, it makes a world of difference!
Main Ingredients
- 1 cup fresh raspberries (about 150 grams)
- 8 ounces (225 grams) dark chocolate (at least 70% cocoa)
- ½ cup heavy cream (120 ml)
- 2 tablespoons unsalted butter (28 grams)
- 1 teaspoon vanilla extract
- Pinch of salt
When selecting your chocolate, I always opt for high-quality brands. The richer the chocolate, the more decadent your truffles will taste. If you’re feeling adventurous, try using flavored chocolate, like raspberry-infused or even white chocolate for a sweeter twist!
Optional Add-ons
- Cocoa powder for dusting
- Chopped nuts (like hazelnuts or almonds) for coating
- Shredded coconut for a tropical flair
- Crushed freeze-dried raspberries for an extra raspberry punch
These optional add-ons can elevate your truffles to a whole new level. I love rolling some of my truffles in cocoa powder for that classic look, while others get a sprinkle of crushed freeze-dried raspberries for a pop of color and flavor. The choice is yours, and that’s the beauty of making these truffles at home!
How to Prepare Raspberry Truffles Recipe
Now that we have our ingredients ready, it’s time to roll up our sleeves and get cooking! Making raspberry truffles is a delightful process that fills your kitchen with sweet aromas. I promise, the end result is worth every moment spent. Let’s dive into the steps!
Step 1: Prepare the Raspberry Mixture
First things first, we need to prepare our raspberry mixture. Start by washing the fresh raspberries gently under cold water. Pat them dry with a paper towel. Then, in a small saucepan over medium heat, add the raspberries and cook them down for about 5 minutes. You want them to soften and release their juices.
Tips for Step 1
Be careful not to overcook the raspberries; we want them to retain some of their vibrant flavor. If you like a smoother texture, you can mash them with a fork or blend them briefly. Just remember to strain out the seeds if you prefer a seedless mixture!
Step 2: Melt the Chocolate
Next up, it’s time to melt the chocolate. I like to use a double boiler for this, but you can also melt it in the microwave. If using the microwave, heat the chocolate in 30-second intervals, stirring in between until it’s smooth and glossy.
Tips for Step 2
Be patient! Chocolate can seize up if overheated. If you notice it getting too thick, add a teaspoon of vegetable oil to loosen it up. This little trick works wonders!
Step 3: Combine Ingredients
Once your chocolate is melted, it’s time to combine everything. In a mixing bowl, add the heavy cream, unsalted butter, vanilla extract, and a pinch of salt. Pour in the melted chocolate and the raspberry mixture. Stir gently until everything is well combined and smooth.
Tips for Step 3
Make sure to mix thoroughly, as this will ensure that the flavors meld beautifully. If you want a stronger raspberry flavor, feel free to add a bit more raspberry puree at this stage!
Step 4: Form the Truffles
Now comes the fun part—forming the truffles! Once your mixture has cooled slightly, cover it with plastic wrap and refrigerate for about 1-2 hours, or until it’s firm enough to handle. When ready, use a small cookie scoop or your hands to form small balls, about 1 inch in diameter.
Tips for Step 4
If the mixture is too sticky, you can lightly dust your hands with cocoa powder to make rolling easier. Don’t worry about making them perfect; the rustic look adds to their charm!
Step 5: Coat the Truffles
Finally, it’s time to coat our truffles! Roll each truffle in your choice of cocoa powder, chopped nuts, or shredded coconut. This step not only adds flavor but also gives them a beautiful finish.
Tips for Step 5
For a fun twist, try mixing cocoa powder with a bit of powdered sugar for a sweeter coating. You can also experiment with different toppings to find your favorite combination!
And there you have it! Your raspberry truffles are ready to be enjoyed. I can’t wait for you to experience the joy of making and tasting these delightful treats!
Equipment Needed for Raspberry Truffles Recipe
Before we dive into the kitchen, let’s gather the essential tools for making these luscious raspberry truffles. Having the right equipment can make the process smoother and more enjoyable. Here’s what you’ll need:
- Double Boiler or Microwave-Safe Bowl: This is crucial for melting the chocolate. If you don’t have a double boiler, a heatproof bowl set over a pot of simmering water works just as well. Alternatively, a microwave-safe bowl will do the trick for quick melting.
- Small Saucepan: You’ll need this for cooking down the raspberries. A non-stick saucepan is ideal to prevent sticking.
- Mixing Bowl: A medium-sized mixing bowl is perfect for combining all your ingredients. I often use a glass bowl so I can see the beautiful colors of the mixture!
- Cookie Scoop or Melon Baller: This handy tool helps in forming uniform truffle balls. If you don’t have one, you can simply use your hands, but a scoop makes it easier and more fun!
- Plastic Wrap: You’ll need this to cover the truffle mixture while it chills in the fridge. It keeps the mixture fresh and prevents it from drying out.
- Cookie Sheet or Plate: Use this to place your formed truffles as they chill. A parchment-lined sheet makes for easy cleanup!
Don’t worry if you’re missing any of these tools. You can always improvise! For instance, if you don’t have a cookie scoop, your hands will work just fine. The most important thing is to enjoy the process and have fun creating these delightful raspberry truffles!
Variations of Raspberry Truffles Recipe
As I’ve experimented with my raspberry truffles recipe, I’ve discovered that there are endless ways to put a unique spin on these delightful treats. Each variation brings its own charm and flavor, making them even more exciting to create and share. Here are a few of my favorite variations that you might want to try:
- White Chocolate Raspberry Truffles: Swap out the dark chocolate for creamy white chocolate. The sweetness pairs beautifully with the tart raspberries, creating a lovely contrast.
- Mint Chocolate Raspberry Truffles: Add a few drops of peppermint extract to the chocolate mixture for a refreshing twist. The cool mint flavor complements the raspberry perfectly!
- Spicy Raspberry Truffles: For those who enjoy a little heat, mix in a pinch of cayenne pepper or chili powder to the chocolate. It adds a surprising kick that elevates the flavor profile.
- Nutty Raspberry Truffles: Incorporate finely chopped nuts, like pistachios or walnuts, into the truffle mixture. This adds a delightful crunch and nutty flavor that pairs wonderfully with the smooth chocolate.
- Vegan Raspberry Truffles: Substitute the heavy cream with coconut cream and use dairy-free chocolate. This variation is just as rich and delicious, perfect for those following a plant-based diet.
These variations not only keep things interesting but also allow you to cater to different tastes and preferences. I love how a simple change can transform the entire experience of enjoying raspberry truffles. So, don’t hesitate to get creative and make these truffles your own!
Cooking Notes for Raspberry Truffles Recipe
As I’ve crafted my raspberry truffles recipe over the years, I’ve picked up a few cooking notes that can help you achieve the best results. These little tips can make a big difference in your truffle-making adventure!
- Freshness Matters: Always use fresh raspberries for the best flavor. If you can’t find fresh ones, frozen raspberries can work in a pinch, but make sure to thaw and drain them well before cooking.
- Chocolate Quality: The chocolate you choose is crucial. A higher cocoa percentage means richer flavor. I often go for chocolate that’s at least 70% cocoa for that deep, indulgent taste.
- Chilling Time: Don’t rush the chilling process! Allowing the truffle mixture to firm up in the fridge is key to making them easier to handle. Patience is a virtue in the kitchen!
- Experiment with Flavors: Feel free to play around with different flavorings. A splash of orange zest or a hint of almond extract can add a delightful twist to your truffles.
- Storage Tips: Store your truffles in an airtight container in the fridge. They can last up to a week, but I doubt they’ll last that long once you share them with friends and family!
These cooking notes are like little nuggets of wisdom I’ve gathered from my own kitchen escapades. They’ll help you navigate the truffle-making process with ease and confidence. Happy cooking!
Serving Suggestions for Raspberry Truffles Recipe
Now that your raspberry truffles are ready, it’s time to think about how to serve them! Presentation can elevate the experience, making these delightful treats even more special. Here are some of my favorite serving suggestions that I’ve found to be crowd-pleasers:
- Elegant Platter: Arrange the truffles on a beautiful serving platter. You can use a mix of different coatings to create a colorful display. A sprinkle of edible flowers or fresh mint leaves can add a touch of elegance!
- Gift Boxes: If you’re looking to share the love, package the truffles in small gift boxes or mason jars. Tie them with a ribbon for a charming touch. They make perfect gifts for birthdays, holidays, or just because!
- With Fresh Berries: Serve the truffles alongside fresh raspberries or other berries. The vibrant colors and flavors complement each other beautifully, creating a delightful dessert spread.
- Pair with Beverages: Consider pairing your truffles with a glass of dessert wine, coffee, or even a rich hot chocolate. The combination of flavors can enhance the overall tasting experience.
- On a Dessert Table: If you’re hosting a gathering, include the truffles on a dessert table alongside other sweet treats. They’ll stand out and be a hit among your guests!
These serving suggestions not only make your raspberry truffles look stunning but also create a memorable experience for everyone who gets to enjoy them. I can’t wait for you to try these ideas and see how they elevate your truffle game!
Tips for Making Raspberry Truffles Recipe
As I’ve whipped up countless batches of raspberry truffles, I’ve gathered a treasure trove of tips that can help you create the perfect batch every time. These little nuggets of wisdom will make your truffle-making journey smoother and more enjoyable. Here are my top tips:
- Use Room Temperature Ingredients: Before you start, let your butter and cream come to room temperature. This helps them blend seamlessly with the chocolate, creating a smooth and creamy texture.
- Chill Between Steps: If your truffle mixture feels too soft while rolling, pop it back in the fridge for a few minutes. This will make it easier to handle and shape into perfect little balls.
- Experiment with Coatings: Don’t be afraid to get creative with your coatings! Try mixing different toppings together, like crushed nuts and cocoa powder, for a unique flavor and texture.
- Keep It Clean: Use a small bowl of warm water to dip your hands in while rolling the truffles. This prevents the mixture from sticking to your fingers, making the process much cleaner and easier.
- Make a Test Batch: If you’re trying a new variation or flavor, consider making a small test batch first. This way, you can adjust the flavors to your liking without committing to a full batch.
These tips have been my guiding stars in the kitchen, helping me create raspberry truffles that are not only delicious but also visually stunning. I hope they inspire you to experiment and enjoy the process of making these delightful treats!
Breakdown of Time for Raspberry Truffles Recipe
When it comes to making raspberry truffles, timing is everything! I’ve found that understanding the time commitment can help you plan your kitchen adventure better. Here’s a quick breakdown of the time you’ll need for each step:
- Prep Time: 15 minutes – This includes gathering your ingredients, washing the raspberries, and preparing the mixture.
- Cooking Time: 10 minutes – This is the time spent cooking down the raspberries and melting the chocolate. It’s a short but sweet process!
- Chilling Time: 1-2 hours – This is crucial for allowing the truffle mixture to firm up. Patience is key here, but it’s worth the wait!
- Total Time: Approximately 1.5 to 2.5 hours – This includes all the prep, cooking, and chilling time. Most of it is hands-off, so you can use that time to relax or clean up!
Knowing this breakdown helps me plan my day better, especially when I’m making these truffles for a special occasion. I often prepare them ahead of time, allowing me to enjoy the moment without rushing. I hope this helps you too as you embark on your raspberry truffle journey!
Nutritional Information for Raspberry Truffles Recipe
As a passionate home cook, I always find it helpful to know the nutritional content of the treats I make. While raspberry truffles are a delightful indulgence, they can also be enjoyed in moderation as part of a balanced diet. Here’s a general breakdown of the nutritional information for one raspberry truffle, based on the ingredients listed in our recipe:
- Calories: Approximately 100 calories
- Fat: 7 grams (of which saturated fat is about 4 grams)
- Carbohydrates: 9 grams
- Fiber: 1 gram
- Sugar: 5 grams
- Protein: 1 gram
Keep in mind that these values can vary based on the specific brands of ingredients you use and any optional add-ons you choose to include. For instance, using white chocolate instead of dark chocolate will increase the sugar content. If you’re looking to make these truffles a bit healthier, consider using dark chocolate with a higher cocoa percentage, as it typically contains less sugar and more antioxidants.
Enjoying raspberry truffles is all about balance. They’re a sweet treat that can bring joy to any occasion, and knowing their nutritional information can help you savor them even more. So go ahead, indulge a little, and share the love with friends and family!
Frequently Asked Questions about Raspberry Truffles Recipe
As I’ve shared my raspberry truffles recipe with friends and family, I’ve noticed a few common questions pop up. It’s always great to clarify any doubts, especially when it comes to creating these delightful treats. Here are some frequently asked questions that I hope will help you on your truffle-making journey!
Can I use frozen raspberries instead of fresh ones?
Absolutely! While fresh raspberries are ideal for their vibrant flavor, frozen raspberries can work just as well. Just make sure to thaw and drain them thoroughly before cooking. This way, you’ll avoid excess moisture in your truffle mixture.
How long do raspberry truffles last?
When stored in an airtight container in the fridge, your raspberry truffles can last up to a week. However, I doubt they’ll last that long once you share them with friends and family! If you want to keep them longer, you can freeze them for up to three months.
Can I make these truffles vegan?
Yes, you can! To make vegan raspberry truffles, simply substitute the heavy cream with coconut cream and use dairy-free chocolate. This way, you can enjoy the same rich and creamy texture without any animal products.
What’s the best way to coat the truffles?
The coating is where you can get creative! You can roll your truffles in cocoa powder, chopped nuts, shredded coconut, or even crushed freeze-dried raspberries. Each option adds a unique flavor and texture, so feel free to mix and match!
Can I add other flavors to the truffles?
Definitely! The beauty of raspberry truffles is their versatility. You can add a splash of orange zest, a hint of almond extract, or even a few drops of peppermint extract for a refreshing twist. Experimenting with flavors is part of the fun!
What if my truffle mixture is too soft?
If your mixture feels too soft to handle, don’t worry! Just pop it back in the fridge for a little while longer until it firms up. You can also try chilling your hands in cold water before rolling the truffles to make the process easier.
I hope these FAQs help clear up any questions you might have about making raspberry truffles. Remember, the most important part is to enjoy the process and have fun in the kitchen. Happy truffle-making!
Conclusion on Raspberry Truffles Recipe
As I wrap up this delightful journey into the world of raspberry truffles, I can’t help but feel a sense of joy and satisfaction. These little bites of bliss are not just a treat; they’re a celebration of flavors and creativity. The combination of rich chocolate and tart raspberries creates a harmony that’s hard to resist. Plus, the simplicity of the recipe makes it accessible for everyone, whether you’re a seasoned chef or just starting out in the kitchen.
What I love most about making raspberry truffles is the opportunity to share them with loved ones. They make for a thoughtful gift, a sweet addition to any gathering, or simply a special treat for yourself. Each truffle is a labor of love, and the smiles they bring are worth every moment spent in the kitchen.
So, whether you’re whipping up a batch for a special occasion or just indulging in a little self-care, I encourage you to embrace the process. Get creative with flavors, experiment with coatings, and most importantly, enjoy every bite. I can’t wait for you to experience the magic of raspberry truffles in your own home. Happy cooking!