

Introduction to Pumpkin Patch Rice Krispie Treats
As the leaves turn and the air gets crisp, I find myself craving cozy treats that capture the essence of fall. That’s where my Pumpkin Patch Rice Krispie Treats come in! These delightful, festive bites are not just a quick solution for a busy day; they’re a fun way to bring the family together. Whether you’re hosting a Halloween party or just want to surprise your loved ones, these treats are sure to impress. Plus, they’re so easy to make that even the busiest moms can whip them up in no time!
Why You’ll Love This Pumpkin Patch Rice Krispie Treats
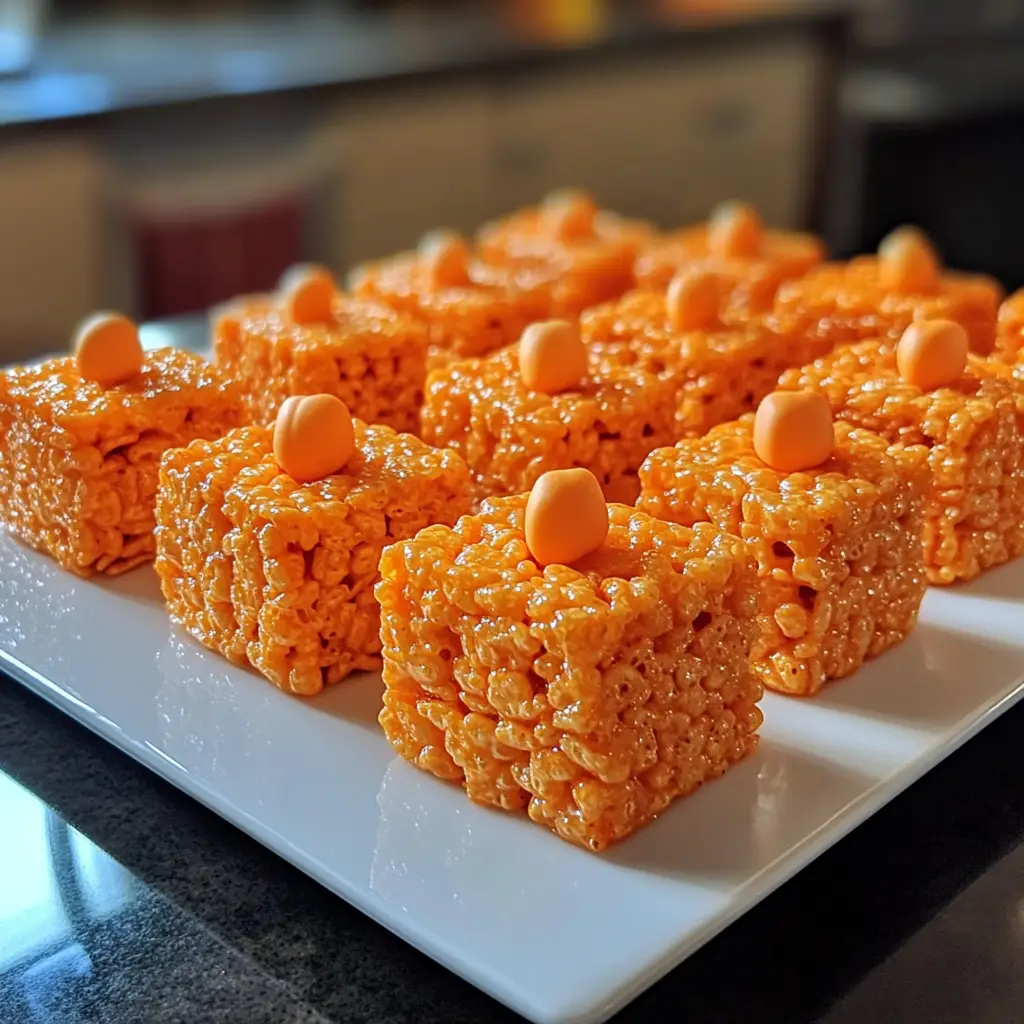
These Pumpkin Patch Rice Krispie Treats are a delightful blend of simplicity and flavor. They come together in just 25 minutes, making them perfect for busy days. The sweet, gooey marshmallows combined with the crunch of Rice Krispies create a texture that’s hard to resist. Plus, they’re a hit with kids and adults alike, bringing smiles to everyone’s faces. Who wouldn’t love a treat that’s as fun to make as it is to eat?
Ingredients for Pumpkin Patch Rice Krispie Treats
Gathering the right ingredients is the first step to creating these delightful Pumpkin Patch Rice Krispie Treats. Here’s what you’ll need:
- Butter: This adds richness and helps bind the treats together. I prefer unsalted for better control over the sweetness.
- Marshmallows: The star of the show! They provide that gooey sweetness we all love. Mini marshmallows work great, but regular ones can be used too.
- Rice Krispies cereal: This gives the treats their signature crunch. You can also use other puffed cereals if you’re feeling adventurous.
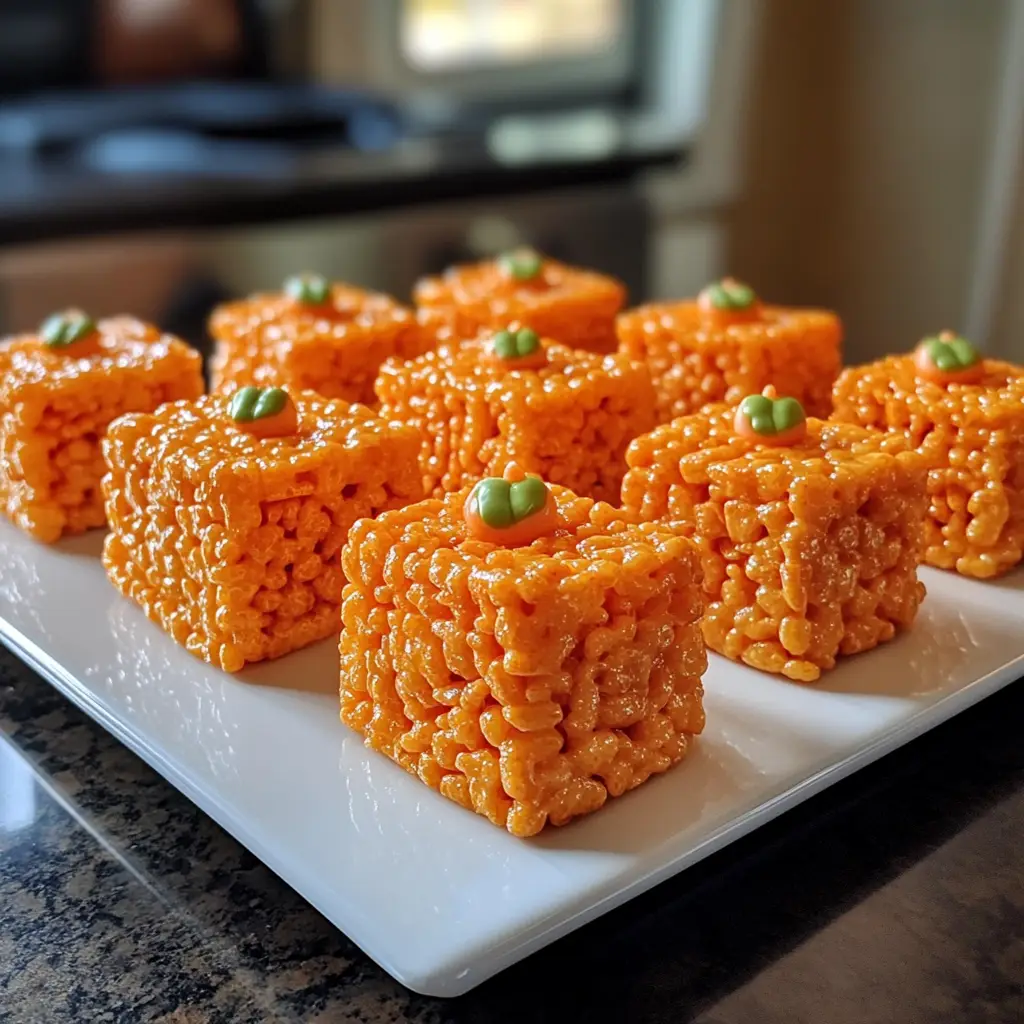
- Orange food coloring: A few drops will transform your treats into vibrant pumpkins. Feel free to adjust the amount for a deeper hue!
- Green candy melts: These are perfect for creating the pumpkin stems. If you can’t find them, melted chocolate or even green frosting can work as substitutes.
- Chocolate chips: Use these to make adorable little eyes on your pumpkins. Dark, milk, or even white chocolate can add a fun twist!
For exact quantities, check the bottom of the article where you can find everything listed for easy printing. Happy cooking!
How to Make Pumpkin Patch Rice Krispie Treats
Now that you have your ingredients ready, let’s dive into the fun part—making these adorable Pumpkin Patch Rice Krispie Treats! Follow these simple steps, and you’ll have a festive treat that’s sure to delight everyone.
Step 1: Melt the Butter
Start by grabbing a large saucepan. Place it on the stove over low heat and add the butter. As it melts, keep an eye on it to prevent burning. The butter should be bubbly and golden, creating a lovely base for your treats.
Step 2: Add the Marshmallows
Once the butter is melted, it’s time to add the marshmallows. Pour them into the saucepan and stir continuously. You want to keep stirring until they’re completely melted and smooth. This gooey mixture is what makes these treats so irresistible!
Step 3: Color the Mixture
Now comes the fun part—adding color! Remove the saucepan from the heat and add a few drops of orange food coloring. Stir well until the mixture is a vibrant pumpkin hue. If you want a deeper color, feel free to add more food coloring until you’re happy with the shade.
Step 4: Combine with Rice Krispies
Next, it’s time to add the Rice Krispies cereal. Pour it into the marshmallow mixture and stir gently. Make sure every piece of cereal is well coated. This step is crucial for that delightful crunch in your Pumpkin Patch Rice Krispie Treats!
Step 5: Shape the Treats
Allow the mixture to cool slightly, just enough so it’s safe to handle. Then, take small handfuls and shape them into pumpkin forms. I like to make them a bit lumpy for that authentic pumpkin look. Place them on a baking sheet lined with parchment paper to set.
Step 6: Add the Stems
While your pumpkins are setting, melt the green candy melts in a microwave-safe bowl. Heat them in short bursts, stirring in between until smooth. Drizzle the melted candy over the tops of your pumpkins to create cute little stems. It’s the finishing touch that makes them pop!
Step 7: Create the Eyes
Finally, grab your chocolate chips. Use them to create adorable eyes on your pumpkins. You can place them however you like—big, small, or even silly! This is where you can let your creativity shine.
Tips for Success
- Use fresh marshmallows for the best texture and flavor.
- Don’t rush the melting process; low heat is key to a smooth mixture.
- Wet your hands slightly when shaping the pumpkins to prevent sticking.
- Experiment with different colors for fun variations—think Halloween or Thanksgiving themes!
- Store leftovers in an airtight container to keep them fresh and chewy.
Equipment Needed
- Large saucepan: Essential for melting butter and marshmallows. A non-stick pot works well too.
- Wooden spoon: Perfect for stirring the mixture. A silicone spatula can also do the trick.
- Baking sheet: Needed for setting the shaped treats. Parchment paper makes cleanup easier.
- Microwave-safe bowl: For melting the green candy melts. A small saucepan can be used on the stove as an alternative.
Variations
- Chocolate Pumpkin Patch Treats: Mix in some cocoa powder with the Rice Krispies for a chocolatey twist.
- Nutty Delight: Add chopped nuts or sunflower seeds for an extra crunch and flavor.
- Gluten-Free Option: Use gluten-free Rice Krispies to make these treats suitable for those with dietary restrictions.
- Vegan Version: Substitute butter with coconut oil and use vegan marshmallows for a plant-based treat.
- Spiced Pumpkin Treats: Add a pinch of cinnamon or pumpkin spice to the marshmallow mixture for a warm, autumn flavor.
Serving Suggestions
- Pair these treats with warm apple cider for a cozy fall snack.
- Serve alongside a platter of fresh fruit for a balanced treat table.
- Display them on a festive Halloween-themed platter to impress your guests.
- Wrap individual treats in clear bags tied with orange ribbons for party favors.
- Enjoy them with a scoop of vanilla ice cream for an indulgent dessert!
FAQs about Pumpkin Patch Rice Krispie Treats
Can I make Pumpkin Patch Rice Krispie Treats ahead of time?
Absolutely! These treats can be made a few days in advance. Just store them in an airtight container to keep them fresh and chewy. They’re perfect for prepping for Halloween parties or fall gatherings!
What can I use instead of green candy melts?
If you can’t find green candy melts, don’t worry! You can use melted chocolate or even green frosting as a substitute. Both will create adorable pumpkin stems!
How do I store leftover treats?
To keep your Pumpkin Patch Rice Krispie Treats fresh, store them in an airtight container at room temperature. They should stay delicious for several days, but I doubt they’ll last that long!
Can I customize the colors for different occasions?
<pDefinitely! You can use different food coloring to match any theme. For Halloween, go for orange and black. For Thanksgiving, maybe a warm brown or gold. The possibilities are endless!
Are these treats suitable for kids with allergies?
While these treats are vegetarian, they may not be suitable for everyone. Always check for allergies, especially with marshmallows and chocolate. You can easily adapt the recipe to be nut-free or gluten-free with the right ingredients!
Final Thoughts
Making Pumpkin Patch Rice Krispie Treats is more than just a recipe; it’s a delightful experience that brings joy to both the kitchen and the table. The laughter shared while shaping the pumpkins and the smiles that follow when they’re devoured are priceless. These treats are a wonderful way to celebrate the season, creating memories that last long after the last bite. So, gather your loved ones, roll up your sleeves, and dive into this fun, festive adventure. Trust me, these treats will become a cherished tradition in your home, bringing warmth and sweetness to your fall celebrations!
Print
Pumpkin Patch Rice Krispie Treats You Can’t Resist!
- Total Time: 25 minutes
- Yield: 12 servings 1x
- Diet: Vegetarian
Description
Delicious and festive Rice Krispie Treats shaped like pumpkins, perfect for fall celebrations.
Ingredients
- 3 tablespoons butter
- 1 package (10 oz) marshmallows
- 6 cups Rice Krispies cereal
- Orange food coloring
- Green candy melts
- Chocolate chips (for eyes)
Instructions
- In a large saucepan, melt the butter over low heat.
- Add the marshmallows and stir until completely melted.
- Remove from heat and add a few drops of orange food coloring, mixing until the desired color is achieved.
- Stir in the Rice Krispies cereal until well coated.
- Allow the mixture to cool slightly, then shape into pumpkin shapes.
- Melt the green candy melts and drizzle over the top for stems.
- Use chocolate chips to create eyes on the pumpkins.
Notes
- For a more vibrant color, add more food coloring as needed.
- Store in an airtight container to keep them fresh.
- These treats can be made ahead of time and stored for several days.
- Prep Time: 15 minutes
- Cook Time: 10 minutes
- Category: Dessert
- Method: No-Bake
- Cuisine: American
Nutrition
- Serving Size: 1 treat
- Calories: 150
- Sugar: 10g
- Sodium: 50mg
- Fat: 5g
- Saturated Fat: 3g
- Unsaturated Fat: 2g
- Trans Fat: 0g
- Carbohydrates: 22g
- Fiber: 0g
- Protein: 1g
- Cholesterol: 15mg
Keywords: Pumpkin Patch Rice Krispie Treats, Halloween treats, fall desserts


