Sensory-Rich Introduction with Immediate Craving
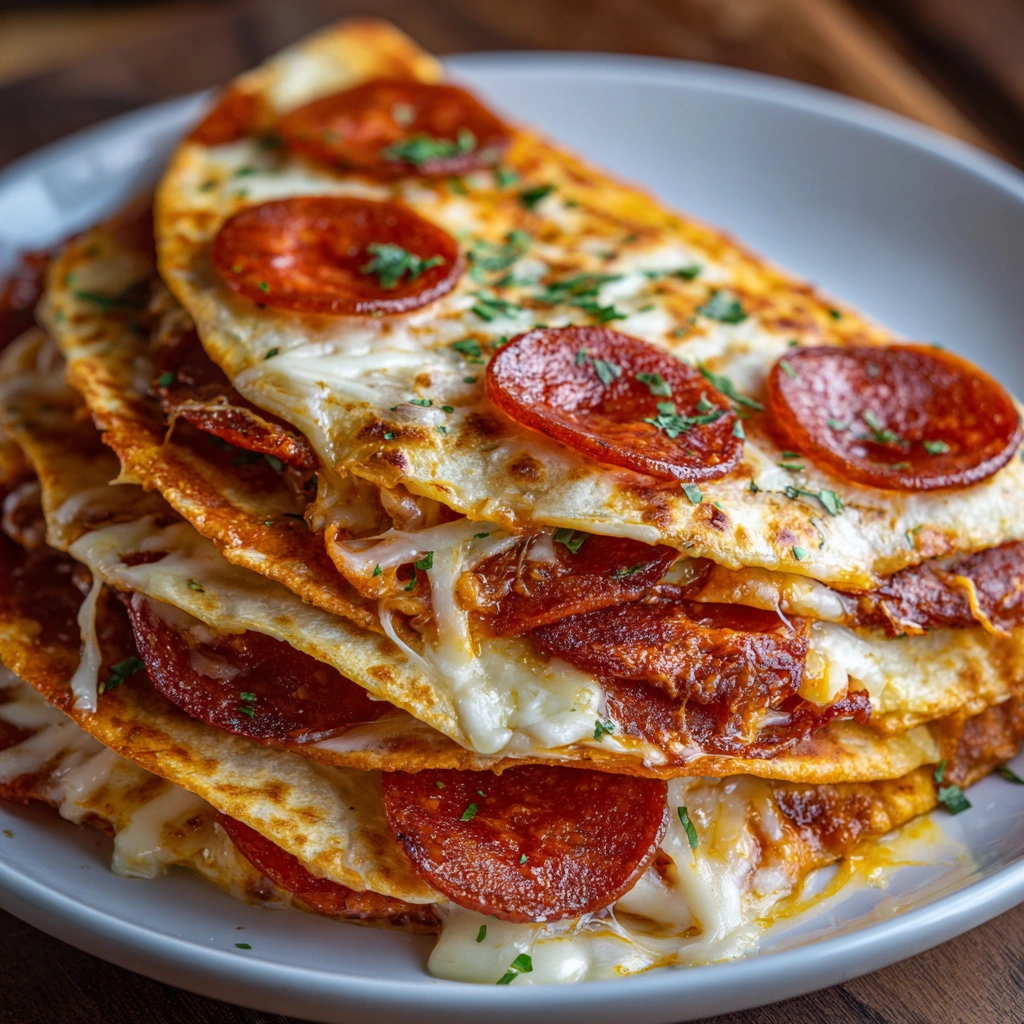
Imagine this: you take your first bite of a Pepperoni Pizzadilla, and the world around you fades away. The moment your teeth sink into the crispy tortilla, you hear that satisfying crunch, a prelude to the gooey, melted cheese that follows. As you chew, the savory burst of pepperoni dances on your palate, mingling with the rich, creamy texture of the cheese. It’s a symphony of flavors and sensations that leaves you craving more.
Growing up, pizzadillas were a staple at our family gatherings. I can still picture my grandmother in the kitchen, her laughter echoing as she flipped each pizzadilla with the grace of a seasoned chef. The aroma of sizzling tortillas and melting cheese filled the air, drawing us all together like moths to a flame. Those moments were more than just meals; they were cherished memories, a time when we shared stories, laughter, and love over a plate of deliciousness.
Food has a magical way of bringing people together, doesn’t it? Whether it’s a game night with friends, a casual get-together, or a fun family dinner, Pepperoni Pizzadillas are the perfect dish to create lasting memories. They’re easy to make, and even easier to devour, making them an ideal choice for any occasion. So gather your loved ones, whip up a batch, and let the good times roll!
Why You’ll Love This Pepperoni Pizzadillas
Let me tell you, there are countless reasons to fall head over heels for Pepperoni Pizzadillas. Each bite is a delightful experience that keeps you coming back for more. Here’s why this dish has earned a special place in my heart (and stomach):
- Texture Contrast: The moment you take a bite, you’re greeted with a satisfying crunch from the crispy exterior. As you chew, the soft, gooey cheese envelops your taste buds, creating a delightful mouthfeel that’s simply irresistible.
- Flavor Balance: The savory, slightly spicy notes of the pepperoni perfectly complement the rich, creamy cheese. If you sprinkle in some optional herbs, like Italian seasoning, you’ll elevate the flavor profile even further, adding depth and complexity to each bite.
- Versatility: One of the best things about pizzadillas is their adaptability. You can easily customize them with different fillings or sauces to suit your taste. Whether you want to swap out the pepperoni for veggies or try a different cheese, the possibilities are endless!
- Ease of Preparation: These pizzadillas are a breeze to whip up, making them perfect for busy weeknights or last-minute gatherings. In just under 20 minutes, you can have a delicious meal on the table that will impress everyone.
- Universal Appeal: Let’s face it—who doesn’t love cheesy, crispy goodness? Pepperoni Pizzadillas are a hit with both kids and adults alike, making them a go-to dish for any occasion. They’re the kind of food that brings smiles and satisfaction to the table.
So, whether you’re hosting a game night, looking for a quick dinner solution, or just craving something delicious, these pizzadillas are sure to please. Trust me, once you try them, you’ll understand why they’re a family favorite!
Essential Tools & Preparation Strategy
Before we dive into the delicious world of Pepperoni Pizzadillas, let’s make sure you have the right tools at your disposal. Having the right equipment not only makes the cooking process smoother but also ensures that your pizzadillas turn out perfectly crispy and gooey every time. Here’s what you’ll need:
- Skillet: This is essential for achieving that perfect crispy texture. I recommend a non-stick skillet for easy flipping and cleanup. If you have a cast-iron skillet, even better—it can enhance the crispiness!
- Spatula: A wide spatula is your best friend here. It’s crucial for flipping the pizzadillas without breaking them apart. Trust me, you’ll want to keep all that cheesy goodness intact!
- Measuring Cups: To ensure accurate ingredient quantities for consistent results. Precision is key, especially when it comes to cheese and pepperoni!
- Knife: A sharp knife is recommended for slicing the pizzadillas into wedges for easy serving. You want those slices to look as good as they taste!
- Cutting Board: Provides a safe surface for cutting the pizzadillas. A plastic one is great for easy cleaning, but a wooden board adds a rustic touch to your kitchen.
- Brush: A silicone brush is perfect for applying olive oil evenly on the tortillas. It’s easy to clean and helps you avoid using too much oil.
- Plate: After cooking, let the pizzadillas rest on a plate to prevent sogginess. This resting time allows the cheese to set slightly, making for a better eating experience.
With these tools in hand, you’re well on your way to creating mouthwatering Pepperoni Pizzadillas. Remember, the right preparation strategy can make all the difference in your cooking journey. So, let’s get ready to make some magic happen in the kitchen!
Ingredients & Their Roles in This Pepperoni Pizzadillas
Every ingredient in our Pepperoni Pizzadillas plays a vital role in creating that perfect balance of flavor and texture. Let’s break down each component and explore how they contribute to this delicious dish:
- Tortillas: The foundation of our pizzadillas, tortillas provide the essential structure and delightful crunch. I recommend using large flour tortillas for that classic taste, but if you’re looking for a healthier option, whole wheat or gluten-free tortillas work beautifully as substitutes.
- Cheese: Shredded mozzarella is the star here, known for its incredible meltiness and stretch. If you’re feeling adventurous, you can swap it out for cheddar for a sharper flavor, or even try a dairy-free alternative if you’re catering to dietary restrictions.
- Pepperoni: This iconic topping adds a savory, slightly spicy flavor that elevates the pizzadilla experience. If you prefer a lighter option, turkey pepperoni is a great substitute, or you can omit it entirely for a vegetarian version packed with veggies instead.
- Olive Oil: Essential for frying, olive oil gives the pizzadillas that golden, crispy exterior we all crave. If you’re looking for alternatives, butter or cooking spray can also do the trick, though they may impart different flavors.
- Italian Seasoning: While optional, a sprinkle of Italian seasoning can add a delightful depth of flavor to your pizzadillas. If you don’t have it on hand, feel free to substitute with dried oregano or basil for a similar effect.
- Marinara Sauce: The perfect dipping companion, marinara sauce complements the flavors of the pizzadillas beautifully. You can use store-bought for convenience, or whip up a homemade version for a fresh touch that will impress your guests.
Understanding the role of each ingredient not only enhances your cooking skills but also allows you to customize the pizzadillas to your liking. So, whether you stick to the classic recipe or make it your own, you’re sure to create a dish that’s both satisfying and delicious!
Step-by-Step Guide to Perfect Pepperoni Pizzadillas
Now that you’re all set with the ingredients and tools, let’s dive into the heart of the matter: making these Pepperoni Pizzadillas. Trust me, the process is as satisfying as the end result. Picture this: the aroma of sizzling tortillas fills your kitchen, and the anticipation builds as you watch the cheese melt into a gooey masterpiece. Let’s get started!
- Heat a large skillet over medium heat for about 2-3 minutes. This step is crucial for achieving that perfect golden crust.
- Brush one side of a tortilla with 1 tablespoon of olive oil and place it in the skillet, oiled side down. The oil will help create that irresistible crunch.
- Sprinkle 1/2 cup of shredded mozzarella cheese evenly over the tortilla. Make sure to cover it well, but don’t go overboard—too much cheese can lead to a soggy pizzadilla!
- Add 1/4 cup of pepperoni slices on top of the cheese. The pepperoni will release its savory oils as it cooks, enhancing the flavor.
- If you’re feeling adventurous, sprinkle a pinch of Italian seasoning for an extra layer of flavor.
- Top with another tortilla, oiled side up. This creates a delightful sandwich of flavors and textures.
- Cook for 3-4 minutes until the bottom tortilla is golden brown and the cheese begins to melt. You’ll know it’s ready when you can smell that cheesy goodness!
- Carefully flip the pizzadilla using a spatula and cook for an additional 3-4 minutes until the other side is golden and crispy. This is where the magic happens!
- Remove from the skillet and let it cool for a minute before slicing into wedges. This resting time allows the cheese to set slightly, preventing it from oozing out when you cut it.
- Serve with 1/2 cup of marinara sauce for dipping. Trust me, this is the cherry on top of your pizzadilla experience!
As you embark on this culinary adventure, remember that cooking is as much about the journey as it is about the destination. Enjoy the process, and don’t hesitate to make it your own!
Chef’s Notes & Pro Tips for Flawless Results
As someone who has spent countless hours perfecting the art of pizzadilla-making, I’m excited to share some of my best tips to ensure your Pepperoni Pizzadillas turn out perfectly every time. These little nuggets of wisdom will help you navigate any kitchen challenges and elevate your cooking game!
- Make-ahead: If you’re planning a gathering or just want to save time, you can prepare the pizzadillas in advance. Simply assemble them, refrigerate, and when you’re ready to serve, reheat them in a skillet over medium heat for that fresh, crispy texture.
- Storage: Leftovers? No problem! Store any uneaten pizzadillas in an airtight container in the refrigerator for up to 3 days. Just remember, they’re best enjoyed fresh, so try to eat them up quickly!
- Equipment Recommendations: While any skillet will do, I highly recommend using a cast-iron skillet. It retains heat beautifully and can enhance the crispiness of your pizzadillas, giving them that restaurant-quality crunch.
- Customization Options: Don’t be afraid to get creative! Experiment with different cheeses like pepper jack for a spicy kick, or try adding veggies like bell peppers or mushrooms for a hearty twist. The beauty of pizzadillas is their versatility—make them your own!
With these pro tips in your back pocket, you’ll be well on your way to mastering the art of Pepperoni Pizzadillas. Remember, cooking is all about having fun and making it your own, so don’t hesitate to play around with flavors and techniques!
Avoid These Common Cooking Mistakes
Even the most seasoned cooks can run into a few hiccups when making Pepperoni Pizzadillas. But fear not! I’ve compiled a list of common mistakes to watch out for, along with simple solutions to ensure your pizzadillas turn out perfectly every time. Let’s dive in!
- Using too much cheese: While it’s tempting to pile on the cheese, too much can make the pizzadilla soggy. Stick to the recommended amount of 1/2 cup for the best texture.
- Not preheating the skillet: Skipping this step can lead to uneven cooking and a less-than-crispy crust. Always preheat your skillet for about 2-3 minutes before adding the tortillas.
- Flipping too early: If you flip the pizzadilla before it’s ready, you risk breakage and a mess. Wait until the bottom is golden brown, which usually takes about 3-4 minutes.
- Using cold ingredients: Cold cheese and pepperoni can prevent proper melting, leading to disappointing results. Let your ingredients come to room temperature before assembling your pizzadillas.
- Overcrowding the skillet: Trying to cook too many pizzadillas at once can lead to steaming instead of crisping. If you’re making a batch, cook in batches to ensure each one gets the attention it deserves.
- Not letting the pizzadilla rest: Cutting into a pizzadilla immediately can cause the cheese to ooze out, making a mess. Allow it to cool for about a minute before slicing into wedges.
- Using low-quality tortillas: Cheap tortillas can tear easily, ruining your pizzadilla experience. Choose sturdy, fresh tortillas for the best results.
By keeping these common pitfalls in mind, you’ll be well-equipped to create Pepperoni Pizzadillas that are not only delicious but also visually appealing. Remember, every cooking experience is a chance to learn and improve, so don’t be discouraged by a few bumps along the way!
Creative Variations & Customizations
One of the best things about Pepperoni Pizzadillas is their versatility. You can easily switch up the ingredients to suit your taste or dietary preferences. Here are some creative variations and customizations that will keep your pizzadilla game exciting:
- Vegetarian Pizzadillas: For a meat-free option, substitute the pepperoni with a colorful medley of bell peppers, mushrooms, and fresh spinach. The veggies add a delightful crunch and a burst of flavor, making this a satisfying choice for vegetarians and meat-lovers alike.
- Spicy Pizzadillas: If you like a little heat, kick things up a notch by adding sliced jalapeños or a sprinkle of crushed red pepper flakes. The spicy kick pairs beautifully with the gooey cheese and savory toppings, creating a pizzadilla that packs a punch!
- BBQ Chicken Pizzadillas: For a smoky twist, use shredded chicken mixed with your favorite BBQ sauce instead of pepperoni. The sweet and tangy flavors of the BBQ sauce will transform your pizzadilla into a deliciously different experience that’s sure to impress.
- Breakfast Pizzadillas: Why not enjoy pizzadillas for breakfast? Fill them with scrambled eggs, cheese, and diced ham or your choice of veggies. It’s a hearty way to start the day, and you can even serve them with salsa for an extra kick!
- Caprese Pizzadillas: For a fresh and light option, use slices of fresh mozzarella, ripe tomatoes, and fragrant basil. This combination brings a taste of Italy to your pizzadillas and is perfect for a summer meal or a light lunch.
Feel free to mix and match these ideas or come up with your own unique combinations! The beauty of Pepperoni Pizzadillas lies in their adaptability, so let your creativity shine in the kitchen. No matter how you customize them, you’re bound to create a delicious dish that will have everyone coming back for seconds!
Perfect Pairings: What to Serve With Pepperoni Pizzadillas
When it comes to enjoying Pepperoni Pizzadillas, the right accompaniments can elevate your meal from delicious to unforgettable. Here are some perfect pairings that will complement the flavors and textures of your pizzadillas:
- Marinara Sauce: This classic dipping sauce is a must-have! Its rich, tangy flavor beautifully complements the savory pizzadillas, making each bite even more satisfying.
- Side Salad: A light, refreshing salad provides a crisp contrast to the richness of the pizzadillas. Consider a simple mixed greens salad with a zesty vinaigrette to balance the meal.
- Ranch Dressing: For those who love creamy dips, ranch dressing adds a different flavor profile that pairs wonderfully with the cheesy goodness of the pizzadillas.
- Garlic Bread: Enhance the Italian theme of your meal with some warm, buttery garlic bread. It’s the perfect side to soak up any leftover marinara sauce!
- Pickled Jalapeños: If you enjoy a bit of heat, pickled jalapeños are a fantastic addition. Their tangy spice adds a delightful kick that contrasts nicely with the cheesy pizzadillas.
- Coleslaw: This crunchy side dish provides a refreshing texture and balances the richness of the pizzadillas. A tangy coleslaw can brighten up your plate!
- Iced Tea or Lemonade: Refreshing beverages like iced tea or lemonade are perfect for washing down your pizzadillas. Their coolness complements the warm, cheesy dish beautifully.
- Light Beer: For a casual gathering, a light beer pairs well with the flavors of the pizzadillas. It’s a great choice for those looking to enjoy a laid-back meal with friends.
These pairings not only enhance the overall dining experience but also allow you to create a well-rounded meal that everyone will love. So, gather your favorite sides and drinks, and get ready to enjoy a delightful feast of Pepperoni Pizzadillas!
Storage & Meal Prep Instructions
Now that you’ve created a batch of delicious Pepperoni Pizzadillas, you might be wondering how to store any leftovers or prepare them in advance for a busy week. Don’t worry—I’ve got you covered with some simple storage and meal prep tips that will keep your pizzadillas fresh and tasty!
- Fridge Storage: If you have any leftovers (which is rare, but it happens!), keep them in an airtight container in the refrigerator. They’ll stay fresh for up to 3 days. Just remember to reheat them properly to maintain that crispy texture!
- Freezer Storage: For longer storage, wrap individual pizzadillas in plastic wrap and place them in a freezer-safe bag. They can be stored in the freezer for up to 2 months. This is a great option for meal prepping or when you want a quick snack on hand!
- Reheating Methods: When you’re ready to enjoy your pizzadillas again, the best way to reheat them is in a skillet over medium heat. This method helps restore that crispy exterior while warming the cheese inside. Alternatively, you can use an oven preheated to 350°F and bake them for 10-15 minutes until heated through and crispy.
With these storage and meal prep instructions, you can enjoy your Pepperoni Pizzadillas anytime you crave that cheesy goodness. Whether you’re making them ahead of time or saving leftovers, you’ll always have a delicious treat ready to go!
Nutrition Facts & Health Insights
Understanding the nutritional value of your Pepperoni Pizzadillas can help you enjoy them guilt-free while still savoring every delicious bite. Here’s a breakdown of the nutrition facts per serving, which is one pizzadilla (1/4 of the recipe):
| Nutrient | Amount per Serving |
|---|---|
| Calories | 350 |
| Fat | 20 grams |
| Saturated Fat | 8 grams |
| Unsaturated Fat | 10 grams |
| Trans Fat | 0 grams |
| Cholesterol | 30 milligrams |
| Sodium | 800 milligrams |
| Carbohydrates | 30 grams |
| Fiber | 2 grams |
| Sugar | 2 grams |
| Protein | 12 grams |
Now, let’s talk about the health benefits of these delightful pizzadillas. The combination of cheese and pepperoni provides a good source of protein, which is essential for muscle repair and growth. Each serving contains about 12 grams of protein, making it a satisfying option for a quick meal or snack.
If you opt for whole wheat tortillas, you’ll also gain the added benefit of fiber, which aids in digestion and helps keep you feeling full longer. Fiber is an important part of a balanced diet, and incorporating it into your meals can support overall health.
While Pepperoni Pizzadillas are undeniably indulgent, they can be enjoyed as part of a balanced diet. Pair them with a side salad or some fresh veggies to enhance the nutritional profile of your meal. Remember, moderation is key, and savoring each bite is what makes cooking and eating such a joy!
Frequently Asked Questions
As you embark on your journey to create the perfect Pepperoni Pizzadillas, you might have a few questions along the way. Don’t worry—I’ve got you covered! Here are some of the most frequently asked questions, along with helpful answers to guide you:
- Can I use corn tortillas instead of flour?
Absolutely! Corn tortillas can be used for a gluten-free option, but keep in mind that they may not hold up as well as flour tortillas when it comes to crispiness. If you choose corn tortillas, be gentle when flipping to avoid breakage. - What can I substitute for mozzarella cheese?
If mozzarella isn’t your favorite, you can substitute it with shredded cheddar, pepper jack for a spicy kick, or even a dairy-free cheese alternative if you’re looking for a vegan option. Just ensure that whatever cheese you choose melts well! - How do I make these pizzadillas gluten-free?
To make Pepperoni Pizzadillas gluten-free, simply use gluten-free tortillas. Many brands offer delicious options that mimic the texture of traditional flour tortillas, allowing you to enjoy this dish without the gluten. - Can I bake these instead of frying?
Yes, you can bake them! Preheat your oven to 400°F, place the assembled pizzadillas on a baking sheet, and bake for about 10-15 minutes or until golden and crispy. Just keep an eye on them to prevent burning! - How long can I store leftovers?
Leftover pizzadillas can be stored in an airtight container in the refrigerator for up to 3 days. For longer storage, wrap them individually and freeze for up to 2 months. - What other meats can I use?
Feel free to get creative! You can use shredded chicken, turkey pepperoni, or even crumbled sausage. The key is to choose meats that complement the cheesy goodness of the pizzadillas. - Can I make these pizzadillas in advance?
Yes! You can assemble the pizzadillas ahead of time and refrigerate them. When you’re ready to serve, just reheat them in a skillet over medium heat until crispy and heated through. - What’s the best way to reheat them?
The best way to reheat pizzadillas is in a skillet over medium heat. This method helps restore their crispy texture. Alternatively, you can bake them in a preheated oven at 350°F for about 10-15 minutes. - How can I make them healthier?
To make your pizzadillas healthier, consider using whole wheat or gluten-free tortillas, reducing the amount of cheese, and adding plenty of veggies like spinach, bell peppers, or mushrooms. You can also opt for leaner meats or plant-based proteins. - What dipping sauces work best?
Marinara sauce is a classic choice, but you can also try ranch dressing, garlic butter, or even a spicy salsa for a fun twist. The right dipping sauce can elevate your pizzadilla experience!
With these FAQs answered, you’re well-equipped to tackle any challenges that may arise while making your Pepperoni Pizzadillas. Happy cooking!
Final Inspiration & Kitchen Confidence
As you wrap up your culinary adventure with Pepperoni Pizzadillas, I want to encourage you to let your creativity shine in the kitchen. Don’t be afraid to experiment with different ingredients, flavors, and techniques. Each pizzadilla you make is a canvas waiting for your personal touch! Whether you decide to add extra veggies, try a new cheese, or even create a unique dipping sauce, the possibilities are endless.
Cooking is not just about following a recipe; it’s about expressing yourself and finding joy in the process. There’s something incredibly satisfying about creating a delicious meal from scratch, especially when you share it with loved ones. Remember, every time you step into the kitchen, you’re not just preparing food—you’re crafting memories, sharing love, and bringing people together.
So, I invite you to try this Pepperoni Pizzadilla recipe and make it your own. Once you’ve whipped up a batch, I’d love to see your creations! Share your pizzadilla masterpieces on social media and tag me. Let’s celebrate the joy of cooking together and inspire others to join in on the fun. Happy cooking, and may your kitchen always be filled with laughter and delicious aromas!
Print
Pepperoni Pizzadillas: Crispy, Gooey, Irresistibly Delicious!
- Total Time: 18 minutes
- Yield: 4 servings
- Diet: Gluten-Free option available
Description
Pepperoni Pizzadillas are a delightful fusion of crispy tortillas and gooey melted cheese, bursting with the savory flavor of pepperoni. Each bite offers a satisfying crunch followed by a warm, cheesy interior that tantalizes the taste buds.
Ingredients
- Tortillas: 4 large flour tortillas
- Cheese: 2 cups shredded mozzarella cheese
- Pepperoni: 1 cup sliced pepperoni
- Olive Oil: 2 tablespoons for frying
- Italian Seasoning: 1 teaspoon (optional)
- Marinara Sauce: 1/2 cup for dipping
Instructions
- Heat a large skillet over medium heat.
- Brush one side of a tortilla with olive oil and place it in the skillet, oiled side down.
- Sprinkle 1/2 cup of mozzarella cheese evenly over the tortilla.
- Add 1/4 cup of pepperoni slices on top of the cheese.
- Sprinkle with Italian seasoning if desired.
- Top with another tortilla, oiled side up.
- Cook for 3-4 minutes until the bottom tortilla is golden brown and the cheese begins to melt.
- Carefully flip the pizzadilla and cook for an additional 3-4 minutes until the other side is golden and crispy.
- Remove from the skillet and let it cool for a minute before slicing into wedges.
- Serve with marinara sauce for dipping.
Notes
- Make-ahead: You can prepare the pizzadillas in advance and refrigerate them. Just reheat in a skillet before serving.
- Storage: Store leftovers in an airtight container in the refrigerator for up to 3 days.
- Substitutions: Use whole wheat tortillas for a healthier option or swap pepperoni for vegetables for a vegetarian version.
- Prep Time: 10 minutes
- Cook Time: 8 minutes
- Category: appetizers
- Method: frying
- Cuisine: American
Nutrition
- Serving Size: 1 pizzadilla (1/4 of the recipe)
- Calories: 350
- Sugar: 2 grams
- Sodium: 800 milligrams
- Fat: 20 grams
- Saturated Fat: 8 grams
- Unsaturated Fat: 10 grams
- Trans Fat: 0 grams
- Carbohydrates: 30 grams
- Fiber: 2 grams
- Protein: 12 grams
- Cholesterol: 30 milligrams
Keywords: Pepperoni Pizzadillas, cheesy pizzadillas, easy appetizers, crispy tortillas, pepperoni recipes, quick snacks, party food, Italian-inspired dishes, comfort food, kid-friendly meals, homemade pizzadillas, tortilla recipes, melted cheese, savory snacks, finger foods