
Introduction to Peanut Butter Crunch Fudge Recipe
Ah, fudge! Just the word brings back sweet memories of my childhood. I remember the first time I tasted peanut butter fudge; it was like a warm hug on a chilly day. The creamy texture, the rich flavor of peanut butter, and that delightful crunch—it was love at first bite! Today, I want to share my favorite Peanut Butter Crunch Fudge Recipe with you. This recipe is not just a treat; it’s a celebration of flavors that dance together in perfect harmony.
What I adore about this fudge is how simple it is to make. You don’t need to be a master chef to whip up this delightful dessert. In fact, I often find myself making it on a whim, especially when I have friends over or when I need a little pick-me-up after a long day. The best part? It’s a crowd-pleaser! Every time I serve it, I see smiles and hear compliments, which makes my heart swell with joy.
As I guide you through this recipe, I’ll sprinkle in some personal anecdotes and tips that I’ve gathered over the years. Whether you’re a seasoned cook or just starting your culinary journey, I promise you’ll find this fudge recipe both fun and rewarding. So, grab your apron, and let’s dive into the world of creamy, crunchy, peanut buttery goodness!
Ingredients for Peanut Butter Crunch Fudge Recipe
Before we embark on our fudge-making adventure, let’s gather our ingredients. Having everything ready makes the process smoother and more enjoyable. Trust me, there’s nothing worse than realizing you’re missing a key ingredient halfway through! Here’s what you’ll need for my Peanut Butter Crunch Fudge Recipe.
Main Ingredients
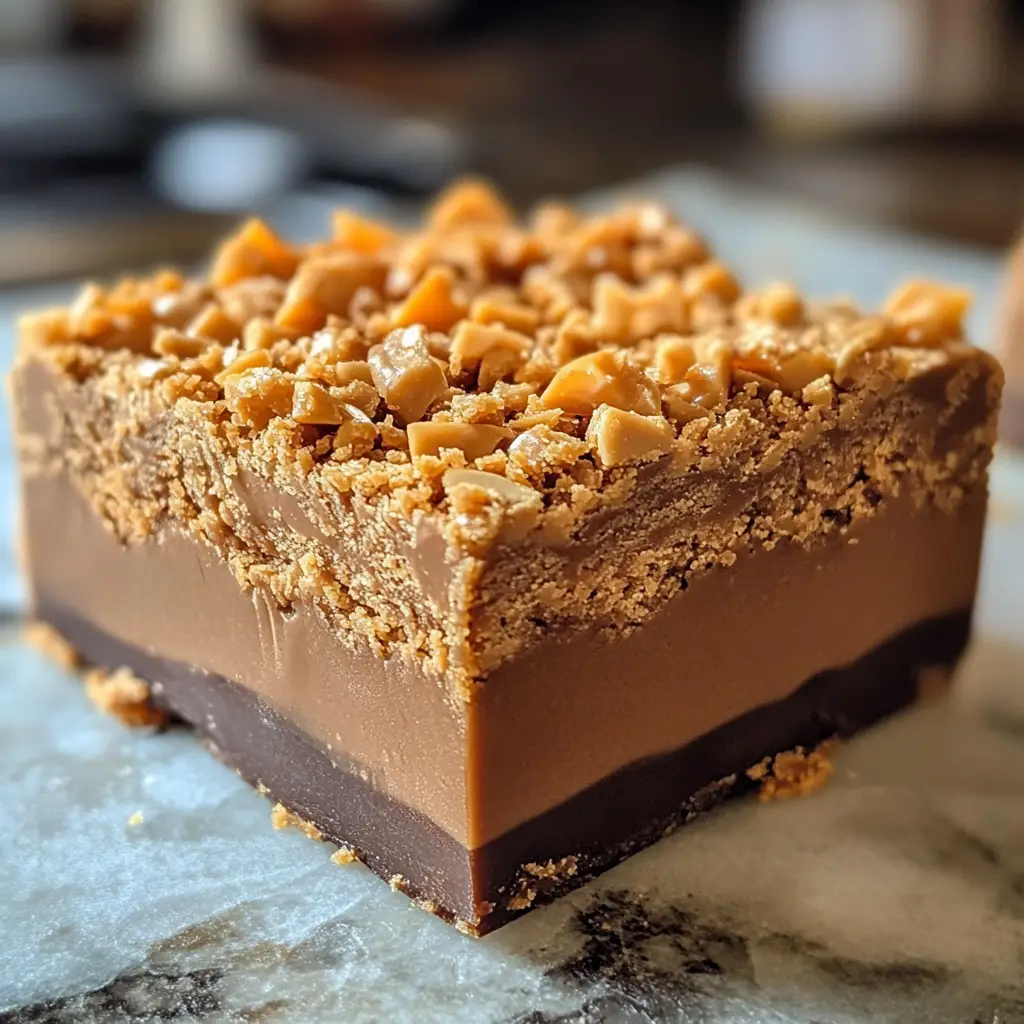
- 1 cup of creamy peanut butter (I prefer natural peanut butter for its rich flavor and smooth texture)
- 2 cups of semi-sweet chocolate chips (choose high-quality chocolate for the best taste)
- 1 can (14 ounces) of sweetened condensed milk (this adds the perfect sweetness and creaminess)
- 1 teaspoon of vanilla extract (for that extra layer of flavor)
- 1 cup of crispy rice cereal (this is what gives our fudge that delightful crunch)
Optional Add-ons
- Chopped nuts (like peanuts or almonds) for an extra crunch
- Mini marshmallows for a chewy texture
- Drizzle of melted chocolate on top for a decorative touch
- Sea salt flakes to sprinkle on top for a sweet and salty contrast
When it comes to sourcing ingredients, I always recommend visiting local markets or health food stores. They often have fresher options, especially for peanut butter and chocolate. Plus, supporting local businesses is a win-win! Remember, the quality of your ingredients can make a world of difference in the final taste of your fudge.
Now that we have our ingredients ready, let’s move on to the fun part—preparing our delicious fudge!
How to Prepare Peanut Butter Crunch Fudge Recipe
Now that we have our ingredients all lined up like eager little soldiers, it’s time to dive into the preparation of our Peanut Butter Crunch Fudge Recipe. I promise, this part is where the magic happens! Follow these steps, and you’ll be on your way to creating a sweet masterpiece that will have everyone asking for seconds.
Step 1: Gather Your Ingredients
First things first, let’s make sure we have everything we need. I like to lay out all my ingredients on the counter. It feels like I’m setting the stage for a delicious performance!
Tips for Step 1
- Double-check your pantry and fridge to avoid any surprises.
- Measure out your ingredients beforehand. This makes mixing easier and more fun!
- Keep a clean workspace. A tidy kitchen is a happy kitchen!
Step 2: Melt the Chocolate
Next, we’ll melt the chocolate chips. I usually do this in a microwave-safe bowl. It’s quick and easy, just like a summer breeze!
Tips for Step 2
- Microwave in 30-second intervals, stirring in between. This prevents the chocolate from burning.
- If you prefer, you can use a double boiler. Just make sure the water doesn’t touch the bowl!
- Keep an eye on it! Melted chocolate should be smooth and glossy, like a shiny new car.
Step 3: Mix in Peanut Butter
Once your chocolate is melted, it’s time to mix in the creamy peanut butter. This is where the magic truly begins! The combination of chocolate and peanut butter is like a match made in heaven.
Tips for Step 3
- Stir the peanut butter into the melted chocolate until fully combined. It should look like a rich, velvety dream!
- If your peanut butter is too thick, you can warm it slightly in the microwave to make mixing easier.
- Don’t be afraid to taste! A little spoonful of this mixture is pure bliss.
Step 4: Add Crunchy Elements
Now comes the fun part—adding the crispy rice cereal! This is what gives our fudge that delightful crunch, making it a textural wonder.
Tips for Step 4
- Gently fold in the crispy rice cereal. You want to keep it light and airy, like a fluffy cloud.
- If you’re adding nuts or marshmallows, now’s the time! Mix them in for an extra layer of flavor.
- Be careful not to overmix. We want those crunchy bits to stay intact!
Step 5: Pour and Set
Finally, it’s time to pour our luscious mixture into a prepared pan. I usually line my pan with parchment paper for easy removal later. It’s like giving our fudge a cozy blanket!
Tips for Step 5
- Spread the mixture evenly in the pan. A spatula works wonders here!
- Let it cool at room temperature for a bit before placing it in the fridge. This helps it set perfectly.
- Once set, you can cut it into squares or rectangles. Just remember to share—if you can resist the temptation!
And there you have it! Your very own batch of Peanut Butter Crunch Fudge is ready to be enjoyed. I can already picture the smiles on everyone’s faces as they take that first bite. Let’s move on to the next section, where we’ll talk about the equipment you’ll need for this delightful recipe!
Equipment Needed for Peanut Butter Crunch Fudge Recipe
Before we dive into the delicious world of fudge, let’s make sure we have the right tools at our disposal. Having the right equipment can make the process smoother and more enjoyable. Here’s what you’ll need for my Peanut Butter Crunch Fudge Recipe.
- Microwave-safe bowl: This is perfect for melting your chocolate. If you don’t have one, a regular bowl can work, but be cautious with the heat.
- Spatula: A silicone spatula is my go-to for mixing and spreading. It’s flexible and helps scrape every last bit of that delicious fudge!
- 9×9-inch baking pan: This is ideal for setting your fudge. If you don’t have one, a similar-sized dish will do just fine.
- Parchment paper: Lining your pan with parchment makes it easy to lift the fudge out later. If you’re out of parchment, you can lightly grease the pan instead.
- Measuring cups and spoons: Accurate measurements are key to a successful fudge. If you don’t have measuring tools, you can use a standard cup or spoon, but keep in mind that results may vary.
With these tools in hand, you’re all set to create your own batch of Peanut Butter Crunch Fudge. Remember, cooking is all about improvisation, so feel free to adapt as needed. Now, let’s move on to the next exciting part—variations of this delightful recipe!
Variations of Peanut Butter Crunch Fudge Recipe
While I absolutely adore the classic Peanut Butter Crunch Fudge Recipe, there’s something thrilling about experimenting with different flavors and textures. Each variation brings its own unique twist, making it a fun adventure in the kitchen! Here are a few delightful ideas to inspire your fudge-making journey:
- Chocolate Mint Fudge: Add a few drops of peppermint extract to the melted chocolate for a refreshing minty flavor. It’s like a cool breeze on a warm day!
- Nutty Delight: Swap out the crispy rice cereal for crushed nuts like walnuts or pecans. This adds a rich, earthy flavor that pairs beautifully with peanut butter.
- Fruit Fusion: Mix in dried fruits like cranberries or cherries for a burst of sweetness. The chewy texture complements the creamy fudge perfectly!
- Spicy Kick: For those who love a little heat, add a pinch of cayenne pepper or chili powder. It’s a surprising twist that will leave your taste buds dancing!
- Vegan Version: Use dairy-free chocolate chips and coconut milk instead of sweetened condensed milk. You’ll still get that creamy goodness without any animal products!
These variations are just the tip of the iceberg! Feel free to get creative and mix in your favorite ingredients. After all, cooking is all about expressing yourself and having fun. Now, let’s move on to some important cooking notes to ensure your fudge turns out perfectly every time!
Cooking Notes for Peanut Butter Crunch Fudge Recipe
As I’ve learned through my culinary adventures, a few cooking notes can make all the difference in achieving that perfect batch of Peanut Butter Crunch Fudge. Here are some tips I’ve gathered over the years that will help you navigate the fudge-making process with ease:
- Room Temperature Ingredients: Make sure your peanut butter and sweetened condensed milk are at room temperature. This helps them blend smoothly with the melted chocolate, creating a luscious texture.
- Don’t Rush the Cooling: Allow your fudge to cool at room temperature before refrigerating. This step is crucial for achieving the right consistency. If you rush it, you might end up with a gooey mess!
- Storage Tips: Store your fudge in an airtight container at room temperature for up to a week. If you want to keep it longer, refrigerate it for up to two weeks. Just be sure to let it come to room temperature before serving for the best flavor!
- Cutting the Fudge: Use a sharp knife to cut your fudge into squares. Warming the knife slightly under hot water can help make cleaner cuts. It’s like giving your fudge a neat little haircut!
- Experiment with Toppings: Feel free to get creative with toppings! A sprinkle of crushed nuts, a drizzle of chocolate, or even a dusting of cocoa powder can elevate your fudge to a whole new level.
With these cooking notes in your back pocket, you’re well on your way to creating a delightful batch of fudge that will impress everyone. Now, let’s explore some serving suggestions to make your fudge even more irresistible!
Serving Suggestions for Peanut Butter Crunch Fudge Recipe
Now that our Peanut Butter Crunch Fudge is ready, it’s time to think about how to serve it! Presentation can elevate your dessert from simple to spectacular, and I love to get a little creative when it comes to serving. Here are some of my favorite ideas that will make your fudge the star of any gathering:
- Fudge Platter: Arrange your fudge squares on a beautiful platter, mixing in some fresh fruits like strawberries or banana slices. The vibrant colors create a feast for the eyes!
- Ice Cream Sundae: Top a scoop of vanilla or chocolate ice cream with warm fudge. Drizzle some chocolate sauce and sprinkle crushed nuts for a decadent treat!
- Gift Boxes: Cut the fudge into bite-sized pieces and package them in cute little boxes or bags. They make perfect homemade gifts for friends and family!
- Coffee Pairing: Serve your fudge alongside a cup of freshly brewed coffee or a rich hot chocolate. The combination is simply heavenly!
- Party Treats: Cut the fudge into fun shapes using cookie cutters for a festive touch. This is especially great for birthdays or holiday celebrations!
These serving suggestions not only enhance the experience but also allow you to share the joy of your homemade fudge with others. I can already imagine the smiles and laughter as everyone enjoys this delightful treat. Now, let’s move on to some tips for perfecting your fudge-making skills!
Tips for Perfecting Peanut Butter Crunch Fudge Recipe
As I’ve whipped up countless batches of my Peanut Butter Crunch Fudge Recipe, I’ve gathered a treasure trove of tips that can help you achieve fudge perfection every time. Here are some of my favorite nuggets of wisdom that I hope will make your fudge-making journey even more delightful:
- Quality Matters: Always opt for high-quality chocolate and peanut butter. The better the ingredients, the richer and more delicious your fudge will be. It’s like choosing the finest paint for a masterpiece!
- Don’t Overheat: When melting chocolate, be patient. Overheating can lead to a grainy texture. Remember, slow and steady wins the race!
- Chill Out: After pouring your fudge into the pan, let it cool at room temperature before refrigerating. This helps it set evenly and prevents it from becoming too hard.
- Experiment with Flavors: Don’t hesitate to play around with different flavors and add-ins. A little cinnamon or a splash of almond extract can take your fudge to new heights!
- Share the Love: Fudge is best enjoyed with friends and family. Don’t forget to share your delicious creation! The joy of cooking is in the smiles it brings.
With these tips in your back pocket, you’re well-equipped to create a batch of fudge that will leave everyone craving more. Now, let’s take a quick look at the time breakdown for making this delightful treat!
Breakdown of Time for Peanut Butter Crunch Fudge Recipe
Now that we’ve covered all the delicious details of making my Peanut Butter Crunch Fudge Recipe, let’s talk about the time it takes to whip up this sweet treat. Knowing the time breakdown can help you plan your fudge-making adventure better. Here’s how it all adds up:
- Prep Time: 15 minutes. This includes gathering your ingredients, measuring them out, and getting everything ready for mixing. It’s like setting the stage for a delightful performance!
- Cooking Time: 10 minutes. This is the time it takes to melt the chocolate and mix in the peanut butter and crunchy elements. It’s a quick and easy process that will have your kitchen smelling heavenly!
- Total Time: 25 minutes (not including cooling time). In just under half an hour, you can have your fudge mixture ready to set. Just remember, the cooling time will vary depending on how you choose to set it!
So, in just a short amount of time, you can create a batch of delicious fudge that will impress your friends and family. It’s perfect for those moments when you need a sweet treat in a hurry. Now, let’s move on to the nutritional information to help you keep track of those tasty bites!
Nutritional Information for Peanut Butter Crunch Fudge Recipe
As a passionate home cook, I believe it’s important to enjoy our treats while being mindful of what we’re eating. My Peanut Butter Crunch Fudge Recipe is not only delicious but also offers a delightful balance of flavors and nutrients. Here’s a quick breakdown of the nutritional information per serving (assuming you cut the fudge into 16 squares):
- Calories: Approximately 150 calories
- Fat: 9 grams (mostly healthy fats from peanut butter)
- Carbohydrates: 15 grams
- Protein: 3 grams
- Sugar: 10 grams (from sweetened condensed milk and chocolate)
- Fiber: 1 gram
While this fudge is a treat, it’s also packed with protein and healthy fats from the peanut butter, making it a satisfying snack. Just remember, moderation is key! Enjoying a piece or two will surely bring a smile to your face without derailing your healthy eating goals. Now that we’ve covered the nutritional side, let’s move on to some frequently asked questions about this delightful fudge!
Frequently Asked Questions about Peanut Butter Crunch Fudge Recipe
As I’ve shared my Peanut Butter Crunch Fudge Recipe with friends and family, I’ve noticed a few common questions pop up. It’s always great to clarify any doubts, especially when it comes to creating such a delicious treat! Here are some of the most frequently asked questions, along with my answers to help you on your fudge-making journey.
Can I use natural peanut butter instead of regular peanut butter?
Absolutely! I often use natural peanut butter in my fudge. It adds a rich flavor and creamy texture. Just make sure to stir it well before measuring, as natural peanut butter can separate.
How long does the fudge need to set?
Typically, I let my fudge set in the fridge for about 2-3 hours. However, if you’re in a hurry, you can let it cool at room temperature for about 30 minutes before refrigerating. Just remember, the longer it sets, the firmer it will become!
Can I freeze the fudge for later?
Yes, you can freeze your fudge! Just wrap it tightly in plastic wrap and then place it in an airtight container. It can last in the freezer for up to 3 months. When you’re ready to enjoy it, let it thaw in the fridge overnight.
What can I substitute for sweetened condensed milk?
If you’re looking for a substitute, you can use coconut milk mixed with a bit of sugar. Alternatively, you can make your own by simmering milk and sugar until it thickens. Just keep in mind that the flavor may vary slightly!
Can I add other flavors to the fudge?
Definitely! I love experimenting with flavors. You can add extracts like almond or mint, or even mix in spices like cinnamon. The possibilities are endless, so feel free to get creative!
These questions are just a glimpse into the wonderful world of fudge-making. If you have any more questions or need further clarification, don’t hesitate to reach out! Now that we’ve covered the FAQs, let’s wrap up our delicious adventure with a sweet conclusion.
Conclusion on Peanut Butter Crunch Fudge Recipe
As we wrap up our delightful journey through the world of my Peanut Butter Crunch Fudge Recipe, I can’t help but feel a sense of joy. This recipe is more than just a sweet treat; it’s a celebration of flavors, memories, and the simple pleasure of cooking. The creamy peanut butter, rich chocolate, and satisfying crunch come together to create a dessert that’s not only delicious but also incredibly easy to make.
What I love most about this fudge is its versatility. Whether you’re whipping it up for a cozy night in, a festive gathering, or as a thoughtful gift, it never fails to bring smiles and compliments. Plus, with the option to customize it with various add-ins and flavors, you can make it uniquely yours!
So, the next time you’re in need of a quick and satisfying dessert, remember this recipe. It’s a sweet reminder that cooking can be fun, rewarding, and a wonderful way to share love with those around you. I hope you enjoy making and sharing this fudge as much as I do. Happy cooking!


