No-Bake Chocolate Peanut Butter Cookies: Creamy Bliss Awaits!
Sensory-Rich Introduction with Immediate Craving
Imagine sinking your teeth into a cookie that combines the rich, velvety texture of creamy peanut butter with the indulgent sweetness of chocolate. As you take a bite, the delightful crunch of rolled oats adds a satisfying contrast, while a hint of vanilla dances on your palate. These No-Bake Chocolate Peanut Butter Cookies are not just a treat; they are a nostalgic reminder of childhood afternoons spent in the kitchen, crafting sweet delights with loved ones. Perfect for any occasion—from casual gatherings to festive celebrations—these cookies are sure to evoke joy and satisfaction, making them a must-have in your dessert repertoire.
Why You’ll Love This No-Bake Chocolate Peanut Butter Cookies
- Texture Contrast: The combination of creamy peanut butter and crunchy oats creates a delightful mouthfeel that keeps each bite interesting.
- Flavor Balance: The sweetness of honey or maple syrup perfectly complements the rich cocoa, while the vanilla extract adds a subtle warmth.
- Versatility: These cookies can be customized with various mix-ins, making them suitable for different tastes and dietary preferences.
- Ease of Preparation: With just a few simple steps and no baking required, these cookies are quick to whip up, even for novice bakers.
- Universal Appeal: Loved by both kids and adults, these cookies are a crowd-pleaser that can be enjoyed by everyone, regardless of dietary restrictions.
Essential Tools & Preparation Strategy
- Medium Saucepan: Essential for melting and mixing the ingredients smoothly.
- Wooden Spoon or Spatula: Necessary for stirring the mixture and ensuring even consistency.
- Measuring Cups: To ensure accurate ingredient quantities for the perfect cookie texture.
- Measuring Spoons: For precise measurements of smaller ingredients like vanilla extract and cocoa powder.
- Parchment Paper: Prevents sticking and makes cleanup a breeze, ensuring your cookies come off the baking sheet easily.
- Refrigerator: Crucial for setting the cookies to achieve the right texture and firmness.
- Cookie Scoop or Tablespoon: Helpful for portioning the cookie dough evenly for uniform cookies.
- Mixing Bowl: Optional, but useful for combining ingredients before transferring to the saucepan.
Ingredients & Their Roles in This No-Bake Chocolate Peanut Butter Cookies
- Creamy Peanut Butter: The star ingredient that provides richness and binds the cookies together.
- Honey or Maple Syrup: Acts as a natural sweetener and helps to hold the mixture together.
- Unsweetened Cocoa Powder: Adds a deep chocolate flavor without additional sugar.
- Vanilla Extract: Enhances the overall flavor profile with a warm, aromatic note.
- Rolled Oats: Provides texture and a wholesome element, making the cookies hearty.
- Chocolate Chips (optional): Adds extra chocolatey goodness and a delightful surprise in every bite.
Substitutions & Preparation Notes
- Peanut Butter: Almond butter or cashew butter can be used for a different flavor profile.
- Sweeteners: Agave syrup can be substituted for honey or maple syrup for a vegan option.
- Oats: Quick oats can be used in place of rolled oats, but the texture may vary slightly.
Step-by-Step Guide to Perfect No-Bake Chocolate Peanut Butter Cookies
- Combine Ingredients: In a medium saucepan, mix together the peanut butter, honey (or maple syrup), cocoa powder, and vanilla extract over medium heat. Stir until smooth, about 2-3 minutes.
- Incorporate Oats: Remove the saucepan from heat and stir in the rolled oats until fully combined.
- Add Chocolate Chips: If desired, fold in the chocolate chips until evenly distributed throughout the mixture.
- Scoop the Mixture: Using a tablespoon or cookie scoop, portion out the mixture and drop it onto a parchment-lined baking sheet.
- Flatten Cookies: Gently flatten each cookie with the back of a fork to create an even texture.
- Chill to Set: Refrigerate the cookies for at least 30 minutes to allow them to firm up before serving.
Chef’s Notes & Pro Tips for Flawless Results
- Make-Ahead Instructions: These cookies can be prepared in advance and stored in an airtight container in the refrigerator for up to one week.
- Storage: Keep cookies in the fridge to maintain their texture, or freeze for longer storage.
- Equipment Recommendations: A non-stick saucepan is ideal to prevent sticking and ensure easy cleanup.
- Customization Options: Experiment with different add-ins like nuts, dried fruits, or seeds for added flavor and nutrition.
Avoid These Common Cooking Mistakes
- Not Measuring Ingredients Accurately: Can lead to a dry or overly sticky mixture. Always use measuring cups and spoons.
- Overheating the Mixture: Can cause the peanut butter to separate. Heat just until smooth.
- Skipping the Refrigeration Step: Results in cookies that are too soft. Always chill for at least 30 minutes.
- Using Natural Peanut Butter Without Stirring: Can lead to a gritty texture. Stir well before measuring.
- Not Using Parchment Paper: Can cause cookies to stick. Always line your baking sheet.
- Adding Too Many Chocolate Chips: Can overwhelm the flavor. Stick to the recommended amount.
- Not Flattening the Cookies: Can result in uneven texture. Flatten slightly for even cooking.
Creative Variations & Customizations
- Nut-Free Version: Substitute peanut butter with sunflower seed butter for a nut-free alternative.
- Vegan Option: Use maple syrup instead of honey and ensure chocolate chips are dairy-free.
- Seasonal Twist: Add pumpkin spice for a fall-inspired flavor or peppermint extract for a festive touch.
- Protein Boost: Mix in a scoop of protein powder for a nutritious snack.
- Fruit-Infused: Incorporate dried fruits like cranberries or raisins for added sweetness and texture.
Perfect Pairings: What to Serve With No-Bake Chocolate Peanut Butter Cookies
- Cold Almond Milk: A refreshing drink that complements the rich flavors of the cookies.
- Fresh Fruit: Strawberries or bananas provide a refreshing contrast to the sweetness.
- Vanilla Ice Cream: An indulgent pairing that elevates the dessert experience.
- Coffee or Espresso: Enhances the chocolate flavor and provides a delightful contrast.
- Sea Salt Sprinkle: A touch of salt on top creates a sweet and salty experience.
- Whipped Cream: Adds an extra layer of creaminess to the cookies.
- Lemonade: Perfect for summer picnics, balancing the sweetness with a citrusy zing.
- Nutty Granola: Offers a crunchy texture contrast that pairs well with the soft cookies.
Storage & Meal Prep Instructions
- Refrigeration: Store cookies in an airtight container in the fridge for up to one week.
- Freezing: For longer storage, freeze cookies in a single layer, then transfer to a freezer-safe bag for up to three months.
- Reheating: Enjoy cookies cold or let them sit at room temperature for a few minutes before serving.
Nutrition Facts & Health Insights
| Nutrient | Amount per Cookie |
|---|---|
| Calories | 150 |
| Sugar | 8 grams |
| Sodium | 50 milligrams |
| Fat | 8 grams |
| Saturated Fat | 2 grams |
| Unsaturated Fat | 6 grams |
| Trans Fat | 0 grams |
| Carbohydrates | 15 grams |
| Fiber | 2 grams |
| Protein | 4 grams |
| Cholesterol | 0 milligrams |
Health Benefits of Key Ingredients
- Peanut Butter: Rich in protein and healthy fats, providing sustained energy.
- Oats: High in fiber, promoting digestive health and keeping you full longer.
- Cocoa Powder: Contains antioxidants that may improve heart health.
Frequently Asked Questions
- Can I use crunchy peanut butter instead of creamy?Yes, crunchy peanut butter will add extra texture to the cookies.
- How long do these cookies last?They can be stored in the refrigerator for up to one week.
- Can I make these cookies gluten-free?Yes, ensure you use certified gluten-free oats.
- What can I substitute for honey?Maple syrup or agave syrup can be used as alternatives.
- Can I add protein powder to the recipe?Yes, you can mix in a scoop of protein powder for added nutrition.
- Is it necessary to refrigerate the cookies?Yes, refrigeration helps them set and achieve the right texture.
- Can I use a different sweetener?Yes, you can experiment with different natural sweeteners.
- What if my mixture is too dry?Add a little more peanut butter or sweetener to achieve the right consistency.
Final Inspiration & Kitchen Confidence
As you embark on your journey to create these No-Bake Chocolate Peanut Butter Cookies, remember that cooking is not just about following a recipe; it’s about expressing creativity and sharing joy with others. Celebrate your achievements in the kitchen, and don’t hesitate to experiment with flavors and textures. With each batch, you’ll gain confidence and discover new ways to enjoy this delightful treat. So gather your ingredients, roll up your sleeves, and let the creamy bliss of these cookies inspire you to create delicious memories!
Print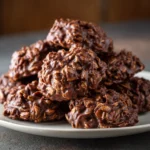
No-Bake Chocolate Peanut Butter Cookies: Creamy Bliss Awaits!
- Total Time: 45 minutes
- Yield: 12 cookies 1x
- Diet: Gluten-Free, Vegetarian
Description
Indulge in the rich, creamy texture of these No-Bake Chocolate Peanut Butter Cookies, where the smoothness of peanut butter meets the decadent sweetness of chocolate. Each bite offers a delightful crunch from the oats, perfectly balanced with a hint of vanilla, creating a heavenly treat that melts in your mouth.
Ingredients
- 1 cup creamy peanut butter
- 1/2 cup honey or maple syrup
- 1/4 cup unsweetened cocoa powder
- 1 teaspoon vanilla extract
- 2 cups rolled oats
- 1/4 cup chocolate chips (optional)
Instructions
- In a medium saucepan, combine the peanut butter, honey (or maple syrup), cocoa powder, and vanilla extract over medium heat. Stir until the mixture is smooth and well combined, about 2-3 minutes.
- Remove the saucepan from heat and stir in the rolled oats until fully incorporated.
- If using, fold in the chocolate chips until evenly distributed.
- Using a tablespoon, scoop the mixture and form into balls or drop onto a parchment-lined baking sheet.
- Flatten each cookie slightly with the back of a fork.
- Refrigerate for at least 30 minutes to set before serving.
Notes
- These cookies can be made ahead of time and stored in an airtight container in the refrigerator for up to one week.
- For a vegan option, use maple syrup instead of honey.
- Feel free to substitute almond butter or cashew butter for a different flavor profile.
- Prep Time: 10 minutes
- Cook Time: 5 minutes
- Category: desserts
- Method: no-bake
- Cuisine: American
Nutrition
- Serving Size: 1 cookie
- Calories: 150
- Sugar: 8 grams
- Sodium: 50 milligrams
- Fat: 8 grams
- Saturated Fat: 2 grams
- Unsaturated Fat: 6 grams
- Trans Fat: 0 grams
- Carbohydrates: 15 grams
- Fiber: 2 grams
- Protein: 4 grams
- Cholesterol: 0 milligrams
Keywords: No-Bake Chocolate Peanut Butter Cookies, easy dessert recipes, gluten-free cookies, quick snacks, chocolate treats, peanut butter recipes, no-bake desserts, healthy cookies, vegetarian snacks, simple cookie recipes, homemade cookies, chocolate peanut butter, no-bake chocolate treats