Sensory-Rich Introduction with Immediate Craving
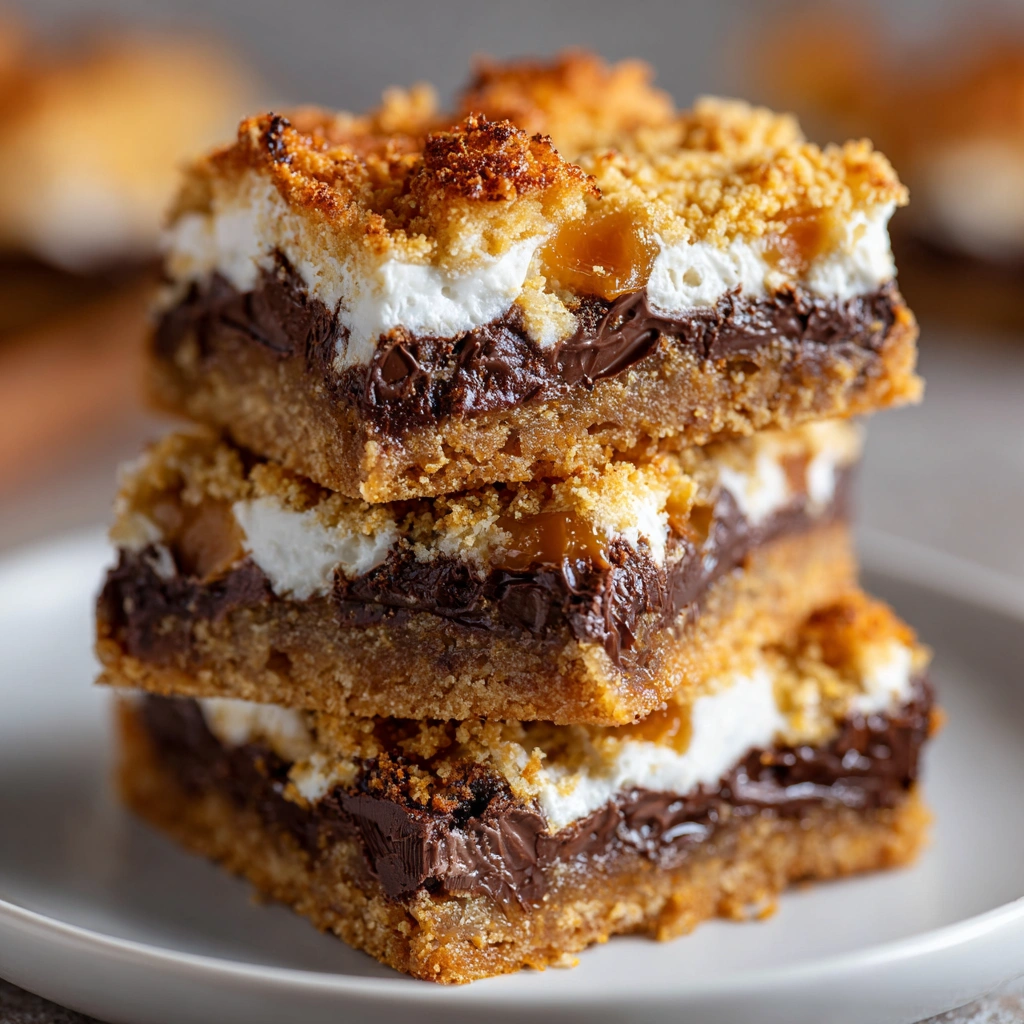
Imagine biting into a Millionaire Magic Bar—the moment your teeth sink through the layers, you’re greeted by the rich, velvety chocolate that melts in your mouth, followed by the sweet, creamy caramel that oozes with every bite. The crunchy nuts add a delightful contrast, while the buttery graham cracker crust cradles it all together, creating a symphony of textures and flavors that dance on your palate. It’s a dessert that doesn’t just satisfy your sweet tooth; it envelops you in a warm embrace of nostalgia and comfort.
These bars hold a special place in my heart, as they were a staple at family gatherings growing up. I remember my grandmother, with her flour-dusted apron, whipping up a batch every holiday season. The aroma of melting chocolate and toasting nuts would fill the kitchen, drawing us in like moths to a flame. We’d gather around the table, eagerly waiting for her to cut the bars into squares, each piece a treasure waiting to be devoured. It was more than just a dessert; it was a moment of connection, laughter, and love shared among family.
Whether it’s a birthday party, a potluck, or simply a cozy evening at home, these Millionaire Magic Bars are the perfect treat to share with loved ones. They bring joy to any occasion, transforming ordinary moments into cherished memories. So, grab your apron and let’s create something magical together—because every bite is a reminder of the sweetness life has to offer, especially on those rainy days when all you need is a little indulgence.
Why You’ll Love This Millionaire Magic Bars
Let me tell you, there’s something truly special about Millionaire Magic Bars that keeps me coming back for more. It’s not just the taste; it’s the entire experience that makes these bars a beloved treat in my kitchen.
Texture Contrast
First off, the texture contrast is simply divine. You start with a delightful crunch from the buttery graham cracker crust, which provides a sturdy base. Then, as you bite into the layers, you’re met with the gooey filling that oozes chocolate and caramel, creating a heavenly combination that’s both satisfying and indulgent. It’s like a party in your mouth, and everyone’s invited!
Flavor Balance
The flavor balance is another reason to love these bars. The rich, semi-sweet chocolate chips meld beautifully with the buttery butterscotch chips, creating a sweet symphony that dances on your taste buds. Add in the nutty crunch from the pecans or walnuts, and you have a harmonious blend of flavors that’s hard to resist. Each bite is a perfect balance of sweetness and richness, making it a true crowd-pleaser.
Versatility
One of the best parts about Millionaire Magic Bars is their versatility. You can easily customize them to suit your taste preferences or dietary needs. Want to swap out the nuts? Go for it! Prefer dark chocolate over semi-sweet? Absolutely! The possibilities are endless, allowing you to make these bars uniquely yours.
Ease of Preparation
Let’s not forget how easy they are to prepare. With just a few simple steps, you can whip up a batch of these decadent bars in no time. Even if you’re a beginner in the kitchen, I promise you’ll feel like a pro as you layer the ingredients and watch them transform into a delicious dessert. It’s a great way to build your baking confidence!
Universal Appeal
Finally, the universal appeal of Millionaire Magic Bars is undeniable. They’re a hit with kids and adults alike, making them the perfect dessert for any occasion. Whether you’re serving them at a birthday party, a family gathering, or just enjoying them on a quiet evening at home, these bars are sure to bring smiles and satisfaction to everyone who takes a bite.
So, if you’re looking for a dessert that combines texture, flavor, and ease of preparation, look no further than these Millionaire Magic Bars. Trust me, once you try them, you’ll understand why they hold a special place in my heart—and why they’ll soon hold a special place in yours too!
Essential Tools & Preparation Strategy
Before diving into the delicious world of Millionaire Magic Bars, let’s gather our essential tools and set ourselves up for success. Trust me, having the right equipment makes all the difference in achieving that perfect gooey texture and rich flavor.
- Mixing Bowl: A large mixing bowl is essential for combining the crust ingredients. I always opt for a glass bowl; it’s sturdy and allows me to see the mixture’s consistency.
- 9×13 inch Baking Pan: This is the perfect size for baking and serving the bars. I recommend using a non-stick pan or lining it with parchment paper for easy removal.
- Measuring Cups and Spoons: Accurate measurements are crucial for the right texture and flavor. I can’t stress enough how important it is to measure precisely, especially with the graham cracker crumbs and butter.
- Rubber Spatula: This tool is ideal for spreading the crust and layering the ingredients evenly. Plus, it’s great for scraping down the sides of the bowl to ensure nothing goes to waste!
- Oven Mitts: Protect your hands when handling hot pans. I always keep a pair handy, as I tend to get a bit too eager when it comes to checking on my baked goods.
- Cooling Rack: A cooling rack helps cool the bars evenly and prevents sogginess. Trust me, letting them cool properly is key to achieving that perfect cut.
- Parchment Paper (optional): If you want to make removal a breeze, line your baking pan with parchment paper. It’s a little trick I learned from my grandmother, and it works like a charm!
Ingredients & Their Roles in This Millionaire Magic Bars
Now that we have our tools ready, let’s talk about the star players in this recipe. Each ingredient plays a vital role in creating the layers of flavor and texture that make these bars so irresistible.
Crust:
- Graham cracker crumbs: They provide a sweet, crunchy base that perfectly complements the gooey filling. The aroma of freshly crushed graham crackers brings back memories of summer picnics and campfire s’mores.
- Unsalted butter: This binds the crust together and adds richness. Make sure it’s melted for the best results! The buttery scent wafting through your kitchen will have everyone eagerly anticipating dessert.
- Granulated sugar: Enhances sweetness and flavor, giving the crust that delightful touch. Just a little sugar goes a long way in elevating the overall taste of the bars.
Filling:
- Semi-sweet chocolate chips: They add a rich chocolate flavor that’s hard to resist. The moment they melt in the oven, they create a luscious layer that’s simply divine.
- Butterscotch chips: Introduce a sweet, buttery taste that balances the chocolate beautifully. Their golden hue adds a lovely visual appeal to the layers.
- Sweetened shredded coconut: Adds chewiness and texture, making each bite a delightful experience. The coconut brings a tropical twist that brightens the overall flavor profile.
- Chopped pecans or walnuts: Provide crunch and nutty flavor, enhancing the overall taste. The nutty aroma as they bake is simply irresistible!
- Sweetened condensed milk: Acts as a binding agent and adds creaminess, ensuring everything holds together. It’s the secret ingredient that transforms these bars into a gooey masterpiece.
Substitutions:
If you’re looking to customize your bars, here are a few ideas:
- Substitute almond flour for graham cracker crumbs for a gluten-free version. This will still give you that delightful texture without compromising on flavor.
- Use dark chocolate for a richer taste if you prefer a more intense chocolate flavor. It adds a sophisticated twist that chocolate lovers will adore.
Step-by-Step Guide to Perfect Millionaire Magic Bars
Now that we have our ingredients and tools ready, it’s time to bring our Millionaire Magic Bars to life! Follow these simple steps, and you’ll be well on your way to creating a dessert that’s sure to impress.
- Preheat your oven: Start by preheating your oven to 350°F (175°C). This ensures that your bars bake evenly and achieve that perfect golden-brown finish.
- Mix the crust: In a mixing bowl, combine 1 ½ cups of graham cracker crumbs, ½ cup of melted unsalted butter, and ¼ cup of granulated sugar until well mixed. The mixture should resemble wet sand, and the buttery aroma will have you dreaming of the delicious layers to come!
- Form the crust: Press the mixture firmly into the bottom of a greased 9×13 inch baking pan. Make sure to pack it tightly; this will create a sturdy base for your bars. I like to use the bottom of a measuring cup to get an even layer.
- Add the filling: Sprinkle 1 cup of semi-sweet chocolate chips, 1 cup of butterscotch chips, 1 cup of sweetened shredded coconut, and 1 cup of chopped pecans or walnuts evenly over the crust. The colorful layers will make your heart sing with anticipation!
- Pour the sweetened condensed milk: Gently pour 1 can (14 oz) of sweetened condensed milk evenly over the top of the layered ingredients. This magical ingredient binds everything together and adds that irresistible creaminess.
- Bake to perfection: Place the pan in the preheated oven and bake for 25-30 minutes, or until the edges are golden brown and the center is set. Keep an eye on them; the aroma wafting through your kitchen will be hard to resist!
- Cool and cut: Once baked, allow the bars to cool completely in the pan before cutting them into squares. This step is crucial; cutting too soon can lead to messy bars. Patience is key here, my friend!
And there you have it! Follow these steps, and you’ll be rewarded with a batch of Millionaire Magic Bars that are not only delicious but also a joy to share with family and friends. Trust me, they won’t last long!
Chef’s Notes & Pro Tips for Flawless Results
As you embark on your journey to create the perfect Millionaire Magic Bars, I want to share some of my favorite tips and tricks that have helped me achieve delicious results every time. These little nuggets of wisdom can make all the difference in your baking experience!
Make-ahead Instructions
If you’re anything like me, you love the idea of having dessert ready to go. One of the best things about these bars is that you can prepare them a day in advance. This not only saves you time but also allows the flavors to meld beautifully, enhancing the overall taste. Just be sure to store them in an airtight container to keep them fresh!
Storage
To keep your Millionaire Magic Bars at their best, store them in an airtight container at room temperature for up to one week. If you want to extend their shelf life, you can freeze them for up to three months. Just wrap the bars tightly in plastic wrap and then in foil to prevent freezer burn. When you’re ready to enjoy, simply thaw them in the refrigerator overnight. Trust me, they’ll taste just as good as the day you made them!
Equipment Recommendations
For even baking and easy removal, I highly recommend using a glass baking dish. Glass conducts heat more evenly than metal, which helps prevent overbaking. Plus, you can see the beautiful layers as they bake! If you don’t have a glass dish, a non-stick metal pan will work just fine—just be sure to grease it well.
Customization Options
The beauty of Millionaire Magic Bars lies in their versatility. Feel free to experiment with different nuts based on your preference or what you have on hand. Almonds, macadamia nuts, or even hazelnuts can add a delightful twist. If you’re feeling extra indulgent, consider adding a layer of caramel sauce between the chocolate and coconut for an even richer flavor. The possibilities are endless, and that’s what makes these bars so fun to make!
With these tips in your back pocket, you’re well on your way to creating a batch of Millionaire Magic Bars that will impress everyone. Happy baking!
Avoid These Common Cooking Mistakes
As you embark on your journey to create the perfect Millionaire Magic Bars, it’s essential to be aware of some common pitfalls that can hinder your baking success. Trust me, I’ve made these mistakes myself, and I want to save you from the same fate! Here are the key things to watch out for:
- Not pressing the crust firmly enough: This can lead to a crumbly base that falls apart when you cut into it. Make sure to pack it tightly into the pan; I like to use the bottom of a measuring cup to get an even layer.
- Overbaking: It’s easy to get distracted while baking, but overbaking can dry out the bars. Keep an eye on them and look for a golden edge with a slightly soft center. They will continue to set as they cool!
- Using cold butter: Cold butter can prevent the crust from binding properly, leading to a crumbly texture. Always melt the butter before mixing it with the graham cracker crumbs for the best results.
- Skipping the cooling step: I know the temptation to dive right in, but cutting the bars too soon can lead to messy squares. Allow them to cool completely in the pan before slicing; patience is key!
- Not using enough filling: If you skimp on the filling, you may end up with a dry bar. Be sure to layer all ingredients as specified in the recipe to achieve that gooey, indulgent texture.
- Using sweetened coconut: While sweetened coconut can be tempting, it can make the bars overly sweet. Opt for unsweetened coconut to maintain a balanced flavor profile that complements the other ingredients.
- Not greasing the pan: This can make it difficult to remove the bars once they’re baked. Always grease your pan or line it with parchment paper to ensure easy removal and clean cuts.
By keeping these common mistakes in mind, you’ll be well on your way to creating a batch of Millionaire Magic Bars that are not only delicious but also visually appealing. Happy baking!
Creative Variations & Customizations
One of the best things about Millionaire Magic Bars is their versatility. You can easily adapt the recipe to suit your dietary preferences or simply to mix things up a bit. Here are some creative variations and customizations that I’ve tried and loved:
Gluten-Free Version
If you’re looking for a gluten-free option, simply substitute almond flour for the graham cracker crumbs. This swap not only makes the bars gluten-free but also adds a lovely nutty flavor that complements the other ingredients beautifully. Just be sure to check that your chocolate chips and other ingredients are also gluten-free!
Nut-Free Option
For those with nut allergies or preferences, you can easily omit the nuts altogether. Instead, consider adding extra chocolate chips or a bit more shredded coconut to maintain that delightful texture. Trust me, the bars will still be just as delicious and satisfying!
Seasonal Twist
Want to give your Millionaire Magic Bars a seasonal flair? Incorporate pumpkin spice into the filling for a fall-inspired treat. Just add a teaspoon or two of pumpkin spice to the sweetened condensed milk before pouring it over the layers. It adds a warm, cozy flavor that’s perfect for autumn gatherings!
Vegan Version
If you’re following a vegan diet, you can easily adapt this recipe. Use coconut milk in place of sweetened condensed milk and opt for dairy-free chocolate chips. The result is a rich and indulgent treat that everyone can enjoy, regardless of dietary restrictions!
Fruit Addition
For a delightful twist, consider adding dried fruits like cranberries or cherries to the filling. Their tartness provides a lovely contrast to the sweetness of the chocolate and butterscotch, creating a more complex flavor profile. Just sprinkle them in with the other filling ingredients, and you’re good to go!
With these creative variations, you can make Millionaire Magic Bars that cater to your taste and dietary needs. So go ahead, experiment, and make this recipe your own—because the magic truly happens when you put your personal touch on it!
Perfect Pairings: What to Serve With Millionaire Magic Bars
When it comes to enjoying Millionaire Magic Bars, the right accompaniments can elevate your dessert experience to new heights. Here are some delightful pairings that I’ve discovered over the years, each one enhancing the rich flavors and textures of these bars:
- Vanilla Ice Cream: A classic pairing that balances the sweetness of the bars with a creamy, cool contrast. The melting ice cream creates a delightful combination that’s simply irresistible!
- Caramel Sauce: Drizzle some warm caramel sauce over the bars for an extra indulgent treat. The gooey caramel adds another layer of sweetness that complements the chocolate and butterscotch beautifully.
- Coffee or Espresso: A cup of coffee or a shot of espresso pairs perfectly with the sweetness of the bars. The rich, bold flavors of the coffee enhance the chocolate, making each bite even more satisfying.
- Whipped Cream: A dollop of freshly whipped cream adds lightness and a fancy touch to your dessert. It’s a simple yet elegant way to elevate your presentation and flavor.
- Fresh Berries: Serve with a side of fresh berries for a refreshing contrast to the rich bars. The tartness of the berries cuts through the sweetness, creating a balanced dessert experience.
- Cold Milk: A timeless combination that enhances the dessert experience. There’s something nostalgic about enjoying a sweet treat with a glass of cold milk—it’s a classic for a reason!
- Chocolate Sauce: For an interactive dessert experience, serve with a side of chocolate sauce for dipping. It’s a fun way to indulge and adds an extra layer of chocolatey goodness.
- Nutty Granola: Serve on the side for added crunch and texture. The granola’s nuttiness complements the bars while providing a delightful contrast in texture.
These pairings not only enhance the flavors of Millionaire Magic Bars but also create a memorable dessert experience for you and your loved ones. So, whether you’re hosting a gathering or enjoying a quiet night in, consider these delicious accompaniments to take your dessert to the next level!
Storage & Meal Prep Instructions
Now that you’ve created a batch of Millionaire Magic Bars, it’s essential to know how to store them properly to maintain their deliciousness. Trust me, these bars are so good that you’ll want to savor them for as long as possible!
Fridge Storage
To keep your bars fresh, store them in an airtight container in the refrigerator. They will stay delicious for up to one week. Just be sure to separate layers with parchment paper to prevent sticking, and you’ll have a sweet treat ready to enjoy whenever the craving strikes!
Freezer Storage
If you want to extend the life of your Millionaire Magic Bars, you can freeze them for up to three months. Here’s how:
- Wrap each bar tightly in plastic wrap to prevent freezer burn.
- Then, wrap them again in foil for extra protection.
- Label the package with the date so you can keep track of how long they’ve been in the freezer.
When you’re ready to enjoy them, simply thaw the bars in the refrigerator overnight. This way, they’ll be perfectly soft and ready to indulge!
Reheating Methods
If you prefer your Millionaire Magic Bars warm and gooey, you can easily reheat them. Just pop a square in the microwave for a few seconds—about 10-15 seconds should do the trick. This will bring back that delightful gooey texture that makes these bars so irresistible!
With these storage and meal prep tips, you can enjoy your Millionaire Magic Bars for days to come. So go ahead, make a big batch, and treat yourself to a little slice of heaven whenever the mood strikes!
Nutrition Facts & Health Insights
As we indulge in the delightful layers of Millionaire Magic Bars, it’s essential to be mindful of the nutrition they offer. While these bars are undeniably a treat, they also come with some health benefits that can make your dessert experience a little more guilt-free!
Nutrition Table
| Nutrient | Amount per Serving |
|---|---|
| Serving Size | 1 square (approximately 2×2 inches) |
| Calories | 250 |
| Sugar | 20 grams |
| Sodium | 150 milligrams |
| Fat | 12 grams |
| Saturated Fat | 7 grams |
| Unsaturated Fat | 3 grams |
| Trans Fat | 0 grams |
| Carbohydrates | 32 grams |
| Fiber | 1 gram |
| Protein | 3 grams |
| Cholesterol | 15 milligrams |
Health Benefits
While Millionaire Magic Bars are a sweet indulgence, they also offer some nutritional perks:
- Nuts: The chopped pecans or walnuts provide healthy fats, which are essential for heart health and can help keep you feeling full.
- Coconut: The sweetened shredded coconut adds fiber to the mix, aiding in digestion and contributing to a feeling of fullness.
- Energy Boost: With a combination of carbohydrates and fats, these bars can provide a quick energy boost, making them a great treat for an afternoon pick-me-up.
So, while we savor the rich flavors and textures of these Millionaire Magic Bars, we can also appreciate the nutritional benefits they bring to the table. Enjoying them in moderation allows us to indulge without the guilt!
Frequently Asked Questions
As you embark on your journey to create the perfect Millionaire Magic Bars, you might have a few questions along the way. Don’t worry; I’ve got you covered! Here are some of the most common queries I’ve encountered, along with helpful answers to guide you through the process.
1. Can I substitute the sweetened condensed milk?
Absolutely! If you’re looking for a dairy-free option, you can use coconut milk or a homemade vegan condensed milk made from coconut cream and sweetener. Just keep in mind that the texture and flavor may vary slightly, but it will still be delicious!
2. How do I know when the bars are done baking?
The key to knowing when your Millionaire Magic Bars are done is to look for a golden edge and a slightly soft center. They will continue to set as they cool, so don’t worry if the center looks a bit soft when you take them out of the oven. Just be sure to keep an eye on them during the last few minutes of baking!
3. What can I use instead of graham cracker crumbs?
If you’re looking for alternatives, you can use almond flour for a gluten-free version or crushed digestive biscuits for a similar flavor profile. You can also try oat flour or crushed vanilla wafers for a unique twist!
4. Can I make these bars ahead of time?
Yes! In fact, making them ahead of time can enhance the flavors as they sit. You can prepare the bars a day in advance and store them in an airtight container. Just be sure to let them cool completely before cutting and storing!
5. How do I store leftovers?
To keep your Millionaire Magic Bars fresh, store them in an airtight container at room temperature for up to one week. If you want to keep them longer, you can freeze them for up to three months. Just wrap them tightly in plastic wrap and foil before freezing!
6. Can I use different types of chocolate?
Absolutely! Feel free to experiment with different types of chocolate. You can use dark chocolate for a richer flavor, or even white chocolate for a sweeter twist. Just keep in mind that the flavor profile will change slightly based on your choice!
7. What if I don’t have a 9×13 inch pan?
If you don’t have a 9×13 inch pan, you can use a smaller pan, but keep in mind that the baking time may vary. A 9×9 inch pan will work, but you may need to increase the baking time slightly. Just keep an eye on them as they bake!
8. How can I make these bars more chocolatey?
If you’re a chocolate lover, consider adding an extra layer of chocolate chips or even a layer of chocolate ganache on top after baking. You can also use chocolate syrup as a drizzle for an extra chocolatey finish!
9. Are there any nut-free alternatives?
Yes! If you want to make these bars nut-free, simply omit the nuts altogether. You can replace them with extra chocolate chips or shredded coconut to maintain that delightful texture. Your bars will still be delicious!
10. How do I troubleshoot if my bars are too crumbly?
If your Millionaire Magic Bars are too crumbly, it’s likely due to not pressing the crust firmly enough or not using enough binding ingredients. Make sure to pack the crust tightly into the pan and ensure you’re using the right amount of melted butter. If they still crumble, try adding a bit more sweetened condensed milk to the filling to help bind everything together!
With these FAQs in mind, you’re well-equipped to tackle any challenges that may arise while making your Millionaire Magic Bars. Happy baking!
Final Inspiration & Kitchen Confidence
As we wrap up our journey into the delightful world of Millionaire Magic Bars, I want to take a moment to celebrate the joy of baking. There’s something truly magical about creating something from scratch, especially when it brings smiles to the faces of those you love. Each time you step into the kitchen, you’re not just following a recipe; you’re crafting memories, sharing love, and indulging in the sweet satisfaction of your hard work.
Remember, every baking attempt is a step towards mastery. Whether your bars turn out perfectly gooey or a little crumbly, each experience teaches you something new. Embrace the process, learn from any mishaps, and don’t be afraid to experiment. After all, some of the best recipes come from a little trial and error—and a dash of creativity!
So, I encourage you to roll up your sleeves, gather your ingredients, and give this Millionaire Magic Bars recipe a try. Share your results with friends and family, and don’t forget to savor every delicious bite. Whether you’re enjoying them at a gathering or indulging in a quiet moment at home, these bars are sure to bring joy and sweetness to your day. Happy baking, and may your kitchen always be filled with love and laughter!
Print
“Millionaire Magic Bars: Indulge in Gooey, Chocolatey Bliss!”
- Total Time: 45 minutes
- Yield: 24 servings 1x
- Diet: Vegetarian
Description
Millionaire Magic Bars are a decadent treat that combines layers of rich chocolate, creamy caramel, and crunchy nuts, all nestled atop a buttery graham cracker crust. Each bite offers a delightful contrast of textures, from the smoothness of the chocolate to the chewy caramel, making it an irresistible dessert experience.
Ingredients
- Crust:
- 1 ½ cups graham cracker crumbs
- ½ cup unsalted butter, melted
- ¼ cup granulated sugar
- Filling:
- 1 cup semi-sweet chocolate chips
- 1 cup butterscotch chips
- 1 cup sweetened shredded coconut
- 1 cup chopped pecans or walnuts
- 1 can (14 oz) sweetened condensed milk
Instructions
- Preheat your oven to 350°F (175°C).
- In a mixing bowl, combine graham cracker crumbs, melted butter, and sugar until well mixed.
- Press the mixture firmly into the bottom of a greased 9×13 inch baking pan to form the crust.
- Sprinkle chocolate chips, butterscotch chips, coconut, and nuts evenly over the crust.
- Pour the sweetened condensed milk evenly over the top of the layered ingredients.
- Bake in the preheated oven for 25-30 minutes, or until the edges are golden brown and the center is set.
- Allow to cool completely in the pan before cutting into squares.
Notes
- These bars can be made ahead of time and stored in an airtight container for up to one week.
- For longer storage, freeze the bars for up to three months; thaw in the refrigerator before serving.
- Substitute almond flour for graham cracker crumbs for a gluten-free version.
- Prep Time: 15 minutes
- Cook Time: 30 minutes
- Category: desserts
- Method: baking
- Cuisine: American
Nutrition
- Serving Size: 1 square (approximately 2x2 inches)
- Calories: 250
- Sugar: 20 grams
- Sodium: 150 milligrams
- Fat: 12 grams
- Saturated Fat: 7 grams
- Unsaturated Fat: 3 grams
- Trans Fat: 0 grams
- Carbohydrates: 32 grams
- Fiber: 1 gram
- Protein: 3 grams
- Cholesterol: 15 milligrams
Keywords: Millionaire Magic Bars, chocolate dessert, caramel bars, easy dessert recipe, no-bake bars, sweet treats, graham cracker crust, layered dessert, party dessert, indulgent snacks, homemade candy bars, rich desserts