
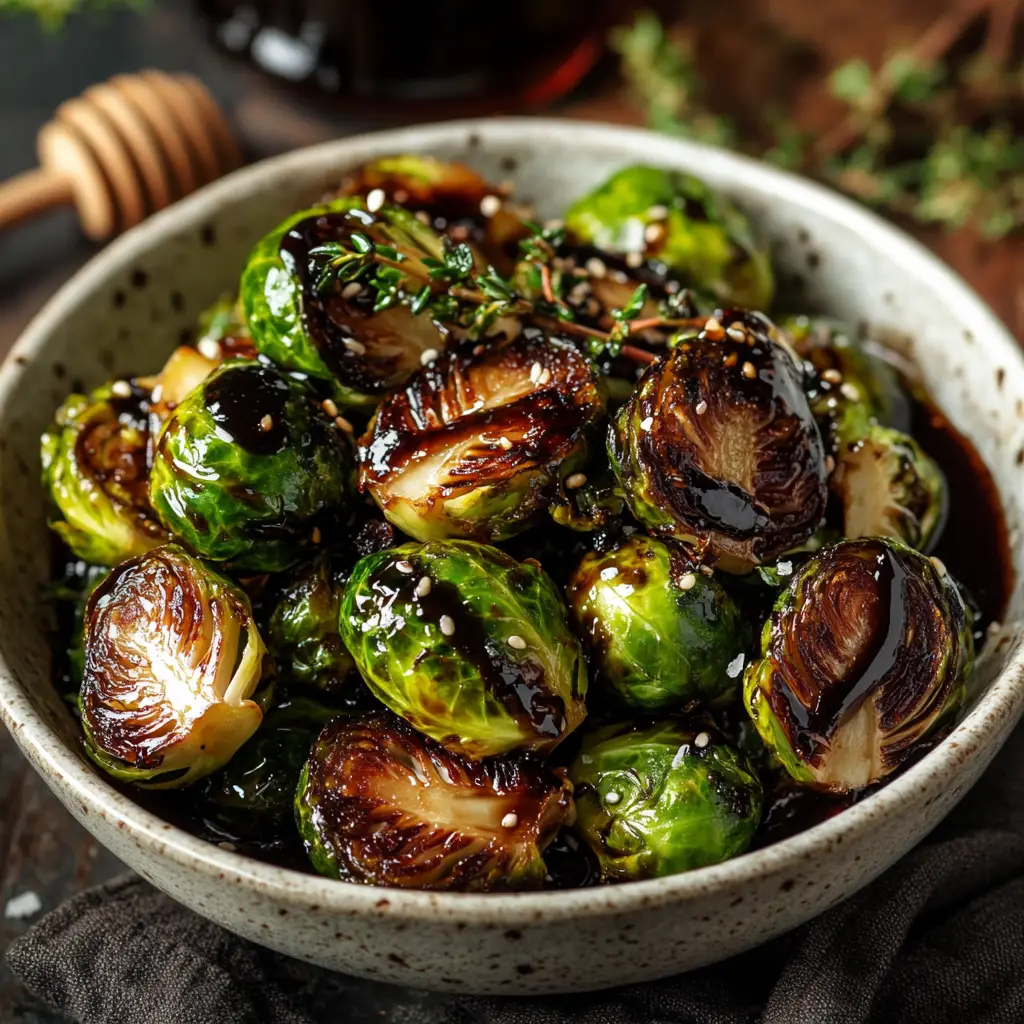
Introduction to Honey Balsamic Brussels Sprouts
Ah, Brussels sprouts! Those little green gems often get a bad rap, but let me tell you, they can be absolutely delightful when prepared the right way. I remember the first time I tried Honey Balsamic Brussels Sprouts. It was at a cozy dinner party, and I was skeptical at first. But as soon as I took a bite, I was hooked! The sweet and tangy glaze danced on my taste buds, transforming these humble veggies into a star dish.
As a passionate home cook, I love experimenting with flavors, and this recipe has become one of my go-to favorites. The combination of honey and balsamic vinegar creates a beautiful harmony that elevates the Brussels sprouts to a whole new level. It’s like a warm hug on a plate! Plus, they’re super easy to make, which is a win-win in my book.
Whether you’re looking for a side dish for a holiday feast or just want to jazz up your weeknight dinner, these Honey Balsamic Brussels Sprouts are sure to impress. They’re not just tasty; they’re also packed with nutrients, making them a guilt-free indulgence. So, grab your apron, and let’s dive into this delicious culinary adventure together!
Ingredients for Honey Balsamic Brussels Sprouts
Before we get our hands dirty in the kitchen, let’s gather all the ingredients we need for these scrumptious Honey Balsamic Brussels Sprouts. I always believe that quality ingredients make a world of difference in any dish. So, let’s make sure we’re using the best!
Main Ingredients
- 1 pound Brussels sprouts: Look for firm, bright green sprouts. Avoid any that are yellowing or have blemishes.
- 3 tablespoons honey: I prefer using raw honey for its rich flavor, but any honey will do.
- 2 tablespoons balsamic vinegar: A good quality balsamic vinegar adds depth. If you can, go for the aged variety!
- 2 tablespoons olive oil: Extra virgin olive oil is my go-to for its robust taste.
- Salt and pepper: To taste, but I usually sprinkle a generous pinch of each.
Optional Add-ons
- 1/4 cup chopped walnuts or pecans: For a delightful crunch, toss in some nuts before roasting.
- 1/4 teaspoon red pepper flakes: If you like a little heat, this is a great addition!
- Grated Parmesan cheese: A sprinkle on top after roasting adds a savory touch.
- Fresh herbs: Chopped thyme or rosemary can elevate the flavor even more.
These ingredients come together to create a dish that’s not only visually appealing but also bursting with flavor. I love how the honey caramelizes during roasting, giving the Brussels sprouts a beautiful golden hue. So, let’s make sure we have everything ready before we jump into the cooking process!
How to Prepare Honey Balsamic Brussels Sprouts
Now that we have our ingredients ready, it’s time to roll up our sleeves and get cooking! Preparing Honey Balsamic Brussels Sprouts is a straightforward process, and I promise you’ll be amazed at how easy it is to create such a delicious dish. Let’s break it down step by step!
Step 1: Prepping the Brussels Sprouts
First things first, we need to prep our Brussels sprouts. This step is crucial for ensuring they roast evenly and soak up all that yummy glaze.
Tips for Step 1
- Trim the Ends: Start by trimming the stem end of each Brussels sprout. This helps them cook better and makes them easier to eat.
- Remove Outer Leaves: If any leaves are wilted or discolored, peel them off. Fresh, vibrant leaves are key to a tasty dish!
- Halve Them: I like to cut each sprout in half. This increases the surface area, allowing more of that delicious glaze to cling to them.
Step 2: Making the Honey Balsamic Glaze
Next up is the star of the show—the honey balsamic glaze! This sweet and tangy mixture is what makes these Brussels sprouts truly shine.
Tips for Step 2
- Mixing it Up: In a small bowl, whisk together the honey, balsamic vinegar, and olive oil until well combined. I love using a fork for this; it’s simple and effective!
- Taste Test: Don’t be shy! Give the glaze a little taste. If you want it sweeter, add more honey. If you prefer it tangier, a splash more vinegar does the trick.
- Consistency Matters: The glaze should be thick enough to coat the sprouts but not so thick that it clumps. If it’s too thick, a tiny splash of water can help.
Step 3: Roasting the Brussels Sprouts
Now comes the fun part—roasting! This is where the magic happens, and your kitchen will smell heavenly.
Tips for Step 3
- Preheat the Oven: Make sure your oven is preheated to 400°F (200°C). A hot oven is essential for getting those sprouts crispy!
- Coat Evenly: In a large bowl, toss the halved Brussels sprouts with the honey balsamic glaze until they’re well coated. I like to use my hands for this; it’s the best way to ensure every sprout gets some love!
- Spread Them Out: Arrange the sprouts in a single layer on a baking sheet. Crowding them can lead to steaming instead of roasting, and we want that crispy texture!
- Roast to Perfection: Roast for about 20-25 minutes, flipping them halfway through. Keep an eye on them; you want them golden brown and tender!
And there you have it! With these steps, you’ll have a plate of Honey Balsamic Brussels Sprouts that are not only delicious but also a feast for the eyes. I can’t wait for you to try this recipe and share in the joy of cooking!
Equipment Needed for Honey Balsamic Brussels Sprouts
Before we dive into the cooking process, let’s make sure we have the right tools at our disposal. Having the right equipment can make all the difference in the kitchen. Here’s what you’ll need to whip up those delightful Honey Balsamic Brussels Sprouts:
- Baking Sheet: A sturdy baking sheet is essential for roasting the Brussels sprouts. If you don’t have one, a large oven-safe dish will work just fine.
- Mixing Bowl: You’ll need a medium-sized mixing bowl to combine the honey balsamic glaze and toss the sprouts. A large bowl is great for this, but any bowl will do!
- Whisk or Fork: A whisk is perfect for mixing the glaze, but a fork works just as well. It’s all about what you have on hand!
- Knife and Cutting Board: A sharp knife and a sturdy cutting board are necessary for prepping the Brussels sprouts. Safety first, so make sure your knife is in good condition!
- Spatula or Tongs: To flip the Brussels sprouts halfway through roasting, a spatula or tongs will help you do this easily without losing any of that delicious glaze.
With these simple tools, you’ll be well-equipped to create a dish that’s not only tasty but also visually stunning. Cooking should be fun and stress-free, so don’t worry if you don’t have all the fancy gadgets. Sometimes, the simplest tools lead to the best culinary adventures!
Variations of Honey Balsamic Brussels Sprouts
As a passionate home cook, I love to play around with recipes and make them my own. Honey Balsamic Brussels Sprouts are no exception! Here are a few fun variations that can add a twist to this already delightful dish:
- Maple Balsamic Variation: Swap out honey for pure maple syrup. The rich, earthy flavor of maple pairs beautifully with balsamic vinegar, creating a unique sweetness.
- Garlic Infusion: Add minced garlic to the honey balsamic glaze for an aromatic kick. The garlic caramelizes during roasting, adding depth to the flavor.
- Asian Twist: Incorporate soy sauce and sesame oil into the glaze. This gives the Brussels sprouts an Asian flair that’s both savory and sweet.
- Cheesy Delight: After roasting, sprinkle some crumbled feta or goat cheese on top. The creaminess of the cheese complements the tangy glaze perfectly.
- Fruit Fusion: Toss in some dried cranberries or pomegranate seeds before serving. They add a pop of color and a burst of sweetness that balances the dish beautifully.
These variations not only keep things exciting but also allow you to cater to different tastes and occasions. I encourage you to experiment and find your favorite twist on this classic recipe. After all, cooking is all about creativity and having fun in the kitchen!
Cooking Notes for Honey Balsamic Brussels Sprouts
As I’ve learned through my culinary adventures, a few cooking notes can make all the difference when preparing Honey Balsamic Brussels Sprouts. Here are some tips that I’ve gathered over time to ensure your dish turns out perfectly every time:
- Freshness is Key: Always choose fresh Brussels sprouts. The fresher they are, the better the flavor. If you can, buy them from a local farmer’s market!
- Don’t Skip the Soaking: If you’re using wooden skewers for any optional add-ons, soak them in water for about 30 minutes before grilling. This prevents them from burning.
- Watch the Oven: Ovens can vary in temperature, so keep an eye on your sprouts as they roast. You want them crispy and caramelized, not burnt!
- Let Them Rest: After roasting, let the Brussels sprouts sit for a few minutes before serving. This allows the flavors to meld together beautifully.
- Storage Tips: If you have leftovers (which is rare!), store them in an airtight container in the fridge. They can be reheated in the oven for a few minutes to regain their crispiness.
These cooking notes are like little nuggets of wisdom that I’ve picked up along the way. They help me create a dish that’s not only delicious but also a joy to share with family and friends. Happy cooking!
Serving Suggestions for Honey Balsamic Brussels Sprouts
Now that we’ve created a beautiful dish of Honey Balsamic Brussels Sprouts, it’s time to think about how to serve them! Presentation can elevate your meal, and I love to get a little creative when it comes to plating. Here are some of my favorite serving suggestions:
- As a Side Dish: These Brussels sprouts make a fantastic side for roasted meats like chicken, pork, or beef. Their sweet and tangy flavor complements savory dishes beautifully.
- On a Bed of Greens: Serve the roasted sprouts over a bed of fresh spinach or arugula. The greens add a lovely contrast and make for a vibrant presentation.
- With a Drizzle of Extra Glaze: For an extra touch, drizzle some additional honey balsamic glaze over the top just before serving. It adds a glossy finish and enhances the flavor.
- Garnished with Nuts: If you added nuts during roasting, sprinkle a few more on top for added crunch and visual appeal. It’s a simple way to make the dish pop!
- In a Grain Bowl: Toss the Brussels sprouts into a grain bowl with quinoa or farro, along with some roasted veggies and a protein of your choice. It’s a hearty and nutritious meal!
These serving suggestions not only enhance the dish but also make it versatile for any occasion. Whether it’s a casual weeknight dinner or a festive gathering, Honey Balsamic Brussels Sprouts are sure to impress your guests and family alike. Enjoy the deliciousness!
Tips for Perfect Honey Balsamic Brussels Sprouts
As I’ve whipped up countless batches of Honey Balsamic Brussels Sprouts, I’ve gathered a few golden tips that can help you achieve perfection every time. These little nuggets of wisdom can elevate your dish from good to absolutely fantastic!
- Choose the Right Size: When selecting Brussels sprouts, aim for ones that are similar in size. This ensures they cook evenly, so you won’t end up with some sprouts overcooked while others are still crunchy.
- Don’t Rush the Roasting: Patience is key! Allow the sprouts to roast until they’re beautifully caramelized. This brings out their natural sweetness and adds a delightful depth of flavor.
- Experiment with Seasoning: While salt and pepper are classic, don’t hesitate to get creative! A sprinkle of garlic powder or smoked paprika can add an exciting twist to the flavor profile.
- Use Parchment Paper: Lining your baking sheet with parchment paper can help prevent sticking and make cleanup a breeze. Plus, it helps the sprouts roast evenly!
- Serve Immediately: For the best texture and flavor, serve your Honey Balsamic Brussels Sprouts right out of the oven. They’re at their crispiest and most delicious when fresh!
With these tips in your back pocket, you’ll be well on your way to creating Honey Balsamic Brussels Sprouts that are not only tasty but also a hit at any gathering. Happy cooking, and enjoy the delightful journey of flavors!
Breakdown of Time for Honey Balsamic Brussels Sprouts
When it comes to cooking, timing is everything! I’ve learned that knowing how long each step takes can help you plan your meal better. Here’s a quick breakdown of the time needed to prepare these delicious Honey Balsamic Brussels Sprouts:
- Prep Time: About 15 minutes. This includes washing, trimming, and halving the Brussels sprouts, as well as mixing the honey balsamic glaze. It’s a great time to get your kitchen organized and enjoy the process!
- Cooking Time: Approximately 25 minutes. Roasting the Brussels sprouts at 400°F (200°C) allows them to caramelize beautifully. Keep an eye on them to ensure they reach that perfect golden-brown color!
- Total Time: Around 40 minutes. In just under an hour, you’ll have a stunning side dish that’s bursting with flavor and ready to impress your family or guests.
With this time breakdown, you can easily fit these Honey Balsamic Brussels Sprouts into your meal planning. I love how quick and simple they are to make, yet they feel so special on the table. Happy cooking!
Nutritional Information for Honey Balsamic Brussels Sprouts
As a passionate home cook, I always appreciate knowing the nutritional benefits of the dishes I prepare. Honey Balsamic Brussels Sprouts not only taste amazing but also pack a healthy punch! Here’s a quick look at the nutritional information for a serving size of about 1 cup (approximately 150 grams):
- Calories: 120
- Protein: 4 grams
- Fat: 7 grams (mostly healthy fats from olive oil)
- Carbohydrates: 12 grams
- Fiber: 4 grams
- Sugar: 5 grams (natural sugars from honey and Brussels sprouts)
- Vitamin C: 120% of the Daily Value (DV)
- Vitamin K: 200% of the DV
- Folate: 15% of the DV
These little green powerhouses are rich in vitamins and minerals, making them a fantastic addition to any meal. The fiber content helps with digestion, while the antioxidants support overall health. Plus, the natural sweetness from honey and the tanginess of balsamic vinegar make this dish not only nutritious but also a delightful treat for the taste buds!
So, as you enjoy your Honey Balsamic Brussels Sprouts, you can feel good knowing you’re nourishing your body with every delicious bite. Happy cooking and eating!
Frequently Asked Questions about Honey Balsamic Brussels Sprouts
As I’ve shared my love for Honey Balsamic Brussels Sprouts, I often get questions from fellow home cooks eager to try this delightful dish. Here are some of the most common questions I’ve encountered, along with my answers to help you on your culinary journey!
Can I use frozen Brussels sprouts instead of fresh?
While fresh Brussels sprouts are my top choice for this recipe, you can use frozen ones in a pinch. Just be sure to thaw and drain them well before roasting. They may not get as crispy, but they’ll still be delicious!
How can I make this dish vegan?
Great question! To make Honey Balsamic Brussels Sprouts vegan, simply substitute the honey with maple syrup or agave nectar. Both options will provide that sweet touch without compromising the flavor!
Can I prepare the glaze in advance?
Absolutely! You can mix the honey balsamic glaze ahead of time and store it in the fridge for up to a week. Just give it a good stir before using, as it may thicken a bit in the fridge.
What should I do if my Brussels sprouts are bitter?
If you find your Brussels sprouts taste bitter, it could be due to overcooking or using older sprouts. To counteract bitterness, try adding a pinch of sugar to the glaze or roasting them with a bit of extra honey. This will help balance the flavors!
Can I add other vegetables to this recipe?
Definitely! Feel free to mix in other veggies like carrots, sweet potatoes, or cauliflower. Just keep in mind that different vegetables may require varying cooking times, so adjust accordingly to ensure everything is perfectly roasted.
These FAQs are just a glimpse into the wonderful world of Honey Balsamic Brussels Sprouts. I hope they help you feel more confident as you embark on this delicious cooking adventure. Remember, cooking is all about experimenting and having fun, so don’t hesitate to make this recipe your own!
Conclusion on Honey Balsamic Brussels Sprouts
In wrapping up my culinary journey with Honey Balsamic Brussels Sprouts, I can’t help but feel a sense of joy and satisfaction. This dish is not just a side; it’s a celebration of flavors that brings a delightful twist to any meal. The sweet and tangy glaze transforms these often-overlooked veggies into a star attraction on your dinner table.
What I love most about this recipe is its versatility. Whether you’re serving it at a holiday feast or enjoying it on a casual weeknight, these Brussels sprouts are sure to impress. Plus, they’re packed with nutrients, making them a guilt-free indulgence that you can feel good about sharing with family and friends.
So, if you’re looking to elevate your cooking game and bring a burst of flavor to your meals, I wholeheartedly encourage you to give Honey Balsamic Brussels Sprouts a try. With just a few simple ingredients and steps, you’ll create a dish that’s not only delicious but also a feast for the eyes. Happy cooking, and may your kitchen always be filled with love and laughter!


