Sensory-Rich Introduction with Immediate Craving
Imagine pulling a freshly baked Homemade Challah from the oven, its golden crust glistening under the kitchen lights, inviting you to take that first, irresistible bite. As you slice through the loaf, the soft, pillowy interior reveals itself, releasing a warm, buttery aroma that fills the air with comfort and nostalgia. Each slice is a perfect balance of sweetness and richness, making it hard to resist going back for seconds—or thirds!
I still remember the first time I made challah. It was a chilly Friday evening, and my family gathered in the kitchen, eager to help. Flour dust danced in the air as we mixed and kneaded, laughter echoing off the walls. The joy of creating something together, something that had been passed down through generations, was palpable. When we finally sat down to enjoy the warm, braided bread, it felt like we were not just sharing a meal, but a piece of our heritage. That moment solidified my love for baking challah, and it has since become a cherished tradition in our home.
Baking challah is more than just a recipe; it’s a ritual that connects us to our roots, especially during Shabbat and holidays. The act of braiding the dough is symbolic, representing unity and togetherness. Whether it’s a family dinner, a festive celebration, or a cozy brunch, this beautiful bread is the centerpiece that brings everyone together. It’s perfect for sharing stories, laughter, and love, making every occasion feel a little more special.
So, as you embark on your own challah-making journey, remember that each loaf carries with it the warmth of tradition and the joy of togetherness. Let’s create some delicious memories!
Why You’ll Love This Homemade Challah
There’s something truly magical about Homemade Challah that makes it a beloved staple in kitchens around the world. Let me share with you why this bread is not just a recipe, but an experience that will have you coming back for more.
- Texture Contrast: The moment you take a bite, you’ll experience the delightful crunch of the golden crust giving way to a soft, airy interior. It’s a textural journey that dances on your palate, making each slice a joy to savor.
- Flavor Balance: The perfect blend of buttery richness and subtle sweetness creates a flavor profile that is both comforting and indulgent. It’s not overly sweet, allowing the natural flavors to shine through, making it suitable for any meal of the day.
- Versatility: This bread is incredibly versatile! Enjoy it fresh out of the oven, toasted with a pat of butter, or use it as a base for decadent French toast or hearty sandwiches. The possibilities are endless, and it adapts beautifully to any culinary creation.
- Ease of Preparation: Don’t let the beautiful braid intimidate you! The steps are simple and straightforward, yielding impressive results even for beginners. With just a little patience and practice, you’ll be a challah pro in no time.
- Universal Appeal: Loved by all ages, this bread is a crowd-pleaser at any gathering. Whether it’s a family dinner, a holiday celebration, or a cozy brunch with friends, challah brings people together, making every occasion feel special.
As you can see, Homemade Challah is more than just a loaf of bread; it’s a delightful experience that nourishes both the body and soul. So roll up your sleeves and get ready to create something truly special!
Essential Tools & Preparation Strategy
Before we dive into the delightful process of making Homemade Challah, it’s essential to gather the right tools and set up your kitchen for success. Having everything at your fingertips not only streamlines the process but also makes baking a more enjoyable experience. Here’s a list of the must-have tools that will help you create that perfect loaf:
- Mixing Bowl: A large mixing bowl is essential for combining ingredients and kneading the dough. I recommend using a glass or stainless steel bowl, as they are easy to clean and won’t retain odors.
- Measuring Cups and Spoons: Accurate measurements are crucial for achieving the perfect texture in your challah. Invest in a good set of measuring cups and spoons to ensure your ingredients are spot on.
- Stand Mixer with Dough Hook: If you have one, a stand mixer can be a game-changer! It makes kneading the dough easier and saves you time and effort, especially if you’re making multiple loaves.
- Baking Sheet: A sturdy baking sheet provides a solid base for your challah. Make sure it’s large enough to accommodate the braided loaf without crowding.
- Parchment Paper: Lining your baking sheet with parchment paper prevents sticking and simplifies cleanup. Plus, it helps the bread bake evenly.
- Wire Rack: Once your challah is baked to golden perfection, a wire rack allows it to cool evenly, preventing a soggy bottom. Trust me, this step is worth it!
- Dough Scraper: A dough scraper is incredibly useful for handling sticky dough and dividing portions. It’s a handy tool that makes the process smoother and less messy.
- Kitchen Towel: Keep a clean kitchen towel handy to cover the dough during rising. This helps maintain warmth and moisture, ensuring a successful rise.
With these tools in your arsenal, you’ll be well-prepared to tackle the art of challah-making. Remember, the key to a successful baking experience is not just the ingredients, but also the environment you create in your kitchen. So, let’s get everything ready and set the stage for some delicious bread-making magic!
Ingredients & Their Roles in This Homemade Challah
Understanding the ingredients that go into your Homemade Challah is key to mastering this delightful bread. Each component plays a vital role in creating that perfect loaf, so let’s break down what you’ll need and why they matter:
- Flour: The backbone of your challah, flour provides structure and texture. I recommend using 4 cups of all-purpose flour, as it strikes the perfect balance between strength and tenderness, resulting in a beautifully soft loaf.
- Yeast: This little powerhouse is the leavening agent that helps the bread rise. I suggest using 2 1/4 teaspoons of active dry yeast, which is reliable and easy to work with. When activated properly, it creates those lovely air pockets that give challah its lightness.
- Water: Warm water is crucial for activating the yeast. You’ll need 1 1/2 cups of warm water at around 110°F. This temperature is just right to wake up the yeast without killing it, ensuring a successful rise.
- Sugar: Not only does sugar add a touch of sweetness, but it also helps with browning the crust. You’ll use 1/4 cup of granulated sugar, but if you’re feeling adventurous, you can substitute honey for a more traditional flavor that adds depth.
- Salt: A crucial ingredient that enhances flavor and controls yeast activity. Just 1 teaspoon of kosher salt will do the trick, ensuring your bread isn’t bland and that the yeast doesn’t go into overdrive.
- Eggs: Eggs contribute to the richness and color of the bread. You’ll need 3 large eggs for the dough, plus an additional egg for the egg wash, which gives the challah its beautiful golden sheen.
- Butter: The secret to that rich, buttery flavor and tender texture lies in 1/4 cup of unsalted butter, melted. It adds a luxurious mouthfeel that elevates your challah from good to unforgettable.
Each ingredient in this recipe is carefully chosen to create a harmonious blend of flavors and textures. As you gather these components, take a moment to appreciate how they work together to create the magic of Homemade Challah. Happy baking!
Step-by-Step Guide to Perfect Homemade Challah
Now that you’re ready to embark on this delightful baking journey, let’s dive into the step-by-step process of creating your very own Homemade Challah. Each step is designed to guide you through the art of bread-making, ensuring that your loaf turns out beautifully golden and irresistibly soft.
- Activate Yeast: In a small bowl, dissolve 2 1/4 teaspoons of active dry yeast in 1 1/2 cups of warm water (around 110°F) with 1 tablespoon of sugar. Let it sit for 5-10 minutes until it becomes frothy. This is the moment when the magic begins, and the aroma of yeast fills the air, promising a delightful bread ahead.
- Combine Dry Ingredients: In a large mixing bowl, combine 4 cups of sifted all-purpose flour, the remaining 1/4 cup of sugar, and 1 teaspoon of kosher salt. The sweet and salty balance is crucial for flavor, and the sight of the flour mound is a comforting reminder of home baking.
- Form Dough: Make a well in the center of the flour mixture and add the yeast mixture, 1/4 cup of melted unsalted butter, and 3 large eggs. Mix until a dough forms. You’ll notice the dough coming together, and the buttery scent will start to envelop your kitchen.
- Knead Dough: On a floured surface, knead the dough for about 10 minutes until it’s smooth and elastic. This is where you can really get your hands into the dough, feeling its texture transform from sticky to silky. If it’s too sticky, don’t hesitate to sprinkle a little more flour.
- First Rise: Place the kneaded dough in a greased bowl, cover it with a damp cloth, and let it rise in a warm place for 1-2 hours, or until it has doubled in size. This is the perfect time to clean up your workspace and enjoy the sweet smell of rising dough.
- Shape the Loaf: Once risen, punch down the dough to release the air. Divide it into three equal pieces, roll each piece into a long rope, and braid them together. The sight of the braided dough is not only visually appealing but also a testament to your hard work.
- Second Rise: Place the braided dough on a parchment-lined baking sheet, cover it, and let it rise for another 30-45 minutes. This second rise is crucial for achieving that fluffy texture we all love.
- Bake: Preheat your oven to 350°F (175°C). Brush the dough with the beaten egg for a shiny finish. Bake for 25-30 minutes, or until the bread is golden brown and sounds hollow when tapped on the bottom. The aroma wafting through your home will be nothing short of heavenly.
- Cool: Let the challah cool on a wire rack before slicing. This is the hardest part—waiting to dig in! But trust me, the wait will be worth it.
As you follow these steps, remember that baking is as much about the process as it is about the end result. Each knead, rise, and braid is a step closer to creating a loaf that not only tastes incredible but also carries the warmth of tradition and love. So roll up your sleeves, and let’s make some magic happen in the kitchen!
Chef’s Notes & Pro Tips for Flawless Results
As you embark on your journey to create the perfect Homemade Challah, I want to share some invaluable tips and tricks that I’ve gathered over the years. These insights will help you achieve a loaf that not only looks stunning but also tastes divine. Let’s dive into the details!
- Make-Ahead Instructions: If you’re short on time, don’t worry! You can prepare the dough a day in advance. After the first rise, simply cover it tightly and refrigerate. When you’re ready to bake, let it come to room temperature, shape it, and proceed with the second rise. This little trick can save you time and still yield a delicious loaf!
- Storage: To keep your challah fresh, store it in an airtight container at room temperature for up to 3 days. If you want to enjoy it later, freeze it for up to 3 months. Just wrap it tightly in plastic wrap and then in aluminum foil. When you’re ready to enjoy, thaw it at room temperature and warm it in the oven at 350°F for about 10-15 minutes to revive that fresh-baked taste.
- Equipment Recommendations: While you can certainly knead by hand, a stand mixer with a dough hook can simplify the process significantly. It saves your arms from fatigue and ensures a consistent knead, which is crucial for developing that lovely texture. If you don’t have a stand mixer, don’t fret—your hands are perfectly capable of creating magic!
- Customization Options: One of the joys of baking challah is the ability to make it your own. Feel free to add herbs, spices, or dried fruits to the dough for unique flavors. For instance, a sprinkle of cinnamon and some raisins can transform your challah into a delightful sweet treat, while fresh rosemary can give it a savory twist. The possibilities are endless, so let your creativity shine!
With these tips in your back pocket, you’re well on your way to mastering the art of Homemade Challah. Remember, baking is about experimentation and joy, so don’t be afraid to make it your own. Happy baking!
Avoid These Common Cooking Mistakes
As you embark on your journey to create the perfect Homemade Challah, it’s essential to be aware of some common pitfalls that can hinder your baking success. Trust me, I’ve made these mistakes myself, and learning from them has made all the difference. Here’s a list of what to watch out for:
- Insufficient Rising Time: One of the most common mistakes is not allowing the dough to rise long enough. This can lead to dense bread that lacks the airy texture we all love. Make sure to give your dough ample time to double in size during both rises—patience is key!
- Too Hot Water: Using water that’s too hot can kill the yeast, preventing your bread from rising. Always aim for warm water around 110°F. If you’re unsure, test it with your wrist; it should feel comfortably warm, not hot.
- Over-Kneading: While kneading is crucial for developing gluten, overdoing it can result in tough bread. Knead just until the dough is smooth and elastic—about 10 minutes should do the trick. If it feels too tough, you’ve likely gone too far!
- Loose Braiding: A loosely braided loaf can cause the bread to fall apart during baking. Make sure to braid tightly, ensuring that the strands are well-integrated. This not only helps with structure but also enhances the visual appeal of your challah.
- Skipping Egg Wash: The egg wash is what gives your challah that beautiful, shiny crust. Skipping this step results in a dull appearance. Always brush the dough with the beaten egg before baking for that golden finish.
- Not Preheating Oven: Failing to preheat your oven can lead to uneven baking, affecting the texture and color of your bread. Always preheat your oven to 350°F (175°C) before placing your challah inside to ensure even cooking.
- Improper Storage: Storing your challah improperly can lead to staleness. To keep it fresh, store it in an airtight container at room temperature for up to 3 days. If you plan to keep it longer, freeze it for up to 3 months.
By being mindful of these common mistakes, you’ll be well on your way to creating a stunning and delicious Homemade Challah that will impress your family and friends. Remember, every baking experience is a learning opportunity, so don’t be discouraged if things don’t go perfectly the first time. Happy baking!
Creative Variations & Customizations
One of the most delightful aspects of making Homemade Challah is the opportunity to get creative with flavors and ingredients. While the traditional recipe is absolutely delicious on its own, these variations and customizations will allow you to put your own spin on this beloved bread. Let’s explore some fun and tasty options!
- Whole Wheat Challah: For a healthier twist, substitute half of the all-purpose flour with whole wheat flour. This not only adds a nutty flavor but also increases the fiber content, making your challah a bit more wholesome without sacrificing taste.
- Sweet Cinnamon Raisin Challah: If you have a sweet tooth, this variation is for you! Add 1 tablespoon of ground cinnamon and 1 cup of raisins to the dough for a delightful sweet twist. The warm spices and chewy raisins create a comforting flavor that’s perfect for breakfast or dessert.
- Savory Herb Challah: For those who prefer a savory option, incorporate fresh herbs like 1 tablespoon of chopped rosemary or thyme into the dough. This adds a fragrant aroma and a unique flavor profile that pairs beautifully with soups and stews.
- Chocolate Chip Challah: Indulge your sweet cravings by folding in 1 cup of chocolate chips into the dough before braiding. This dessert-style bread is perfect for a special occasion or as a sweet treat to enjoy with coffee or tea.
- Seasonal Flavors: Don’t hesitate to experiment with seasonal ingredients! In the fall, try adding 1 teaspoon of pumpkin spice to the dough for a festive touch. In the spring, a bit of citrus zest (like lemon or orange) can brighten up the flavor and add a refreshing twist.
These creative variations not only enhance the flavor of your Homemade Challah but also allow you to tailor the bread to suit your personal taste or the occasion. So, don’t be afraid to get adventurous in the kitchen—your taste buds will thank you!
Perfect Pairings: What to Serve With Homemade Challah
Now that you’ve mastered the art of making Homemade Challah, it’s time to explore the delightful ways to enjoy this beautiful bread. Its versatility makes it a perfect companion for a variety of dishes, whether you’re looking for a sweet breakfast treat or a savory side. Here are some of my favorite pairings that will elevate your challah experience:
- Honey or Jam: Drizzle some honey or spread your favorite jam on a warm slice of challah for a sweet breakfast or brunch treat. The combination of the soft bread with the sticky sweetness is simply irresistible!
- Rich Butter: A generous pat of rich, creamy butter on a slice of freshly baked challah makes for a decadent snack or side. The butter melts into the warm bread, creating a luxurious mouthfeel that’s hard to resist.
- French Toast: Transform your challah into a gourmet breakfast dish by using slices to make French toast. The bread’s soft texture soaks up the egg mixture beautifully, resulting in a rich and flavorful breakfast that will impress anyone at your table.
- Warm Soup: Serve your challah alongside a warm bowl of soup for a comforting meal. The bread is perfect for dipping and soaking up all those delicious flavors, making each bite a cozy experience.
- Avocado Toast: For a modern brunch option, top slices of challah with smashed avocado, a sprinkle of salt, and a drizzle of olive oil. This trendy twist adds a fresh and healthy element to your meal.
- Deli Meats and Cheeses: Use challah as the base for hearty sandwiches filled with your favorite deli meats and cheeses. The bread’s soft texture and subtle sweetness complement savory fillings perfectly, creating a satisfying lunch option.
- Charcuterie Board: Include slices of challah on your charcuterie board for gatherings. It pairs beautifully with a variety of cheeses, cured meats, and spreads, adding a touch of elegance to your spread.
- Sweet Wine: For a delightful dessert pairing, enjoy your challah with a glass of sweet wine. The combination of the bread’s buttery richness and the wine’s sweetness creates a harmonious finish to any meal.
These pairings not only enhance the flavor of your Homemade Challah but also allow you to explore new culinary experiences. Whether you’re hosting a brunch, enjoying a cozy dinner, or simply indulging in a snack, these suggestions will make your challah shine. So, gather your loved ones, serve up some delicious pairings, and enjoy the warmth and joy that comes with sharing good food!
Storage & Meal Prep Instructions
Once you’ve created your beautiful Homemade Challah, it’s important to know how to store it properly to maintain its freshness and flavor. Here are some simple yet effective storage and meal prep instructions to ensure your bread stays delicious for as long as possible:
- Fridge Storage: If you plan to enjoy your challah over a few days, keep it in an airtight container at room temperature for up to 3 days. This will help retain its soft texture and prevent it from drying out. Just be sure to keep it away from direct sunlight or heat sources!
- Freezing: For longer storage, you can freeze your challah. Wrap it tightly in plastic wrap and then in aluminum foil to prevent freezer burn. It can be frozen for up to 3 months. When you’re ready to enjoy it, simply remove it from the freezer and let it thaw at room temperature.
- Reheating: To revive that fresh-baked taste, warm your thawed challah in the oven at 350°F for about 10-15 minutes. This will help restore its soft, pillowy texture and bring back the delightful aroma that fills your kitchen.
By following these storage and meal prep instructions, you can enjoy your Homemade Challah at its best, whether it’s fresh out of the oven or a few days later. So go ahead, bake a loaf (or two!), and savor the joy of sharing this delicious bread with family and friends!
Nutrition Facts & Health Insights
Understanding the nutritional value of your Homemade Challah is essential, especially if you’re looking to enjoy this delightful bread while being mindful of your health. Below is a detailed breakdown of the nutrition per serving (1 slice, approximately 1 oz):
| Nutrient | Amount per Serving |
|---|---|
| Calories | 120 |
| Sugar | 2g |
| Sodium | 150mg |
| Fat | 4g |
| Saturated Fat | 2g |
| Carbohydrates | 18g |
| Fiber | 1g |
| Protein | 3g |
| Cholesterol | 30mg |
Now, let’s talk about the health benefits of some key ingredients in your challah:
- Eggs: Rich in protein and essential nutrients, eggs contribute to the overall nutritional profile of challah. They provide a good source of vitamins such as B12 and D, which are important for energy production and bone health.
- Whole Grains: If you choose to incorporate whole wheat flour into your challah, you’ll benefit from increased fiber content, which aids in digestion and helps maintain a healthy weight. Whole grains are also linked to a lower risk of heart disease and diabetes.
- Butter: While butter adds richness and flavor, it also contains fat-soluble vitamins like A, D, E, and K. Moderation is key, but using quality butter can enhance the nutritional value of your bread.
- Sugar: The sugar in challah not only adds sweetness but also plays a role in browning the crust during baking. While it’s important to be mindful of sugar intake, the amount in homemade challah is relatively low compared to many store-bought options.
By enjoying Homemade Challah in moderation and considering the nutritional benefits of its ingredients, you can savor this delicious bread while still being mindful of your health. So go ahead, indulge in a slice (or two) and relish the joy of homemade goodness!
Frequently Asked Questions
As you embark on your journey to create the perfect Homemade Challah, you may have some questions along the way. Don’t worry; I’ve got you covered! Here are some of the most frequently asked questions about making challah, along with helpful answers to guide you through the process:
- Can I use instant yeast instead of active dry yeast?
Absolutely! You can use instant yeast in place of active dry yeast. Just remember that you can add it directly to the dry ingredients without needing to activate it in warm water first. However, the rising times may vary slightly, so keep an eye on your dough! - What can I substitute for butter?
If you’re looking for a dairy-free option, you can substitute unsalted butter with an equal amount of margarine or a plant-based butter alternative. For a healthier twist, you can also use coconut oil, which will impart a subtle flavor to your challah. - How do I know when the dough has risen enough?
The dough is ready when it has doubled in size. You can test this by gently pressing your finger into the dough; if the indentation remains, it’s ready for the next step. If it springs back, give it a little more time to rise. - Can I make challah without eggs?
Yes, you can make challah without eggs! To replace each egg, you can use 1/4 cup of unsweetened applesauce, 1/4 cup of silken tofu, or a flaxseed egg (1 tablespoon of ground flaxseed mixed with 2.5 tablespoons of water). Keep in mind that the texture and flavor may vary slightly. - What’s the best way to store leftover challah?
To keep your challah fresh, store it in an airtight container at room temperature for up to 3 days. If you want to keep it longer, wrap it tightly in plastic wrap and aluminum foil, then freeze it for up to 3 months. Just thaw it at room temperature when you’re ready to enjoy! - How can I make my challah sweeter?
If you prefer a sweeter challah, you can increase the sugar in the recipe by a tablespoon or two. Alternatively, you can add a drizzle of honey or maple syrup to the dough for a natural sweetness that complements the buttery flavor. - What if my dough is too sticky?
If your dough feels too sticky, don’t panic! You can sprinkle a little more flour onto your work surface and knead it in gradually until the dough reaches a smooth and elastic consistency. Just be careful not to add too much flour, as it can make the bread dense. - Can I add toppings to my challah before baking?
Absolutely! Feel free to get creative with toppings. You can sprinkle sesame seeds, poppy seeds, or even everything bagel seasoning on top of your challah before baking. Just brush the dough with the egg wash first to help the toppings stick!
With these answers in hand, you’re well-equipped to tackle any challenges that may arise while making your Homemade Challah. Remember, baking is a journey filled with learning and joy, so embrace the process and have fun in the kitchen!
Final Inspiration & Kitchen Confidence
As you stand in your kitchen, surrounded by the delightful aroma of freshly baked Homemade Challah, take a moment to appreciate the journey you’ve embarked on. Baking this traditional bread is not just about following a recipe; it’s about creating something beautiful and nourishing that carries the warmth of your heart and the love of your family. Each loaf you make is a testament to your dedication and creativity, and I hope you feel a sense of pride in mastering this cherished recipe.
Remember, baking is an art that flourishes with practice and patience. Don’t be discouraged by any bumps along the way; every great baker has faced challenges in the kitchen. Embrace the process, learn from your experiences, and celebrate the small victories. Whether your challah turns out perfectly braided or a little lopsided, what matters most is the joy it brings to your table and the memories you create while making it.
Now, I invite you to share your Homemade Challah experience with friends and family. Post a picture of your beautiful loaf on social media, or better yet, invite loved ones over to enjoy it together. Your journey in baking can inspire others to step into the kitchen and create their own delicious memories. So, roll up your sleeves, keep that oven warm, and let the magic of baking continue to unfold in your home!
Print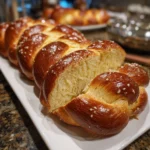
Homemade Challah: Irresistibly Buttery & Golden Delight!
- Total Time: 2 hours
- Yield: 1 large loaf (12 servings)
- Diet: Vegetarian
Description
Homemade Challah is a beautifully braided bread that boasts a golden crust and a soft, pillowy interior. Each bite is a delightful balance of buttery richness and subtle sweetness, making it perfect for any occasion.
Ingredients
- Flour: 4 cups all-purpose flour, sifted
- Yeast: 2 1/4 teaspoons active dry yeast
- Water: 1 1/2 cups warm water (110°F)
- Sugar: 1/4 cup granulated sugar
- Salt: 1 teaspoon kosher salt
- Eggs: 3 large eggs, plus 1 for egg wash
- Butter: 1/4 cup unsalted butter, melted
Instructions
- In a small bowl, dissolve the yeast in warm water with 1 tablespoon of sugar. Let it sit for 5-10 minutes until frothy.
- In a large mixing bowl, combine the flour, remaining sugar, and salt.
- Make a well in the center and add the yeast mixture, melted butter, and eggs. Mix until a dough forms.
- Knead the dough on a floured surface for about 10 minutes until smooth and elastic.
- Place the dough in a greased bowl, cover with a damp cloth, and let it rise in a warm place for 1-2 hours, or until doubled in size.
- Punch down the dough and divide it into three equal pieces. Roll each piece into a long rope and braid them together.
- Place the braided dough on a baking sheet lined with parchment paper. Cover and let rise for another 30-45 minutes.
- Preheat the oven to 350°F (175°C). Brush the dough with the beaten egg for a shiny finish.
- Bake for 25-30 minutes, or until the bread is golden brown and sounds hollow when tapped on the bottom.
- Let cool on a wire rack before slicing.
Notes
- This bread can be made ahead and stored in an airtight container for up to 3 days.
- For longer storage, freeze the baked challah for up to 3 months. Thaw at room temperature before serving.
- Substitute honey for sugar for a more traditional flavor.
- Prep Time: 30 minutes
- Cook Time: 30 minutes
- Category: Breads
- Method: Baking
- Cuisine: Jewish
Nutrition
- Serving Size: 1 slice (about 1 oz)
- Calories: 120
- Sugar: 2 grams
- Sodium: 150 milligrams
- Fat: 4 grams
- Saturated Fat: 2 grams
- Unsaturated Fat: 2 grams
- Trans Fat: 0 grams
- Carbohydrates: 18 grams
- Fiber: 1 gram
- Protein: 3 grams
- Cholesterol: 30 milligrams
Keywords: Homemade Challah, braided bread, Jewish bread, soft bread, buttery bread, sweet bread, challah recipe, traditional challah, egg bread, festive bread, bread baking, easy bread recipe, homemade bread, challah for Shabbat, challah bread