Introduction to Grilled Chicken Caesar Wrap
As a passionate home cook, I find joy in creating meals that are not only delicious but also easy to prepare. One of my all-time favorites is the Grilled Chicken Caesar Wrap. This dish is like a warm hug on a plate, combining the classic flavors of a Caesar salad with the convenience of a wrap. It’s perfect for busy weeknights or a delightful picnic in the park.
Let me take you back to the first time I made this wrap. It was a sunny Saturday afternoon, and I had just returned from the local farmer’s market, my bag brimming with fresh produce. The aroma of grilled chicken wafted through my kitchen as I marinated the chicken, and I could hardly wait to dig in. The crunch of romaine lettuce, the creamy dressing, and the savory chicken all wrapped up in a soft tortilla made my taste buds dance with joy!
What I love most about the Grilled Chicken Caesar Wrap is its versatility. You can customize it to suit your taste or dietary needs. Whether you’re a fan of extra cheese, a sprinkle of crispy bacon, or even a vegetarian twist, this wrap can adapt to your cravings. Plus, it’s a fantastic way to use up leftover grilled chicken or veggies from the week.
In this article, I’ll guide you through the ingredients, preparation steps, and tips to make the perfect Grilled Chicken Caesar Wrap. So, roll up your sleeves, and let’s embark on this culinary adventure together!
Ingredients for Grilled Chicken Caesar Wrap
Before we dive into the cooking process, let’s gather all the ingredients for our Grilled Chicken Caesar Wrap. Having everything ready makes the cooking experience smoother and more enjoyable. Here’s what you’ll need:
Main Ingredients
- 2 boneless, skinless chicken breasts (about 1 pound)
- 1 tablespoon olive oil
- 1 teaspoon garlic powder
- 1 teaspoon Italian seasoning
- Salt and pepper to taste
- 4 large flour tortillas (or whole wheat for a healthier option)
- 2 cups romaine lettuce, chopped
- ½ cup Caesar dressing (store-bought or homemade)
- ¼ cup grated Parmesan cheese
- ¼ cup croutons (optional, for added crunch)
When selecting your chicken, I always recommend choosing organic or free-range options if possible. The flavor is richer, and it feels good to support sustainable farming practices. Fresh romaine lettuce is a must for that crisp texture, and don’t skimp on the Parmesan cheese—it adds a delightful nuttiness to the wrap!
Optional Add-ons
- Cooked bacon bits for a smoky flavor
- Sliced avocado for creaminess
- Cherry tomatoes, halved for a burst of sweetness
- Red onion slices for a bit of zing
- Grilled vegetables like bell peppers or zucchini for extra nutrition
Feel free to get creative with your add-ons! I often toss in whatever I have on hand. One time, I added some grilled zucchini, and it was a game-changer. The key is to balance flavors and textures, so don’t hesitate to experiment!
How to Prepare Grilled Chicken Caesar Wrap
Now that we have our ingredients ready, it’s time to roll up our sleeves and get cooking! Making a Grilled Chicken Caesar Wrap is a delightful process, and I’m excited to share each step with you. Let’s dive in!
Step 1: Marinate the Chicken
First things first, we need to marinate our chicken. This step is crucial because it infuses the meat with flavor and keeps it juicy while grilling.
- In a bowl, combine the olive oil, garlic powder, Italian seasoning, salt, and pepper.
- Add the chicken breasts to the bowl, ensuring they are well-coated with the marinade.
- Cover the bowl with plastic wrap and let it marinate in the refrigerator for at least 30 minutes. If you have more time, marinating for a few hours or overnight will enhance the flavor even more!
Tips for Marinating
To make the most of your marinade, I like to poke a few holes in the chicken with a fork. This helps the flavors seep in better. If you’re short on time, even a quick 15-minute marinade can make a difference!
Step 2: Grill the Chicken
Once the chicken has marinated, it’s time to fire up the grill! The sizzle of the chicken hitting the grill is music to my ears.
- Preheat your grill to medium-high heat.
- Remove the chicken from the marinade and place it on the grill. Cook for about 6-7 minutes on each side, or until the internal temperature reaches 165°F (75°C).
- Once cooked, let the chicken rest for a few minutes before slicing it into strips.
Tips for Grilling
To achieve those beautiful grill marks, avoid moving the chicken around too much. Just let it sit! If you’re using a grill pan, a little olive oil can help prevent sticking.
Step 3: Prepare the Caesar Dressing
While the chicken is grilling, let’s whip up the Caesar dressing. You can use store-bought, but I love making my own for that fresh taste!
- In a small bowl, mix together the Caesar dressing ingredients: mayonnaise, lemon juice, Worcestershire sauce, minced garlic, and Parmesan cheese.
- Whisk until smooth and creamy. Adjust the seasoning with salt and pepper to taste.
Tips for Dressing Preparation
If you want a lighter dressing, you can substitute Greek yogurt for half of the mayonnaise. It adds a nice tang without sacrificing creaminess!
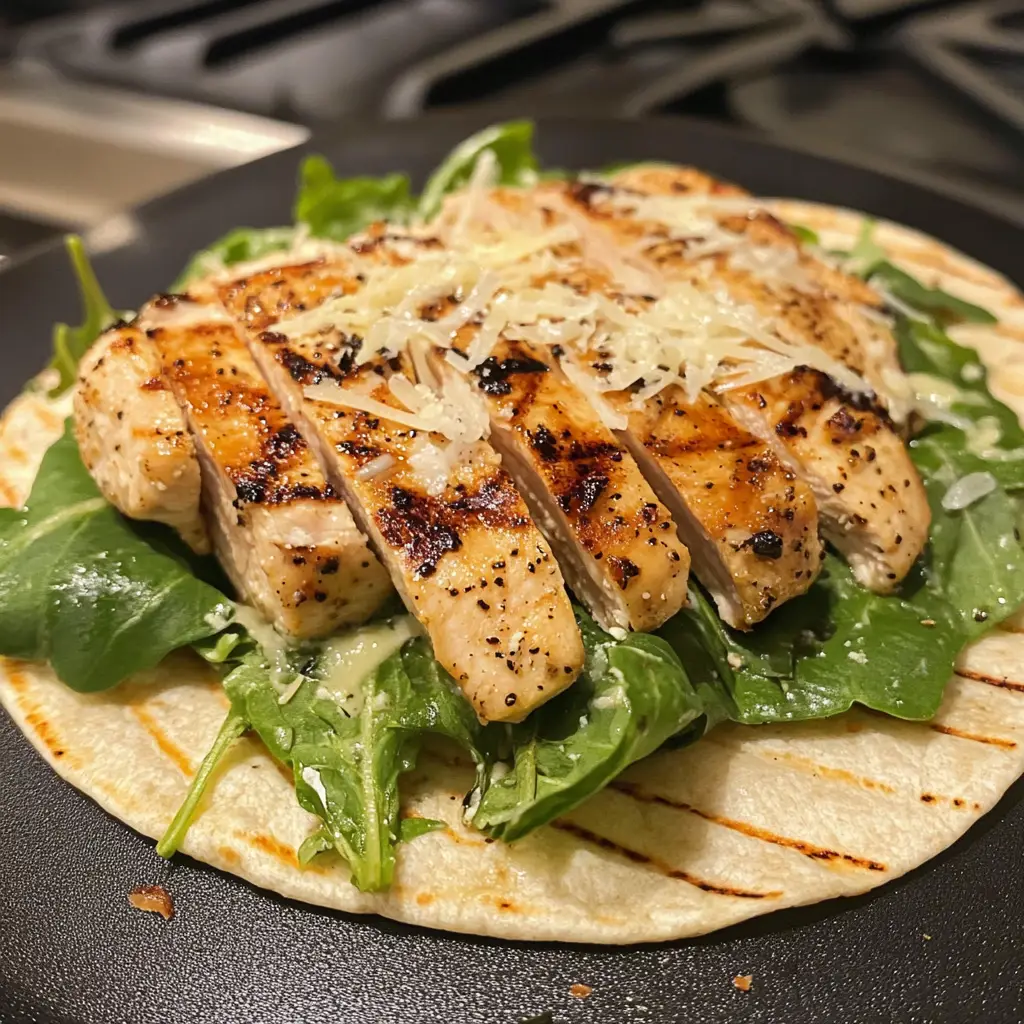
Step 4: Assemble the Wrap
Now comes the fun part—assembling our Grilled Chicken Caesar Wrap! This is where all the flavors come together.
- Lay a tortilla flat on a clean surface.
- Spread a generous amount of Caesar dressing over the tortilla.
- Add a handful of chopped romaine lettuce, followed by the sliced grilled chicken.
- Sprinkle with Parmesan cheese and croutons, if using.
- Carefully roll the tortilla tightly, tucking in the sides as you go.
- Slice the wrap in half, and voilà!
Tips for Assembly
To keep your wrap from falling apart, don’t overfill it. A little goes a long way! If you want to make it extra fancy, you can grill the wrap for a minute on each side to warm it up and create a crispy exterior.
Equipment Needed for Grilled Chicken Caesar Wrap
Before we dive into the deliciousness of the Grilled Chicken Caesar Wrap, let’s make sure we have the right tools at our disposal. Having the right equipment can make the cooking process smoother and more enjoyable. Here’s what you’ll need:
- Grill or Grill Pan: A traditional outdoor grill works wonders, but if the weather isn’t cooperating, a grill pan on your stovetop will do just fine. It gives you those lovely grill marks and that smoky flavor.
- Mixing Bowls: You’ll need a couple of bowls—one for marinating the chicken and another for mixing the Caesar dressing. I love using glass bowls because they’re easy to clean and don’t retain odors.
- Whisk: A simple whisk is perfect for blending the dressing ingredients. If you don’t have one, a fork can work in a pinch!
- Meat Thermometer: This handy tool ensures your chicken is cooked to perfection. If you don’t have one, just cut into the chicken to check that it’s no longer pink inside.
- Cutting Board and Knife: A sturdy cutting board and a sharp knife are essential for slicing the grilled chicken and assembling your wrap.
- Plastic Wrap or Foil: Use this to cover your marinating chicken, keeping it fresh and flavorful in the fridge.
Don’t worry if you’re missing any of these tools! You can always improvise. For instance, if you don’t have a grill, a broiler can work just as well. The key is to enjoy the process and make it your own!
Variations of Grilled Chicken Caesar Wrap
One of the things I adore about the Grilled Chicken Caesar Wrap is its flexibility. You can easily switch things up to keep your taste buds excited! Here are a few variations that I’ve tried and loved:
- Spicy Chicken Caesar Wrap: Add a kick by marinating the chicken with a dash of cayenne pepper or chili powder. You can also drizzle some hot sauce over the finished wrap for an extra layer of heat.
- Vegetarian Caesar Wrap: Swap the chicken for grilled portobello mushrooms or roasted chickpeas. They add a hearty texture and soak up the flavors beautifully.
- Buffalo Chicken Caesar Wrap: Use buffalo sauce in place of the Caesar dressing for a tangy twist. The spicy chicken pairs perfectly with the coolness of the lettuce.
- Greek Caesar Wrap: Incorporate feta cheese and kalamata olives for a Mediterranean flair. You can even use tzatziki sauce instead of traditional Caesar dressing!
These variations not only keep the meal exciting but also allow you to cater to different dietary preferences. I often find myself experimenting with whatever ingredients I have on hand, and it’s always a delightful surprise!
Cooking Notes for Grilled Chicken Caesar Wrap
As I’ve journeyed through the world of cooking, I’ve learned that a few simple notes can elevate your Grilled Chicken Caesar Wrap to new heights. Here are some insights I’ve gathered along the way:
- Marination Time: The longer you marinate the chicken, the more flavorful it becomes. If you can, aim for at least an hour, or even overnight for the best results.
- Grilling Temperature: Make sure your grill is preheated to medium-high heat. This ensures a nice sear on the chicken, locking in those juicy flavors.
- Resting the Chicken: After grilling, let the chicken rest for a few minutes before slicing. This allows the juices to redistribute, making each bite tender and succulent.
- Fresh Ingredients: Always opt for the freshest ingredients you can find. Crisp lettuce and high-quality cheese can make a world of difference in taste.
- Wrap Storage: If you have leftovers, store the components separately. This keeps the wrap from getting soggy and allows you to enjoy it fresh the next day!
These cooking notes are like little treasures I’ve picked up over time. They help me create a Grilled Chicken Caesar Wrap that’s not just good, but truly unforgettable. Happy cooking!
Serving Suggestions for Grilled Chicken Caesar Wrap
Now that we’ve crafted our delicious Grilled Chicken Caesar Wrap, it’s time to think about how to serve it up! Presentation can elevate your meal from simple to spectacular, and I love to get creative with my serving ideas. Here are a few suggestions that I’ve found to be delightful:
- Side Salads: Pair your wrap with a light side salad. A simple mixed greens salad with a lemon vinaigrette complements the rich flavors of the wrap beautifully.
- Chips or Fries: For a casual meal, serve your wrap with a side of crispy potato chips or sweet potato fries. The crunch adds a fun texture contrast!
- Fruit Platter: A refreshing fruit platter can balance the savory flavors of the wrap. Think juicy watermelon, sweet strawberries, or tangy pineapple.
- Dipping Sauces: Offer a variety of dipping sauces on the side, like extra Caesar dressing, ranch, or even a spicy sriracha mayo for those who like a kick.
- Wrap it Up: If you’re serving guests, consider cutting the wraps into smaller pieces and arranging them on a platter. It makes for a beautiful appetizer or party snack!
These serving suggestions not only enhance the meal but also create a delightful dining experience. I often mix and match based on what I have on hand or the occasion. The key is to enjoy the process and share the joy of good food with others!
Tips for Making the Perfect Grilled Chicken Caesar Wrap
Creating the perfect Grilled Chicken Caesar Wrap is all about the little details. Over the years, I’ve gathered some handy tips that can elevate your wrap from good to absolutely fantastic. Here’s what I’ve learned:
- Choose the Right Tortilla: Opt for large, soft tortillas that can hold all the delicious fillings without tearing. Whole wheat tortillas add a nutty flavor and extra nutrition!
- Don’t Skip the Resting Time: After grilling, let your chicken rest for a few minutes. This simple step keeps the meat juicy and tender, making every bite a delight.
- Layer Wisely: When assembling, start with the dressing, then add lettuce, chicken, and cheese. This layering helps distribute flavors evenly and prevents sogginess.
- Experiment with Seasoning: Don’t be afraid to add your favorite spices to the chicken marinade. A pinch of smoked paprika or a dash of lemon zest can add a delightful twist!
- Wrap it Right: When rolling your wrap, tuck in the sides as you go to keep everything secure. A well-wrapped wrap is a happy wrap!
These tips have transformed my Grilled Chicken Caesar Wraps into a family favorite. Each time I make them, I’m reminded of the joy of cooking and sharing delicious meals with loved ones. Happy wrapping!
Breakdown of Time for Grilled Chicken Caesar Wrap
When it comes to cooking, I always appreciate knowing how much time I need to set aside. The Grilled Chicken Caesar Wrap is not only delicious but also quick to prepare, making it perfect for busy days. Here’s a simple breakdown of the time involved:
- Prep Time: 15 minutes. This includes gathering your ingredients, marinating the chicken, and preparing the Caesar dressing.
- Cooking Time: 15-20 minutes. This is the time it takes to grill the chicken and assemble the wrap.
- Total Time: 30-35 minutes. In just over half an hour, you can have a scrumptious meal ready to enjoy!
Knowing this time breakdown helps me plan my cooking sessions better. Whether I’m whipping up a quick dinner after a long day or preparing for a weekend gathering, the Grilled Chicken Caesar Wrap fits perfectly into my schedule. Plus, the aroma of grilled chicken filling the kitchen is always a bonus!
Nutritional Information for Grilled Chicken Caesar Wrap
As a home cook, I always keep an eye on the nutritional value of the meals I prepare. The Grilled Chicken Caesar Wrap is not only delicious but also offers a balanced mix of nutrients. Here’s a general breakdown of the nutritional information for one wrap, assuming you use the main ingredients listed:
- Calories: Approximately 450-500 calories
- Protein: About 30-35 grams
- Carbohydrates: Roughly 40-45 grams
- Fat: Around 20-25 grams
- Fiber: 3-5 grams
- Sodium: Approximately 800-900 mg
These values can vary based on the specific ingredients you choose, especially if you add optional ingredients like bacon or avocado. I love that this wrap provides a good source of protein from the chicken, along with healthy fats from the dressing and cheese. Plus, the fresh romaine lettuce adds a nice crunch and some fiber to keep you feeling satisfied.
When I make this wrap, I often think about how I can make it even healthier. Using whole wheat tortillas, reducing the amount of dressing, or adding more veggies can boost the nutritional profile without sacrificing flavor. It’s all about finding that perfect balance!
Frequently Asked Questions about Grilled Chicken Caesar Wrap
As I’ve shared my love for the Grilled Chicken Caesar Wrap, I’ve often received questions from fellow home cooks eager to try their hand at this delicious dish. Here are some of the most frequently asked questions, along with my personal insights to help you on your culinary journey!
Can I use a different type of protein?
Absolutely! While grilled chicken is a classic choice, you can easily substitute it with grilled shrimp, turkey, or even tofu for a vegetarian option. Each protein brings its own unique flavor and texture, so feel free to experiment!
How can I make this wrap gluten-free?
If you’re looking to make a gluten-free version, simply swap out the flour tortillas for gluten-free wraps or lettuce leaves. I’ve tried using large romaine leaves, and they make for a refreshing and crunchy alternative!
Can I prepare the wrap in advance?
Yes, you can! I often prepare the components ahead of time. Just keep the chicken, dressing, and veggies separate until you’re ready to eat. This way, the wrap stays fresh and doesn’t get soggy. It’s perfect for meal prep!
What can I serve with the Grilled Chicken Caesar Wrap?
There are so many delicious options! I love pairing my wraps with a light side salad, crispy chips, or even a refreshing fruit platter. You can also serve it with a variety of dipping sauces for an extra flavor boost!
How do I store leftovers?
If you have any leftovers, store the components separately in airtight containers. This keeps the wrap fresh and prevents it from getting soggy. The chicken and dressing can last in the fridge for a few days, making it easy to enjoy again!
Can I make the Caesar dressing from scratch?
Definitely! Making your own Caesar dressing is simple and adds a fresh touch to the wrap. I love using a mix of mayonnaise, lemon juice, garlic, and Parmesan cheese. You can adjust the ingredients to suit your taste, too!
These FAQs reflect the curiosity and creativity that come with cooking. I hope my answers inspire you to dive into making your own Grilled Chicken Caesar Wrap and enjoy the delightful flavors it brings. Happy cooking!
Conclusion on Grilled Chicken Caesar Wrap
In wrapping up our culinary journey with the Grilled Chicken Caesar Wrap, I can’t help but feel a sense of satisfaction. This dish is more than just a meal; it’s a celebration of flavors, textures, and the joy of cooking. The combination of juicy grilled chicken, crisp romaine lettuce, and creamy Caesar dressing all tucked into a soft tortilla creates a delightful experience that’s hard to resist.
What I love most about this wrap is its versatility. Whether you’re looking for a quick weeknight dinner or a fun picnic treat, it fits the bill perfectly. Plus, it’s a fantastic way to use up leftovers and get creative with your ingredients. You can easily customize it to suit your taste or dietary needs, making it a go-to recipe for everyone in the family.
So, the next time you’re in the kitchen, I encourage you to give the Grilled Chicken Caesar Wrap a try. It’s not just about the delicious flavors; it’s about the memories you’ll create while cooking and sharing this meal with loved ones. Happy wrapping, and may your culinary adventures be filled with joy and flavor!