Introduction to Glow-in-the-Dark Moon Rocks
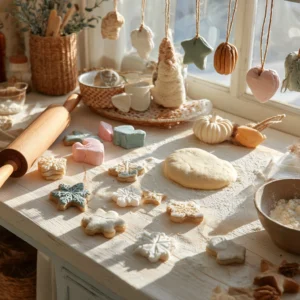
Creating a cozy and inviting home doesn’t have to be expensive or time-consuming. With a little creativity and some simple materials, you can transform ordinary spaces into extraordinary ones. One delightful project that combines fun and functionality is making glow-in-the-dark moon rocks. These enchanting decorations not only add a whimsical touch to your home or garden but also create a magical ambiance at night.
As a busy mom, I often find myself juggling multiple responsibilities, and sometimes, I just need a little escape into the world of crafting. This DIY project is perfect for those moments! It allows me to unwind while creating something beautiful that my family can enjoy. I remember the first time I made these moon rocks; it was a rainy afternoon, and I needed a little brightness in my day. The process was simple, yet the results were stunning!
Whether you’re a busy mom or a professional looking for a creative outlet, this DIY project is perfect for you! It’s easy to follow, requires minimal materials, and the satisfaction of seeing your glowing creations light up your space is truly rewarding. Plus, it’s a wonderful way to involve your kids in a fun activity that sparks their creativity too!
So, let’s dive into the magical world of glow-in-the-dark moon rocks and discover how you can bring a little sparkle into your life!
Why You’ll Love This Glow-in-the-Dark Moon Rocks
Glow-in-the-dark moon rocks are a fantastic way to express your creativity while being budget-friendly. I can’t tell you how many times I’ve found myself searching for a simple yet rewarding craft project that fits into my busy schedule. This project is just that! With minimal materials and tools, it’s accessible for everyone, even if you’re short on time.
What I love most about making these moon rocks is the sheer joy of creating something beautiful with my own hands. There’s a special satisfaction that comes from transforming ordinary white rocks into glowing treasures. I remember the first time I placed my finished moon rocks in the garden; the way they lit up at night was simply magical! It felt like I had brought a piece of the night sky into my backyard.
Not only do these glowing rocks add a whimsical touch to your home decor, but they also serve as a wonderful conversation starter. Friends and family are always amazed when they see them glowing softly in the dark. It’s a delightful way to share your crafting journey and inspire others to get creative too!
Plus, the process of making these moon rocks can be a great way to unwind after a long day. I often find that taking a little time for myself to craft helps me recharge. Whether you’re a busy mom or a professional, this DIY project is a perfect escape that allows you to tap into your artistic side while creating something that brings joy to your space.
So, if you’re looking for a fun and fulfilling craft that can brighten up your evenings and spark joy in your home decor, look no further than these enchanting glow-in-the-dark moon rocks!
Materials Needed for Glow-in-the-Dark Moon Rocks
To create your stunning glow-in-the-dark moon rocks, you will need the following materials:
- White rocks – 10 pieces: These will serve as the base for your moon rocks. I love collecting smooth, white stones from my local park; they add a natural touch to the project!
- Glow-in-the-dark paint – 1 bottle: This special paint will give your rocks their magical glow. I recommend choosing a high-quality paint for the best results; the glow is truly mesmerizing!
- Paintbrush – 1: For applying the paint evenly on the rocks. A medium-sized brush works well, allowing you to cover the surfaces without too much fuss.
- Clear sealant spray – 1 can: This will protect your painted rocks and enhance their glow. I always opt for a sealant that’s suitable for outdoor use, especially if I plan to display them in the garden.
Gathering these materials is part of the fun! I often find myself excitedly rummaging through my craft supplies, and it’s a great way to get the kids involved too. They love helping me pick out the perfect rocks and colors!
*For a printable full list of materials, see below.*
Tools Required for Glow-in-the-Dark Moon Rocks
Before you start crafting your enchanting glow-in-the-dark moon rocks, it’s important to gather the right tools. Having everything ready will make the process smoother and more enjoyable. Here’s what you’ll need:
- Paintbrush: This is essential for applying the glow-in-the-dark paint. I recommend using a medium-sized brush, as it allows for even coverage without too much hassle. I’ve found that a brush with soft bristles works best for a smooth finish!
- Protective gloves: These are a must to keep your hands clean while painting. Trust me, I’ve made the mistake of skipping this step, and scrubbing paint off my hands was not fun! A simple pair of disposable gloves will do the trick.
- Drop cloth or newspaper: Use this to protect your workspace from paint spills. I always lay down an old tablecloth or some newspaper on my kitchen table before starting any craft project. It makes cleanup a breeze and keeps my crafting area tidy!
Gathering these tools is part of the excitement! I often find myself setting up my crafting space like a little art studio, and it helps to get me in the creative mood. Plus, it’s a great way to involve the kids; they love helping me prepare the area and get everything ready for our crafting adventure!
How to Make Glow-in-the-Dark Moon Rocks
Creating your own glow-in-the-dark moon rocks is a delightful and straightforward process! I remember the first time I embarked on this crafting adventure; it felt like I was about to create my own little piece of the night sky. Follow these easy step-by-step instructions to bring your glowing creations to life:
Step 1: Gather Materials and Tools
Before diving in, collect all the materials and tools listed above. Having everything at your fingertips ensures a smooth crafting experience. I often lay everything out on my table, and it gets me excited to start!
Step 2: Clean the Rocks
Next, wash the white rocks thoroughly to remove any dirt or debris. This step is crucial because a clean surface helps the paint adhere better. I usually rinse them under warm water and let them dry completely. It’s amazing how a little prep work can make such a difference!
Step 3: Wear Protective Gloves
Now, it’s time to put on your protective gloves. Trust me, this is a step you don’t want to skip! I’ve learned the hard way that paint can be tricky to remove from skin, so I always keep a pair of disposable gloves handy.
Step 4: Apply Glow-in-the-Dark Paint
Using your paintbrush, apply a coat of glow-in-the-dark paint to each rock. Make sure to cover all surfaces evenly. I like to start with one side and then flip the rock to get every angle. The transformation is so satisfying; it’s like watching the rocks come to life!
Step 5: Allow Paint to Dry
After painting, let the paint dry completely, following the manufacturer’s instructions. This usually takes about 30 minutes to an hour. I often use this time to clean up my workspace or plan where I’ll display my moon rocks later.
Step 6: Seal the Paint
Once the paint is dry, it’s time to apply a clear sealant spray. This step protects your painted rocks and enhances their glow effect. I always make sure to do this in a well-ventilated area, as the spray can be a bit strong!
Step 7: Let the Sealant Dry
Allow the sealant to dry as per the instructions on the can, usually around 30 minutes. I find this is a great time to take a break and enjoy a cup of tea while I wait for my creations to be ready.
Step 8: Display Your Moon Rocks
Finally, find the perfect spot to display your glow-in-the-dark moon rocks. Whether it’s in your garden, on a shelf, or as part of a centerpiece, enjoy their magical glow at night! I love watching them light up my garden; it feels like I’ve sprinkled a bit of magic around my home.
Tips for Best Results
As I’ve dived into the world of crafting glow-in-the-dark moon rocks, I’ve picked up a few tips that can really enhance your results. These little nuggets of wisdom have made my crafting experience even more enjoyable, and I’m excited to share them with you!
- For a more vibrant glow: I’ve found that applying multiple coats of glow-in-the-dark paint can significantly boost the brightness of your rocks. It’s like layering a beautiful sunset; the more colors you add, the more stunning the result! Just be sure to let each coat dry completely before adding the next.
- Sunlight is your friend: To maximize the glow at night, place your moon rocks in an area where they can soak up sunlight during the day. I love setting mine out on a sunny windowsill or in the garden. The more light they absorb, the more they’ll shine when the sun goes down!
- Get creative with shapes and sizes: Don’t be afraid to experiment with different sizes and shapes of rocks for a unique look. I’ve had so much fun collecting various stones, and each one adds its own character to my display. Larger rocks can make a bold statement, while smaller ones can be scattered for a whimsical touch.
These tips have truly transformed my crafting journey, and I hope they inspire you to create your own stunning glow-in-the-dark moon rocks. Remember, crafting is all about having fun and expressing yourself, so let your creativity shine!
Project Variations
One of the most exciting aspects of crafting glow-in-the-dark moon rocks is the endless possibilities for variations! I love how a simple change can completely transform the look and feel of your creations. Here are some fun project variations that I’ve tried and enjoyed:
- Color Changes: Why stick to just one color? Experimenting with different colors of glow-in-the-dark paint can add a playful twist to your moon rocks. I once made a set in vibrant green and blue, and they looked stunning against the night sky! Mixing colors can create a beautiful gradient effect, making your rocks even more eye-catching.
- Seasonal Adaptations: Get festive by decorating your moon rocks with seasonal themes! For instance, adding a sprinkle of glitter for the holidays can give them a magical sparkle. I love creating a winter wonderland vibe by using white and silver paints, then dusting them with glitter. It’s a fun way to celebrate the seasons and keep your decor fresh!
- Style Variations: Don’t be afraid to play with the size and shape of your rocks. Using larger rocks can create a bold statement piece, while smaller ones can be scattered throughout your garden for a whimsical touch. I’ve had a blast collecting various sizes, and each one adds its own charm to my displays. You can even paint them in different patterns or designs for a unique look!
These variations not only keep the crafting process exciting but also allow you to personalize your moon rocks to fit your style and the seasons. I remember the joy of unveiling my seasonal moon rocks to my family; their faces lit up with delight! So, let your imagination run wild and have fun experimenting with these creative twists on your glow-in-the-dark moon rocks!
Decoration and Usage Ideas
Once you’ve created your stunning glow-in-the-dark moon rocks, the fun doesn’t stop there! There are countless ways to incorporate these magical creations into your home and garden decor. Here are some of my favorite ideas that I’ve personally tried and loved:
- Garden Pathway: Line your garden path with moon rocks to create a whimsical trail that glows at night. It’s like walking on a starry path!
- Indoor Decor: Place your moon rocks in a decorative bowl on your coffee table or shelf. They make for a charming centerpiece that sparks conversation.
- Kids’ Room: Use them as night lights in your children’s rooms. The soft glow can provide comfort and ease any nighttime fears.
- Outdoor Parties: Scatter them around your outdoor seating area for a whimsical touch during evening gatherings. They’ll add a magical ambiance that your guests will adore.
Each of these ideas not only enhances the beauty of your space but also allows you to showcase your creativity. I remember the first time I lined my garden path with these glowing rocks; it felt like stepping into a fairy tale! The joy of seeing my kids’ faces light up when they spotted the glowing rocks in their room was priceless. So, don’t hesitate to get creative and find the perfect spot for your moon rocks!
FAQs about Glow-in-the-Dark Moon Rocks
As I’ve shared my journey of creating glow-in-the-dark moon rocks, I’ve received quite a few questions from fellow crafters and curious friends. Here are some of the most common FAQs that I’ve encountered, along with my personal insights:
Q: How long does the glow last?
A: The glow duration depends on the quality of the paint and the amount of light absorbed. Typically, they glow for several hours after being charged by light. I’ve noticed that the brighter the sunlight they soak up during the day, the longer they glow at night. It’s like a little magic show every evening!
Q: Can I use other types of rocks?
A: Yes! You can use any smooth, clean rocks, but white rocks provide the best base for the glow effect. I’ve experimented with different types of stones, and while they all work, the white ones really enhance the glow. Plus, they’re easy to find at local parks or craft stores!
Q: Is the paint safe for outdoor use?
A: Yes, as long as you use a sealant that is suitable for outdoor conditions. I always check the labels to ensure that both the paint and sealant are designed for outdoor use, especially since I love displaying my moon rocks in the garden. It gives me peace of mind knowing they’ll withstand the elements!
These FAQs reflect some of the common concerns and curiosities that arise when embarking on this delightful crafting adventure. I hope my answers help you feel more confident as you create your own glowing treasures!
Final Thoughts
Creating glow-in-the-dark moon rocks is not just a fun DIY project; it’s a way to bring a little magic into your home. I can’t tell you how fulfilling it feels to transform simple white rocks into glowing treasures that light up my evenings. As busy moms and professionals, we often find ourselves caught up in the hustle and bustle of daily life, and taking time to craft can be a wonderful escape.
These moon rocks will not only beautify your space but also serve as a reminder of your creativity and resourcefulness. I remember the first time I placed my finished moon rocks in the garden; the way they illuminated the night was simply enchanting! It’s moments like these that remind me of the joy that crafting can bring, not just to me, but to my family as well.
So gather your materials, unleash your inner artist, and enjoy the glowing results of your hard work! Whether you’re displaying them in your garden, using them as night lights, or sharing them with friends, these moon rocks are sure to spark joy and inspire creativity. Embrace the process, have fun, and let your imagination shine bright!
Print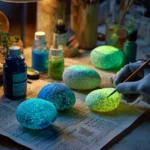
Glow-in-the-Dark Moon Rocks for Stunning DIY Decor
Description
Create beautiful glow-in-the-dark moon rocks that can be used as stunning decor for your home or garden. These DIY moon rocks will add a magical touch to any space, especially at night.
Instructions
- Gather all materials and tools needed for the project.
- Clean the white rocks to remove any dirt or debris.
- Put on protective gloves to avoid getting paint on your hands.
- Using the paintbrush, apply a coat of glow-in-the-dark paint to each rock.
- Allow the paint to dry completely, following the manufacturer’s instructions.
- Once dry, apply a clear sealant spray to protect the paint and enhance the glow effect.
- Let the sealant dry as per the instructions on the can.
- Display your glow-in-the-dark moon rocks in your desired location and enjoy their glow at night!
Keywords: Glow-in-the-Dark, Moon Rocks, DIY Decor, Home Decor, Craft Project