Ingredients
White Vinegar (1 cup)
The acid core of the brine. White vinegar is sharp, clean, and completely neutral in color — it lets the orange-red of the smoked paprika and hot sauce color the brine vividly, and it delivers pickling acidity without any competing flavor. Its efficiency at penetrating dense egg whites makes it the right choice for a recipe where flavor infusion time is already at a premium.
Water (1 cup)
Balances the vinegar to a level of acidity that’s potent enough to flavor and preserve without overwhelming. The 1:1 ratio is the reliable standard for quick refrigerator pickle brines.
Hot Sauce (2 tbsp)
More than just heat — hot sauce contributes fermented pepper complexity, additional acidity, and a flavor depth that no dried spice or fresh pepper can replicate on its own. It distributes evenly throughout the brine and infuses into every egg uniformly. This is the ingredient that makes people taste these eggs and immediately think “what is that?” — they know it’s spicy, they know it’s pickled, but the hot sauce adds an almost umami-adjacent depth that they can’t quite place.
Pickling Salt or Kosher Salt (1 tbsp)
Seasons the brine and accelerates flavor penetration into the egg white through osmotic processes. Always use pickling salt or kosher salt — table salt’s iodine and anti-caking agents cloud the brine and can affect flavor in ways that are particularly noticeable in a clear, vinegar-based brine.
Sugar (1 tbsp)
One tablespoon across twelve eggs adds no perceptible sweetness — what it does is round the aggressive edge of the vinegar and prevent the brine from tasting hollow and one-dimensional. Sugar in a spicy brine functions as a flavor amplifier, making the heat and tang more vivid and coherent rather than just harsh.
Garlic (5 cloves, smashed)
Smashing rather than slicing or mincing is a deliberate technique choice. When a garlic clove is smashed, its cell walls rupture completely and immediately, releasing allicin and aromatic compounds rapidly into the brine. Five smashed cloves produce a brine so deeply garlicky that the eggs themselves carry pronounced garlic flavor by the end of the pickling period. The garlic flavor doesn’t compete with the heat — it undergirds it, adding savory depth that makes the overall experience feel substantial rather than just burning.
Jalapeños (2, thinly sliced)
The foundational fresh pepper layer. Two jalapeños provide the green, vegetal brightness and accessible building heat that makes the overall pepper profile approachable even as the serranos push the intensity higher. Sliced thin for maximum surface area and brine contact.
Serrano Peppers (2, thinly sliced)
The upgrade that separates these from standard spicy pickled eggs. Two serrano peppers add a sharper, more intense heat layer on top of the jalapeños. People who eat one of these eggs and think “that’s hotter than I expected” are feeling the serrano doing its work. Their flavor is similar to jalapeño but with less of the vegetal sweetness and more of a raw, aggressive bite that mellows — but doesn’t disappear — during pickling.
Crushed Red Pepper Flakes (1 tsp)
Sustained background warmth. The flakes infuse the brine during heating and continue to release capsaicin throughout the refrigeration period, slowly increasing the heat level of the brine over the two-week storage window. Eggs eaten at day seven are noticeably hotter than eggs eaten at day three — the red pepper flakes are a primary reason why.
Black Peppercorns (1 tsp)
Aromatic warmth and complexity. Whole peppercorns contribute a different kind of heat than capsaicin — piperine, the active compound in black pepper, creates warmth without the same receptor activation as chili heat. The combination of capsaicin and piperine produces a more complex, layered heat experience than either provides alone.
Mustard Seeds (1 tsp)
The spice that declares this a serious, well-made pickle. Mustard seeds contribute a mild earthiness and pop of texture and signal culinary intention — the way a good brine should smell and taste. They soften during pickling and become edible, delivering a small burst of warm, savory flavor when bitten.
Smoked Paprika (½ tsp)
The depth and color agent. Smoked paprika gives the brine its gorgeous orange-red color and adds a dry, wood-fire smokiness that adds a completely different sensory dimension to the heat profile. It doesn’t add capsaicin heat, but the smokiness creates a perception of intensity that makes the overall experience feel more complex. It’s also what makes people look at the brine in the jar and immediately want to try whatever’s in it.
Bay Leaf (1)
The quiet professional. One bay leaf adds a subtly herbal, faintly floral background note that rounds the brine and makes it taste intentional and complete. Remove it before serving if desired, though it causes no harm left in.
Instructions
Step 1: Perfect Hard-Boiled Eggs
Everything starts here. Rubbery, overcooked eggs with green-gray yolks undermine the finished pickle regardless of how good the brine is. Here’s the method that works every time:
Place eggs in a single layer in a saucepan. Cover with cold water by an inch. Bring to a full boil over medium-high heat. The moment the water reaches a rolling boil, remove from heat, cover, and let sit for exactly 11 minutes. Transfer immediately to an ice bath — a large bowl filled with water and ice cubes. Let cool for at least 15 minutes before peeling.
The result is a fully set white, a bright yellow yolk with no green ring, and a texture that holds up to the pickling brine without becoming rubbery or falling apart.
Steaming alternative: Many experienced cooks prefer steaming for eggs that peel more easily. Place eggs in a steamer basket over boiling water, cover, and steam for 13 minutes. Ice bath as above. Steamed eggs — especially farm-fresh eggs — peel dramatically more easily than boiled ones.
The peeling tip that actually works: Peel under cold running water. The water gets beneath the membrane between the shell and the white, sliding the shell off cleanly rather than pulling chunks of white with it. Work from the wider end where the air pocket gives you an initial gap.
Step 2: Pack the Jar Strategically
Use a wide-mouth quart jar — wide-mouth for easy access when you want to grab an egg, quart-sized because twelve eggs need the room. Place eggs into the jar first, then tuck the smashed garlic cloves, jalapeño slices, and serrano slices into the gaps between eggs. Distribute everything evenly throughout the jar rather than all in one place — you want every egg surrounded by aromatics and heat sources.
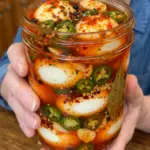
For visual drama: press jalapeño and serrano slices against the inside wall of the jar as you pack. Once the brine goes in and the jar sits on the counter or in the fridge, the pepper slices will be visible through the glass against the orange-red brine — a visual that immediately communicates exactly what these are and what they’ll do.
Step 3: Build and Heat the Brine
Combine the white vinegar, water, hot sauce, salt, sugar, red pepper flakes, black peppercorns, mustard seeds, smoked paprika, and bay leaf in a small saucepan. The mixture will look slightly orange-red immediately from the hot sauce and smoked paprika. Set over medium heat and stir occasionally until the salt and sugar dissolve completely — 3 to 4 minutes. Don’t bring to a full rolling boil; a gentle simmer is all you need and avoids excessive evaporation of the brine.
The kitchen will smell extraordinary during this step — vinegary, garlicky, smoky, and spiced.
Step 4: Pour and Submerge
Pour the hot brine over the eggs slowly and carefully. Eggs are heavier than most pickling vegetables and will stay put rather than floating — which makes the submersion step easier. Make sure every egg is fully covered. Any egg surface exposed above the brine line won’t pickle properly and will deteriorate faster.
Step 5: Cool, Seal, and Refrigerate
Leave the jar uncovered on the counter until it cools to room temperature — 45 minutes to an hour for a full quart jar. Seal tightly and move to the refrigerator.
Step 6: The Five to Seven Day Window
The most difficult part of this recipe is also the most important.
Day 3: Minimum viable pickle. The brine has penetrated the outer layer of the whites. The flavor is tangy and garlicky with noticeable heat. Edible, but a preview of what’s coming.
Day 5: Significantly better. The heat has built and distributed more evenly. The garlic is fully present in every bite. The whites have taken on a visible orange tinge from the brine.
Day 7: The target. Full infusion. The whites are deeply flavored all the way through, the heat is complex and layered, and the brine itself has become something extraordinary — spicy, tangy, smoky, and deeply garlicky. Worth every day of waiting.
Beyond seven days, the eggs continue to absorb brine and get progressively more intense. A two-week egg is significantly hotter and more pickled-tasting than a seven-day egg. Some people prefer this; others prefer the balance of the first week.
- Prep Time: 15 minutes
- Cook Time: 5 minutes
Nutrition
- Serving Size: 12 eggs
- Calories: 80 per egg