Sensory-Rich Introduction with Immediate Craving
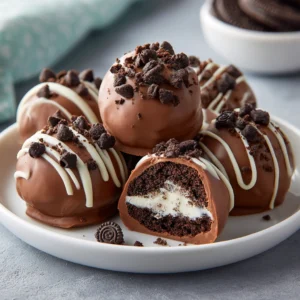
Imagine biting into a Easter Oreo Truffle—the moment your teeth sink into the creamy, chocolatey exterior, you’re greeted by a delightful crunch from the crushed Oreos nestled within. The rich, velvety texture of cream cheese melds perfectly with the sweetness of white chocolate, creating a symphony of flavors that dance on your palate. Each truffle is a little piece of heaven, adorned with colorful sprinkles that catch the light, making them as visually appealing as they are delicious.
These truffles hold a special place in my heart, as they remind me of the joyful Easter mornings spent in my grandmother’s kitchen. I can still hear her laughter as we rolled the truffle mixture into perfect little balls, her hands dusted with Oreo crumbs. It was a family affair, with everyone pitching in—my siblings, cousins, and even the family dog, who patiently waited for any fallen morsels. Those moments were filled with love, laughter, and the sweet aroma of melting chocolate wafting through the air, creating memories that I cherish to this day.
Sharing these treats with loved ones during festive occasions brings me immense joy. There’s something magical about watching the faces of family and friends light up as they take their first bite. Whether it’s at an Easter celebration, a spring gathering, or a casual family picnic, these Easter Oreo Truffles are the perfect addition to any dessert table. They not only satisfy your sweet tooth but also create a sense of togetherness, making every occasion a little sweeter.
Why You’ll Love This Easter Oreo Truffles
Let me tell you, there are so many reasons to fall head over heels for these Easter Oreo Truffles. First and foremost, the texture contrast is simply divine. Imagine the creamy filling of cream cheese melding with the crunchy bits of Oreo cookies. Each bite is a delightful dance of textures that keeps you coming back for more.
Then there’s the flavor balance. The sweetness of the chocolate coating perfectly complements the rich cream cheese, while the hint of vanilla from the Oreos adds a subtle depth. It’s a flavor explosion that’s not overly sweet, making it just right for any palate.
One of the best parts? The versatility of these truffles! You can easily customize them with different chocolate coatings—dark, milk, or even a swirl of colored chocolate for a festive touch. And let’s not forget about toppings! From crushed nuts to coconut flakes, the possibilities are endless.
What I love most about this recipe is its ease. It’s a no-bake wonder that requires minimal time and effort. Perfect for those busy days when you want to whip up something special without spending hours in the kitchen. Trust me, you’ll be amazed at how quickly these truffles come together!
Lastly, these truffles have a universal appeal. Kids and adults alike can’t resist their charm. They’re a hit at any gathering, whether it’s an Easter celebration, a birthday party, or just a cozy family get-together. You’ll find that everyone will be reaching for seconds (and thirds!).
So, if you’re looking for a treat that’s not only delicious but also brings joy and smiles to those you share it with, look no further than these Easter Oreo Truffles. They’re sure to become a beloved staple in your holiday traditions!
Essential Tools & Preparation Strategy
Before diving into the delightful world of Easter Oreo Truffles, let’s gather our essential tools. Having the right equipment not only makes the process smoother but also enhances your overall experience in the kitchen. Trust me, I’ve learned this the hard way!
- Mixing Bowl: A large mixing bowl is essential for combining the Oreo and cream cheese mixture. I prefer using a glass bowl because it allows me to see the beautiful marbling of the cream cheese and Oreos as I mix.
- Baking Sheet: You’ll need a baking sheet to chill the truffles before coating them. I always line mine with parchment paper to prevent any sticking disasters.
- Parchment Paper: This is a must-have! It not only prevents sticking but also makes cleanup a breeze. Trust me, your future self will thank you.
- Microwave-Safe Bowl: For melting the chocolate safely, a microwave-safe bowl is crucial. I often use a glass bowl, as it heats evenly and allows me to monitor the melting process.
- Spoon or Fork: These are handy for dipping the truffles into the melted chocolate. I usually opt for a fork, as it allows me to lift the truffles out without too much mess.
- Refrigerator: This is your best friend when it comes to chilling the truffles to achieve that perfect texture. Don’t skip this step!
- Optional: If you want to save time, a food processor can be a game-changer for finely crushing Oreos. Just be careful not to turn them into dust!
With these tools at your disposal, you’re well on your way to creating a batch of Easter Oreo Truffles that will impress your family and friends. Remember, the key to a successful kitchen adventure is preparation. So, let’s get ready to roll those truffles!
Ingredients & Their Roles in This Easter Oreo Truffles
Understanding the ingredients in your Easter Oreo Truffles is key to mastering this delightful treat. Each component plays a vital role in creating the perfect balance of flavor and texture. Let’s break it down!
For the Truffles:
- Oreo Cookies: These iconic cookies serve as the base flavor and provide that satisfying crunch. The chocolatey goodness of Oreos is what makes these truffles so irresistible. I love using the classic variety, but feel free to experiment with different flavors for a unique twist!
- Cream Cheese: This is the secret ingredient that brings everything together. It provides a rich creaminess that binds the mixture, creating a smooth and luscious filling. Make sure to use softened cream cheese for easy mixing—trust me, it makes a world of difference!
For the Coating:
- White Chocolate Chips: The sweet coating adds a layer of richness that perfectly complements the Oreo filling. I prefer using high-quality white chocolate chips for a smoother melt and better flavor. If you’re feeling adventurous, try flavored chocolate for a fun twist!
- Vegetable Oil: This little addition helps achieve a smooth melting consistency for the chocolate. It prevents the chocolate from seizing and gives it that glossy finish that makes your truffles look professional. Just a tablespoon goes a long way!
- Colored Sprinkles: These are the fun, festive touch that enhances the visual appeal of your truffles. They add a pop of color and make your treats look extra special. Plus, who doesn’t love a little sparkle on their dessert?
Substitutions:
If you’re looking to mix things up or accommodate dietary preferences, here are some great substitutions:
- Use dark or milk chocolate for coating instead of white chocolate for a different flavor profile.
- For a dairy-free option, swap out the cream cheese for vegan cream cheese. It works beautifully and keeps the truffles creamy!
With these ingredients in hand, you’re well on your way to creating Easter Oreo Truffles that will delight everyone at your gathering. Remember, the quality of your ingredients can make a significant difference, so choose wisely!
Step-by-Step Guide to Perfect Easter Oreo Truffles
Now that you have all your ingredients and tools ready, it’s time to dive into the fun part—making your Easter Oreo Truffles! Follow these simple steps, and you’ll be on your way to creating a batch of delightful treats that will impress everyone.
- Combine the Ingredients: In a large mixing bowl, combine the crushed Oreo cookies and softened cream cheese. Use a spatula or your hands to mix until well blended. The mixture should be thick and cohesive, with the chocolatey crumbs fully incorporated into the cream cheese. Don’t be afraid to get your hands in there; it’s part of the fun!
- Shape the Truffles: Once your mixture is well combined, roll it into 1-inch balls. I find that using a small cookie scoop helps keep them uniform in size. Place each ball on a parchment-lined baking sheet, giving them a little space to breathe.
- Chill the Truffles: Pop the baking sheet into the refrigerator and chill the truffles for at least 30 minutes. This step is crucial! Chilling helps them firm up, making them easier to coat in chocolate. Trust me, you don’t want soft truffles that lose their shape!
- Melt the Chocolate: While the truffles are chilling, it’s time to melt the white chocolate chips. In a microwave-safe bowl, combine the chocolate chips and vegetable oil. Microwave in 30-second intervals, stirring after each interval until the chocolate is smooth and fully melted. Be careful not to overheat it, as that can cause the chocolate to seize!
- Coat the Truffles: Once the truffles are firm, it’s time to dip! Using a fork or a toothpick, dip each chilled truffle into the melted chocolate, allowing any excess to drip off. Make sure they are fully coated for that delicious chocolatey goodness.
- Decorate: Place the coated truffles back on the parchment paper. While the chocolate is still wet, sprinkle them with colored sprinkles for a festive touch. This is where you can get creative—mix and match colors to suit your Easter theme!
- Set the Chocolate: Let the chocolate set at room temperature for about 15 minutes, or you can pop them back in the refrigerator to speed up the process. You want that chocolate to harden perfectly around the truffles.
- Serve and Enjoy: Once the chocolate has set, your Easter Oreo Truffles are ready to be served! They can be enjoyed chilled or at room temperature, but I personally love them straight from the fridge for that extra refreshing bite.
And there you have it! A step-by-step guide to creating the most delightful Easter Oreo Truffles. I can already imagine the smiles on your loved ones’ faces as they take their first bite. Happy truffle-making!
Chef’s Notes & Pro Tips for Flawless Results
As someone who has made countless batches of Easter Oreo Truffles, I’ve gathered a few tips and tricks that will help you achieve the best results every time. Trust me, these little nuggets of wisdom can make all the difference!
- Make-ahead Instructions: One of the best things about these truffles is that you can prepare them up to 3 days in advance. Just store them in an airtight container in the refrigerator, and they’ll be ready to impress your guests when the time comes!
- Storage: Keep your truffles in an airtight container in the fridge for up to 1 week. If you want to extend their life, you can freeze them for up to 3 months. Just make sure to thaw them in the fridge before serving for the best texture.
- Equipment Recommendations: If you prefer a more controlled melting process for your chocolate, consider using a double boiler. This method prevents the chocolate from overheating and ensures a smooth, glossy finish. Just be sure to stir frequently!
- Customization Options: Don’t be afraid to get creative! Experiment with different toppings like crushed nuts, coconut flakes, or even a drizzle of caramel for an extra layer of flavor. You can also try using flavored chocolate for the coating—think mint or raspberry for a fun twist!
With these pro tips in your back pocket, you’re well-equipped to create Easter Oreo Truffles that will not only taste amazing but also look stunning. Happy truffle-making, and may your kitchen be filled with joy and delicious aromas!
Avoid These Common Cooking Mistakes
Even the most seasoned cooks can run into a few hiccups when making Easter Oreo Truffles. I’ve certainly had my fair share of kitchen blunders, and I’m here to help you avoid them! Here are some common mistakes to watch out for, along with tips to ensure your truffles turn out perfectly every time.
- Not chilling the truffles long enough: This is a biggie! If you skip or shorten the chilling time, you’ll end up with soft truffles that lose their shape when coated. Make sure to chill them for at least 30 minutes to achieve that perfect firmness.
- Overheating the chocolate: Chocolate can be temperamental. If you overheat it, it can seize up and become unusable. Melt your chocolate in short intervals—30 seconds at a time—stirring in between until it’s smooth and glossy.
- Using cold cream cheese: Cold cream cheese makes it difficult to mix and can result in a lumpy filling. Always use softened cream cheese for a smooth, creamy texture. I usually take mine out of the fridge about 30 minutes before I start.
- Not coating evenly: If your truffles aren’t fully coated in chocolate, you’ll end up with uneven flavors and a less appealing look. Make sure to dip each truffle thoroughly, allowing excess chocolate to drip off before placing them back on the parchment paper.
- Skipping the sprinkles: I get it—sometimes you want to keep it simple. But skipping the sprinkles can make your truffles look less festive. Always add a colorful sprinkle topping to enhance their visual appeal and make them pop!
- Not using parchment paper: Trust me, lining your baking sheet with parchment paper is a must! It prevents sticking and makes cleanup a breeze. You’ll thank yourself later when you can easily lift the truffles off without any hassle.
- Storing at room temperature: While they may look tempting sitting out, storing your truffles at room temperature can cause them to soften. Always refrigerate them for the best texture and to keep them firm and delicious.
By keeping these common mistakes in mind, you’ll be well on your way to creating stunning and delicious Easter Oreo Truffles that will impress everyone at your gathering. Happy truffle-making!
Creative Variations & Customizations
One of the best things about Easter Oreo Truffles is their versatility! You can easily customize them to suit your taste preferences or to celebrate different occasions. Here are some fun and delicious variations to try:
- Peanut Butter Oreo Truffles: For all the peanut butter lovers out there, this variation is a must-try! Simply add a few tablespoons of creamy peanut butter to the cream cheese mixture. The combination of chocolate, Oreos, and peanut butter creates a rich and indulgent treat that’s hard to resist.
- Mint Chocolate Truffles: If you’re a fan of mint, swap out the regular Oreos for mint-flavored Oreos and coat your truffles in dark chocolate. The refreshing mint flavor paired with the rich chocolate will transport you to a delightful chocolate mint paradise!
- Seasonal Variations: Get festive by using pastel-colored chocolate for coating your truffles during spring or Easter. You can also use holiday-themed sprinkles to match the occasion. These little touches will make your truffles not only delicious but also visually stunning!
- Nutty Truffles: For a delightful crunch, roll your truffles in crushed nuts instead of sprinkles. Chopped almonds, walnuts, or pecans add a wonderful texture and flavor contrast that elevates the overall experience.
- Vegan Version: If you’re looking for a dairy-free option, simply substitute the cream cheese with vegan cream cheese and use dark chocolate for coating. This way, everyone can enjoy these delicious treats, regardless of dietary restrictions!
With these creative variations, you can make Easter Oreo Truffles that are uniquely yours. Don’t be afraid to experiment and let your imagination run wild in the kitchen. After all, the best recipes are the ones that reflect your personal touch!
Perfect Pairings: What to Serve With Easter Oreo Truffles
When it comes to enjoying your Easter Oreo Truffles, the right pairings can elevate the experience to a whole new level. Here are some delightful suggestions that will complement the rich, creamy flavors of your truffles:
- Cold Milk: You can’t go wrong with a classic! A glass of cold milk perfectly complements the sweetness of the truffles, creating a nostalgic pairing that takes you back to childhood.
- Fresh Strawberries: The juicy, fruity contrast of fresh strawberries adds a refreshing element to the rich truffles. Plus, the vibrant red color makes for a beautiful presentation!
- Easter Dessert Platter: Create a stunning dessert platter by combining your Easter Oreo Truffles with cupcakes, cookies, and other festive treats. It’s a great way to offer variety and impress your guests.
- Vanilla Ice Cream: For an indulgent dessert experience, serve your truffles alongside a scoop of creamy vanilla ice cream. The combination of textures and flavors is simply divine!
- Mint Leaves: Garnish your truffles with fresh mint leaves for a pop of color and a refreshing touch. It not only looks beautiful but also adds a hint of freshness that balances the sweetness.
- Lemonade: Perfect for a spring picnic vibe, a glass of refreshing lemonade pairs beautifully with the rich flavors of the truffles. The tartness of the lemonade cuts through the sweetness, making for a delightful contrast.
- Gift Box: Consider including your Easter Oreo Truffles in a homemade treat gift box for friends and family. It’s a thoughtful gesture that shows you care, and who wouldn’t love receiving a box of these delicious treats?
- Coffee or Espresso: For a delightful after-dinner treat, serve your truffles with a cup of coffee or espresso. The rich, bold flavors of the coffee enhance the sweetness of the truffles, making for a perfect pairing.
With these perfect pairings, your Easter Oreo Truffles will shine even brighter at your gatherings. Whether you’re hosting a festive celebration or simply enjoying a quiet moment at home, these suggestions will enhance your experience and bring joy to every bite!
Storage & Meal Prep Instructions
Once you’ve created your delightful Easter Oreo Truffles, it’s important to know how to store them properly to maintain their deliciousness. Here are some handy tips for keeping your truffles fresh and ready to enjoy!
- Fridge Storage: To keep your truffles at their best, store them in an airtight container in the refrigerator. They will stay fresh for up to 1 week. Just make sure to separate layers with parchment paper to prevent sticking—nobody wants a truffle disaster!
- Freezer Storage: If you want to make your truffles ahead of time, you can freeze them for up to 3 months. Just place them in a single layer on a baking sheet to freeze them individually before transferring them to an airtight container. When you’re ready to enjoy, simply thaw them in the fridge for a few hours before serving.
- Reheating Methods: While there’s no need to reheat these truffles, it’s best to allow them to come to room temperature before serving. This enhances their creamy texture and makes each bite even more enjoyable. Trust me, you’ll want to savor every moment!
By following these storage and meal prep instructions, you can ensure that your Easter Oreo Truffles remain as delicious as the day you made them. Enjoy sharing these sweet treats with family and friends, and watch as they disappear in no time!
Nutrition Facts & Health Insights
When indulging in Easter Oreo Truffles, it’s always good to know what you’re treating yourself to. Here’s a breakdown of the nutrition facts for these delightful bites, so you can enjoy them guilt-free!
| Nutrient | Amount per Serving (1 truffle) |
|---|---|
| Calories | 120 |
| Sugar | 10 grams |
| Sodium | 50 milligrams |
| Fat | 7 grams |
| Saturated Fat | 4 grams |
| Carbohydrates | 14 grams |
| Protein | 1 gram |
While these truffles are undeniably a treat, they also offer some nutritional benefits. The cream cheese used in the filling provides a good source of calcium, which is essential for strong bones and teeth. Plus, let’s not forget the nostalgic joy that Oreos bring to the table! They remind us of childhood moments and family gatherings, making every bite not just delicious but also filled with sweet memories.
So, as you enjoy your Easter Oreo Truffles, remember that it’s all about balance. Savor the flavors, share the joy, and indulge in the delightful experience of creating and sharing these treats with loved ones!
Frequently Asked Questions
As you embark on your journey to create the perfect Easter Oreo Truffles, you might have a few questions along the way. Don’t worry; I’ve got you covered! Here are some common queries and their answers to help you navigate any uncertainties:
- Can I use low-fat cream cheese?
Absolutely! Low-fat cream cheese can be used as a substitute. Just keep in mind that it may alter the texture slightly, making the truffles a bit less creamy. But they will still be delicious! - How long do these truffles last in the fridge?
Your Easter Oreo Truffles will stay fresh in an airtight container in the fridge for up to 1 week. If you want to keep them longer, consider freezing them for up to 3 months. - Can I use gluten-free Oreos?
Yes, you can! Gluten-free Oreos are a fantastic option for those with dietary restrictions. They will work just as well in this recipe, ensuring everyone can enjoy these delightful treats. - What if my chocolate coating is too thick?
If your chocolate coating is too thick, try adding a little more vegetable oil to thin it out. This will help achieve a smoother consistency for dipping. Remember to melt the chocolate in short intervals to avoid overheating! - How do I prevent the truffles from sticking to the parchment paper?
To prevent sticking, make sure to chill the truffles thoroughly before coating them. Additionally, using parchment paper is key! If you find they still stick, you can lightly grease the parchment with a bit of cooking spray. - Can I make these truffles without a microwave?
Yes, you can! If you prefer not to use a microwave, you can melt the chocolate using a double boiler. Just place a heatproof bowl over a pot of simmering water, stirring until smooth. - What’s the best way to crush Oreos?
The easiest way to crush Oreos is to use a food processor for a fine crumb. If you don’t have one, you can place the cookies in a zip-top bag and crush them with a rolling pin. Just be careful not to turn them into dust! - Can I add flavor extracts to the truffle mixture?
Absolutely! Adding flavor extracts like vanilla, almond, or even peppermint can elevate your truffles to a whole new level. Just start with a small amount (about 1/2 teaspoon) and adjust to taste.
With these FAQs answered, you’re well-equipped to tackle any challenges that may arise while making your Easter Oreo Truffles. Enjoy the process, and happy truffle-making!
Final Inspiration & Kitchen Confidence
As you wrap up your journey of creating Easter Oreo Truffles, take a moment to celebrate your baking achievements! Each truffle you’ve crafted is not just a sweet treat; it’s a labor of love, a testament to your creativity, and a delightful way to share joy with those around you. Remember, the kitchen is a place of magic where memories are made, and every bite carries the warmth of your effort.
So, gather your loved ones, serve up those beautiful truffles, and watch as their faces light up with delight. There’s something incredibly rewarding about sharing your culinary creations, and I can assure you, these truffles will be a hit! I encourage you to try making Easter Oreo Truffles and let your imagination run wild with variations and decorations.
Don’t forget to snap a few photos of your delicious creations and share them with friends and family. Whether it’s on social media or in a family group chat, let the world see your baking triumphs! Your kitchen confidence will inspire others to join in the fun, and who knows? You might just start a new family tradition.
Happy truffle-making, and may your kitchen always be filled with laughter, love, and the sweet aroma of delicious treats!
Print
Easter Oreo Truffles: Creamy, Chocolatey Bliss Awaits!
- Total Time: 50 minutes
- Yield: 24 truffles 1x
- Diet: Vegetarian
Description
Easter Oreo Truffles are a delightful treat that combines the rich, creamy texture of cream cheese with the crunch of crushed Oreos, all enveloped in a smooth layer of chocolate. Each bite offers a perfect balance of sweetness and a hint of vanilla, making them an irresistible addition to your holiday celebrations.
Ingredients
- For the Truffles:
- 1 package (15.35 oz) Oreo cookies, crushed
- 8 oz cream cheese, softened
- For the Coating:
- 12 oz white chocolate chips
- 1 tablespoon vegetable oil
- Colored sprinkles (for decoration)
Instructions
- In a large mixing bowl, combine the crushed Oreo cookies and softened cream cheese until well blended.
- Using your hands, roll the mixture into 1-inch balls and place them on a baking sheet lined with parchment paper.
- Chill the truffles in the refrigerator for at least 30 minutes until firm.
- Meanwhile, melt the white chocolate chips with vegetable oil in a microwave-safe bowl in 30-second intervals, stirring until smooth.
- Dip each chilled truffle into the melted chocolate, allowing excess to drip off.
- Place the coated truffles back on the parchment paper and immediately sprinkle with colored sprinkles.
- Let the chocolate set at room temperature or refrigerate for about 15 minutes.
- Serve chilled or at room temperature.
Notes
- Make-ahead: These truffles can be made up to 3 days in advance and stored in an airtight container in the refrigerator.
- Storage: Keep truffles in the fridge for up to 1 week or freeze for up to 3 months.
- Substitutions: Use dark chocolate or milk chocolate for coating instead of white chocolate for a different flavor profile.
- Prep Time: 20 minutes
- Cook Time: 0 minutes
- Category: desserts
- Method: no-bake
- Cuisine: American
Nutrition
- Serving Size: 1 truffle
- Calories: 120
- Sugar: 10 grams
- Sodium: 50 milligrams
- Fat: 7 grams
- Saturated Fat: 4 grams
- Unsaturated Fat: 2 grams
- Trans Fat: 0 grams
- Carbohydrates: 14 grams
- Fiber: 0 grams
- Protein: 1 gram
- Cholesterol: 10 milligrams
Keywords: Easter Oreo Truffles, no-bake desserts, chocolate truffles, holiday treats, Oreo recipes, cream cheese desserts, festive sweets, easy dessert recipes, spring desserts, homemade truffles, chocolate-covered treats, party desserts, kid-friendly recipes