Introduction to Easter Egg Sugar Cookies Recipe
As a passionate home cook, I find that the kitchen is my happy place, especially during the festive seasons. Easter, with its vibrant colors and joyful spirit, brings a special kind of magic. One of my favorite traditions is baking Easter Egg Sugar Cookies. The aroma of sweet vanilla wafting through the air, the sound of laughter as my family gathers around, and the sight of beautifully decorated cookies bring me immense joy.
These cookies are not just a treat; they are a canvas for creativity! I remember the first time I made them with my little niece. We rolled out the dough, cut it into egg shapes, and let our imaginations run wild with sprinkles and icing. It was a delightful mess, but oh, the smiles we shared! Each cookie became a masterpiece, and the best part? We got to eat our art!
What I love most about this Easter Egg Sugar Cookies Recipe is its simplicity. With just a handful of ingredients, you can create something truly special. Whether you’re hosting an Easter brunch or simply want to brighten up your day, these cookies are perfect for any occasion. Plus, they make for a wonderful gift when wrapped in a colorful box or bag.
So, grab your apron and let’s dive into this delightful recipe together! I promise you’ll find joy in every step, from mixing the dough to decorating those adorable egg shapes. Let’s make some sweet memories this Easter!
Ingredients for Easter Egg Sugar Cookies Recipe
Before we roll up our sleeves and get baking, let’s gather all the ingredients we need for these delightful Easter Egg Sugar Cookies. I always believe that quality ingredients make a world of difference in baking. So, let’s make sure we have the best of the best!
Main Ingredients
- 2 ¾ cups all-purpose flour
- 1 teaspoon baking powder
- ½ teaspoon salt
- 1 cup unsalted butter, softened (make sure it’s at room temperature for easy creaming!)
- 1 ½ cups granulated sugar
- 1 large egg
- 1 teaspoon pure vanilla extract (the real stuff makes a huge difference!)
When I shop for ingredients, I often opt for organic butter and pure vanilla extract. They add a rich flavor that elevates the cookies to a whole new level. Plus, using fresh eggs from a local farm can make your cookies taste even better!
Optional Add-ons
- 1 teaspoon almond extract (for a nutty twist)
- Food coloring (to tint your icing or dough)
- Sprinkles or edible glitter (for that festive touch)
- Royal icing or fondant (for decorating)
These optional add-ons can really take your cookies from ordinary to extraordinary! I love adding a splash of food coloring to the icing, making each cookie a vibrant work of art. And who can resist a sprinkle of edible glitter? It’s like magic on a cookie!
Now that we have our ingredients ready, we’re one step closer to creating these sweet masterpieces. Let’s move on to the next part of our baking adventure!
How to Prepare Easter Egg Sugar Cookies Recipe
Now that we have our ingredients all lined up, it’s time to get our hands a little floury! Baking is like a dance, and each step is a part of the rhythm. Let’s follow the beat and create some delightful Easter Egg Sugar Cookies together!
Step 1: Creaming the Butter and Sugar
First things first, we need to cream the butter and sugar together. In a large mixing bowl, combine the softened butter and granulated sugar. Using an electric mixer, beat them together on medium speed until the mixture is light and fluffy. This usually takes about 3-5 minutes.
Tips for Step 1
- Make sure your butter is at room temperature. Cold butter won’t cream well!
- Scrape down the sides of the bowl occasionally to ensure everything is mixed evenly.
Step 2: Adding the Eggs and Vanilla
Next, it’s time to add the egg and vanilla extract. Crack the egg into the bowl and pour in the vanilla. Mix on low speed until everything is well combined. The mixture should look smooth and creamy.
Tips for Step 2
- For an extra flavor boost, consider adding almond extract along with the vanilla!
- Don’t overmix; just blend until combined to keep the cookies tender.
Step 3: Mixing in the Dry Ingredients
Now, let’s bring in the dry ingredients! In a separate bowl, whisk together the flour, baking powder, and salt. Gradually add this dry mixture to the wet ingredients, mixing on low speed until just combined. Be careful not to overmix; we want soft cookies!
Tips for Step 3
- Use a sifter for the flour to avoid lumps and ensure a light texture.
- Mix until you can no longer see the flour; it’s okay if there are a few small lumps.
Step 4: Chilling the Dough
Once the dough is mixed, it’s time to chill! Wrap the dough in plastic wrap and refrigerate it for at least 1 hour. Chilling helps the cookies hold their shape while baking.
Tips for Step 4
- If you’re short on time, you can chill the dough for just 30 minutes, but longer is better!
- For easier handling, divide the dough into two portions before chilling.
Step 5: Rolling and Cutting the Dough
After the dough has chilled, it’s time to roll it out! On a lightly floured surface, roll the dough to about ¼ inch thick. Use your favorite egg-shaped cookie cutter to cut out the cookies. Place them on a baking sheet lined with parchment paper.
Tips for Step 5
- Keep your rolling pin floured to prevent sticking.
- For fun shapes, try using different cookie cutters or even freehanding some designs!
Step 6: Baking the Cookies
Preheat your oven to 350°F (175°C). Bake the cookies for 8-10 minutes, or until the edges are lightly golden. Keep an eye on them; you want them to be soft and chewy!
Tips for Step 6
- Rotate the baking sheet halfway through for even baking.
- Let the cookies cool on the baking sheet for a few minutes before transferring them to a wire rack.
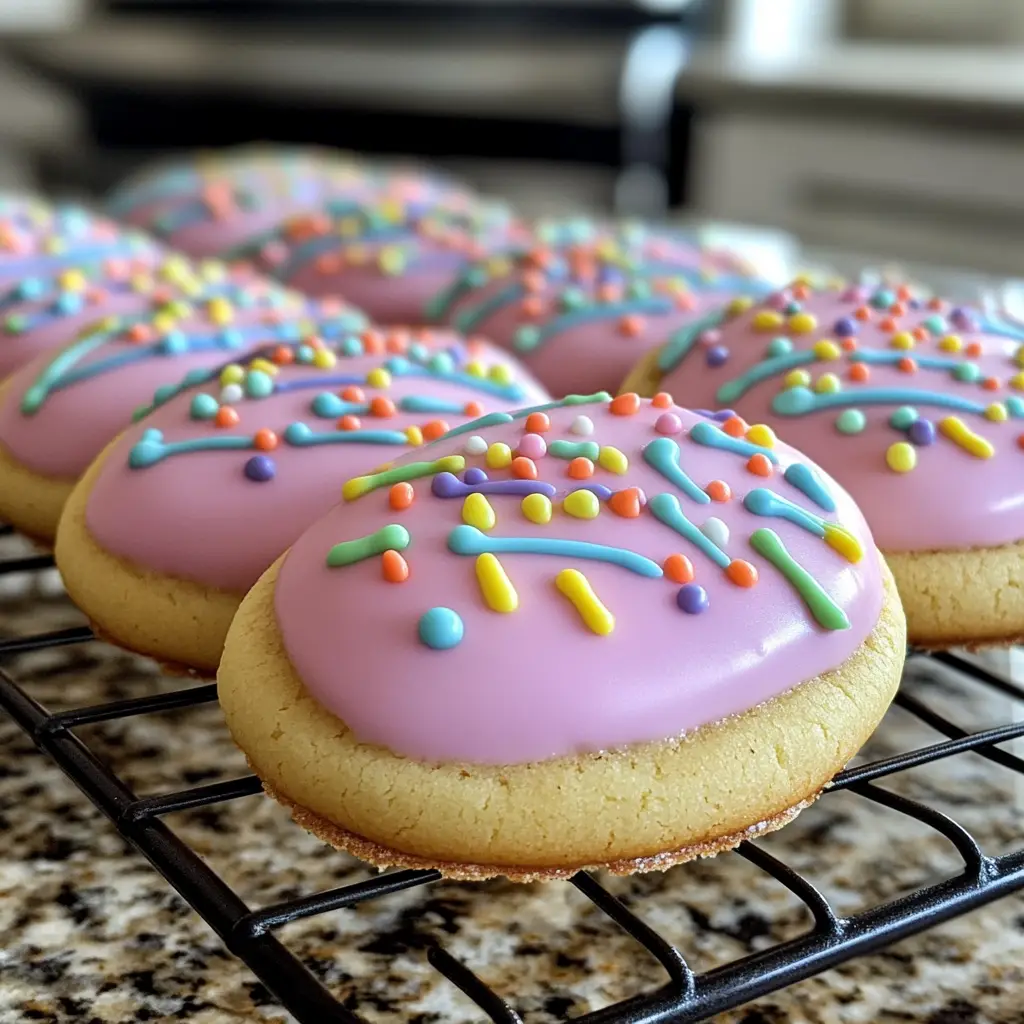
Step 7: Decorating the Cookies
Now comes the best part—decorating! Once the cookies are completely cool, it’s time to unleash your creativity. Use royal icing, colored sprinkles, or edible glitter to make your cookies pop!
Tips for Step 7
- For a smooth icing finish, thin your royal icing with a little water.
- Let your decorated cookies dry completely before stacking them to avoid smudging.
And there you have it! Each step brings us closer to those delightful Easter Egg Sugar Cookies. I can already smell the sweetness in the air! Let’s move on to the next part of our baking journey.
Equipment Needed for Easter Egg Sugar Cookies Recipe
Before we dive into the baking process, let’s make sure we have all the right tools at our fingertips. Having the right equipment can make a world of difference in your baking experience. Here’s a quick list of what you’ll need to whip up these delightful Easter Egg Sugar Cookies!
- Mixing Bowls: A large mixing bowl for creaming the butter and sugar, and a smaller one for whisking the dry ingredients.
- Electric Mixer: An electric mixer is a game-changer for creaming butter and sugar. If you don’t have one, a good old-fashioned whisk will do the trick, but it may take a bit more elbow grease!
- Measuring Cups and Spoons: Accurate measurements are key in baking. Make sure you have both dry and liquid measuring cups.
- Rolling Pin: A rolling pin helps flatten the dough evenly. If you don’t have one, a clean wine bottle can work in a pinch!
- Cookie Cutters: Egg-shaped cookie cutters are essential for this recipe. If you don’t have any, you can use a knife to cut out shapes freehand.
- Baking Sheets: A couple of baking sheets lined with parchment paper will help prevent sticking and make cleanup a breeze.
- Wire Rack: A wire rack is perfect for cooling your cookies. If you don’t have one, a plate will work, but the cookies may take longer to cool.
With these tools in hand, you’re all set to create some scrumptious Easter Egg Sugar Cookies! Remember, the joy of baking comes not just from the end result, but from the process itself. So, let’s get started and make some sweet memories together!
Variations of Easter Egg Sugar Cookies Recipe
As I’ve explored the world of baking, I’ve discovered that there’s always room for creativity! These Easter Egg Sugar Cookies are a fantastic base for experimenting with flavors and decorations. Here are a few delightful variations that I’ve tried and loved:
- Chocolate Chip Easter Egg Cookies: Add a cup of mini chocolate chips to the dough for a sweet surprise in every bite. The combination of chocolate and vanilla is simply irresistible!
- Funfetti Easter Egg Cookies: Mix in colorful sprinkles directly into the dough. When you cut them into egg shapes, the sprinkles will create a festive, confetti-like effect!
- Spiced Easter Egg Cookies: For a warm twist, add a teaspoon of cinnamon or nutmeg to the dry ingredients. This adds a cozy flavor that’s perfect for springtime.
- Gluten-Free Easter Egg Cookies: Substitute all-purpose flour with a gluten-free blend. Just make sure to check that your baking powder is gluten-free as well!
Each variation brings its own unique flair to the table. I love to mix and match these ideas, depending on my mood or the occasion. The best part? You can let your imagination run wild! So, don’t hesitate to try something new and make these cookies your own. Happy baking!
Cooking Notes for Easter Egg Sugar Cookies Recipe
As I’ve baked these delightful Easter Egg Sugar Cookies over the years, I’ve picked up a few handy cooking notes that can make your baking experience even smoother. Here are some tips that I always keep in mind:
- Room Temperature Ingredients: Ensure your butter and egg are at room temperature. This helps them blend more easily, creating a smoother dough.
- Don’t Skip Chilling: Chilling the dough is crucial! It helps the cookies maintain their shape and prevents them from spreading too much while baking.
- Watch the Baking Time: Every oven is different. Keep an eye on your cookies as they bake. They should be lightly golden around the edges but still soft in the center.
- Storage Tips: Store your cookies in an airtight container at room temperature. They’ll stay fresh for up to a week. If you want to keep them longer, consider freezing them!
- Get Creative with Decorations: Don’t be afraid to experiment with different icing techniques or toppings. Each cookie can tell a story, and your creativity is the limit!
These little notes have helped me create the perfect batch of cookies time and time again. I hope they inspire you to bake with confidence and joy! Now, let’s keep the momentum going as we explore more about serving these delightful treats!
Serving Suggestions for Easter Egg Sugar Cookies Recipe
Once those delightful Easter Egg Sugar Cookies are baked and beautifully decorated, it’s time to think about how to serve them! I love to make the presentation as fun as the baking process itself. Here are some of my favorite serving suggestions that will surely impress your family and friends:
- Cookie Platters: Arrange the cookies on a colorful platter, mixing different designs and colors. It creates a vibrant centerpiece for your Easter brunch or gathering!
- Gift Bags: Package a few cookies in clear cellophane bags tied with a cheerful ribbon. They make for sweet, homemade gifts that anyone would love to receive.
- Cookie Decorating Station: Set up a decorating station with extra icing, sprinkles, and edible glitter. Let your guests decorate their own cookies for a fun, interactive experience!
- Pair with Milk: Serve the cookies alongside a glass of cold milk or a warm cup of tea. The combination is simply delightful and brings back childhood memories!
- Cookie Jars: Fill a decorative jar with your cookies and place it on the kitchen counter. It not only looks charming but also invites everyone to grab a treat whenever they pass by!
These serving ideas not only enhance the enjoyment of your Easter Egg Sugar Cookies but also create a festive atmosphere. I can’t wait to see how you choose to share your sweet creations! Remember, the joy of baking is best when shared with others. Happy serving!
Tips for Perfect Easter Egg Sugar Cookies Recipe
As I’ve baked these Easter Egg Sugar Cookies time and time again, I’ve gathered a treasure trove of tips that can help you achieve cookie perfection. Here are my top suggestions to ensure your cookies turn out just right:
- Measure Accurately: Baking is a science! Use proper measuring cups and spoons to ensure you get the right amounts of each ingredient. A little too much flour can lead to dry cookies.
- Don’t Rush the Chilling: Chilling the dough is essential for maintaining shape. If you skip this step, your cookies may spread too much in the oven, losing that lovely egg shape.
- Use Parchment Paper: Line your baking sheets with parchment paper. It prevents sticking and makes cleanup a breeze, allowing your cookies to bake evenly.
- Experiment with Flavors: Don’t hesitate to add your favorite flavors! A hint of lemon zest or a dash of cinnamon can elevate your cookies to a whole new level.
- Practice Patience: Allow your cookies to cool completely before decorating. This prevents the icing from melting and ensures your designs stay intact.
With these tips in your back pocket, you’re well on your way to baking the perfect Easter Egg Sugar Cookies! Remember, the joy of baking comes not just from the end result, but from the love and care you put into each step. Happy baking!
Breakdown of Time for Easter Egg Sugar Cookies Recipe
As a passionate home cook, I know that timing is everything in the kitchen. When it comes to baking these delightful Easter Egg Sugar Cookies, it’s essential to plan ahead. Here’s a quick breakdown of the time you’ll need to create these sweet treats:
- Prep Time: 20 minutes – This includes gathering your ingredients, creaming the butter and sugar, and mixing everything together.
- Chilling Time: 1 hour – Chilling the dough is crucial for maintaining the shape of your cookies. Patience is key here!
- Cooking Time: 10 minutes – Baking the cookies is a quick process, but keep an eye on them to ensure they don’t overbake.
- Total Time: 1 hour and 30 minutes – From start to finish, you’ll have delicious cookies ready to enjoy in just over an hour and a half!
With this time breakdown, you can easily plan your baking session. I often find that the anticipation makes the cookies taste even sweeter! So, gather your ingredients, set your timer, and let’s get baking!
Nutritional Information for Easter Egg Sugar Cookies Recipe
As a passionate home cook, I believe it’s important to know what goes into our delicious creations. While these Easter Egg Sugar Cookies are a delightful treat, they also come with their own nutritional profile. Here’s a quick overview of the nutritional information per cookie, assuming the recipe yields about 24 cookies:
- Calories: Approximately 120 calories
- Fat: 6g (Saturated Fat: 4g)
- Carbohydrates: 16g (Sugars: 8g)
- Protein: 1g
- Sodium: 50mg
Keep in mind that these values can vary based on the specific ingredients you use and any optional add-ons you choose to include. For instance, adding chocolate chips or using different types of icing can change the nutritional content. I always encourage balance, so enjoy these cookies as part of a varied diet!
Whether you’re indulging in one or sharing them with loved ones, these cookies are sure to bring smiles all around. Now, let’s keep the baking spirit alive as we move on to the next section!
Frequently Asked Questions about Easter Egg Sugar Cookies Recipe
As I’ve shared my Easter Egg Sugar Cookies Recipe with friends and family, I’ve noticed a few common questions pop up. It’s always great to clarify any doubts, especially when it comes to baking. Here are some frequently asked questions that I hope will help you on your baking journey!
Can I freeze the cookie dough?
Absolutely! Freezing the cookie dough is a fantastic way to save time. Just wrap the dough tightly in plastic wrap and place it in an airtight container. You can freeze it for up to three months. When you’re ready to bake, simply thaw it in the refrigerator overnight before rolling and cutting.
What if I don’t have a cookie cutter?
No worries at all! If you don’t have a cookie cutter, you can use a knife to cut out egg shapes freehand. Alternatively, you can use any round object, like a glass, to create circular cookies. The beauty of baking is that it allows for creativity!
How can I make my cookies softer?
If you prefer softer cookies, try not to overbake them. Remove them from the oven when the edges are just lightly golden, and the centers still look a bit underbaked. They will continue to firm up as they cool. Additionally, using a little more butter can also help achieve that soft texture!
Can I use whole wheat flour instead of all-purpose flour?
Yes, you can! Whole wheat flour can be a healthier alternative, but it may change the texture slightly. I recommend using half whole wheat and half all-purpose flour for the best results. This way, you still get that classic cookie texture while adding some whole grain goodness!
How do I store the decorated cookies?
To keep your decorated cookies fresh, store them in an airtight container at room temperature. If you’ve used royal icing, make sure the icing is completely dry before stacking them. This prevents smudging and keeps your designs intact. They should stay fresh for about a week!
These FAQs cover some of the most common queries I’ve encountered while baking these delightful Easter Egg Sugar Cookies. If you have any more questions, feel free to reach out! Baking is all about learning and sharing, and I’m here to help you create sweet memories in your kitchen!
Conclusion on Easter Egg Sugar Cookies Recipe
As I wrap up this delightful journey of baking Easter Egg Sugar Cookies, I can’t help but feel a sense of joy and accomplishment. These cookies are more than just a sweet treat; they are a celebration of creativity, family, and the spirit of Easter. With their vibrant colors and charming shapes, they bring smiles to faces young and old alike.
What I love most about this recipe is its simplicity. With just a handful of ingredients, you can create something truly special that fills your home with warmth and happiness. Whether you’re baking for a festive gathering or simply indulging in a sweet moment, these cookies are sure to brighten your day.
So, gather your loved ones, roll up your sleeves, and let the magic of baking unfold in your kitchen. I hope you find as much joy in making these Easter Egg Sugar Cookies as I do. Remember, it’s not just about the cookies; it’s about the memories you create along the way. Happy baking, and may your Easter be filled with sweetness and love!