Sensory-Rich Introduction with Immediate Craving
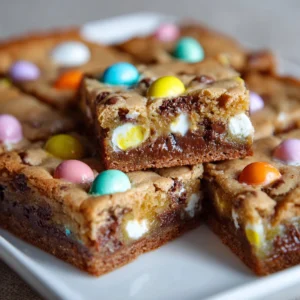
Imagine biting into a warm, gooey Easter Egg Cookie Bar, where the creamy chocolate layer meets the crispy cookie base, creating a delightful explosion of flavors and textures. The rich aroma of freshly baked cookies wafts through the air, mingling with the sweet scent of melting chocolate, while the vibrant colors of crushed mini chocolate eggs add a festive touch that beckons you to indulge. Each bar is a visual feast, with its golden edges and glossy chocolate topping, making it nearly impossible to resist.
As I reminisce about my childhood, I can still hear the laughter of my family filling the kitchen as we baked together during Easter. My grandmother would gather us around the counter, her hands expertly mixing the ingredients while sharing stories of her own childhood baking adventures. The joy of creating something delicious to share with loved ones was always palpable, and it’s a tradition I cherish deeply. These Easter Egg Cookie Bars are not just a recipe; they are a celebration of those moments, a way to bring the warmth of family gatherings into my own home.
These bars are perfect for any occasion—whether it’s an Easter brunch, a spring celebration, or a cozy family gathering. They also make a delightful dessert for holiday parties, where their vibrant colors and rich flavors will surely impress your guests. So, gather your loved ones, roll up your sleeves, and let’s create some sweet memories together with these irresistible treats!
Why You’ll Love This Easter Egg Cookie Bars
- Texture Contrast: The combination of a soft, chewy cookie base with a smooth, rich chocolate layer creates a delightful mouthfeel that dances on your palate. Each bite offers a satisfying crunch from the mini chocolate eggs, making it a textural delight.
- Flavor Balance: The sweetness of the cookie base perfectly complements the rich chocolate, creating a harmonious blend of flavors. The added crunch of the mini chocolate eggs introduces a playful element, enhancing the overall taste experience.
- Versatility: These bars can be enjoyed as a dessert, snack, or festive treat, making them suitable for various occasions. Whether you’re hosting an Easter brunch or simply craving a sweet indulgence, these bars fit the bill perfectly.
- Ease of Preparation: With simple ingredients and straightforward steps, these bars are accessible for bakers of all skill levels. Even if you’re short on time, you can whip up a batch without feeling overwhelmed.
- Universal Appeal: Loved by both kids and adults, these bars are a hit at any gathering. Their vibrant colors and rich flavors ensure that everyone leaves satisfied, making them a must-have for your dessert table.
Essential Tools & Preparation Strategy
Before diving into the delightful world of Easter Egg Cookie Bars, it’s essential to gather the right tools to ensure a smooth baking experience. Trust me, having everything at your fingertips will make the process not only easier but also more enjoyable!
- Mixing Bowls: A large bowl is essential for combining ingredients smoothly. I recommend using a glass or stainless steel bowl, as they are sturdy and easy to clean.
- Measuring Cups and Spoons: Accurate measurements are crucial for achieving the perfect texture and flavor. Invest in a good set of dry and liquid measuring cups to ensure your ingredients are spot on.
- Spatula: An offset spatula is ideal for spreading the cookie dough and chocolate layer evenly in the pan. It’s also great for scraping down the sides of the bowl to make sure nothing goes to waste!
- Baking Pan: A 9×13 inch pan is necessary for the right thickness and even baking of the bars. If you have a non-stick version, that’s even better for easy removal.
- Whisk: A whisk is useful for mixing dry ingredients and ensuring a lump-free batter. It’s also handy for incorporating air into your mixtures, which helps with texture.
- Toothpick: Essential for checking the doneness of the cookie base. Insert it into the center of the bars; if it comes out clean, you’re good to go!
- Parchment Paper (optional): Lining the baking pan with parchment paper can make it easier to lift the bars out once they’re cooled. It’s a little trick I learned from my grandmother that saves time and hassle.
- Cooling Rack: A cooling rack helps cool the bars evenly and prevents sogginess. It’s important to let them cool completely before cutting to ensure clean edges.
With these tools in hand, you’ll be well-prepared to create your Easter Egg Cookie Bars. Remember, the right equipment can make all the difference in your baking journey, so take a moment to gather everything before you start. Happy baking!
Ingredients & Their Roles in This Easter Egg Cookie Bars
Understanding the ingredients in your Easter Egg Cookie Bars is key to mastering this delightful treat. Each component plays a vital role in achieving the perfect balance of flavor and texture. Let’s break it down:
For the Cookie Base:
- Unsalted Butter: This is the foundation of richness and moisture in your bars. Softened to room temperature, it blends beautifully with sugars to create a creamy texture.
- Granulated Sugar & Brown Sugar: Together, they add sweetness and depth of flavor. The granulated sugar contributes to a crisp edge, while the brown sugar brings a hint of caramel-like richness.
- Eggs: These little wonders bind the ingredients together and add moisture, ensuring your cookie base is soft and chewy.
- Vanilla Extract: A splash of vanilla enhances the overall flavor profile, adding warmth and a hint of nostalgia that makes every bite comforting.
- All-Purpose Flour: This forms the structure of the cookie base. It’s the backbone that holds everything together, giving the bars their delightful chewiness.
- Baking Soda: Acting as a leavening agent, it helps the bars rise slightly, creating a light texture that contrasts beautifully with the rich chocolate layer.
- Salt: A pinch of salt balances the sweetness and enhances the flavors, making each bite more complex and satisfying.
For the Chocolate Layer:
- Semi-Sweet Chocolate Chips: These provide a rich, creamy chocolate flavor that melts beautifully over the cookie base, creating a luscious layer that’s hard to resist.
- Heavy Cream: This is the secret to a smooth ganache texture. When heated and combined with chocolate, it creates a velvety layer that adds indulgence to your bars.
- Vanilla Extract: Just like in the cookie base, a touch of vanilla in the chocolate layer adds depth and enhances the chocolate flavor, making it even more irresistible.
For Topping:
- Mini Chocolate Eggs: These not only add a festive touch but also a delightful crunch. Their colorful appearance makes your Easter Egg Cookie Bars visually appealing, perfect for any spring celebration!
With these ingredients, you’re well on your way to creating a batch of Easter Egg Cookie Bars that will delight your family and friends. Each component is carefully selected to ensure a harmonious blend of flavors and textures, making these bars a true celebration of spring!
Step-by-Step Guide to Perfect Easter Egg Cookie Bars
- Preheat your oven to 350°F (175°C) and grease a 9×13 inch baking pan. The anticipation builds as the oven warms up, filling your kitchen with the promise of sweet treats to come.
- In a large bowl, cream together 1 cup unsalted butter, 1 cup granulated sugar, and 1 cup brown sugar until light and fluffy. This step is crucial; the mixture should be pale and airy, which will give your cookie bars that melt-in-your-mouth texture.
- Add the 2 large eggs one at a time, mixing well after each addition, then stir in 2 teaspoons vanilla extract. The vanilla will add a warm, inviting aroma that makes it hard to resist sneaking a taste!
- In a separate bowl, whisk together 3 cups all-purpose flour, 1 teaspoon baking soda, and 1/2 teaspoon salt. Gradually add this dry mixture to the wet ingredients until just combined. Be careful not to overmix; we want to keep that tender texture!
- Spread the cookie dough evenly in the prepared baking pan and bake for 20-25 minutes, or until the edges are golden brown and a toothpick inserted in the center comes out clean. The smell of baking cookies will be irresistible, and you’ll be counting down the minutes!
- While the cookie base is baking, prepare the chocolate layer by heating 1 cup heavy cream in a saucepan over medium heat until it begins to simmer. This step is where the magic happens; the cream will transform into a luscious ganache.
- Remove from heat and add 2 cups semi-sweet chocolate chips and 1 teaspoon vanilla extract, stirring until smooth and glossy. The rich chocolate aroma will envelop your kitchen, making it hard to wait for the next step!
- Once the cookie base is done, pour the chocolate mixture over the warm cookie layer and spread evenly. The contrast of the warm cookie and the glossy chocolate is a sight to behold.
- Sprinkle 1 cup mini chocolate eggs on top and let cool completely before cutting into bars. This final touch adds a festive flair and a delightful crunch that will make your Easter Egg Cookie Bars truly special.
Chef’s Notes & Pro Tips for Flawless Results
As you embark on your baking journey with these Easter Egg Cookie Bars, I want to share some of my favorite tips and tricks that will help you achieve the best results. Trust me, a little preparation goes a long way in ensuring your bars turn out perfectly every time!
- Make-Ahead Instructions: These bars can be made a day in advance for convenience. In fact, letting them sit overnight allows the flavors to meld beautifully, making them even more delicious!
- Storage: Keep your Easter Egg Cookie Bars in an airtight container at room temperature for up to a week. If you want to extend their freshness, refrigerate them; just be sure to let them come to room temperature before serving for the best texture.
- Equipment Recommendations: I highly recommend using a silicone spatula for easy spreading of the cookie dough and chocolate layer. It’s also great for scraping down the sides of the bowl to ensure no delicious batter goes to waste! Additionally, a non-stick baking pan can make removal a breeze, ensuring your bars come out intact.
- Customization Options: Feel free to get creative! Substitute semi-sweet chocolate chips with milk or white chocolate for different flavor profiles. You can even mix in some chopped nuts or dried fruits for added texture and taste.
With these tips in your back pocket, you’ll be well-equipped to create Easter Egg Cookie Bars that are not only delicious but also visually stunning. Happy baking!
Avoid These Common Cooking Mistakes
Even the most seasoned bakers can run into a few hiccups when making Easter Egg Cookie Bars. To help you achieve the perfect batch, I’ve compiled a list of common mistakes to avoid. Trust me, learning from these will save you time and frustration!
- Overmixing the Dough: This is a classic pitfall that can lead to tough bars. Mix just until combined; a few lumps are perfectly fine! Remember, we want that tender, melt-in-your-mouth texture.
- Not Cooling the Bars: Patience is key! Cutting too soon can result in messy pieces. Allow your bars to cool completely in the pan before slicing; this will ensure clean edges and a beautiful presentation.
- Using Cold Ingredients: Cold butter or eggs can affect the texture of your bars. Make sure to bring your ingredients to room temperature before starting. This simple step can make a world of difference!
- Not Measuring Ingredients Accurately: Baking is a science, and precise measurements are crucial for success. Use proper measuring tools to ensure your ingredients are spot on; it can alter the final product significantly.
- Skipping the Baking Time: Underbaking can lead to gooey centers, which might sound tempting but can ruin the texture. Always check with a toothpick; it should come out clean or with a few moist crumbs for the perfect bake.
- Using the Wrong Pan Size: A different size can affect baking time and texture. Stick to the recommended 9×13 inch pan for the best results; it’s designed to give you the right thickness and even baking.
- Not Letting the Chocolate Layer Set: This is crucial for a clean cut. If you dive in too soon, the chocolate layer can ooze out, making a mess. Allow it to cool completely before cutting into bars for a neat presentation.
By keeping these tips in mind, you’ll be well on your way to creating Easter Egg Cookie Bars that are not only delicious but also visually stunning. Happy baking!
Creative Variations & Customizations
One of the best things about Easter Egg Cookie Bars is their versatility! You can easily customize this recipe to suit your taste preferences or dietary needs. Here are some fun and creative variations to consider:
- Nutty Addition: For those who love a bit of crunch, add chopped nuts like walnuts or pecans. They not only enhance the texture but also add a delightful nutty flavor that pairs beautifully with the chocolate.
- Fruit Infusion: Incorporate dried fruits like cranberries or cherries for a tart contrast. The sweetness of the cookie base and chocolate layer will balance perfectly with the fruity tang, creating a burst of flavor in every bite.
- Seasonal Flavors: Get creative with seasonal flavors! Use peppermint extract for a refreshing winter twist or add orange zest for a bright, citrusy spring flavor. These small changes can elevate your bars and make them even more special.
- Gluten-Free Option: If you or your guests are gluten-sensitive, simply substitute all-purpose flour with a gluten-free blend. There are many great options available that will yield delicious results without compromising on taste or texture.
- Vegan Version: For a vegan-friendly treat, replace the butter with coconut oil and the eggs with a flaxseed meal mixed with water (1 tablespoon of flaxseed meal + 2.5 tablespoons of water = 1 egg). This will keep the bars moist and flavorful while accommodating dietary restrictions.
With these creative variations, you can make your Easter Egg Cookie Bars uniquely yours. Don’t be afraid to experiment and have fun in the kitchen—after all, that’s what baking is all about!
Perfect Pairings: What to Serve With Easter Egg Cookie Bars
When it comes to enjoying your Easter Egg Cookie Bars, the right accompaniments can elevate the experience to new heights. Here are some delightful pairings that will complement the rich flavors and textures of these bars:
- Vanilla Ice Cream: The creamy texture of vanilla ice cream pairs beautifully with the warm, gooey cookie bars, creating a delightful contrast that’s hard to resist. Imagine the cold ice cream melting into the chocolate layer—pure bliss!
- Cold Milk: A classic pairing, cold milk enhances the chocolate flavor and balances the sweetness of the bars. It’s the perfect drink to wash down each delicious bite, making it a nostalgic treat for all ages.
- Whipped Cream & Fresh Berries: For a fruity twist, top your bars with a dollop of whipped cream and a handful of fresh berries. The lightness of the cream and the tartness of the berries add a refreshing contrast to the rich chocolate and cookie base.
- Coffee or Tea: A cozy cup of coffee or tea makes for a perfect afternoon pairing. The warmth of the beverage complements the sweetness of the bars, creating a comforting experience that’s ideal for a relaxing break.
- Chocolate-Covered Strawberries: For a decadent dessert platter, serve your Easter Egg Cookie Bars alongside chocolate-covered strawberries. The combination of flavors and textures will impress your guests and make for a stunning presentation.
- Caramel Sauce: Drizzle some caramel sauce over your bars for added sweetness and richness. The gooey caramel will enhance the overall flavor profile, making each bite even more indulgent.
- Easter-themed Desserts: Create a festive dessert buffet by serving your bars alongside other Easter-themed treats. Think pastel-colored cupcakes, bunny-shaped cookies, and colorful candies to celebrate the season!
- Fruit Salad: A refreshing fruit salad provides a light contrast to the rich bars. The natural sweetness and acidity of the fruits will cleanse your palate, making it a delightful addition to your dessert spread.
With these perfect pairings, your Easter Egg Cookie Bars will shine even brighter at your next gathering. So, gather your loved ones, serve up these delicious treats, and enjoy the sweet moments together!
Storage & Meal Prep Instructions
Once you’ve baked your delicious Easter Egg Cookie Bars, it’s important to store them properly to maintain their freshness and flavor. Here are some simple storage and meal prep instructions to keep your bars delightful for days to come:
- Fridge Storage: Store your Easter Egg Cookie Bars in an airtight container at room temperature for up to a week. This will help keep them soft and chewy, ready for you to enjoy whenever the craving strikes!
- Freezer Storage: If you want to extend their shelf life, wrap the bars individually in plastic wrap or aluminum foil and place them in a freezer-safe container. They can be frozen for up to three months. When you’re ready to indulge, simply thaw them at room temperature for a few hours or pop them in the microwave for a quick warm-up.
- Reheating Methods: To enjoy your bars warm, microwave them for just a few seconds until they’re heated through. This will revive the gooey chocolate layer and make them feel freshly baked again. Alternatively, you can enjoy them at room temperature for a delightful treat that’s still packed with flavor.
With these storage tips, you can savor your Easter Egg Cookie Bars long after they come out of the oven. Whether you’re enjoying them fresh or reheated, they’re sure to bring a smile to your face!
Nutrition Facts & Health Insights
Understanding the nutritional value of your Easter Egg Cookie Bars can help you enjoy them guilt-free while still indulging in a delicious treat. Here’s a detailed breakdown of the nutrition facts per serving:
| Nutrient | Amount per Serving |
|---|---|
| Serving Size | 1 bar (approximately 2×2 inches) |
| Calories | 250 |
| Sugar | 18 grams |
| Sodium | 150 milligrams |
| Fat | 12 grams |
| Saturated Fat | 7 grams |
| Unsaturated Fat | 3 grams |
| Trans Fat | 0 grams |
| Carbohydrates | 32 grams |
| Fiber | 1 gram |
| Protein | 3 grams |
| Cholesterol | 30 milligrams |
These Easter Egg Cookie Bars not only satisfy your sweet tooth but also offer some health benefits. The dark chocolate used in the recipe is rich in antioxidants, which can help combat oxidative stress in the body. Additionally, the bars provide a quick source of energy, making them a great treat for active days or post-workout snacks.
So, go ahead and enjoy these delightful bars knowing that they can be part of a balanced diet. Just remember, moderation is key, and sharing them with loved ones makes the experience even sweeter!
Frequently Asked Questions
- Can I substitute the chocolate chips? Absolutely! You can use milk chocolate or white chocolate chips for a different flavor profile. If you’re feeling adventurous, try mixing in some butterscotch or peanut butter chips for a unique twist!
- How do I know when the bars are done baking? The best way to check for doneness is to insert a toothpick into the center of the bars. If it comes out clean or with a few moist crumbs, they’re ready! Keep an eye on the edges; they should be golden brown.
- Can I make these bars gluten-free? Yes, you can! Simply substitute the all-purpose flour with a gluten-free flour blend. Make sure to choose a blend that includes xanthan gum for the best texture.
- What can I use instead of eggs? For a vegan option, you can replace each egg with 1 tablespoon of flaxseed meal mixed with 2.5 tablespoons of water. Let it sit for a few minutes until it thickens. Alternatively, unsweetened applesauce (1/4 cup per egg) works well too!
- How long do these bars last? When stored in an airtight container at room temperature, your Easter Egg Cookie Bars will stay fresh for up to a week. If you refrigerate them, they can last even longer!
- Can I freeze the cookie bars? Yes! Wrap the bars individually in plastic wrap or aluminum foil and place them in a freezer-safe container. They can be frozen for up to three months. Just thaw them at room temperature before enjoying!
- What if I don’t have a 9×13 inch pan? If you don’t have a 9×13 inch pan, you can use an 8×8 inch or 9×9 inch pan, but keep in mind that the baking time may vary. Just check for doneness a few minutes earlier or later.
- How can I customize the flavors? Get creative! You can add spices like cinnamon or nutmeg for warmth, or mix in citrus zest for a refreshing twist. Experimenting with different extracts, like almond or coconut, can also add a unique flavor.
- What’s the best way to cut the bars? For clean cuts, use a sharp knife and wipe it with a damp cloth between cuts. This prevents the chocolate from smudging and keeps your bars looking beautiful!
- Can I add more toppings? Absolutely! Feel free to sprinkle on some chopped nuts, shredded coconut, or even a drizzle of caramel or chocolate sauce on top for an extra indulgent treat!
Final Inspiration & Kitchen Confidence
As you wrap up your baking adventure with these Easter Egg Cookie Bars, take a moment to celebrate the joy that comes from creating something delicious. Baking is not just about the end result; it’s about the laughter, the shared moments, and the love that fills your kitchen. Each time you whip up a batch, you’re not just making treats; you’re crafting memories that will be cherished for years to come.
Remember, every time you step into the kitchen, you’re achieving something wonderful. Whether it’s your first time baking or you’re a seasoned pro, the act of creating something from scratch is a rewarding experience. Don’t be afraid to embrace the process, learn from any mishaps, and savor the sweet success of your efforts. Each bar you cut is a testament to your hard work and creativity!
So, I encourage you to dive into this recipe, share your creations with family and friends, and relish the joy that comes from baking together. Snap a few photos of your beautiful Easter Egg Cookie Bars and share them on social media—let the world see your culinary triumphs! Most importantly, gather your loved ones around the table, enjoy these delightful treats, and make lasting memories that will warm your hearts for years to come. Happy baking!
Print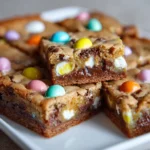
Easter Egg Cookie Bars: Creamy, Crispy, Irresistible Treat!
- Total Time: 45 minutes
- Yield: 24 bars 1x
- Diet: Vegetarian
Description
These Easter Egg Cookie Bars are a delightful combination of creamy chocolate and crispy cookie layers, creating a texture that melts in your mouth. Each bite bursts with the rich flavor of buttery cookies and sweet chocolate, making them an irresistible treat for any celebration.
Ingredients
- For the Cookie Base:
- 1 cup unsalted butter, softened
- 1 cup granulated sugar
- 1 cup brown sugar, packed
- 2 large eggs
- 2 teaspoons vanilla extract
- 3 cups all-purpose flour
- 1 teaspoon baking soda
- 1/2 teaspoon salt
- For the Chocolate Layer:
- 2 cups semi-sweet chocolate chips
- 1 cup heavy cream
- 1 teaspoon vanilla extract
- For Topping:
- 1 cup mini chocolate eggs, crushed
Instructions
- Preheat your oven to 350°F (175°C) and grease a 9×13 inch baking pan.
- In a large bowl, cream together the softened butter, granulated sugar, and brown sugar until light and fluffy.
- Add the eggs one at a time, mixing well after each addition, then stir in the vanilla extract.
- In a separate bowl, whisk together the flour, baking soda, and salt. Gradually add this to the wet mixture until just combined.
- Spread the cookie dough evenly in the prepared baking pan and bake for 20-25 minutes, or until the edges are golden brown and a toothpick inserted in the center comes out clean.
- While the cookie base is baking, prepare the chocolate layer by heating the heavy cream in a saucepan over medium heat until it begins to simmer.
- Remove from heat and add the chocolate chips and vanilla extract, stirring until smooth and glossy.
- Once the cookie base is done, pour the chocolate mixture over the warm cookie layer and spread evenly.
- Sprinkle the crushed mini chocolate eggs on top and let cool completely before cutting into bars.
Notes
- These bars can be made a day in advance and stored in an airtight container at room temperature.
- For a different flavor, substitute the semi-sweet chocolate chips with milk chocolate or white chocolate chips.
- Store leftovers in the refrigerator for up to a week.
- Prep Time: 20 minutes
- Cook Time: 25 minutes
- Category: desserts
- Method: baking
- Cuisine: American
Nutrition
- Serving Size: 1 bar (approximately 2x2 inches)
- Calories: 250
- Sugar: 18 grams
- Sodium: 150 milligrams
- Fat: 12 grams
- Saturated Fat: 7 grams
- Unsaturated Fat: 3 grams
- Trans Fat: 0 grams
- Carbohydrates: 32 grams
- Fiber: 1 gram
- Protein: 3 grams
- Cholesterol: 30 milligrams
Keywords: Easter Egg Cookie Bars, Easter desserts, chocolate cookie bars, festive treats, spring baking, cookie recipes, chocolate desserts, holiday baking, easy dessert recipes, family-friendly treats, sweet bars, creamy chocolate bars