Easter Egg Cheesecake: Rich, Creamy Delight Awaits!
Sensory-Rich Introduction with Immediate Craving
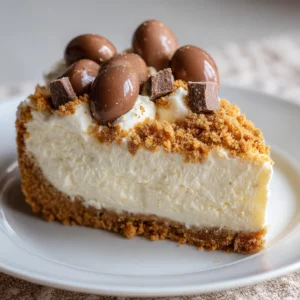
Imagine slicing into a velvety Easter Egg Cheesecake, the rich aroma of chocolate wafting through the air as you reveal its creamy interior. Each bite is a harmonious blend of smooth cream cheese, sweet chocolate, and a buttery graham cracker crust that crumbles delightfully in your mouth. This dessert is not just a treat; it’s a celebration of spring, perfect for family gatherings, Easter brunches, or any festive occasion where indulgence is the order of the day. As you gather around the table, sharing stories and laughter, this cheesecake becomes the centerpiece, evoking memories of joyful celebrations and the warmth of togetherness.
Why You’ll Love This Easter Egg Cheesecake
- Texture Contrast: The creamy filling contrasts beautifully with the crunchy graham cracker crust, creating a delightful mouthfeel.
- Flavor Balance: The sweetness of chocolate Easter eggs is perfectly balanced by the tanginess of cream cheese, making each bite a flavor explosion.
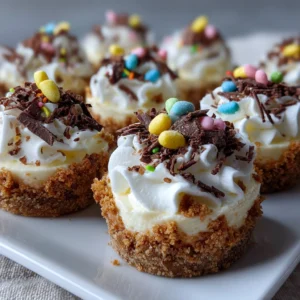
- Versatility: This cheesecake can be enjoyed year-round, not just during Easter, and can be customized with different chocolate eggs or toppings.
- Ease of Preparation: With straightforward steps and minimal equipment, this recipe is accessible for both novice and experienced bakers.
- Universal Appeal: Loved by both children and adults, this cheesecake is a crowd-pleaser that will impress at any gathering.
Essential Tools & Preparation Strategy
- Springform Pan: Essential for easy removal of the cheesecake without damaging its shape.
- Mixing Bowls: Needed for combining ingredients efficiently; opt for glass or stainless steel for durability.
- Electric Mixer: Ensures a smooth and creamy filling without lumps; a hand mixer works well if you don’t have a stand mixer.
- Rubber Spatula: Perfect for folding in ingredients gently, ensuring a light texture.
- Measuring Cups and Spoons: For accurate ingredient measurements; consider using a kitchen scale for precision.
- Oven Thermometer: Ensures your oven is at the correct temperature for baking, preventing over or undercooking.
- Parchment Paper: Optional, but can be used to line the bottom of the springform pan for easier removal.
- Cooling Rack: Helps the cheesecake cool evenly after baking, preventing condensation.
Ingredients & Their Roles in This Easter Egg Cheesecake
Crust
- Graham Cracker Crumbs: Provides a sweet, crunchy base.
- Unsalted Butter: Binds the crumbs together and adds richness.
- Granulated Sugar: Enhances sweetness and flavor.
Filling
- Cream Cheese: The star ingredient, providing creaminess and structure.
- Granulated Sugar: Sweetens the filling, balancing the tang of the cream cheese.
- Vanilla Extract: Adds depth and enhances the overall flavor.
- Eggs: Provide structure and stability to the cheesecake.
- Sour Cream: Adds tanginess and creaminess.
- Heavy Cream: Contributes to a rich, smooth texture.
- Chopped Chocolate Easter Eggs: Adds bursts of chocolate flavor and festive flair.
Substitutions
- For a gluten-free version, use gluten-free graham crackers.
- Substitute sour cream with Greek yogurt for a lighter option.
Step-by-Step Guide to Perfect Easter Egg Cheesecake
- Preheat the Oven: Set your oven to 325°F (160°C) to ensure it’s ready for baking.
- Prepare the Crust: In a mixing bowl, combine graham cracker crumbs, melted butter, and sugar until well mixed. Press the mixture firmly into the bottom of a 9-inch springform pan.
- Make the Filling: In a large bowl, beat the softened cream cheese until smooth. Gradually add sugar and vanilla, mixing until creamy.
- Incorporate Eggs: Add eggs one at a time, mixing well after each addition. Then, mix in sour cream and heavy cream until fully incorporated.
- Add Chocolate: Gently fold in the chopped chocolate Easter eggs, ensuring even distribution.
- Pour and Bake: Pour the filling over the crust in the springform pan. Bake in the preheated oven for 55-60 minutes, or until the edges are set and the center is slightly jiggly.
- Cool Gradually: Turn off the oven and leave the cheesecake inside for 1 hour to cool gradually, preventing cracks.
- Chill: Remove from the oven and refrigerate for at least 4 hours, preferably overnight, before serving.
Chef’s Notes & Pro Tips for Flawless Results
- Make-Ahead Instructions: This cheesecake can be made up to 2 days in advance and stored in the refrigerator.
- Storage: Store leftovers in an airtight container in the fridge for up to 5 days.
- Equipment Recommendations: A high-quality electric mixer will yield the best results for a smooth filling.
- Customization Options: Experiment with different chocolate eggs or add fruit toppings for a seasonal twist.
Avoid These Common Cooking Mistakes
- Overmixing the Batter: Can lead to cracks; mix just until combined.
- Not Letting the Cheesecake Cool in the Oven: Can cause it to crack; always cool gradually.
- Skipping the Refrigeration Step: Results in a soft texture; refrigerate for at least 4 hours.
- Using Cold Cream Cheese: Can create lumps; always use softened cream cheese.
- Not Using a Water Bath: Can lead to uneven baking; consider using a water bath for a creamier texture.
- Not Measuring Ingredients Accurately: Can affect the texture; use proper measuring tools.
- Opening the Oven Door Too Early: Can cause the cheesecake to sink; avoid until baking time is complete.
Creative Variations & Customizations
- Chocolate Mint Cheesecake: Add peppermint extract and top with crushed mint chocolate candies.
- Fruit-Topped Cheesecake: Use fresh berries or a fruit compote for a refreshing contrast.
- Nutty Crust: Substitute some graham cracker crumbs with finely chopped nuts for added flavor.
- Caramel Swirl: Drizzle caramel sauce into the filling before baking for a sweet twist.
- Lemon Zest: Add lemon zest to the filling for a citrusy brightness.
Perfect Pairings: What to Serve With Easter Egg Cheesecake
- Chocolate Sauce: A drizzle adds richness and enhances the chocolate flavor.
- Fresh Berries: Their tartness contrasts beautifully with the sweetness of the cheesecake.
- Whipped Cream: Lightens the dessert and adds an airy finish.
- Vanilla Ice Cream: A scoop adds decadence and creaminess.
- Coffee or Espresso: Balances the sweetness and enhances the chocolate notes.
- Mint Leaves: A garnish for a refreshing touch.
- Fruit Compote: Adds a burst of flavor and color.
- Dessert Wine: A glass of sweet wine elevates the dessert experience.
Storage & Meal Prep Instructions
- Refrigeration: Store the cheesecake in the fridge for up to 5 days in an airtight container.
- Freezing: For longer storage, freeze slices wrapped in plastic wrap and foil for up to 2 months. Thaw in the refrigerator before serving.
- Reheating: Serve chilled; if desired, let it sit at room temperature for 30 minutes before serving for optimal texture.
Nutrition Facts & Health Insights
| Nutrient | Amount per Serving (1 slice) |
|---|---|
| Calories | 450 |
| Sugar | 30 grams |
| Sodium | 350 milligrams |
| Fat | 30 grams |
| Saturated Fat | 18 grams |
| Unsaturated Fat | 8 grams |
| Trans Fat | 0 grams |
| Carbohydrates | 40 grams |
| Fiber | 1 gram |
| Protein | 6 grams |
| Cholesterol | 90 milligrams |
Health Benefits of Key Ingredients
- Cream Cheese: Provides calcium and protein.
- Sour Cream: Adds probiotics for gut health.
- Chocolate: Dark chocolate contains antioxidants.
Frequently Asked Questions
- Can I use low-fat cream cheese? Yes, but the texture may be less creamy.
- How do I know when the cheesecake is done? The edges should be set, and the center should be slightly jiggly.
- Can I make this cheesecake without eggs? Yes, use a vegan egg substitute for a dairy-free version.
- What if my cheesecake cracks? It can still be delicious; cover with toppings to hide imperfections.
- How long can I store leftovers? Up to 5 days in the refrigerator.
- Can I freeze the cheesecake? Yes, wrap slices tightly and freeze for up to 2 months.
- What can I use instead of graham crackers? Digestive biscuits or gluten-free alternatives work well.
- How do I prevent a soggy crust? Bake the crust for 10 minutes before adding the filling.
Final Inspiration & Kitchen Confidence
As you prepare to create this Easter Egg Cheesecake, remember that baking is not just about following a recipe; it’s about expressing love and creativity. Celebrate your achievements in the kitchen, and don’t be afraid to experiment with flavors and presentations. Each cheesecake you make is a step towards mastering your baking skills. So gather your ingredients, embrace the process, and enjoy the delightful journey of creating a dessert that will bring joy to your table. Happy baking!
Print
Easter Egg Cheesecake: Rich, Creamy Delight Awaits!
- Total Time: 4 hours 30 minutes
- Yield: 12 servings 1x
- Diet: Vegetarian
Description
Indulge in the velvety smoothness of this Easter Egg Cheesecake, where each bite reveals a luscious creaminess balanced by the subtle sweetness of chocolate and a hint of vanilla. The rich, buttery crust provides a delightful crunch, making it a perfect treat for your holiday celebrations.
Ingredients
- Crust:
- 1 ½ cups graham cracker crumbs
- ½ cup unsalted butter, melted
- ¼ cup granulated sugar
- Filling:
- 24 oz cream cheese, softened
- 1 cup granulated sugar
- 1 tsp vanilla extract
- 3 large eggs
- ½ cup sour cream
- ½ cup heavy cream
- 1 cup chopped chocolate Easter eggs (e.g., Cadbury Crème Eggs)
Instructions
- Preheat your oven to 325°F (160°C).
- In a mixing bowl, combine graham cracker crumbs, melted butter, and sugar until well mixed. Press the mixture firmly into the bottom of a 9-inch springform pan.
- In a large bowl, beat the softened cream cheese until smooth. Gradually add sugar and vanilla, mixing until creamy.
- Add eggs one at a time, mixing well after each addition. Then, mix in sour cream and heavy cream until fully incorporated.
- Fold in the chopped chocolate Easter eggs gently.
- Pour the filling over the crust in the springform pan.
- Bake in the preheated oven for 55-60 minutes, or until the edges are set and the center is slightly jiggly.
- Turn off the oven and leave the cheesecake inside for 1 hour to cool gradually.
- Remove from the oven and refrigerate for at least 4 hours, preferably overnight, before serving.
Notes
- This cheesecake can be made up to 2 days in advance and stored in the refrigerator.
- Store leftovers in an airtight container in the fridge for up to 5 days.
- For a gluten-free version, use gluten-free graham crackers for the crust.
- Prep Time: 30 minutes
- Cook Time: 60 minutes
- Category: desserts
- Method: baking
- Cuisine: American
Nutrition
- Serving Size: 1 slice (1/12 of the cheesecake)
- Calories: 450
- Sugar: 30 grams
- Sodium: 350 milligrams
- Fat: 30 grams
- Saturated Fat: 18 grams
- Unsaturated Fat: 8 grams
- Trans Fat: 0 grams
- Carbohydrates: 40 grams
- Fiber: 1 gram
- Protein: 6 grams
- Cholesterol: 90 milligrams
Keywords: Easter Egg Cheesecake, cheesecake recipe, Easter dessert, creamy cheesecake, chocolate cheesecake, holiday dessert, festive cheesecake, rich dessert, spring dessert, no-bake cheesecake, easy cheesecake, dessert ideas, chocolate eggs, Cadbury cheesecake