

Sensory-Rich Introduction with Immediate Craving
Imagine biting into a warm Easter Chocolate Chip Cookie, the soft, chewy texture giving way to a cascade of rich, melted chocolate that envelops your taste buds in pure bliss. The aroma wafts through the air, a sweet invitation that beckons you closer, while the colorful sprinkles dance atop the golden-brown surface, adding a festive touch that screams celebration. Each cookie is not just a treat; it’s a moment of joy, a little piece of happiness that melts in your mouth.
As I reminisce about my childhood, I can’t help but smile at the memories of baking cookies with my family during Easter. My grandmother would gather us around the kitchen, her laughter filling the room as we mixed the dough, our hands dusted with flour. The anticipation of pulling those cookies from the oven was palpable, and the first bite was always met with delighted giggles. It was more than just baking; it was about creating memories, sharing stories, and indulging in the simple pleasure of homemade treats.
There’s something magical about sharing these cookies with loved ones during holiday gatherings. The joy of watching friends and family savor each bite, their faces lighting up with delight, is a feeling like no other. Whether it’s Easter brunch, a family picnic, or a cozy afternoon at home, these cookies are the perfect companion, bringing people together and creating moments that linger long after the last crumb is gone.
So, as we dive into this recipe, let’s celebrate the spirit of Easter and the joy of baking. These Easter Chocolate Chip Cookies are not just a dessert; they are a heartfelt offering, a way to share love and warmth with those around us. Get ready to fill your kitchen with laughter, love, and the irresistible aroma of freshly baked cookies!
Why You’ll Love This Easter Chocolate Chip Cookies
Let me tell you, these Easter Chocolate Chip Cookies are not just any cookies; they are a delightful experience that will have you coming back for more. Here’s why they hold a special place in my heart (and my cookie jar):
Texture Contrast
Picture this: you take a bite, and the chewy center gives way to a slightly crispy edge, creating a delightful mouthfeel that dances on your palate. It’s that perfect balance of soft and crunchy that makes each cookie a little adventure. The moment you sink your teeth into one, you’ll understand why I can’t resist them!
Flavor Balance
The flavor profile is a symphony of sweetness, with rich chocolate chips harmonizing beautifully with a hint of vanilla and a touch of salt. This balance elevates the cookies from ordinary to extraordinary, making each bite a celebration of flavors that complement one another perfectly. Trust me, your taste buds will thank you!
Versatility
These cookies are the chameleons of the dessert world! Whether you’re hosting an Easter brunch, a casual get-together, or simply indulging on a cozy afternoon, they fit right in. Their festive appearance makes them a hit at holiday gatherings, while their comforting taste makes them perfect for any day of the week.
Ease of Preparation
As someone who appreciates a straightforward recipe, I can assure you that these cookies are a breeze to whip up. With simple ingredients and clear steps, even novice bakers will find success. You won’t need a culinary degree to create these little masterpieces—just a love for baking and a sprinkle of enthusiasm!
Universal Appeal
Finally, let’s talk about the universal appeal of these cookies. They are loved by kids and adults alike, making them a guaranteed hit at any gathering. Whether you’re sharing them with family, friends, or neighbors, you’ll see smiles all around as everyone enjoys the chewy, gooey bliss that is an Easter Chocolate Chip Cookie.
So, are you ready to dive into this delicious adventure? Let’s get baking!
Essential Tools & Preparation Strategy
Before we dive into the delightful world of Easter Chocolate Chip Cookies, let’s gather our tools and set the stage for baking success. Having the right equipment not only makes the process smoother but also enhances the final outcome. Trust me, a well-prepared kitchen is half the battle won!
Must-Have Tools
- Mixing Bowls: Necessary for combining ingredients efficiently; opt for glass or stainless steel for durability.
- Electric Mixer: Speeds up the creaming process for a light and fluffy batter; a hand mixer is a great alternative if you don’t have a stand mixer.
- Measuring Cups and Spoons: Ensures accurate ingredient quantities; consider a digital scale for precision, especially when baking.
- Baking Sheets: Provides a sturdy surface for baking multiple cookies; use insulated sheets for even baking and to prevent burnt bottoms.
- Parchment Paper: Prevents sticking and simplifies cleanup; silicone baking mats are a reusable alternative that works wonders.
- Cookie Scoop: Ensures uniform cookie sizes for even baking; a tablespoon can work in a pinch, but a scoop makes it so much easier!
- Wire Rack: Allows cookies to cool evenly, preventing sogginess; a cooling mat can also be used if you’re short on space.
Preparation Strategy
Now that we have our tools ready, let’s talk about preparation. Here’s a little tip from my kitchen: always read through the entire recipe before starting. It’s like a roadmap that helps you avoid any detours along the way!
- Gather all your ingredients and tools before you start. This will save you from scrambling around the kitchen mid-bake.
- Make sure your butter is softened to room temperature for easy creaming. If you forget to take it out, you can cut it into small pieces to speed up the softening process.
- Preheat your oven to 350°F (175°C) at least 10 minutes before baking. This ensures that your cookies bake evenly and achieve that perfect golden edge.
- Consider setting up a “baking station” with all your ingredients laid out. It makes the process feel more organized and enjoyable!
With these tools and strategies in place, you’re well on your way to creating the most scrumptious Easter Chocolate Chip Cookies that will have everyone asking for seconds!
Ingredients & Their Roles in This Easter Chocolate Chip Cookies
Understanding the role of each ingredient in your Easter Chocolate Chip Cookies is key to achieving that perfect batch. Each component contributes to the overall flavor, texture, and joy of these delightful treats. Let’s break it down:
- Butter: This is the heart of the cookie, providing richness and moisture that creates that soft, chewy texture we all crave. If you’re looking for a dairy-free option, coconut oil works beautifully as a substitute, adding a subtle hint of tropical flavor.
- Granulated Sugar & Brown Sugar: Together, these sugars add sweetness and contribute to the chewy texture. Granulated sugar helps with spreading, while brown sugar adds moisture and a hint of caramel flavor. For a healthier alternative, consider using coconut sugar, which has a lower glycemic index.
- Vanilla Extract: This ingredient enhances the overall flavor profile of the cookies. I always recommend using pure vanilla extract for the best taste; it makes a noticeable difference compared to imitation vanilla.
- Eggs: Eggs are essential for binding the ingredients together and adding moisture. If you’re looking for a vegan version, flax eggs (1 tablespoon of ground flaxseed mixed with 2.5 tablespoons of water) can be used as a great substitute.
- All-Purpose Flour: This forms the structure of the cookies, giving them that delightful bite. If you want to make a healthier version, whole wheat flour can be used, though it may alter the texture slightly.
- Baking Soda: Acting as a leavening agent, baking soda helps the cookies rise and become fluffy. Always ensure your baking soda is fresh for optimal results; it can lose potency over time.
- Salt: A pinch of salt balances the sweetness and enhances the overall flavor of the cookies. For a gourmet touch, consider using sea salt, which adds a lovely crunch and depth of flavor.
- Chocolate Chips: The star ingredient! Semi-sweet chocolate chips are classic, but feel free to experiment with dark chocolate chips for a richer flavor or even white chocolate for a sweeter twist.
- Easter Sprinkles: While optional, these colorful sprinkles add a festive touch that makes your cookies visually appealing and perfect for the holiday. Trust me, they bring a smile to everyone’s face!
With these ingredients in hand, you’re well on your way to creating the most scrumptious Easter Chocolate Chip Cookies that will have everyone asking for your secret recipe!
Step-by-Step Guide to Perfect Easter Chocolate Chip Cookies
Now that we have our ingredients ready, it’s time to roll up our sleeves and get baking! Follow this step-by-step guide to create the most delightful Easter Chocolate Chip Cookies that will have everyone coming back for seconds. Trust me, the process is just as enjoyable as the end result!
- Preheat Your Oven: Start by preheating your oven to 350°F (175°C). This is crucial for ensuring even baking and achieving that perfect golden edge on your cookies.
- Cream the Butters and Sugars: In a large mixing bowl, combine the softened butter, granulated sugar, and brown sugar. Using an electric mixer, cream them together until the mixture is light and fluffy, about 2-3 minutes. This step is essential for incorporating air into the batter, which helps create that delightful texture.
- Add Vanilla and Eggs: Next, add the vanilla extract and eggs to the creamed mixture. Mix until everything is well combined. The aroma of vanilla will fill your kitchen, making it hard to resist sneaking a taste!
- Whisk Dry Ingredients: In a separate bowl, whisk together the all-purpose flour, baking soda, and salt. This ensures that the leavening agent is evenly distributed throughout the flour, which is key for consistent baking.
- Combine Wet and Dry Ingredients: Gradually add the dry ingredients to the wet mixture, mixing until just combined. Be careful not to overmix; this can lead to tough cookies. A few flour streaks are okay!
- Fold in Chocolate Chips and Sprinkles: Gently fold in the chocolate chips and Easter sprinkles, if using. This is where the magic happens—each cookie will be bursting with chocolatey goodness and a pop of color!
- Prepare for Baking: Using a cookie scoop or rounded tablespoon, drop the dough onto ungreased baking sheets, spacing them about 2 inches apart. This allows the cookies to spread without merging into one another.
- Bake to Perfection: Place the baking sheets in the preheated oven and bake for 10-12 minutes, or until the edges are golden brown but the centers are still soft. Remember, they will continue to cook slightly after being removed from the oven!
- Cool and Enjoy: Once baked, remove the cookies from the oven and let them cool on the baking sheet for 5 minutes before transferring them to a wire rack to cool completely. This step helps them set up perfectly!
And there you have it! With these simple steps, you’ll be well on your way to creating the most scrumptious Easter Chocolate Chip Cookies that will fill your home with warmth and joy. Get ready to share these delightful treats with your loved ones!
Chef’s Notes & Pro Tips for Flawless Results
As a seasoned baker, I’ve learned a few tricks along the way that can elevate your Easter Chocolate Chip Cookies from good to absolutely unforgettable. Here are my top tips to ensure your baking experience is smooth and your cookies turn out perfectly every time!
Make-ahead Instructions
Life can get busy, especially around the holidays, so why not make things easier? You can prepare the cookie dough in advance and refrigerate it for up to 3 days. If you want to plan even further ahead, freeze the dough for up to 3 months. Just scoop the dough onto baking sheets and freeze until solid, then transfer to a freezer-safe bag. When you’re ready to bake, simply preheat your oven and bake straight from the freezer, adding a couple of extra minutes to the baking time.
Storage
To keep your cookies fresh and delicious, store them in an airtight container at room temperature for up to 1 week. If you’re like me and can’t resist the temptation of freshly baked cookies, they might not last that long! For longer storage, consider freezing the baked cookies. Just layer them between sheets of parchment paper in an airtight container, and they’ll be ready to enjoy whenever the craving strikes.
Equipment Recommendations
Investing in quality baking sheets and a reliable mixer can make a world of difference in your baking results. Look for heavy-duty baking sheets that promote even heat distribution, preventing burnt bottoms. A stand mixer is a fantastic investment for serious bakers, but a good hand mixer will do the job just fine for these cookies. Trust me, your arms will thank you!
Customization Options
One of the best parts about baking is the ability to make a recipe your own. Feel free to experiment with different types of chocolate chips—dark chocolate, milk chocolate, or even white chocolate can all bring a unique twist to your cookies. If you’re feeling adventurous, consider adding chopped nuts like walnuts or pecans for an extra crunch. You can also swap in some dried fruit or coconut for a fun flavor variation!
With these tips in your back pocket, you’re well-equipped to create the most delightful Easter Chocolate Chip Cookies that will impress your family and friends. Happy baking!
Avoid These Common Cooking Mistakes
Baking is an art, and like any art form, it comes with its own set of challenges. As someone who has faced my fair share of baking blunders, I’m here to help you avoid the common pitfalls that can turn your Easter Chocolate Chip Cookies from delightful to disastrous. Here are the mistakes to watch out for:
- Overmixing the Dough: This is a classic mistake that can lead to tough cookies. Once you combine the wet and dry ingredients, mix until just combined. A few flour streaks are perfectly fine!
- Not Measuring Flour Correctly: Too much flour can make your cookies dry and crumbly. Use the spoon and level method: spoon the flour into your measuring cup and level it off with a knife for accuracy.
- Baking at the Wrong Temperature: Ensure your oven is preheated to 350°F (175°C) before baking. An oven thermometer can be a great investment to ensure your oven is at the right temperature.
- Not Chilling the Dough: If your dough is too soft, it can result in flat cookies. Chill the dough for at least 30 minutes before baking to help maintain their shape.
- Using Old Baking Soda: Old baking soda can affect the rise of your cookies. Always check the expiration date and replace it if it’s been sitting in your pantry for too long.
- Not Spacing Cookies Properly: If you don’t leave enough space between the cookies on the baking sheet, they can merge together while baking. Aim for about 2 inches of space between each dough ball.
- Overbaking: This can lead to hard cookies that are far from the chewy bliss we desire. Keep an eye on them and remove the cookies when the edges are golden and the centers look slightly underbaked; they will continue to cook on the baking sheet.
By keeping these common mistakes in mind, you’ll be well on your way to baking the most scrumptious Easter Chocolate Chip Cookies that will impress everyone at your gathering. Happy baking!
Creative Variations & Customizations
One of the joys of baking Easter Chocolate Chip Cookies is the ability to customize them to suit your taste or the occasion. Here are some fun and delicious variations that will keep your cookie game fresh and exciting!
- Nutty Easter Cookies: For those who love a bit of crunch, add chopped walnuts or pecans to the dough. The nutty flavor pairs beautifully with the chocolate chips, creating a delightful texture contrast that will have everyone reaching for more.
- Coconut Chocolate Chip Cookies: If you’re dreaming of a tropical escape, incorporate shredded coconut into the dough. This addition not only adds a chewy texture but also infuses your cookies with a subtle coconut flavor that’s simply irresistible.
- Gluten-Free Version: For those with dietary restrictions, you can easily make these cookies gluten-free by substituting all-purpose flour with a gluten-free blend. Just make sure to check that your chocolate chips are also gluten-free!
- Mint Chocolate Chip Cookies: Add a refreshing twist by incorporating mint extract into the dough and topping your cookies with green sprinkles. This variation is perfect for spring and will leave your taste buds feeling invigorated.
- Peanut Butter Swirl: For a rich, nutty flavor, swirl in some creamy peanut butter into the dough. This not only enhances the taste but also adds a delightful creaminess that complements the chocolate chips perfectly.
- Seasonal Sprinkles: Change up the sprinkles to match other holidays or seasons. From pastel colors for Easter to vibrant reds and greens for Christmas, this simple tweak can make your cookies festive year-round!
With these creative variations, you can make your Easter Chocolate Chip Cookies uniquely yours. So, roll up your sleeves and let your imagination run wild in the kitchen!
Perfect Pairings: What to Serve With Easter Chocolate Chip Cookies
When it comes to enjoying your freshly baked Easter Chocolate Chip Cookies, the right accompaniments can elevate the experience to new heights. Here are some delightful pairings that will complement the rich, gooey goodness of your cookies:
- Cold Milk: You can’t go wrong with this classic pairing! A glass of cold milk enhances the cookie experience, making each bite even more satisfying. It’s a nostalgic combination that brings back childhood memories.
- Vanilla Ice Cream: For a decadent treat, create a cookie sundae by placing a warm cookie atop a scoop of vanilla ice cream. Drizzle with chocolate sauce for an indulgent dessert that will impress your guests!
- Coffee or Tea: Enjoy your cookies with a steaming cup of coffee or tea for a perfect afternoon treat. The warmth of the beverage balances the sweetness of the cookies, creating a comforting experience.
- Easter Brunch: These cookies make a festive dessert option for your Easter brunch spread. Serve them alongside other brunch favorites like quiches and fruit salads for a delightful finish to the meal.
- Fresh Fruit: Pair your cookies with fresh strawberries or raspberries for a refreshing contrast. The tartness of the fruit complements the sweetness of the cookies, making for a well-rounded dessert.
- Yogurt or Oatmeal: Crumble a cookie over yogurt or oatmeal for a sweet breakfast twist. It’s a fun way to enjoy your cookies in the morning while adding a touch of indulgence to your meal.
- Dessert Platter: Include your Easter Chocolate Chip Cookies in a variety of cookies and treats on a dessert platter. This creates a delightful spread that offers something for everyone at your gathering.
- Gift Box: Present your cookies in a decorative box as a thoughtful homemade gift. It’s a sweet gesture that shows you care, perfect for sharing the joy of baking with friends and family.
With these perfect pairings, your Easter Chocolate Chip Cookies will shine even brighter, making every bite a memorable experience. So, gather your loved ones, serve up these delightful combinations, and enjoy the sweet moments together!
Storage & Meal Prep Instructions
Once you’ve baked your delicious Easter Chocolate Chip Cookies, you’ll want to ensure they stay fresh and delightful for as long as possible. Here are my tried-and-true storage and meal prep tips to keep your cookies tasting as good as the day they were baked!
Fridge Storage
To maintain the freshness of your cookies, store them in an airtight container at room temperature for up to 1 week. This will help keep them soft and chewy, ready to be enjoyed whenever the craving strikes. If you live in a particularly humid area, consider placing a piece of bread in the container; it helps absorb moisture and keeps your cookies from getting stale!
Freezer Storage
If you want to extend the life of your cookies, freezing is a fantastic option. Start by freezing the cookies in a single layer on a baking sheet until solid. Once frozen, transfer them to a freezer-safe bag or container, where they can be stored for up to 3 months. Just be sure to label the bag with the date so you can keep track of their freshness!
Reheating Methods
When you’re ready to enjoy your frozen cookies, there are a couple of easy reheating methods to restore their delightful texture:
- Microwave: Place a cookie on a microwave-safe plate and warm it for just a few seconds. This will bring back that gooey chocolate goodness!
- Oven: Preheat your oven to 350°F (175°C). Place the cookies on a baking sheet and warm them for a few minutes until they’re just heated through. This method will help maintain their crispy edges while keeping the centers soft.
With these storage and meal prep instructions, you can enjoy your Easter Chocolate Chip Cookies long after they come out of the oven. So go ahead, bake a big batch, and savor the joy of homemade cookies whenever you like!
Nutrition Facts & Health Insights
Understanding the nutritional value of your Easter Chocolate Chip Cookies can help you enjoy them guilt-free. Here’s a detailed breakdown of the nutrition per cookie, so you can indulge while being mindful of your choices:
| Nutrient | Amount per Cookie |
|---|---|
| Calories | 150 |
| Sugar | 10 grams |
| Sodium | 100 milligrams |
| Total Fat | 7 grams |
| Saturated Fat | 4 grams |
| Unsaturated Fat | 2 grams |
| Trans Fat | 0 grams |
| Carbohydrates | 20 grams |
| Fiber | 1 gram |
| Protein | 2 grams |
| Cholesterol | 20 milligrams |
Health Benefits
While cookies are often seen as a guilty pleasure, there are some health benefits to be found in the ingredients of your Easter Chocolate Chip Cookies. Here are a few highlights:
- Dark Chocolate: If you choose to use dark chocolate chips, you’ll be adding antioxidants to your cookies. These antioxidants can help combat oxidative stress in the body, promoting heart health and overall well-being.
- Butter: While butter is high in saturated fat, it also contains vitamins A, D, E, and K, which are essential for various bodily functions. Moderation is key, and using quality butter can enhance the flavor and texture of your cookies.
- Whole Grains: If you opt for whole wheat flour instead of all-purpose flour, you’ll increase the fiber content of your cookies. Fiber is important for digestive health and can help keep you feeling full longer.
- Energy Boost: The sugar in your cookies provides a quick source of energy, making them a delightful treat for a mid-afternoon pick-me-up. Just be mindful of portion sizes to avoid a sugar crash!
So, as you enjoy your Easter Chocolate Chip Cookies, remember that they can be part of a balanced diet when enjoyed in moderation. Happy baking and indulging!
Frequently Asked Questions
As you embark on your baking journey with these delightful Easter Chocolate Chip Cookies, you may have some questions along the way. Don’t worry; I’ve got you covered! Here are some of the most frequently asked questions to help you navigate your cookie-making adventure:
- Can I use different types of chocolate chips?
Absolutely! Feel free to experiment with different types of chocolate chips, such as dark chocolate, milk chocolate, or even white chocolate. Each type will bring its own unique flavor to your cookies, so choose what you love best! - How do I store leftover cookies?
To keep your cookies fresh, store them in an airtight container at room temperature for up to 1 week. If you want to extend their shelf life, consider freezing them. Just layer them between parchment paper in a freezer-safe container, and they’ll be good for up to 3 months. - What can I substitute for eggs?
If you’re looking for an egg substitute, you can use flax eggs (1 tablespoon of ground flaxseed mixed with 2.5 tablespoons of water) or applesauce (1/4 cup per egg). Both options work well in cookies and will help bind the ingredients together. - Can I freeze the cookie dough?
Yes, you can freeze the cookie dough! Scoop the dough onto a baking sheet and freeze until solid. Then transfer the dough balls to a freezer-safe bag. When you’re ready to bake, just preheat your oven and bake straight from the freezer, adding a couple of extra minutes to the baking time. - How do I know when the cookies are done?
The cookies are done when the edges are golden brown, and the centers look slightly underbaked. They will continue to cook on the baking sheet after being removed from the oven, so don’t wait until they look completely set! - What if my dough is too sticky?
If your dough is too sticky to handle, you can chill it in the refrigerator for about 30 minutes. This will firm it up and make it easier to scoop and shape. If it’s still too sticky after chilling, you can add a little more flour, a tablespoon at a time, until it reaches the desired consistency. - Can I add nuts or other mix-ins?
Absolutely! Feel free to add chopped nuts, such as walnuts or pecans, or even dried fruit for a fun twist. Just keep in mind that adding too many mix-ins can affect the texture, so balance is key! - How do I make these cookies gluten-free?
To make gluten-free Easter Chocolate Chip Cookies, simply substitute the all-purpose flour with a gluten-free flour blend. Make sure to check that your chocolate chips are also gluten-free, and you’ll be all set! - What’s the best way to measure flour?
The best way to measure flour is to use the spoon and level method. Spoon the flour into your measuring cup without packing it down, then level it off with a knife. This ensures you’re using the right amount without adding too much, which can lead to dry cookies. - Can I use margarine instead of butter?
Yes, you can use margarine as a substitute for butter, but keep in mind that it may alter the flavor and texture slightly. If you choose to use margarine, opt for a stick variety rather than a spreadable one for the best results.
With these FAQs answered, you’re well-equipped to tackle any challenges that may arise while baking your Easter Chocolate Chip Cookies. Happy baking!
Final Inspiration & Kitchen Confidence
Baking is more than just a task; it’s a joyful experience meant to be shared with those we love. As you embark on your journey to create these Easter Chocolate Chip Cookies, remember that each batch is an opportunity to spread happiness and warmth. The laughter, the sweet aromas wafting through your kitchen, and the smiles on the faces of your loved ones as they enjoy your creations are what make baking truly special.
Celebrate your achievements, no matter how big or small! Whether you’ve nailed the perfect cookie texture or simply enjoyed the process of mixing and baking, every step is worth acknowledging. I encourage you to share your cookie creations with family and friends—there’s nothing quite like the joy of gifting homemade treats. Snap a photo, post it on social media, or simply bring a plate to your next gathering. You never know who might be inspired to join you in the kitchen!
So, what are you waiting for? Dive into this recipe and make it your own! Feel free to experiment with flavors, add your personal touch, and let your creativity shine. Baking is a wonderful way to foster a sense of community, and I can’t wait to see how you put your spin on these Easter Chocolate Chip Cookies. Happy baking, and may your kitchen be filled with love, laughter, and the delightful aroma of freshly baked cookies!
Print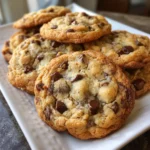
Easter Chocolate Chip Cookies: Chewy, Gooey Bliss Awaits!
- Total Time: 27 minutes
- Yield: 24 cookies
- Diet: Vegetarian
Description
These Easter Chocolate Chip Cookies are a delightful treat, featuring a soft and chewy texture that melts in your mouth. Each bite is bursting with rich chocolate flavor, complemented by a hint of vanilla and a sprinkle of colorful Easter-themed sprinkles for a festive touch.
Ingredients
- Butter: 1 cup (softened)
- Granulated Sugar: 3/4 cup
- Brown Sugar: 3/4 cup (packed)
- Vanilla Extract: 2 teaspoons
- Eggs: 2 large
- All-Purpose Flour: 2 1/4 cups
- Baking Soda: 1 teaspoon
- Salt: 1/2 teaspoon
- Chocolate Chips: 2 cups (semi-sweet)
- Easter Sprinkles: 1/2 cup (optional)
Instructions
- Preheat your oven to 350°F (175°C).
- In a large mixing bowl, cream together the softened butter, granulated sugar, and brown sugar until light and fluffy, about 2-3 minutes.
- Add the vanilla extract and eggs, mixing until well combined.
- In a separate bowl, whisk together the flour, baking soda, and salt.
- Gradually add the dry ingredients to the wet ingredients, mixing until just combined.
- Fold in the chocolate chips and Easter sprinkles, if using.
- Drop rounded tablespoons of dough onto ungreased baking sheets, spacing them about 2 inches apart.
- Bake for 10-12 minutes, or until the edges are golden brown but the centers are still soft.
- Remove from the oven and let cool on the baking sheet for 5 minutes before transferring to a wire rack to cool completely.
Notes
- Make-ahead: The cookie dough can be prepared in advance and refrigerated for up to 3 days or frozen for up to 3 months.
- Storage: Store cookies in an airtight container at room temperature for up to 1 week.
- Substitutions: Use dark chocolate chips for a richer flavor or substitute coconut oil for butter for a dairy-free option.
- Prep Time: 15 minutes
- Cook Time: 12 minutes
- Category: desserts
- Method: baking
- Cuisine: American
Nutrition
- Serving Size: 1 cookie
- Calories: 150
- Sugar: 10 grams
- Sodium: 100 milligrams
- Fat: 7 grams
- Saturated Fat: 4 grams
- Unsaturated Fat: 2 grams
- Trans Fat: 0 grams
- Carbohydrates: 20 grams
- Fiber: 1 gram
- Protein: 2 grams
- Cholesterol: 20 milligrams
Keywords: Easter Chocolate Chip Cookies, chewy cookies, chocolate chip cookies, Easter treats, festive cookies, homemade cookies, dessert recipes, spring baking, holiday cookies, cookie recipes, sweet treats, baking for Easter, chocolate desserts, family recipes, easy cookie recipes


