Introduction to Dutch Baby Pancake Recipe
Ah, the Dutch Baby pancake! Just saying the name makes my heart flutter with excitement. This delightful dish is not just a pancake; it’s a fluffy, oven-baked wonder that feels like a warm hug on a plate. I remember the first time I tried making one. I was in my cozy kitchen, the sun streaming through the window, and I thought, “Why not try something new today?” Little did I know, I was about to embark on a culinary adventure that would become a weekend staple in my home.
The Dutch Baby pancake, also known as a German pancake, has a fascinating history. It’s believed to have originated in the early 1900s in the United States, inspired by the traditional German pancake. The beauty of this dish lies in its simplicity and the way it puffs up dramatically in the oven, creating a golden-brown crust that’s crispy on the edges and soft in the center. It’s like a magic trick, and I can’t help but feel like a magician every time I pull it out of the oven!
What I love most about the Dutch Baby pancake is its versatility. You can dress it up with fresh fruits, a sprinkle of powdered sugar, or a drizzle of maple syrup. Or, if you’re feeling adventurous, you can add savory toppings like cheese and herbs. The possibilities are endless! It’s perfect for brunch with friends or a cozy breakfast with family. Each bite is a reminder of how cooking can bring people together, creating memories that linger long after the last crumb is gone.
So, grab your mixing bowl and let’s dive into this delightful Dutch Baby pancake recipe. I promise you, it’s going to be a hit in your kitchen, just like it is in mine!
Ingredients for Dutch Baby Pancake Recipe
Before we dive into the cooking process, let’s gather our ingredients. I always find that having everything ready makes the cooking experience smoother and more enjoyable. Here’s what you’ll need for a delightful Dutch Baby pancake that will impress your family and friends!
Main Ingredients
- 3 large eggs: Fresh eggs are key! They help the pancake puff up beautifully.
- 1/2 cup all-purpose flour: This is the backbone of our pancake. I prefer using unbleached flour for a richer flavor.
- 1/2 cup milk: Whole milk works best, but you can use any milk you have on hand. Almond or oat milk can be great alternatives!
- 1/4 cup unsalted butter: Melted, this adds richness and flavor. I love using high-quality butter for the best taste.
- 1 tablespoon sugar: Just a touch to balance the flavors. You can use brown sugar for a deeper sweetness.
- 1 teaspoon vanilla extract: This is optional, but it adds a lovely aroma and flavor to the pancake.
- 1/4 teaspoon salt: A pinch of salt enhances all the flavors beautifully.
Optional Add-ons
Now, let’s talk about the fun part—customizing your Dutch Baby pancake! Here are some optional ingredients that can take your pancake to the next level:
- Fresh fruits: Berries, sliced bananas, or apples can add a burst of freshness. I love topping mine with blueberries!
- Powdered sugar: A light dusting on top makes it look fancy and adds a sweet touch.
- Maple syrup or honey: Drizzling some syrup over the pancake is a must for that sweet finish.
- Chopped nuts: Walnuts or pecans add a delightful crunch.
- Savory toppings: If you’re feeling adventurous, try adding cheese, sautéed vegetables, or herbs for a savory twist.
Remember, the beauty of the Dutch Baby pancake is its versatility. Feel free to mix and match these ingredients based on what you have in your pantry or what you’re craving. Cooking is all about creativity, and I can’t wait for you to make this recipe your own!
How to Prepare Dutch Baby Pancake Recipe
Now that we have our ingredients ready, it’s time to bring this Dutch Baby pancake to life! I find that following each step carefully makes all the difference. Let’s get started on this delicious journey!
Step 1: Preheat the Oven
The first step is to preheat your oven to 425°F (220°C). This high temperature is crucial for achieving that beautiful puffiness we all love in a Dutch Baby pancake.
Tips for Preheating
- Use a cast-iron skillet: If you have one, place it in the oven while it preheats. This helps the pancake cook evenly and gives it a lovely crispy edge.
- Don’t skip this step: Preheating is essential! If the oven isn’t hot enough, your pancake won’t puff up as it should.
Step 2: Prepare the Batter
While the oven is heating, let’s whip up the batter! In a mixing bowl, crack the eggs and whisk them until they’re light and frothy. Then, add the milk, melted butter, sugar, vanilla extract, and salt. Mix until everything is well combined.
Tips for Mixing Ingredients
- Don’t overmix: Just mix until combined. A few lumps are okay! Overmixing can lead to a dense pancake.
- Room temperature ingredients: If possible, use eggs and milk that are at room temperature. This helps the batter blend better and rise more.
Step 3: Bake the Pancake
Once your batter is ready, carefully remove the hot skillet from the oven. Pour the batter into the skillet, and watch it sizzle! This is where the magic begins. Place it back in the oven and bake for about 20 minutes, or until it’s puffed and golden brown.
Tips for Baking Time
- Keep an eye on it: Ovens can vary, so check your pancake around the 15-minute mark. You want it to be golden and puffy, not burnt!
- Don’t open the oven door: This can cause the pancake to deflate. Trust the process and let it bake undisturbed!
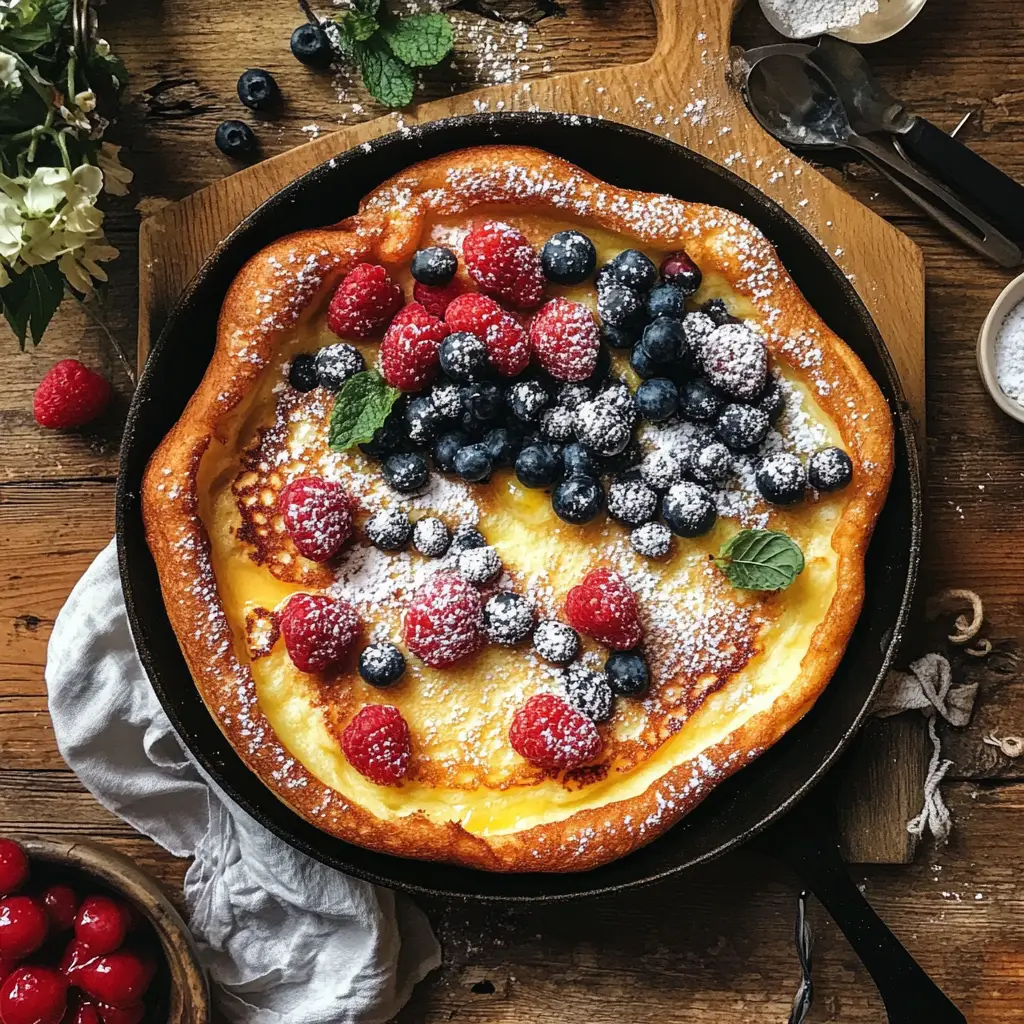
Step 4: Serve and Enjoy
Once your Dutch Baby pancake is out of the oven, it’s time to serve! It will start to deflate a bit, but that’s perfectly normal. Dust it with powdered sugar, add your favorite toppings, and dig in!
Tips for Serving
- Slice it like a pizza: I love cutting it into wedges for easy serving. It makes it feel like a fun treat!
- Pair with fresh fruit: Adding berries or sliced bananas on top not only looks beautiful but also adds a fresh flavor.
And there you have it! A delightful Dutch Baby pancake that’s sure to impress. I can’t wait for you to experience the joy of making and sharing this dish with your loved ones!
Equipment Needed for Dutch Baby Pancake Recipe
Before we dive into the kitchen, let’s make sure we have the right tools at our disposal. The equipment you use can make a big difference in the outcome of your Dutch Baby pancake. Here’s what you’ll need:
- Oven-safe skillet: A cast-iron skillet is my go-to choice. It retains heat beautifully and gives the pancake that perfect crispy edge. If you don’t have one, any oven-safe pan will do, like a stainless steel or ceramic dish.
- Mixing bowl: A medium-sized bowl is perfect for whisking together your ingredients. I love using a glass bowl so I can see the batter come together!
- Whisk: A good whisk is essential for mixing the batter. It helps incorporate air, making your pancake light and fluffy. If you don’t have a whisk, a fork will work in a pinch.
- Measuring cups and spoons: Accurate measurements are key to a successful pancake. I always keep a set handy for baking adventures.
- Spatula: A flexible spatula is great for serving the pancake once it’s baked. It helps slide those delicious wedges right onto your plate!
With these tools in hand, you’re all set to create a stunning Dutch Baby pancake. Remember, the right equipment can make your cooking experience smoother and more enjoyable. Happy cooking!
Variations of Dutch Baby Pancake Recipe
One of the things I adore about the Dutch Baby pancake is its ability to adapt and transform. It’s like a blank canvas waiting for your creative touch! Here are a few variations that I’ve tried and loved, and I think you will too:
- Fruit-Infused Delight: Instead of just topping your pancake with fruits, try blending some berries or bananas right into the batter. It adds a lovely flavor and a pop of color!
- Chocolate Chip Indulgence: For a sweet twist, fold in some chocolate chips before baking. The melted chocolate creates little pockets of gooey goodness that are simply irresistible.
- Savory Spin: Swap out the sugar and vanilla for herbs and cheese. I love adding fresh spinach and feta for a delicious brunch option that’s both hearty and satisfying.
- Spiced Pumpkin: In the fall, I can’t resist adding pumpkin puree and a sprinkle of cinnamon to the batter. It’s like a cozy hug on a plate, perfect for chilly mornings!
- Nutty Banana: Mix in some chopped walnuts or pecans along with sliced bananas for a delightful crunch. It’s a great way to add texture and flavor!
Feel free to experiment with these variations or come up with your own! The Dutch Baby pancake is all about making it your own, and I can’t wait to hear what delicious combinations you come up with!
Cooking Notes for Dutch Baby Pancake Recipe
As I’ve journeyed through the world of Dutch Baby pancakes, I’ve picked up a few cooking notes that can help elevate your pancake game. These little tips can make a big difference in your final result, so let’s dive in!
- Fresh Ingredients: Always use the freshest eggs and milk you can find. Fresh ingredients not only enhance the flavor but also contribute to that beautiful puffiness we all love.
- Room Temperature: If you can, let your eggs and milk sit out for a bit before mixing. Room temperature ingredients blend better and help the pancake rise more effectively.
- Don’t Rush the Oven: Preheating is crucial! Make sure your oven is fully heated before you pop the pancake in. This ensures that it puffs up perfectly.
- Watch the Baking Time: Every oven is different, so keep an eye on your pancake as it bakes. You want it to be golden brown and puffed, but not burnt!
- Serve Immediately: Dutch Baby pancakes are best enjoyed fresh out of the oven. They tend to deflate as they cool, so serve them right away for that wow factor!
With these cooking notes in your back pocket, you’re well on your way to mastering the art of the Dutch Baby pancake. I can’t wait for you to experience the joy of creating this delightful dish!
Serving Suggestions for Dutch Baby Pancake Recipe
Now that your Dutch Baby pancake is baked to perfection, it’s time to think about how to serve it! Presentation can elevate your dish from simple to spectacular, and I love getting creative with my toppings. Here are some of my favorite serving suggestions that will make your pancake shine:
- Classic Toppings: A dusting of powdered sugar is a must! It adds a touch of sweetness and makes the pancake look like a work of art. Pair it with a drizzle of maple syrup for that classic breakfast feel.
- Fresh Fruit Medley: Top your pancake with a colorful array of fresh fruits. I often use strawberries, blueberries, and raspberries. They not only taste amazing but also add a vibrant pop of color!
- Yogurt or Whipped Cream: A dollop of Greek yogurt or whipped cream can add a creamy texture that complements the fluffy pancake beautifully. It’s like a cloud of happiness on your plate!
- Nuts and Seeds: Sprinkle some chopped nuts or seeds on top for an added crunch. Almonds, walnuts, or even chia seeds can give your pancake a delightful texture.
- Savory Twist: If you’re in the mood for something savory, consider topping your pancake with sautéed mushrooms, spinach, or even a sprinkle of cheese. It’s a delicious way to switch things up!
Remember, the beauty of the Dutch Baby pancake is its versatility. Feel free to mix and match these suggestions based on your mood or what you have on hand. Each serving can be a new adventure, and I can’t wait for you to share your creations with family and friends!
Tips for Perfecting Your Dutch Baby Pancake Recipe
As I’ve whipped up countless Dutch Baby pancakes, I’ve gathered a treasure trove of tips that can help you achieve pancake perfection. These little nuggets of wisdom can make all the difference in your cooking journey. Let’s dive into my favorite tips!
- Use a Hot Skillet: Preheating your skillet in the oven is crucial. A hot skillet ensures that the batter sizzles upon contact, creating that beautiful puff. It’s like giving your pancake a warm welcome!
- Don’t Overmix: When combining your ingredients, mix just until everything is combined. Overmixing can lead to a dense pancake instead of the light, airy texture we all crave.
- Experiment with Flavors: Don’t be afraid to play with flavors! Adding spices like cinnamon or nutmeg can elevate your pancake to new heights. It’s all about finding what makes your taste buds dance!
- Serve Immediately: Dutch Baby pancakes are best enjoyed fresh out of the oven. They tend to deflate as they cool, so gather your loved ones and serve it right away for maximum wow factor!
- Practice Makes Perfect: Don’t be discouraged if your first pancake doesn’t turn out perfectly. Each attempt is a step toward mastering this delightful dish. Embrace the process and enjoy the journey!
With these tips in your back pocket, you’re well on your way to creating a Dutch Baby pancake that will impress everyone at your table. I can’t wait for you to experience the joy of sharing this delicious creation with your loved ones!
Breakdown of Time for Dutch Baby Pancake Recipe
Now that we’ve covered the ingredients and the steps to create a delightful Dutch Baby pancake, let’s talk about the time it takes to whip up this delicious dish. I always find it helpful to know how long each part of the process will take, especially when planning a meal. Here’s a quick breakdown:
- Prep Time: 10 minutes. This includes gathering your ingredients, preheating the oven, and mixing the batter. It’s a breeze!
- Cooking Time: 20 minutes. This is the time it takes for your pancake to bake to golden perfection. Trust me, the aroma wafting through your kitchen will be worth the wait!
- Total Time: 30 minutes. In just half an hour, you can have a stunning Dutch Baby pancake ready to serve. Perfect for a quick brunch or a cozy breakfast!
With this time breakdown, you can easily fit this recipe into your busy schedule. I love how such a simple dish can bring so much joy and warmth to the table in such a short amount of time. Happy cooking!
Nutritional Information for Dutch Baby Pancake Recipe
As a passionate home cook, I always find it helpful to know the nutritional value of the dishes I prepare. It allows me to enjoy my meals while being mindful of what I’m putting into my body. Here’s a quick overview of the nutritional information for a serving of Dutch Baby pancake, based on the ingredients listed earlier. Keep in mind that these values can vary depending on the specific brands and quantities you use.
- Calories: Approximately 200-250 calories per serving.
- Protein: About 6-8 grams, thanks to the eggs and milk.
- Carbohydrates: Roughly 25-30 grams, primarily from the flour and sugar.
- Fat: Around 10-12 grams, mainly from the butter and eggs.
- Sugar: Approximately 2-4 grams, depending on whether you add extra sweeteners.
These pancakes can be a delightful treat, especially when topped with fresh fruits or yogurt, which can add additional vitamins and minerals. I love how this recipe can be both indulgent and nourishing at the same time. Remember, balance is key! Enjoy your Dutch Baby pancake as part of a well-rounded meal, and don’t hesitate to get creative with your toppings for added nutrition. Happy cooking and eating!
Frequently Asked Questions about Dutch Baby Pancake Recipe
As I’ve shared my love for Dutch Baby pancakes, I’ve noticed that many people have similar questions. It’s always fun to dive deeper into the details of this delightful dish! Here are some frequently asked questions that I hope will help you on your culinary journey:
Can I make the batter ahead of time?
Absolutely! You can prepare the batter a few hours in advance. Just keep it covered in the fridge. When you’re ready to bake, give it a quick stir and pour it into your hot skillet. Just remember, the fresher the batter, the better the puff!
What if I don’t have a cast-iron skillet?
No worries! While a cast-iron skillet is my favorite for this recipe, any oven-safe skillet or baking dish will work. Just make sure it can handle high temperatures. A stainless steel or ceramic dish can also do the trick!
Can I use whole wheat flour instead of all-purpose flour?
Yes, you can! Whole wheat flour will give your Dutch Baby a nuttier flavor and a bit more texture. Just keep in mind that it may not puff up quite as much as with all-purpose flour. But it’s a delicious and healthier option!
How do I store leftovers?
If you happen to have any leftovers (which is rare in my house!), you can store them in an airtight container in the fridge for up to 2 days. To reheat, pop them in the oven at a low temperature until warmed through. They may not be as puffy, but they’ll still taste great!
Can I freeze Dutch Baby pancakes?
Yes, you can freeze them! Just let the pancake cool completely, then wrap it tightly in plastic wrap and place it in a freezer-safe bag. When you’re ready to enjoy, thaw it in the fridge overnight and reheat in the oven.
What toppings do you recommend?
The sky’s the limit! I love topping my Dutch Baby with fresh fruits, a sprinkle of powdered sugar, and a drizzle of maple syrup. You can also get creative with yogurt, nuts, or even savory toppings like cheese and herbs. It’s all about what you enjoy!
These FAQs should help clear up any questions you might have about making your own Dutch Baby pancake. I’m excited for you to try this recipe and make it your own. Happy cooking!
Conclusion on Dutch Baby Pancake Recipe
As I wrap up this delightful journey into the world of Dutch Baby pancakes, I can’t help but feel a sense of joy. This recipe is more than just a dish; it’s an experience that brings warmth and happiness to the table. The beauty of the Dutch Baby pancake lies in its simplicity and versatility. With just a handful of ingredients, you can create a stunning centerpiece for any meal, whether it’s a cozy breakfast or a festive brunch with friends.
What I love most is how this pancake invites creativity. You can dress it up with fresh fruits, a sprinkle of powdered sugar, or even savory toppings for a unique twist. Each time I make it, I discover new flavor combinations that excite my taste buds. Plus, the process of baking it is like a little magic show in my kitchen, with that glorious puffing action that never fails to impress.
So, whether you’re a seasoned cook or just starting your culinary adventure, I encourage you to give this Dutch Baby pancake recipe a try. It’s a dish that not only satisfies the stomach but also warms the heart. I can’t wait for you to share this delightful creation with your loved ones and create beautiful memories around the table. Happy cooking, and enjoy every delicious bite!