Introduction to Dish Soap Slime
In today’s fast-paced world, finding creative outlets can be a challenge, especially for busy moms and professionals. However, crafting can be a delightful escape that brings joy and relaxation. One of the simplest and most enjoyable DIY projects you can try is making Dish Soap Slime. This colorful and fun slime is not only a fantastic sensory activity for kids but also a great way to bond with them. In just a few minutes, you can create a playful masterpiece that will keep your little ones entertained for hours!
Why You’ll Love This Dish Soap Slime
Dish Soap Slime is a perfect blend of creativity, affordability, and simplicity. It requires minimal ingredients and can be made in just 15 minutes, making it an ideal project for busy schedules. Plus, it’s a fantastic way to engage your children in a hands-on activity that promotes sensory play and imaginative exploration. You’ll love how easy it is to whip up this delightful slime, and your kids will adore the vibrant colors and squishy texture!
Materials Needed for Dish Soap Slime
To create your own Dish Soap Slime, you will need the following materials:
- 1 cup of dish soap: This is the base of your slime, providing the necessary texture.
- 1 cup of cornstarch: This thickens the mixture and gives it that slime-like consistency.
- Food coloring (optional): Add a splash of color to make your slime more exciting!
For a printable full list of materials, see below.
Tools Required for Dish Soap Slime
Before you start crafting, gather these essential tools:
- Mixing bowl: A medium-sized bowl works best for combining your ingredients.
- Spoon or spatula: Use this to mix the ingredients thoroughly.
- Measuring cups: Accurate measurements are key to achieving the right slime consistency.
If you don’t have a spatula, a sturdy spoon will do just fine!
How to Make Dish Soap Slime
- Combine Ingredients: In a mixing bowl, combine 1 cup of dish soap with 1 cup of cornstarch.
- Mix Together: Use your spoon or spatula to mix the ingredients until they form a slime-like consistency.
- Add Color: If desired, add a few drops of food coloring and mix until the color is evenly distributed.
- Knead the Slime: Once the slime is ready, knead it with your hands for a few minutes to improve its texture.
- Store Properly: When not in use, store the slime in an airtight container to keep it fresh.
Tips for Best Results
To ensure your Dish Soap Slime turns out perfectly, consider these practical tips:
- Experiment with different colors by mixing food coloring.
- Adjust the amount of cornstarch for a thicker or thinner slime.
- Keep the slime away from carpets and fabrics to avoid stains.
Project Variations
Get creative with your Dish Soap Slime by trying these fun variations:
- Color Combinations: Mix different food coloring shades to create unique colors.
- Seasonal Themes: Use colors that represent different seasons or holidays (e.g., pastels for spring, reds and greens for Christmas).
- Textured Additions: Incorporate glitter or small foam beads for added texture and visual appeal.
Decoration and Usage Ideas
Once your Dish Soap Slime is ready, here are some fun ways to use it:
- Sensory Play: Perfect for sensory bins or playdates.
- Party Favors: Package small portions in jars as party favors for kids’ birthdays.
- Stress Relief: Use it as a stress-relief tool for adults; the squishy texture can be quite soothing.
FAQs about Dish Soap Slime
Q: Is Dish Soap Slime safe for kids?
A: Yes, but always supervise children while making and playing with slime. Avoid ingestion and wash hands after use.
Q: How long does the slime last?
A: When stored in an airtight container, it can last for several days.
Q: Can I make a larger batch?
A: Absolutely! Just double or triple the ingredients as needed.
Final Thoughts
Creating Dish Soap Slime is not just a fun activity; it’s an opportunity to foster creativity and connection with your children. As you mix, knead, and play, you’ll create lasting memories and perhaps even spark a lifelong love for crafting. So gather your materials, set aside a little time, and enjoy the delightful process of making this colorful slime. Remember, the joy of crafting lies not just in the final product, but in the moments shared along the way!
Introduction to Dish Soap Slime
In today’s fast-paced world, finding creative outlets can be a challenge, especially for busy moms and professionals. However, crafting can be a delightful escape that brings joy and relaxation. One of the simplest and most enjoyable DIY projects you can try is making Dish Soap Slime. This colorful and fun slime is not only a fantastic sensory activity for kids but also a great way to bond with them. In just a few minutes, you can create a playful masterpiece that will keep your little ones entertained for hours!
As a mom, I often find myself juggling work, household chores, and the endless demands of family life. I remember the first time I made Dish Soap Slime with my kids; it was a spontaneous decision on a rainy afternoon. We gathered in the kitchen, and within minutes, we were laughing and creating something magical together. The joy on their faces as they squished and stretched the slime was priceless!
This project is not just about making slime; it’s about creating memories. I’ve learned that even when time is tight, taking a moment to craft can be incredibly rewarding. Plus, the best part? You probably already have the ingredients at home! So, let’s dive into this fun and easy DIY project that will surely brighten your day and your kids’ too!
Why You’ll Love This Dish Soap Slime
Dish Soap Slime is a perfect blend of creativity, affordability, and simplicity. As a busy mom, I truly appreciate projects that don’t require a lengthy time commitment. This delightful slime can be made in just 15 minutes, making it an ideal choice for those hectic afternoons when you need a quick and engaging activity for your kids.
What I love most about this slime is how it encourages sensory play. My children, like many others, thrive on hands-on experiences. The squishy texture of the slime is not only fun to play with but also provides a wonderful outlet for their creativity. I often find them lost in their own little worlds, stretching and molding the slime into various shapes. It’s a joy to watch their imaginations come alive!
Moreover, the affordability of this project is a huge plus. With just a cup of dish soap and a cup of cornstarch, you can create a colorful masterpiece without breaking the bank. I remember one rainy day when we decided to make multiple batches, experimenting with different colors. The kitchen was filled with laughter and vibrant hues, and it felt like a mini art studio right at home!
In a world where we often feel rushed, taking a moment to craft together can be incredibly rewarding. Not only does it provide a break from screens, but it also fosters connection and communication. So, gather your materials, and let’s dive into this fun and easy DIY project that will surely brighten your day and your kids’ too!
Materials Needed for Dish Soap Slime
To create your own Dish Soap Slime, you will need the following materials:
- 1 cup of dish soap: This is the base of your slime, providing the necessary texture. I love using a gentle dish soap that’s safe for kids, ensuring that our crafting time is both fun and worry-free.
- 1 cup of cornstarch: This thickens the mixture and gives it that slime-like consistency. I often keep a bag of cornstarch in my pantry for various recipes, so it’s a handy ingredient to have on hand!
- Food coloring (optional): Add a splash of color to make your slime more exciting! I remember the first time we used food coloring; the kids were thrilled to see the transformation as we mixed in vibrant hues.
For a printable full list of materials, see below.
Tools Required for Dish Soap Slime
Before you start crafting, gather these essential tools:
- Mixing bowl: A medium-sized bowl works best for combining your ingredients. I often use a glass bowl, as it allows me to see the colors mix beautifully!
- Spoon or spatula: Use this to mix the ingredients thoroughly. A spatula is great for scraping down the sides of the bowl, ensuring no ingredient is left behind.
- Measuring cups: Accurate measurements are key to achieving the right slime consistency. I always keep a set of measuring cups handy for all my crafting adventures!
If you don’t have a spatula, a sturdy spoon will do just fine! I remember one time when I was in a rush and had to use a regular spoon; it worked perfectly, and we still had a blast making our Dish Soap Slime. The most important thing is to have fun and enjoy the process!
How to Make Dish Soap Slime
Creating your own Dish Soap Slime is a delightful and straightforward process that I absolutely love sharing with my kids. Here’s how you can make this fun and colorful slime in just a few easy steps:
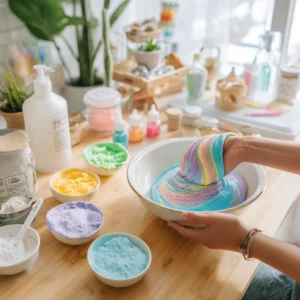
- Combine Ingredients: In a mixing bowl, combine 1 cup of dish soap with 1 cup of cornstarch. I like to pour the dish soap first, as it makes it easier to measure the cornstarch without it sticking to the cup.
- Mix Together: Use your spoon or spatula to mix the ingredients until they form a slime-like consistency. At this stage, it might look a bit lumpy, but don’t worry! Just keep stirring, and it will come together beautifully.
- Add Color: If desired, add a few drops of food coloring and mix until the color is evenly distributed. I remember the excitement on my kids’ faces when they saw the vibrant colors swirl into the mixture. It’s like a mini science experiment right in your kitchen!
- Knead the Slime: Once the slime is ready, knead it with your hands for a few minutes to improve its texture. This part is so much fun! The more you knead, the smoother and stretchier it becomes. I often find my kids giggling as they squish and stretch the slime between their fingers.
- Store Properly: When not in use, store the slime in an airtight container to keep it fresh. I always label the container with the date we made it, so we can keep track of how long it lasts. Plus, it’s a great way to remind the kids to wash their hands after playing!
And there you have it! In just a few minutes, you’ve created your very own Dish Soap Slime. I can’t tell you how many afternoons we’ve spent playing with this slime, and I hope you and your kids enjoy it just as much!
Tips for Best Results
To ensure your Dish Soap Slime turns out perfectly, consider these practical tips that I’ve learned through my own crafting adventures:
- Experiment with Colors: Don’t be afraid to mix different food coloring shades to create unique colors. I remember one time we made a rainbow batch by combining red, blue, and yellow. The kids were thrilled to see how the colors blended together, creating a beautiful spectrum!
- Adjust Consistency: If you prefer a thicker or thinner slime, simply adjust the amount of cornstarch. I’ve found that adding a little more cornstarch can give the slime a firmer texture, which is great for shaping and molding. On the other hand, if you want it to be more fluid, just reduce the cornstarch a bit.
- Protect Your Surfaces: Keep the slime away from carpets and fabrics to avoid stains. I always lay down a plastic tablecloth or some old newspaper on the kitchen table before we start crafting. This way, I can relax and let the kids enjoy their slime without worrying about cleanup!
These simple tips can make a world of difference in your crafting experience. I’ve learned that the key to a successful slime-making session is to embrace the mess and enjoy the process. So gather your materials, and let’s get crafting!
Project Variations
Get creative with your Dish Soap Slime by trying these fun variations that I’ve enjoyed with my kids:
- Color Combinations: Mix different food coloring shades to create unique colors. I remember one afternoon when we decided to blend blue and yellow, resulting in a vibrant green that my kids absolutely loved! It’s a great way to teach them about color mixing while having fun.
- Seasonal Themes: Use colors that represent different seasons or holidays. For instance, we made pastel-colored slime for spring, which was perfect for Easter-themed activities. During the winter holidays, we created red and green slime to get into the festive spirit. It’s a wonderful way to celebrate the seasons and keep the crafting fresh and exciting!
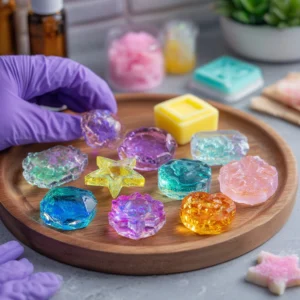
- Textured Additions: Incorporate glitter or small foam beads for added texture and visual appeal. One time, we added some sparkly glitter to our slime, and it transformed into a magical, shimmering creation. The kids were fascinated by how the glitter caught the light, making our slime even more special!
These variations not only enhance the fun but also allow for endless creativity. I love how each batch of Dish Soap Slime can be a unique masterpiece, reflecting our moods and the seasons. So don’t hesitate to experiment and let your imagination run wild!
Decoration and Usage Ideas
Once your Dish Soap Slime is ready, the fun doesn’t have to stop there! I’ve discovered so many creative ways to use this delightful slime that can enhance playtime and even bring a little joy to adults. Here are some of my favorite ideas:
- Sensory Play: This slime is perfect for sensory bins or playdates. I love setting up a sensory station with different textures and tools for my kids to explore. They can squish, stretch, and mold the slime, which not only entertains them but also helps develop their fine motor skills. It’s amazing to see how engaged they become, lost in their own little world of creativity!
- Party Favors: Package small portions of slime in cute jars or containers as party favors for kids’ birthdays. I remember one year, we made colorful slime for my daughter’s birthday party, and the kids went wild for it! It was a hit, and parents appreciated the unique and fun favor that kept the kids entertained long after the party ended.
- Stress Relief: Believe it or not, this slime can also be a great stress-relief tool for adults! The squishy texture can be quite soothing, and I often find myself kneading the slime when I need a little break from the daily hustle. It’s a simple way to unwind and take a moment for myself, and I encourage you to give it a try!
These ideas not only make the most of your Dish Soap Slime but also create opportunities for bonding and fun. Whether you’re crafting with your kids or enjoying a moment of relaxation, this slime is sure to bring smiles and laughter. So go ahead, get creative, and let the slime adventures begin!
FAQs about Dish Soap Slime
Q: Is Dish Soap Slime safe for kids?
A: Yes, but always supervise children while making and playing with slime. Avoid ingestion and wash hands after use. I always remind my kids that while it’s fun to play with, it’s not for eating!
Q: How long does the slime last?
A: When stored in an airtight container, it can last for several days. I’ve found that keeping it in the fridge can help extend its life a bit longer, especially during hot summer days!
Q: Can I make a larger batch?
A: Absolutely! Just double or triple the ingredients as needed. I remember one time we had a playdate, and I made a big batch of Dish Soap Slime to share. The kids loved having their own colorful portions to play with, and it turned into a fun group activity!
Final Thoughts
Creating Dish Soap Slime is not just a fun activity; it’s an opportunity to foster creativity and connection with your children. I can’t tell you how many times I’ve seen my kids’ faces light up as they dive into the squishy, colorful world of slime. Each batch we make is filled with laughter, experimentation, and a little bit of mess, but that’s all part of the joy!
As you mix, knead, and play, you’ll create lasting memories that go beyond just crafting. I’ve found that these moments of creativity often lead to deeper conversations and shared stories. Whether it’s discussing colors, textures, or even the science behind why slime behaves the way it does, crafting together opens up a world of learning and bonding.
So gather your materials, set aside a little time, and enjoy the delightful process of making this colorful slime. Don’t worry about perfection; embrace the fun and the mess! Remember, the joy of crafting lies not just in the final product, but in the moments shared along the way. I encourage you to take a break from the hustle and bustle of daily life and indulge in this simple yet rewarding activity with your kids. You won’t regret it!
Print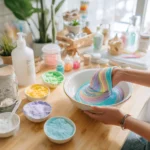
Dish Soap Slime: Create Fun and Colorful Crafts Easily!
Description
This DIY project involves creating colorful and fun slime using dish soap, perfect for kids and a great sensory activity.
Instructions
- In a mixing bowl, combine 1 cup of dish soap with 1 cup of cornstarch.
- Mix the ingredients together until they form a slime-like consistency.
- If desired, add a few drops of food coloring and mix until the color is evenly distributed.
- Once the slime is ready, knead it with your hands for a few minutes to improve its texture.
- Store the slime in an airtight container when not in use.
Keywords: Dish Soap Slime, DIY Slime, Kids Craft, Fun Activities